
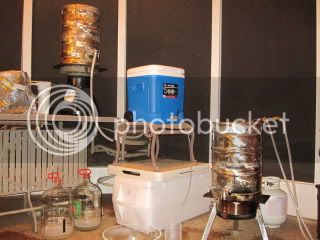
While it was actually a REALLY LONG brew night/morning, it was a pretty successful one. The brew process only took about 6 hours or so, but we didn't start the mash until 11:50pm. Most of the earlier part of the evening was spent calibrating the sight glasses for my newly converted keggles, and tinkering with the weldless ballvalve connections.
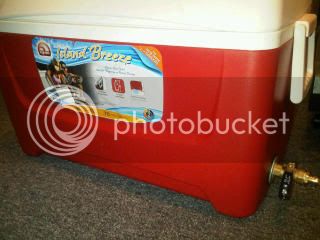
I got a different cooler/mlt because my previous one didn't hold heat for crap, and I needed a little more room for my big OG 10g batches - especially this one, an Arrogant Bastard clone. I shot for my usual 60% efficiency, going for about 1.071...and I hit 1.070 on my PRE-BOIL gravity!! So I ended up with about 1.080 SG @ 72% eff. I also didn't even hardly lose a degree of temperature thru the mash!! Needless to say I was very happy!!

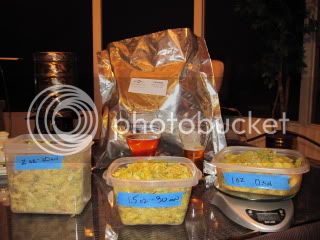
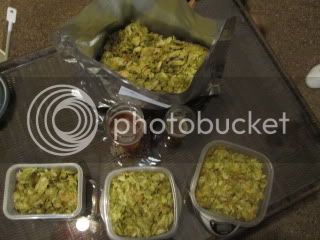
Of course since I hit so high on the OG, I had to add more hops, so it was a good thing I bought a pound of fresh leaf Chinook hops from HopsDirect!! MAN was I in heaven with my face buried in a lb of fresh hops!! I ended up adding an additional .8oz @ 50min(once I read my Pre-Boil OG) and .5oz at KO.

The only bad part about the brewday was those weldless fittings (even on my MLT) were leaking. Not the sight glass/therm combos, but just the ball valve bulkheads. It wasn't TOO BAD, and I everything else went so well, that at the end of the night/morning I really didn't care, and was happy with my equipment upgrades.

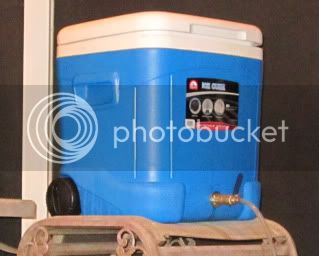
I also purchased a whole house water filtration with an aluminum bracket to hang from the keg/HLT, and also hooked up a shut off valve to my hose connected to QD's for the water filter as well as a high pressure spray handle. I also got the 3pc SS weldless ball valves w SS pick-ups, QD's and Silicone hosing from BargainFittings. It was a pleasure using all of the new equipment, and made the brewday much more convenient, aside from the few quirks.

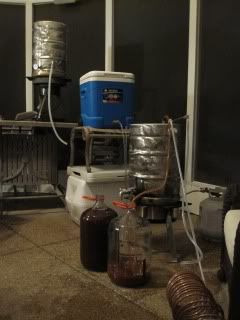
Arrogant Bastard Clones (2 on Right) All Centennial IPA - brewed last weekend (Left)

I had to take my brew buddy home when we were done, and as I said we didn't start the mash until midnight, so after a McDonalds breakfast I finally hit the bed @ 7am!!
I'm going to do some searching on the weldless bulkheads, to make sure I covered all of the bases, but the strange thing is, everything was LEAK-FREE when I tested it with a several gallons of water, but as soon as I filled them up, all 3 vessels leaked...even after I re-taped them. I'm using the red silicone o-rings, and tried not to tighten too much. It's really hard to make everything line up right, and thread to the proper depth, though. If anyone has any ideas, let me know. I didn't sand down the holes, but they were pretty smooth.
I definitely want to thank Bobby M, for the sight glass\thermometer combos and all of the GREAT videos and information, as well as the MANY other great people on this forum. There is such a plethora of resources and info, that really helps others put together well thought-out systems, saving money and headaches in the long run.
The next step is to purchase the single tier system and a pump from BrewersEquipment, but now that I have my mash temp/volume under control, I'm not really looking forward to insulating a keggle, even though I like the idea of just recirculating and having the 3rd burner...or all new burners for that matter, these turkey fryers not very efficient!!
I got a different cooler/mlt because my previous one didn't hold heat for crap, and I needed a little more room for my big OG 10g batches - especially this one, an Arrogant Bastard clone. I shot for my usual 60% efficiency, going for about 1.071...and I hit 1.070 on my PRE-BOIL gravity!! So I ended up with about 1.080 SG @ 72% eff. I also didn't even hardly lose a degree of temperature thru the mash!! Needless to say I was very happy!!
Of course since I hit so high on the OG, I had to add more hops, so it was a good thing I bought a pound of fresh leaf Chinook hops from HopsDirect!! MAN was I in heaven with my face buried in a lb of fresh hops!! I ended up adding an additional .8oz @ 50min(once I read my Pre-Boil OG) and .5oz at KO.
The only bad part about the brewday was those weldless fittings (even on my MLT) were leaking. Not the sight glass/therm combos, but just the ball valve bulkheads. It wasn't TOO BAD, and I everything else went so well, that at the end of the night/morning I really didn't care, and was happy with my equipment upgrades.
I also purchased a whole house water filtration with an aluminum bracket to hang from the keg/HLT, and also hooked up a shut off valve to my hose connected to QD's for the water filter as well as a high pressure spray handle. I also got the 3pc SS weldless ball valves w SS pick-ups, QD's and Silicone hosing from BargainFittings. It was a pleasure using all of the new equipment, and made the brewday much more convenient, aside from the few quirks.
Arrogant Bastard Clones (2 on Right) All Centennial IPA - brewed last weekend (Left)
I had to take my brew buddy home when we were done, and as I said we didn't start the mash until midnight, so after a McDonalds breakfast I finally hit the bed @ 7am!!
I'm going to do some searching on the weldless bulkheads, to make sure I covered all of the bases, but the strange thing is, everything was LEAK-FREE when I tested it with a several gallons of water, but as soon as I filled them up, all 3 vessels leaked...even after I re-taped them. I'm using the red silicone o-rings, and tried not to tighten too much. It's really hard to make everything line up right, and thread to the proper depth, though. If anyone has any ideas, let me know. I didn't sand down the holes, but they were pretty smooth.
I definitely want to thank Bobby M, for the sight glass\thermometer combos and all of the GREAT videos and information, as well as the MANY other great people on this forum. There is such a plethora of resources and info, that really helps others put together well thought-out systems, saving money and headaches in the long run.
The next step is to purchase the single tier system and a pump from BrewersEquipment, but now that I have my mash temp/volume under control, I'm not really looking forward to insulating a keggle, even though I like the idea of just recirculating and having the 3rd burner...or all new burners for that matter, these turkey fryers not very efficient!!
")

