• Please visit and share your knowledge at our sister communities:
  • If you have not, please join our official Homebrewing Facebook Group!

    Homebrewing Facebook Group

Brew Day 1, Finally Finished (and I'm bushed).

Homebrew Talk

Help Support Homebrew Talk:

This site may earn a commission from merchant affiliate links, including eBay, Amazon, and others.
Undisturbed, except...

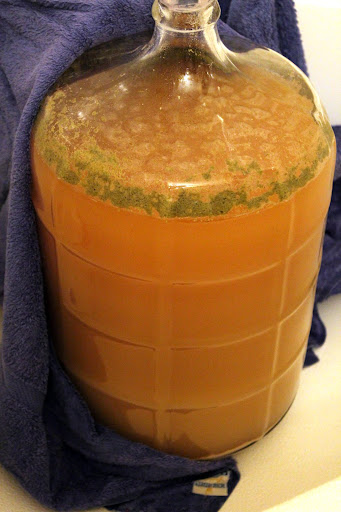
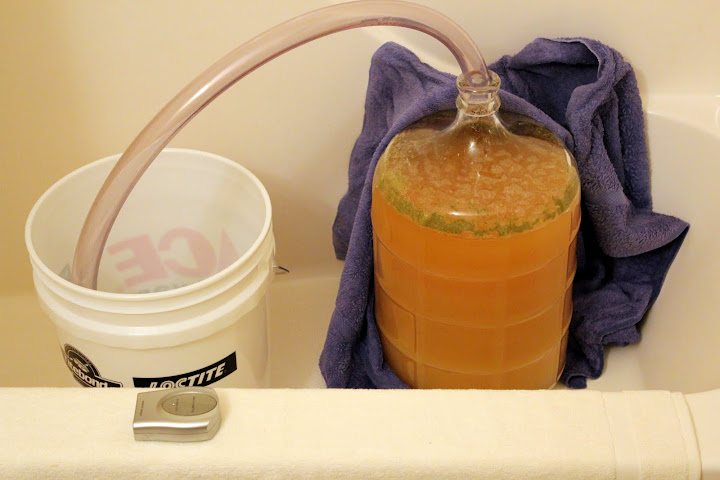
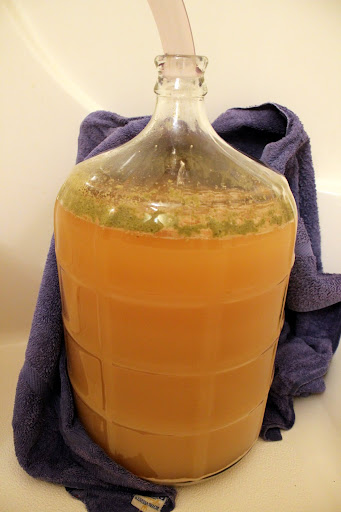
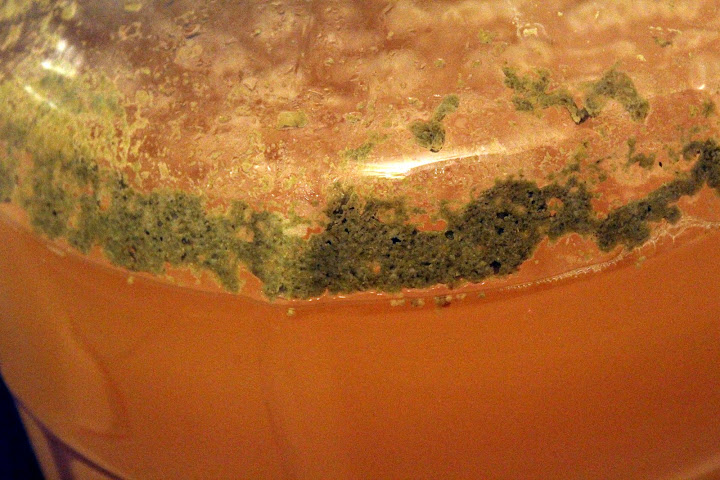
I do a little jiggle every day for the few days before I bottle. I like to get the trub that settled on the ribs of my better bottle to drop to the bottom.

The yeast are way smarter than you think. They will find the sugar. You don't need to do anything.

They yeast are multiplying (budding, to be exact). By the time they are done, there will be a huge amount of them in the bottom of your carboy. Regardless, I suggest you still go with the SWMBO on most things because she is smart, and she is the key to your happiness.
 
Update after 8 days. Still bubbling out the blow off pretty regularly (once per second-ish) so I have just opted to not disturb it by placing the airlock on there. Been keeping it at about 70 degrees which is a little warm for these yeasts but well within range. I did change the towel because that other one staying damp was becoming sour....

it's actually much lighter than I was expecting it to be. Not something I'm worked up over though.

IMG_0686.JPG


IMG_0685.JPG


IMG_0690.JPG


IMG_0691.JPG
 
Looking good! Now i appreciate that it's fun to document your first brew where something you can look into in the near future. I can say that this is an effective way of guiding newbies how to brew with the help of beautiful images.

Thanks for putting much time into this... :=)
 
Looking good! Now i appreciate that it's fun to document your first brew where something you can look into in the near future. I can say that this is an effective way of guiding newbies how to brew with the help of beautiful images.

Thanks for putting much time into this... :=)

It was a pleasure to put so much time into the pics and write up, as I DO know it will probably be helpful for someone doing their first brew.

Now I'm beginning (just beginning??) to think about bottling and knowing I won't have nearly enough without just getting empties from a bar (which i don't really want to do necessarily). So I got to thinking about the 5 gal kegs, knowing how ideal that would be.

I looked at Northern's setup, but couldn't really tell how much I'd need. Also, do I have to keep a 5gal keg cold? So I'd have to buy a minifridge too.... Just trying to think of cost here. But a keg system (but how to dispense) would be great for me. GREAT. Anyone care to comment on what I'd need for a complete setup?
 
call kegconnection.com. seriously though call them. they are honest and can help you tailor a set-up and they are priced right. upgrade the faucets. Ben will tell you that though.
and yes i like my beer cold.
 
If you don't have the funds available for the full keg set up then you can go to a Tap-a-draft system. I call it kegging light or JV kegging. I think a full kit runs about $70 or $80. The key savings is that it fits in a normal fridge without taking up to much room, meaning you don't need to buy a fridge. It will allow you to "keg" most of your brew and bottle the rest.

Here is just one place of many that carry it: http://www.northernbrewer.com/brewing/tap-a-draft-system.html

I have been using it now for a year and a half and really like it. It's not a substitution for full on kegging. I'm switching to kegging now myself, but I'll probably keep it around for brews that my wife might like but I don't want to take up a full keg for the amount of time she takes to drink a full batch.

Some folks are using some Miller contraption in the same manner here https://www.homebrewtalk.com/f51/miller-lite-home-draft-dissected-181602/, however, it uses a different size CO2 cylinder, not a big deal.

So Congrats on the first brew and the good documentation. You sound like you have the right attitude, it's beer, how bad can I really screw it up, and if I do, it's beer. Your system will get smoother with a couple runs and you'll soon end up with 4 fridges and a freezer in your garage and a cabinet full of plastic buckets, carboys and kegs, and wonder...how did that happen.
 
Looks great! As far as kegging goes, even if you get a free minifridge and can do all the modifications yourself, the keg, co2 tank, tapper and all the other stuff will probably cost around 200. The following is the cheapest kit I've found. http://www.rebelbrewer.com/shoppingcart/products/Complete-Homebrew-Kegging-Kit.html

I currently bottle all my beer, which is easy because we make a party out of our brewing/bottling days. The easiest way to get bottles is to ask your friends to save some for you.
 
I have decided against the kegs for now.

Series of question, since I am nearing bottling time.

How do I get samples of the beer for testing the specific gravity, without disturbing the beer too much? (I have an autosiphon, but no wine thief). And do I return this sample to the carboy?

Can I put a small mesh item around the bottom end of the autosiphon when I start to transfer the beer, to kind of filter it a little?

BBS says primary for 2 weeks, then bottle. Since this is a BIG beer I lean toward longer in primary and 3 weeks is a given (can't bottle this weekend). And I'm tempted to go longer. Then I'm going on a week long trip... I know I can leave it in primary TOO long, but the difference in 3 weeks and... say... 5 weeks is pretty minimal right (according to my searching).

Recipe calls for 1 cup of honey before bottling. I'm tempted to let that rest for a while before bottling, for no reason in particular except that it makes sense in my head. However I am sure the honey is food for giving a nicely carbonated beer, so I guess to follow the recipe is the right way. :D
 
I am getting ready to bottle and I was going to take a gravity reading. Nothing I have is deep enough! I have no idea what to use... The only thing I have deep enough is a 48oz container and I don't really want to use that (and "waste" 48 oz of the beer).

Anyway I tasted it and holy-alcohol! Also it looks like bread, but it DOES taste like beer. :D

So tomorrow I will probably bottle it, if I can figure out how to get a reading. I also siphoned up a bunch of the trub. Boo.
 
Ha. Truth be told I was going to cool the carboy in the tub, but when I realized I couldn't find the drain plug... well this is how it ended up. :D I will say that the temperature has risen dramatically (low 80s) so I did wet the towel with some cold water. Might also move carboy out of the tub to the (potentially colder) tile floor. I'll just keep the towel wet -- I can see the temp has dropped 2+ since I wet it (3 minutes ago). Granted that's external temp, ie RIGHT on the cold water but still - good sign.

I have a couple of Rubbermaid tubs that I keep full of water with a frozen bottle of water floating inside. I put the fermenting bucket inside this and put a shirt over the bucket and depending on the amount of frozen bottles I use I can get this into the low 60's. Just a suggestion.
 
I am getting ready to bottle and I was going to take a gravity reading. Nothing I have is deep enough! I have no idea what to use... The only thing I have deep enough is a 48oz container and I don't really want to use that (and "waste" 48 oz of the beer).

Anyway I tasted it and holy-alcohol! Also it looks like bread, but it DOES taste like beer. :D

So tomorrow I will probably bottle it, if I can figure out how to get a reading. I also siphoned up a bunch of the trub. Boo.

Maybe a vase? Hydrometers usually come in a plastic tube that can be used (although they don't stand up too well). You could also just cut a piece of PVC pipe and cap it, although that won't be clear.
 
I am getting ready to bottle and I was going to take a gravity reading. Nothing I have is deep enough! I have no idea what to use... The only thing I have deep enough is a 48oz container and I don't really want to use that (and "waste" 48 oz of the beer).

Anyway I tasted it and holy-alcohol! Also it looks like bread, but it DOES taste like beer. :D

So tomorrow I will probably bottle it, if I can figure out how to get a reading. I also siphoned up a bunch of the trub. Boo.

You were doing a Belgian weren't you? If so then things sound about right in terms of what you're tasting and seeing. Things will age out nicely as I'm sure you've read numerous times.

Do you have an autosiphon? Some folks will use the body of the autosiphon as a wine thief and just drop the hydrometer in there to get a reading.
 
Well I went on vacation right about when it was time for me to bottle, so I cleared out some space and since it just worked out, cold crashed the fermented beer for the week+ I was gone. Should work out nicely....

IMG_1173.JPG


And so today it was time to bottle. I managed to break the first 2 things I picked up, so I figured I was in for a terrible first-ever bottling day, but to sum things up: it wasn't so bad.

I broke my hydrometer, and then I broke the twisty part on the spigot of my Ale Pail. Hydrometer: boo. Spigot: no big deal (still works).

I had to add 1 cup of honey to the brew before bottling. I stupidly poured the cold honey into the bottom of the Ale Pail. It took about 45 minutes of stirring gently to get that to dissolve. Note to self: warm honey, mix in (not at bottom). Anyway, it worked out.

IMG_1175.JPG

IMG_1176.JPG


Leftover yeast. Do you save this as a starter or are they mostly dead?
IMG_1179.JPG


I promise I didn't just make sweet tea:
IMG_1182.JPG


continued:
 
So I stirred and stirred all the while sanitizing my bottles and all the other stuff that will touch beer and hands. It's a pain but not really hard -- not harder than brew day in my opinion. I mean everyone seems to rail so hard on bottle day. To me it was just another step toward me actually making beer. It was fun!

Here was my setup. I think a lot of people might use that little clamp on a hose, but I just fed the bottles through the spigot. Easy.

IMG_1184.JPG


These bottles... (yes there are a few 22 oz Rogue bottles in there that I didn't use, but I did use 2 550ml Samuel Smith bottles and that worked out nicely. I plan to age those for a long long while -- This is a Belgian Tripel after all.)
IMG_1185.JPG


My very first filled bottle
IMG_1188.JPG


IMG_1189.JPG


I really liked the Sierra Nevada bottles, because my capper popped right off willingly from those, whereas I had to really use some intention to get the capper off most of the other bottles (Guiness, New Belgium, Samuel Adams, etc). Also they are short and stocky and for some reason that's appealing to me DO NOT TELL MY WIFE THAT.

The first case of beer. I numbered the bottles because I want to taste randomly and see if the honey was fully dispersed through the beer. I am going to print labels on round Avery's sometime... (what number avery labels fit perfectly?)
IMG_1190.JPG

Note: I didn't consume the Bud Light that came in this box originally. :D

continued:
 
And finally, some random fun bottling shots.

IMG_1193.JPG


IMG_1194.JPG


IMG_1195.JPG


IMG_1196.JPG


And my favorite:
IMG_1198.JPG


So, bottling done. They're still all in the kitchen. I guess it made about 44-46 bottles (I am drawing a blank right now), and there was one bottle that was about 10 of 12 oz, so I'm consuming it right now. ;) It's BEER! For sure. I mean it tastes pretty good right now, but not alcoholy at all (which is vastly different from how it was when I originally tasted it a while back). And there's a touch of carbonation even now (which will only get more so while it bottle conditions). So that's ok too.

After numbering the bottles I went back and randomized them so that storage conditions from front of closed to back won't affect aging vs bottling top-down. :D

I dumped the yeast in a hole in my garden (where I found a big grub worm), and am going to cover it tomorrow. I know I know a beer tree won't be growing there....

maybe this beer DOES have a fair bit of EtOH after all....:drunk:
 
Supposed to bottle condition this for a couple of weeks but I'm now nervous to try my first homebrew... patience has NOT been a problem for me. It seems that it is with most people... but here it's been THREE weeks (fully 1 week more than "required") and I still haven't had one...

Nervous it'll be terrible, or just be "ok" or... stir my sinuses up and I'll snort and sneeze all night.
 
Looks good (mostly).

One last piece of constructive criticism. Get yourself a bottling wand. Three bucks.

Disadvantage of using the spigot directly is that you're apt to introduce a lot of oxygen into the beer as it drops from the spigot to the bottom of the bottle. O2 post-fermentation = a beer that will stale prematurely (flavors like wet cardboard). The bottle filler attaches to a siphon hose that you connect to the spigot. When you press the tip on the bottom of the bottle, it allows the beer to flow through (gently) to the bottom of the bottle - minimizing any O2 being added to the beer.
 
Supposed to bottle condition this for a couple of weeks but I'm now nervous to try my first homebrew... patience has NOT been a problem for me. It seems that it is with most people... but here it's been THREE weeks (fully 1 week more than "required") and I still haven't had one...

Nervous it'll be terrible, or just be "ok" or... stir my sinuses up and I'll snort and sneeze all night.

Damn man, chill one down and try it! It's good to get an idea of how a beer changes during aging by trying them occasionally.
 
Looks good (mostly).

One last piece of constructive criticism. Get yourself a bottling wand. Three bucks.

Disadvantage of using the spigot directly is that you're apt to introduce a lot of oxygen into the beer as it drops from the spigot to the bottom of the bottle. O2 post-fermentation = a beer that will stale prematurely (flavors like wet cardboard). The bottle filler attaches to a siphon hose that you connect to the spigot. When you press the tip on the bottom of the bottle, it allows the beer to flow through (gently) to the bottom of the bottle - minimizing any O2 being added to the beer.
Point of fact is that I didn't know they didn't need 02 at that stage... Bottle conditioning at all -- I thought the yeast needed some O2 for the conditioning.

But thanks for letting me to know -- I will bear that in mind for my next bottle day.

Thanks!
 
Yeast need O2 during the reproductive phase. By the time they've begun converting sugar into alcohol and CO2, you don't need or want to add any more.
 
Back
Top