• Please visit and share your knowledge at our sister communities:
  • If you have not, please join our official Homebrewing Facebook Group!

    Homebrewing Facebook Group

Boil kettle condenser - no overhead ventilation needed

Homebrew Talk

Help Support Homebrew Talk:

This site may earn a commission from merchant affiliate links, including eBay, Amazon, and others.
I do let samples cool and settle and confirmed pre and post poil gravities on both hydrometer and refractometer. I forgot to measure pre-boil volume but if I assume it was correct(ish) and my post boil volume was high then I can assume my boil off rate was very low.

Will hopefully run a water test this week.
 
I have an Anvil Foundry and filled it up with water to a normal-ish level, got it to temp (just below boiling) to get more accurate pre / post measurements (so I wouldn't have to account for volume change with temperature), and then ran 60 minute tests at varying power levels. In the end I found a boil-off rate that I could use and it's been really accurate. Just had to do the up-front work.

My lid has a small hole for their recirculation pipe to go into. I leave it open just in case, it feels like a safety thing. It might be hurting my actual boil-off but I'm OK with that, I have no concerns now about something imploding or exploding.

(240V Anvil 6.5 at 70% power = .5 gallons / hour)
Tracer how you exhausting the steam in your foundry? Through the malt pipe hole in lid, or do you have a mod to condense steam? Just curious cause I have a Foundry for test runs.

Cheers🍻

KBW.
 
Look up "Steam Slayer" at Brew Hardware to get the gist of it. Attaches to the lid at the top. A nozzle sprays inside and condenses the steam to run down my sink drain.
 
Understood; I built the same one as BrunDog a few years back...then Spike released theirs for sale and I have that as well. Question is specific to Foundry because the lid is kinda flimsy, so I haven‘t installed TC fitting on lid to use that set-up.
 
Didn’t realize this was Brian...! Love your vids and always like 👍. I haven’t seen one on the Anvil solution.

Cheers 🍻

KBW.
 
Closed loop would use a copper coil with recirculating water inside, and that water would be cooled via an air-water radiator. Closed loop would not waste any water, but the the heat would need to be rejected somehow.

Why not use a water bath to shed heat? Essentially, an ice water bath with a coil chiller, similar to what we use to chill wort?
 
I see Brian recommends in his video not using until after your done with the hot break. That is my experience as well but I have not seen much if any mention of that on this thread( not that I've read every single post, just in and out from time to time) . Wondering if this is a consensus. I've only used my steam slayer ( 1.5" wide body ) half a dozen times just because everything is easier with out it and my all plywood brew garage can handle the moisture of my brew day with a fan and exhaust of moist air with additional make up air. Has anyone ever used 2 steam condensers on large kettles? I had my buddy weld 2- 1.5" triclamp ferrules onto the lid of my 100 gallon brew kettle thinking this might be a needed solution in my near future should things go as planed. Welded 1 onto my 20 gallon kettle just for testing purposes. Pretty sure I did the 9 GPH sprayer thinking I could upgrade or do a second Slayer or do larger GPH on both if needed. Bobby would probably have an idea if 2 would work or not but it would help balance the lid haha.
 
Last edited:
With appropriate automation (translated: ramp heating), you can brew with the lid on the whole time. I have always used fermcap myself as extra protection, but I know it is not used or considered verboten by many. If you have a large enough headspace, and you approach boiling temperature slowly, you can leave the condenser in place and turn it on once a legit boil is about to start.

Yes, two steam condensers will work. At the end of the day, pulling heat out of the steam is the key - whether its done with one big nozzle or multiple smaller ones doesn't matter much. That said, there is a point of diminishing returns of just putting a bigger nozzle in a condenser... you don't want water hitting the walls of the tube without mixing with the steam first - that is an inefficiency.
 
I wonder, would a larger tube diameter be better for a bigger system than two 1.5s?. I'm using a 1.5/2.0 T with a 9gal sprayer on my 15g kettle and its perfect.
 
Looks like this is 3 Inch. I would have no good way of handling my lid with something this big on it. That is why I put 2 -1.5" triclamp ferrules on my lid ( on opposite sides for balancing purposes ) thinking 2 steam slayers is basically equivalent to a 3" suction and maybe a little more due to wide body construction of the wide body steam slayers.
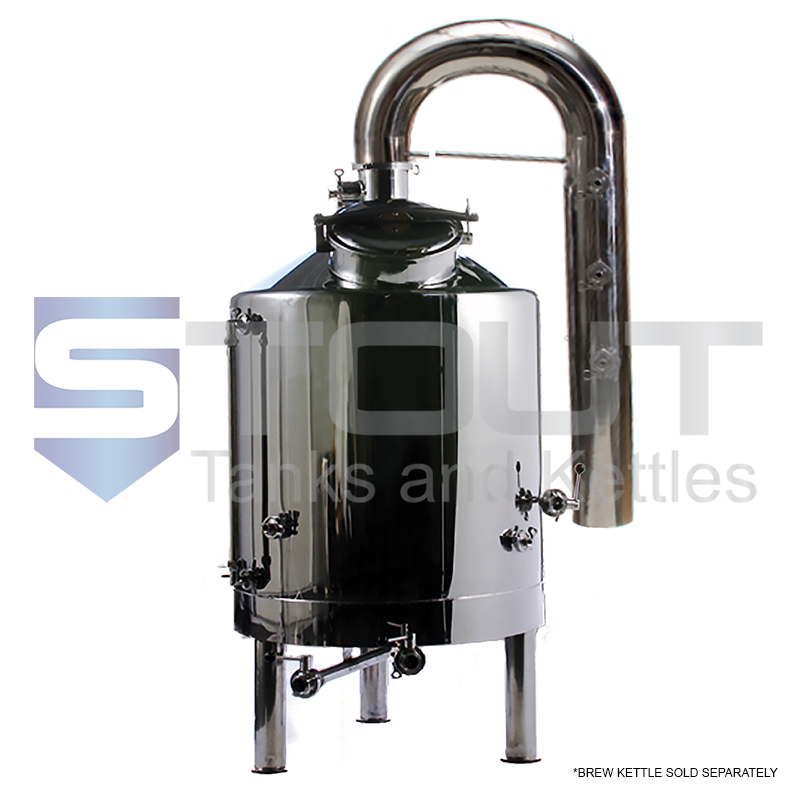
Condenser | for 2-4 BBL Dome Top Brew Kettles

Condenser | for 2-4 BBL Dome Top Brew Kettles
SKU SP700CONDENSER
This stainless steel Condensor is used at installations where it is not permitted or possible to vent the brew kettle steam to the outside via a steam vent stack. It is designed specifically for 2-4 barrels Dome Top Brew Kettles and features:
  • A candy cane shape that eliminates the steam vent by condensing the steam to water and draining to the floor.
  • Condenser pipe
  • 3 Tri Clamp adapters with 1/4-in. NPT Female threads with clamps
A 3" ID tube has 4X the cross sectional area of a 1.5" ID tube. So, 2X - 1.5" is roughly equivalent to 1/2 - 3". Nozzle choice and water flow rate could shift the capacity ratio.

Brew on :mug:
 
A 3" ID tube has 4X the cross sectional area of a 1.5" ID tube. So, 2X - 1.5" is roughly equivalent to 1/2 - 3". Nozzle choice and water flow rate could shift the capacity ratio.

Brew on :mug:
That makes sense. Not sure how the Wide Body Steam Slayer( 3" spray chamber) comes into the equation. BH used to have a 2" version for larger kettles, but at the time I was ready to pull the trigger they only offered the Wide Body version as the solution for larger kettles along with options for larger GPH sprayer nozzles. If I did 2 of these 3" wide Body that would be 3" chamber x 2 obviously. If I go bigger than 9 GPH nozzles it would theoretically pull more steam through the 1.5" openings and guessing that the 2- 3" chambers would also pull more through the 1.5" openings. Eventually I will have to test to know for sure.

Description
clear1x1.gif
clear1x1.gif
clear1x1.gif
This is the new WIDE-BODY edition of the product. The larger 3" diameter spraying chamber maximizes cooling efficiency while keeping the steam entrance port at a standard 1.5" TC. This unit is better for 15 gallon and larger batch sizes or for 10 gallon batches where the source water is typically above 80F.
 
Last edited:
I wonder, would a larger tube diameter be better for a bigger system than two 1.5s?. I'm using a 1.5/2.0 T with a 9gal sprayer on my 15g kettle and its perfect.

Yes, I have a wide body version that uses a 3" diameter chamber and it is about 30% more efficient at the same sprayer rate.

Oops, I hit reply before I read the rest of the posts....
 
That makes sense. Not sure how the Wide Body Steam Slayer( 3" spray chamber) comes into the equation. BH used to have a 2" version for larger kettles, but at the time I was ready to pull the trigger they only offered the Wide Body version as the solution for larger kettles along with options for larger GPH sprayer nozzles. If I did 2 of these 3" wide Body that would be 3" chamber x 2 obviously. If I go bigger than 9 GPH nozzles it would theoretically pull more steam through the 1.5" openings and guessing that the 2- 3" chambers would also pull more through the 1.5" openings. Eventually I will have to test to know for sure.

Description
clear1x1.gif
clear1x1.gif
clear1x1.gif
This is the new WIDE-BODY edition of the product. The larger 3" diameter spraying chamber maximizes cooling efficiency while keeping the steam entrance port at a standard 1.5" TC. This unit is better for 15 gallon and larger batch sizes or for 10 gallon batches where the source water is typically above 80F.

The primary reason that the 3" is more efficient is that the spray pattern is allowed to cover more area before it hits the chamber walls and becomes less effective at interfacing with the incoming steam. There is likely some practical limit where that efficiency would increase without opening up the entrance bore larger.

So, one widebody at 9GPH would be better than two 1.5" TC versions with 4.5GPH sprayers (if such a sprayer tip was available). I'm sure there is a lot of theoretical science that has already been done that could play into figuring all this out but I relied on practical testing of different prototypes.

To deal with really big boilers, I could see using a 3" tc port and welding several sprayer bungs into something like a 3" TC elbow.
 
Has anyone ever done an H configuration like this for their hop additions? Heavy lid and hot steam are the thought process around not lifting at all during the boil. Will weld a ring onto the cap to make for east removal and then use a wide-tip long funnel to not only get past the tee section, but also have easy hop drops during the boil. Any downsides or thoughts/prior experiences?
CC93886B-C351-4A48-AF48-99524995962D.jpeg
 
Seems like it should work fine but the tri-clamp nut will be hot when taking it off the tri-clamp. I wonder if gravity would be a tight enough seal for the cap so you didn't have to mess around with the tri-clamp. Probably would be fine due to the suction action of the steam condenser.
 
Seems like it should work fine but the tri-clamp nut will be hot when taking it off the tri-clamp. I wonder if gravity would be a tight enough seal for the cap so you didn't have to mess around with the tri-clamp. Probably would be fine due to the suction action of the steam condenser.
Yeah I was going to try without a clamp and hope the suction will keep it closed. I have some extra stainless laying around so could try to rig up some extra weight on the cap. I’ve tried taking the elbow and steam condenser off instead of lifting the lid and can second that it’s super hot when in use, even with silicone bbq gloves it was too hot to hold.
 
You could also get a wye fitting to avoid needing a funnel (link below). You'd need a 45 degree bend attachment for a second tee, which would add to cost...less if purchased on Aliexpress.

https://www.brewershardware.com/1-5-tri-clover-compatible-wye.html
I was wondering about that as well, was looking for a sanitary tee like they have in pvc but nobody makes one in tc form. Have seen the double 90 but it would kick the hops directly towards the condenser side of things. Will try next brew day and report back on findings both with, and without a funnel to see if you will actually loose any pellets out the side.
 

Latest posts

Back
Top