• Please visit and share your knowledge at our sister communities:
  • If you have not, please join our official Homebrewing Facebook Group!

    Homebrewing Facebook Group

Basement Brewery Project

Homebrew Talk

Help Support Homebrew Talk:

This site may earn a commission from merchant affiliate links, including eBay, Amazon, and others.
Artbrau, try turning your pump so the the inlet is at the bottom and the outlet is at the top. I use to run my pumps the same as you and always had problems getting them primmed and then they would sometimes loose the prime for no reason, I don't have any of those problems anymore.

I'll try that. Thanks!
 
Do you remember what you paid for the 6" ring burner? I'd love to come check out the system next time you brew or whenever.

It was $45. Which is nuts because the bigger one is $20-something. As it turns out I don't think I have the pressure to run the bigger one because if I try to run 2 9-jets at a time the flames get totally yellow. Nothing stops you from getting the larger one and capping some of the orifices, though.

It should also be noted, the build quality is not top notch. Some of the jets don't perfectly impinge on each other - they are out of alignment. All of these are basically knockoffs of the SolarFlo stuff which is tough to find at retail and way more expensive. I called them years ago and they would not sell direct. I did learn from the SolarFlo site that I've probably allowed too much space between the ring and the kettle. The jets provide: "An intense 1900° flame [...] and it’s hottest at the lowest possible level—right above the jets!" The would be about 1" while I have about 4." My heating times are slower than I got with the previous single-jet system despite slightly higher rated BTU's 75k vs. 65k.

I'm looking to meet other local brewers but the local clubs, HOPZ and Whales are tough for me to get to. I'll let you know when I brew next. Hope you can stop by!
 
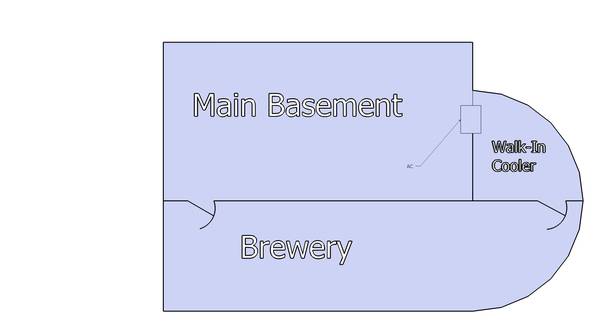
With all that space downstairs, a walk-in is very doable so I did. The space is curved so I walled off a quarter circle. The resulting space is about 43 square feet, if I remember my trig. right. My builder has some extra time on his hands (what a surprise) so he gave me a good deal on a quick-and-dirty build. (He is a very nice guy but he thinks all these DIY custom things I'm doing are a bit nuts).

Brewery_Plan.jpg


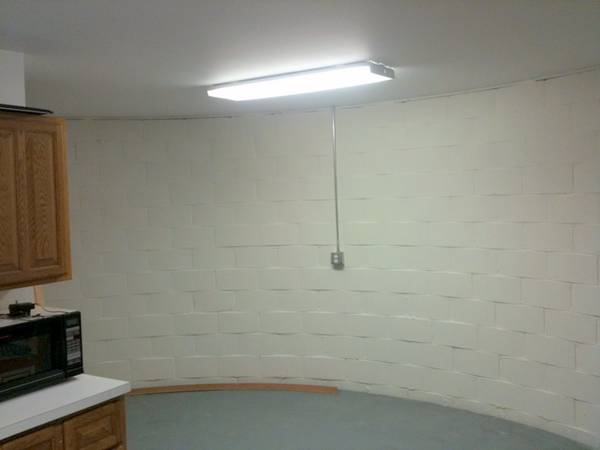
Here is the before shot:

IMG_01761.JPG


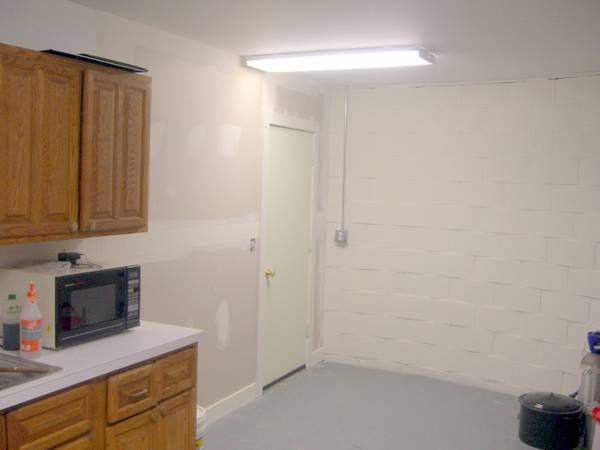
Here are the after shots:

CIMG7354-1.JPG

CIMG7361.JPG


I made all the walls R30 sheathed with "Green Board" and a vapor barrier on the outer layer. The pre-existing wall shared with basement was already insulated to R12 so I added foam board there. I will put more foam board on the steel/foam core exterior-grade door. The floor is still concrete until I figure out a better idea.

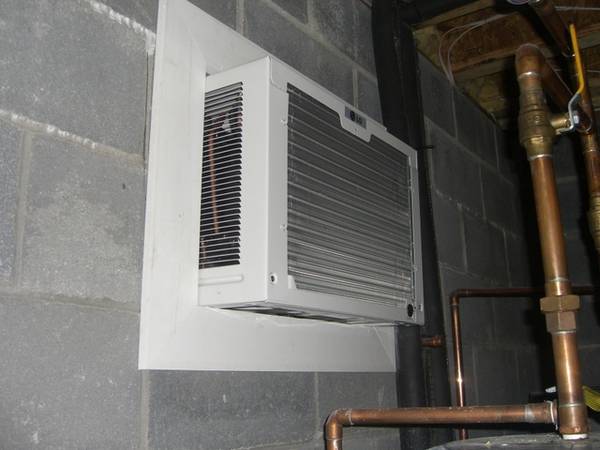
As you can see from the plan the A/C unit vents to the main basement. I am below grade so venting outside would be pain. I figure in the winter I'll get back some heat for the house but the basement is big enough that there isn't a huge heat contribution.

There is a problem though. I have to keep some part of the AC hot side protruding out the back to prevent overheating...
CIMG7352.JPG

but the block wall is 8 inches thick and the there are mucho mas inches of insulation on the cooler side so the AC is deeply recessed.
CIMG7355.JPG

Now I plan to hack the thermostat of this LG 12k btu unit from Costco but I already have an issue. Ambient temps in the main basement are about 72 deg. Ground temps below grade are about 65 deg. The AC should at least be able to get the room down to the lowest temp on the stock thermostat, 60 degrees, but 65 is the best I can do. The unit cycles on for literally one minute then is off for a few. I suspect the cavity gets much colder than the room (or the a/c is defective). I detached the frost sensor from the radiator fins, stuck it in a foam peanut as a buffer, and placed it outside the cavity but this changed absolutely nothing! I also considered a fan blowing INTO the cavity to mix the air better. Is the thermostat sensor somewhere else? Can I make it remote? I'd like to understand this issue before customizing things. Thanks.
 
That is an awesome basement and an awesome project. I look forward to moving farther north where I can find a property with a basement! (and get away from this heat...)

Keep up the good work.
 
Now I plan to hack the thermostat of this LG 12k btu unit from Costco but I already have an issue. Ambient temps in the main basement are about 72 deg. Ground temps below grade are about 65 deg. The AC should at least be able to get the room down to the lowest temp on the stock thermostat, 60 degrees, but 65 is the best I can do. The unit cycles on for literally one minute then is off for a few. I suspect the cavity gets much colder than the room (or the a/c is defective). I detached the frost sensor from the radiator fins, stuck it in a foam peanut as a buffer, and placed it outside the cavity but this changed absolutely nothing!

I took the plunge at bought a "Coolbot." That does the trick and the a/c stays on as long as it should. I just plugged the thing in tonight so I can't do a proper review but it was dead simple to install without modifying the AC at all.

I would have been comfortable circumventing the a/c thermostat myself but the innovation here is the heater to trick the a/c thermostat instead while integrating a new frost sensor.

No frost so far, taking the space down to 55. If it works out, the cost savings will be massive. My builder was trying to talk me into a $2.5k wine fridge unit.
 
Good to hear a real review of a Coolbot, I've read about them but did not know if they were hocus pocus or really any better than a ranco or similar.
For your floor I think you could lay down foam between wood joists and then make a subfloor with sheet vinyl, tile, whatever.
 
Good to hear a real review of a Coolbot, I've read about them but did not know if they were hocus pocus or really any better than a ranco or similar.
For your floor I think you could lay down foam between wood joists and then make a subfloor with sheet vinyl, tile, whatever.

That's on the list, for sure. for now I'm content with 55 deg. cold storage/conditioning. That's only 10 deg below summer ground ambient and equals winter ground ambient so the system isn't working too hard.

I do have to insulate that door, though. There is huge condensation on the outside! Another trip to Home Depot. They're proposing opening an outlet in my yard, by this point.
 
The benefit of the coolbot is not having to do anything. The con is that it's $200 more than a ranco. One way to fool the stock probe is to tuck it around the side of the unit so that it's exposed to the unconditioned space but that only works if your ambient temp is above the lowest stock setpoint of 60F.

Another DIY version of coolbot would be to set your stock thermo to 60F and keep it plugged in to constant power. Run a ranco and have the controlled output hooked to a 1K ohm, 25 watt resistor that you couple to the AC's stock probe. It provides the same kind of control you're looking for by applying heat when cooling is required. Obviously wrapping insulation around the resistor and stock probe will help.
 
Big thanks to elkdog and Bobby M for stopping by on Saturday! These guys are great brewers who gave me lots of good ideas. We tried some fine beers. Bobby's Flanders ale was right there with Rodenbach gran cru and his barleywine beat out Bigfoot, my fave. We pulled out a '95 Bigfoot from my vertical collection and enjoyed its sherry qualities.

Since I had visitors, naturally, I had demo-itis. When the time came to start the RIMS recirc....nothin'. We suspected a clog so Bobby bravely blew into the outflow tube. Nice mash farts but that didn't work.We hot wired the lines to push the sparge water in the outflow... Nothin'. Finally, we suspected the dip tube might be pressing against the keg bottom. Remember the scene in "Blade Runner" where Darryl Hannah retrieves an egg from boiling water? Being a replicant, I jammed my arm into the hot mash and gave a little yank on the dip tube. Success! (okay, I used an L-shaped tube).

It all went pretty smoothly after that. A good brew day with some great company.
 
your setup looks phenomenal! love the vent.
with the paddle, be careful, oak is porus. I'd suggest sealing it, or using a tighter grain wood, like maple.

congrats!
 
The coolbot seems way overpriced to me. It is extremely simple to disconnect the PCB from a window AC unit and just use a ranco. And this is coming from a MechE that doesn't know to much about electronics. Just make sure that giant capacitor is discharged first.
 
Awesome I wish I had room for your set up . I looking into the same jet burners (natural gas) Would you recommend the 6" or the 8" burners or somthing else? I have 1/2 pipe.
 
Love your ventilation hood enough to build my own. I was going to go the same size but ended up only finding 3x4 sheets. So I made my about 8 ft long. It is huge.

Here are pics of the build so far:
http://home-floyd.homelinux.com/brewery/hood1.jpg
http://home-floyd.homelinux.com/brewery/hood2.jpg
http://home-floyd.homelinux.com/brewery/curr_setup.jpg

I am going to use my same range hood in the pics inside the big hood. It pumps out about 400 cfm so it will continue to do the job.

And my output venting is 6in and will soon be hard vent instead of flexible.
 
Back
Top