Auber All-in-One BIAB Panel DIY kit--report

Homebrew Talk - Beer, Wine, Mead, & Cider Brewing Discussion Forum

Help Support Homebrew Talk - Beer, Wine, Mead, & Cider Brewing Discussion Forum:

This site may earn a commission from merchant affiliate links, including eBay, Amazon, and others.

mongoose33

Supporting Member
HBT Supporter
Joined
Dec 16, 2015
Messages
8,139
Reaction score
8,115
Location
Platteville, WI
I've dithered back and forth about how to control my boil element and eventually closed my eyes and just chose the higher end option, the Auber EBIAB kit: https://www.auberins.com/index.php?main_page=product_info&cPath=64_66&products_id=678 The base price is $370, plus or minus depending on what you want.

I've been amazed at what these panels cost, but this was the most cost-effective option for me especially if I want to try some variations. I'm also doing a RIMS system but it's running separately from the Auber kit. FWIW, I'm trying to do LODO brewing so this is part of a larger set of equipment including a stainless counterflow chiller.

I'm also going to implement BobbyM's steam condenser as part of this, which is one reason why I'm going to electric brewing--so I can brew in the garage in the winter without having to exhaust steam with a fan and provide makeup air and use a propane heater and yada, yada, yada.

***********

Can the average person put one of these together? I'm going to say probably not. I've done some wiring in my past, wired up a PID I use to control temp for an alloy pot, but this one was a big challenge. Thanks to all who helped, especially @augiedoggy.

There are no instructions for putting this thing together other than a wiring diagram. It's actually a pretty clear diagram but how exactly one should terminate wires isn't exactly clear. I ended up using a lot of ring and spade terminals which clean things up a bit, but necessitated one extra run to the home store when I ran out.

Another example is a couple of jumpers that were included. No indication where they go, except that after VERY close inspection of the wiring diagrams, it appeared they went on top of the terminal blocks. Pushed them in and there we were. But it was not obvious to a first-timer.

What also makes it difficult is that there are clearly items that should be installed in a certain order or it becomes crowded and hard to add wires. For example, I didn't screw down the SSR to the heat sink until well along and it was hard to get my hands and such in there. What I should have done was do this first, screw the SSR to the heat sink (using thermal paste), add the wires, feed the wires through the hole in the case, then attach the heat sink.

I've posted a few pics showing the process and the end result. I'll tie off some of the wires with zip ties and perhaps a cable wrap. Once it was done I double checked all the connections and that the wires were the right gauge and going to the right places.

********

The wiring in the garage is not complete; I have an electrician friend who's helping with the final connections to the main panel as well as the sub panel we installed in the garage, but he can't get back to finish until next week. So you see where the panels will plug in, just no receptacles as of yet. :(

Not sure exactly how I'm going to arrange things. I might just start with kettles on the workbench, but eventually I'll bet I'm going to build some sort of brew sculpture once I figure out how all this works together.

I'm crossing my fingers that this all will work but until the electricity is connected, I'm just looking at it. If you see anything that looks amiss, please sing out!
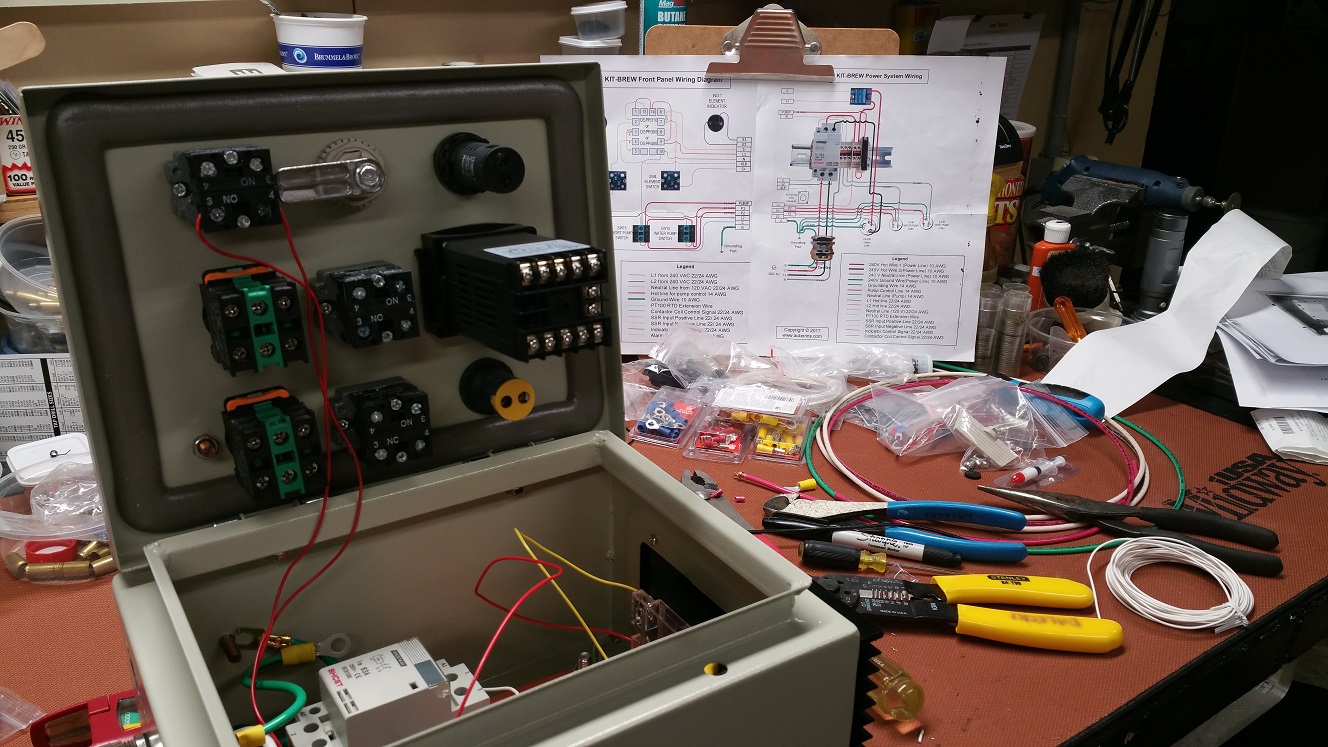

panelassembly1.jpg
panelfinished2.jpg
panelfinished1.jpg
panelsonwall.jpg
 
Last edited:
Looks like you have it figured out! What made you choose this kit?

I can very much relate to your experience right now. I was trying to balance usability with cost; Auber sells a $649 refurbished panel that I looked at but I figured it'd be pushing $700 by the time I was done. And I'm into this for well more than $1000 anyway, so pinching those pennies seemed to make sense. I'll add a few notes below about building it.

I also looked at their "Cube" but something about it doesn't appeal to me. Maybe if I had more room it might have been a better option. The DIY kit I did let me control two pumps, a heating element, has an alarm....it seems like much better functionality than the Cube does, at least to me. That the panel has a key lock is important; if a friend comes by and just decides to flick on the element switch without water in the kettle, it'll fry. I like how I not only can lock it so it can't be used, but the front door has a plastic key thingy that means you're going to have to work to even open it up without that.

I googled panels and didn't come up with much that either was in my range, or looked like it would work well. Stilldragon has a very cheap element controller, but I wasn't quite comfortable with it, and there was no place to grow.

Another thing that factored into this--and I'm sure you're going through the same thing--is trying to figure out what I'm going to wish I'd done a year from now. Can I grow with it, add additional functionality, or do other things with it? I've been doing Low Oxygen brewing and this setup is part of my attempts to dial that in better. One thing about that is getting the O2 out of strike water; I preboil to do that, and beign able to get the water at about the right temp is important. That's why I have a counterflow chiller too, so I can cool that preboiled water down to strike temp.

I took AugieDoggy's advice about RIMS and that's what I've gotten. I bought BrewHardware's RIMS camlock tube minus the heating element because they were out of stock when I bought it. I bought the element for the RIMS on Amazon as Bobby was out of stock. It's got the TC closure, which is what most of the rest of my system is using when not using camlocks.

I'm running the RIMS system using Brewhardware's temp controller. I think I could have bought a more involved panel that would have let me control it from that, but I'd have been pretty high at that point, I think. That BB100 refurbushed panel above would have been $300 more than my DIY, whereas the control I bought from Brewhardware was only $108 or so with the extra switch.

And you know what? If at some point I decide to go whole hog on this, big panel, etc. I think it'll be easier to sell these less expensive units to someone who wants to get into electric brewing, than a bigger panel.

************

Don't know if you've thought about pumps and fittings and such. When I bought my Blichmann Riptide--and I expect I'll be buying a second one here at some point--I had to decide how to do connections. Camlocks seemed the best idea. I like how QuickDisconnects work, but they don't seem to have as much variety of fittings and such, where camlocks do.

That's why I wanted Brewhardware's RIMS tube--it comes set up to use camlocks, one less thing for me to buy. My pump is set up for camlocks, it's my standard for connections.

I have a counterflow chiller that take TriClover fittings, but I bought a couple fittings that allow me to hook up my camlocks to it so I can use the Garden Hose camlock fittings to connect hose to the water side of the chiller.

************

It took me about a week to wire the panel in bits and pieces. An hour here, half hour there, some time off while AugieDoggy answered a question or two, posted a few questions about parts and such. If I were to wire another, it would take maybe 3 hours, maybe a little longer.

I think the parts Auber includes are pretty decent. If you have electronics or wiring experience, I suspect it would be a pretty easy thing. But there were things with which I was unfamiliar, had to figure them out. The terminal blocks on the DIN rail were one thing I'd never seen before, had to figure out how to install them, how they worked for connections, and so on. Same with how the switches connect to the front panel, some have a clip you have to remove, install the switch part from the front, add the guts from the back and use the yellow clip to lock in place.

Most of it I was able to puzzle out. If the things above are familiar to you, you'd have little difficulty wiring the Auber kit. The wiring diagram is very clear.

Anyway, good luck, and let us know what choices you make and why.
 
One more thing about electric brewing (and for those for whom this is TL/DR, skip past the details to the bottom):

I did not have 240-volt electricity in my garage, so I undertook to get that installed. It's not been cheap. If someone already has a dryer outlet where they want to do this, it'll help cut costs immensely.

I have a full 200-amp panel in my basement, full as in there are NO empty circuit breaker spots. I had to double-up a couple circuits so I could leave a double-spot at the bottom of the panel for a 60-amp breaker.

I then had to run 4-conductor wire from that panel out to the garage. The run is about 30 feet, which means I had to buy a 50-foot coil of wire. Cost about $120. Decided to go with 6-gauge wire which may be overkill but I didn't want any issues. I'm fortunate in that in my basement the joists are exposed above, so all I had to do was drill holes in the joists to run the wire.

Yeah, that's all I had to do. I had a few places where there was wire congestion; had to bypass that. I had a buddy help me pull that wire; it was not easy. It took about an hour, not including all the vacuuming of wood shavings from the drilling.

I also needed a sub-panel for the garage. That's about $40.

I also wanted to put in one 30-amp circuit and two 20-amp circuits. I needed some 10-gauge 4-conductor wire for that, another $40. I had 12-ga Romex wire, but if I'd had to buy it, probably $20

I'm repurposing the breakers from the basement panel I had to remove to double up slots. No cost there, otherwise about $15.

Two 20-amp receptacles in the garage. I'm using GFCI receptacles, plus the outlet boxes and covers, about $35.

The 30-amp receptacle including box and cover and receptacle, about $13.

Here's the killer: I want GFCI since I'm mixing electricity and water. Guess what a 30-amp GFCI breaker costs? In my case, with a Square-D QO form factor....drum roll....$103. Yeah. I couldn't believe it. But I'm not going to brew out there in the garage without that kind of protection. I closed my eyes and bought it.

On top of this is the time from an electrician friend of mine. He'll do the hookups. I *probably* could do it, but i want to ensure everything is hunky-dory. He charges $37/hour. We have an hour in on planning out the system, an hour at the home store buying what we needed, and it'll probably take him 2 or maybe 3 hours to complete the hookups. Figure 5 total hours, $185.

To distribute the electricity in the garage, I use wiring chases up against the ceiling. Cost of materials to do that was about $60.

**********

So, just to get that electricity to my garage where I can hook up the panels and go from there: Right around $650

Now, I will say that this is exactly what I want, I added a second 20-amp circuit to run the chiller, I could have gotten away without that, but as long as I was doing it, I might as well add capacity. Those 3 circuits will likely never run concurrently, so I'm not worried about too much draw. And I have an alternate use for the 3rd circuit, I do powdercoating in a small oven, the extra circuit will help with that.

*********

Moral of the story: it's not likely to be cheap, just to get the electricity there. I ended up at some point feeling like I was committed one way or the other, and thus if you'd told me at the outset it would be this much, I might have reconsidered. Now, there's no turning back.

**********

And if I ever get an electric car, at least I have power out there to charge it. :)
 
Last edited:
Yeah, conduit is really the only right way to do it. Fortunately, I wired my detached garage as a shop, which it is, and has it's own sub panel, 10/4 and 6/4 wires in walls for welders, lift and other tools. If I had not, I'd probably be brewing out of my house instead, which would not be as good.

I put a swim spa(endless pool knockoff) in my house basement, and use GFI breakers for that. Besides being costly, they are not as durable as regular breakers, and you should test them occasionally, for GFI function. I have had one circuit where the breaker fails once in a while, but there may have been an arc condition from a contactor on it. I suppose I should put a GFI on the circuit running my Cube, thanks for reminding me.

Nice job on the control panel, by the way. Looks like it does similar function as "cube", but with the lock, alarm & lights. Auber had a kit for the Cube for $125 less than assembled, but I know I would not wire it as neat as they would, and I'd figure any problems I was having was my fault in assembly, as opposed to not understanding operating instructions.
 
old fridge compressors sometimes trip GFCI breakers.

I had that problem at one point. Funny thing is, now I have two ferm chamber refrigerators (one regular size, one mini) on a GFCI circuit and they have never tripped it. But the other fridge? Couldn't get it to run on that GFCI. No longer a problem. Have a newer fridge now.
 
Yeah, conduit is really the only right way to do it. Fortunately, I wired my detached garage as a shop, which it is, and has it's own sub panel, 10/4 and 6/4 wires in walls for welders, lift and other tools. If I had not, I'd probably be brewing out of my house instead, which would not be as good.

Welders, lift and other tools? Trade you garages! :)

I put a swim spa(endless pool knockoff) in my house basement, and use GFI breakers for that. Besides being costly, they are not as durable as regular breakers, and you should test them occasionally, for GFI function. I have had one circuit where the breaker fails once in a while, but there may have been an arc condition from a contactor on it. I suppose I should put a GFI on the circuit running my Cube, thanks for reminding me.

Nice job on the control panel, by the way. Looks like it does similar function as "cube", but with the lock, alarm & lights. Auber had a kit for the Cube for $125 less than assembled, but I know I would not wire it as neat as they would, and I'd figure any problems I was having was my fault in assembly, as opposed to not understanding operating instructions.

I looked--hard--for an assembled version of my kit, but I could not find one. If they'd have assembled it for me for $125, I'd have jumped on that in a New York minute. As it was, since the electric portion of this isn't complete, I had time to do it. But I'll guess it would have been at least $200 more to wire it for me.

Assuming it works, it all worked out.
 
I can very much relate to your experience right now. I was trying to balance usability with cost; Auber sells a $649 refurbished panel that I looked at but I figured it'd be pushing $700 by the time I was done. And I'm into this for well more than $1000 anyway, so pinching those pennies seemed to make sense. I'll add a few notes below about building it.

I also looked at their "Cube" but something about it doesn't appeal to me. Maybe if I had more room it might have been a better option. The DIY kit I did let me control two pumps, a heating element, has an alarm....it seems like much better functionality than the Cube does, at least to me. That the panel has a key lock is important; if a friend comes by and just decides to flick on the element switch without water in the kettle, it'll fry. I like how I not only can lock it so it can't be used, but the front door has a plastic key thingy that means you're going to have to work to even open it up without that.

I googled panels and didn't come up with much that either was in my range, or looked like it would work well. Stilldragon has a very cheap element controller, but I wasn't quite comfortable with it, and there was no place to grow.

Another thing that factored into this--and I'm sure you're going through the same thing--is trying to figure out what I'm going to wish I'd done a year from now. Can I grow with it, add additional functionality, or do other things with it? I've been doing Low Oxygen brewing and this setup is part of my attempts to dial that in better. One thing about that is getting the O2 out of strike water; I preboil to do that, and beign able to get the water at about the right temp is important. That's why I have a counterflow chiller too, so I can cool that preboiled water down to strike temp.

I took AugieDoggy's advice about RIMS and that's what I've gotten. I bought BrewHardware's RIMS camlock tube minus the heating element because they were out of stock when I bought it. I bought the element for the RIMS on Amazon as Bobby was out of stock. It's got the TC closure, which is what most of the rest of my system is using when not using camlocks.

I'm running the RIMS system using Brewhardware's temp controller. I think I could have bought a more involved panel that would have let me control it from that, but I'd have been pretty high at that point, I think. That BB100 refurbushed panel above would have been $300 more than my DIY, whereas the control I bought from Brewhardware was only $108 or so with the extra switch.

And you know what? If at some point I decide to go whole hog on this, big panel, etc. I think it'll be easier to sell these less expensive units to someone who wants to get into electric brewing, than a bigger panel.

************

Don't know if you've thought about pumps and fittings and such. When I bought my Blichmann Riptide--and I expect I'll be buying a second one here at some point--I had to decide how to do connections. Camlocks seemed the best idea. I like how QuickDisconnects work, but they don't seem to have as much variety of fittings and such, where camlocks do.

That's why I wanted Brewhardware's RIMS tube--it comes set up to use camlocks, one less thing for me to buy. My pump is set up for camlocks, it's my standard for connections.

I have a counterflow chiller that take TriClover fittings, but I bought a couple fittings that allow me to hook up my camlocks to it so I can use the Garden Hose camlock fittings to connect hose to the water side of the chiller.

************

It took me about a week to wire the panel in bits and pieces. An hour here, half hour there, some time off while AugieDoggy answered a question or two, posted a few questions about parts and such. If I were to wire another, it would take maybe 3 hours, maybe a little longer.

I think the parts Auber includes are pretty decent. If you have electronics or wiring experience, I suspect it would be a pretty easy thing. But there were things with which I was unfamiliar, had to figure them out. The terminal blocks on the DIN rail were one thing I'd never seen before, had to figure out how to install them, how they worked for connections, and so on. Same with how the switches connect to the front panel, some have a clip you have to remove, install the switch part from the front, add the guts from the back and use the yellow clip to lock in place.

Most of it I was able to puzzle out. If the things above are familiar to you, you'd have little difficulty wiring the Auber kit. The wiring diagram is very clear.

Anyway, good luck, and let us know what choices you make and why.
Thanks for the detailed reply! I have been lurking and doing research for some time. I am now at a point where I am starting to buy the parts I need. I am going to have to do it in phases, but I appreciate you taking to the time to help educate me.
 
It lives!

panelislive.jpg


I did a boil test and I'm amazed at how fast the temp ramps up. I had 6 gallons of water in the kettle, started at 124 degrees, it ramped up to 162 degrees in five minutes. That's pretty fast.

Only downside of the test came before the test--the $103 30-amp GFCI breaker had the on/off lever snap off on the first try. It's being returned to Amazon, ordered another. Fortunately had a 30-amp breaker I could sub in for it so I could do some testing.
 
I was doing some testing with it this morning. Had 8.25 gallons of water in the kettle, starting at 84 degrees. It took 29 minutes to bring that to a boil.

That's strike water, which I'll pre-boil for LODO purposes, but the beauty of this is I don't have to babysit the kettle while it comes up to temp.

I worked with the counterflow chiller this afternoon, it's the next place I need to figure out. There was almost 1/2 gallon of water bound up in the pump, hoses, and CF chiller. Have to determine how to reduce that.

Making progress always feels good!
 
I was doing some testing with it this morning. Had 8.25 gallons of water in the kettle, starting at 84 degrees. It took 29 minutes to bring that to a boil.

That's strike water, which I'll pre-boil for LODO purposes, but the beauty of this is I don't have to babysit the kettle while it comes up to temp.

I worked with the counterflow chiller this afternoon, it's the next place I need to figure out. There was almost 1/2 gallon of water bound up in the pump, hoses, and CF chiller. Have to determine how to reduce that.
You can do what I and many others do when bringing wort up to a boil and set the controller for 207 degrees and to have the alarm go off . That way you dont have to worry about a boil over. at that point you switch to manual duty cycle mode.
 
I was doing some testing with it this morning. Had 8.25 gallons of water in the kettle, starting at 84 degrees. It took 29 minutes to bring that to a boil.

That's strike water, which I'll pre-boil for LODO purposes, but the beauty of this is I don't have to babysit the kettle while it comes up to temp.

I worked with the counterflow chiller this afternoon, it's the next place I need to figure out. There was almost 1/2 gallon of water bound up in the pump, hoses, and CF chiller. Have to determine how to reduce that.

What chiller are you using? Seems like we’re building similar setups just I’m usin a K-RIMS instead of a traditional one. Just wired up my Auber panel too only change is I had them sub out the pump buttons and the switches for all illuminated toggle switches.

My biggest struggle right now is dead space water in the pumps and chiller, and figuring out how to make the running connection movements without dribbling water/wort everywhere.

Sounds like we have the same set of problems to solve. Maybe the two of us together can do it, with some help.

I'm using the Stout Tanks counterflow chiller. It's all-stainless which is important as I'm doing LODO brewing.

I have a Spike conical fermenter and between pumping strike water to the mash tun, trub losses, and pump losses of wort into the fermenter, I had to increase my batch size by 10 percent to accommodate those losses. It looks like the CF chiller will potentially require another marginal increase in batch size.

I have another thread ongoing asking about how to minimize those losses: it deals with some of the issues related to this.

https://www.homebrewtalk.com/forum/threads/how-do-you-limit-losses-w-counterflow-chiller.654907/
 
What chiller are you using? Seems like we’re building similar setups just I’m usin a K-RIMS instead of a traditional one. Just wired up my Auber panel too only change is I had them sub out the pump buttons and the switches for all illuminated toggle switches.

My biggest struggle right now is dead space water in the pumps and chiller, and figuring out how to make the running connection movements without dribbling water/wort everywhere.
Gravity and three way valves work well.. I designed my plumbing so the rims gets flushed with sparge water and any wort left in the plumbing from the kettle dip tube through my plate chiller can just be drained from the lower entrance of the plate chiller where I normly connect my DC pump directly with a cam lock connection. This along with the use of 2 hp spiders allows me to only waste about a pint of wort. I bought an inline hop filter and it was a disaster with a ton of grub in my bk and a lot of wasted beer so I went back to what works best for me with this setup.
 
I've dithered back and forth about how to control my boil element and eventually closed my eyes and just chose the higher end option, the Auber EBIAB kit: https://www.auberins.com/index.php?main_page=product_info&cPath=64_66&products_id=678 The base price is $370, plus or minus depending on what you want.

I've been amazed at what these panels cost, but this was the most cost-effective option for me especially if I want to try some variations. I'm also doing a RIMS system but it's running separately from the Auber kit. FWIW, I'm trying to do LODO brewing so this is part of a larger set of equipment including a stainless counterflow chiller.

I'm also going to implement BobbyM's steam condenser as part of this, which is one reason why I'm going to electric brewing--so I can brew in the garage in the winter without having to exhaust steam with a fan and provide makeup air and use a propane heater and yada, yada, yada.

***********

Can the average person put one of these together? I'm going to say probably not. I've done some wiring in my past, wired up a PID I use to control temp for an alloy pot, but this one was a big challenge. Thanks to all who helped, especially @augiedoggy.

There are no instructions for putting this thing together other than a wiring diagram. It's actually a pretty clear diagram but how exactly one should terminate wires isn't exactly clear. I ended up using a lot of ring and spade terminals which clean things up a bit, but necessitated one extra run to the home store when I ran out.

Another example is a couple of jumpers that were included. No indication where they go, except that after VERY close inspection of the wiring diagrams, it appeared they went on top of the terminal blocks. Pushed them in and there we were. But it was not obvious to a first-timer.

What also makes it difficult is that there are clearly items that should be installed in a certain order or it becomes crowded and hard to add wires. For example, I didn't screw down the SSR to the heat sink until well along and it was hard to get my hands and such in there. What I should have done was do this first, screw the SSR to the heat sink (using thermal paste), add the wires, feed the wires through the hole in the case, then attach the heat sink.

I've posted a few pics showing the process and the end result. I'll tie off some of the wires with zip ties and perhaps a cable wrap. Once it was done I double checked all the connections and that the wires were the right gauge and going to the right places.

********

The wiring in the garage is not complete; I have an electrician friend who's helping with the final connections to the main panel as well as the sub panel we installed in the garage, but he can't get back to finish until next week. So you see where the panels will plug in, just no receptacles as of yet. :(

Not sure exactly how I'm going to arrange things. I might just start with kettles on the workbench, but eventually I'll bet I'm going to build some sort of brew sculpture once I figure out how all this works together.

I'm crossing my fingers that this all will work but until the electricity is connected, I'm just looking at it. If you see anything that looks amiss, please sing out!
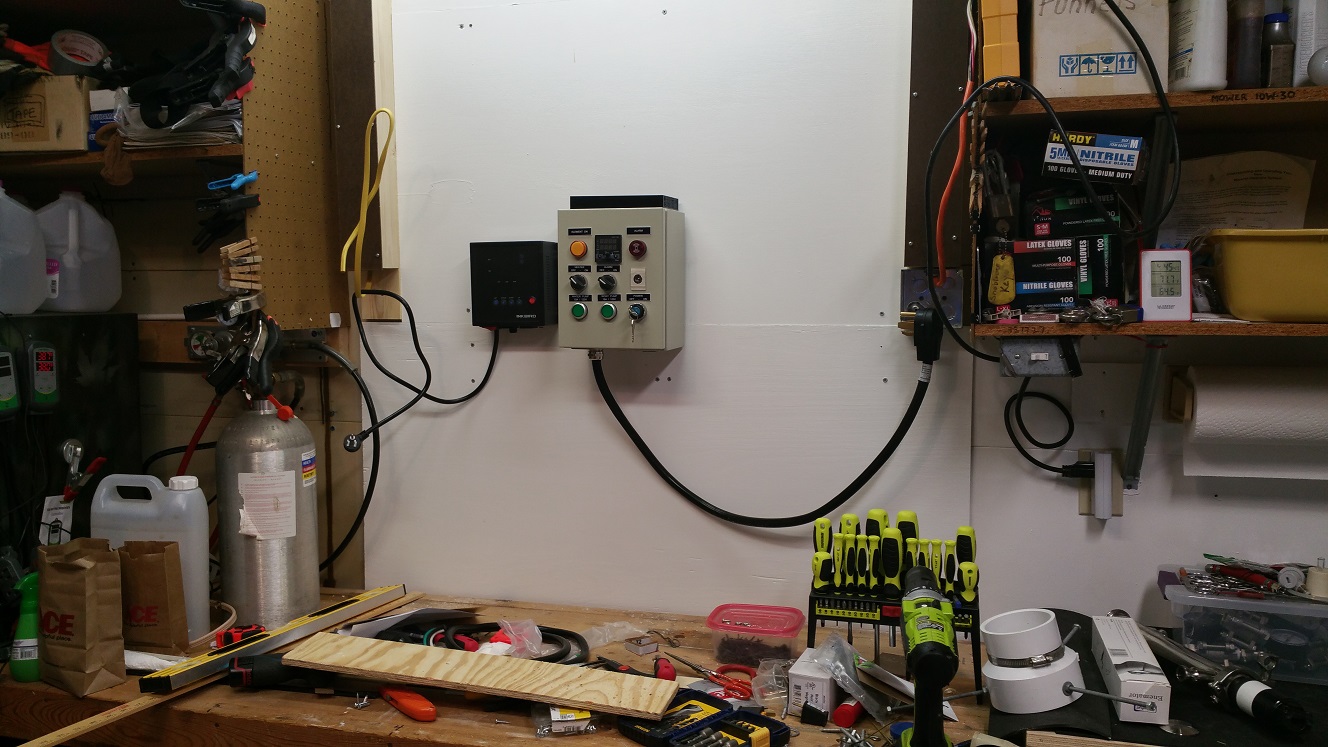

View attachment 584939 View attachment 584936 View attachment 584937 View attachment 584935
I just bought this a couple weeks ago, but I haven't had a chance to get started on putting it together. Did you go off of any detailed instructions in order to get started? I'm OK at wiring, but this will probably be the most complex project that I've done
 
I just bought this a couple weeks ago, but I haven't had a chance to get started on putting it together. Did you go off of any detailed instructions in order to get started? I'm OK at wiring, but this will probably be the most complex project that I've done

The kit includes a wiring diagram/schematic. You need three gauges of wire: 22/24, 14, and 10. If you can get terminals for them, that'll be a good thing. I used terminals for almost all of the wiring to the EzBoil as well as the front switches. If you look closely at the schematic, it shows actual representations/photos of the devices like the terminal block, the EZboil, and so on. The one I figured out from looking at the terminal blocks was the jumpers; they're inserted, then you have to push them down tight to engage. You can see how they go in the pic above--they're the red things in the top of the terminal blocks.

I didn't have any experience with the DIN rail so I had to figure out how to make the terminal blocks work. Also, on the line from the SSR to, i think, the line out to the kettle, I made the line too short, such that it interfered with the EzBoil as it closed. I had to reroute a few of the wires to the EZBoil to accommodate that; make sure you run that wire around the din rail instead of over it.

Also: I made the mistake of wiring the Din rail stuff before installing the heat sink and SSR on the heat sink. If i were to do it again, I'd wire the SSR, add the thermal grease to the underside of the SSR, screw it to the heat sink, then screw the heat sink to the box. Because I did a lot of wiring before that, it was a real challenge to get it on the box. I'd do this before doing anything with the din rail.
thank you for your reply. I live on a mountain, so going back and forth to Home Depot is... lame. I'll be sure to acquire some extra wiring in order to limit those trips
 
thank you for your reply. I live on a mountain, so going back and forth to Home Depot is... lame. I'll be sure to acquire some extra wiring in order to limit those trips

One more thing: you can get the 10 and 14 wire at the home store, but at mine, you had to buy a largish reel of each type and each color you wanted. I found I could get it at my Ace Hardware where I could buy it by the foot.
 
One more thing: you can get the 10 and 14 wire at the home store, but at mine, you had to buy a largish reel of each type and each color you wanted. I found I could get it at my Ace Hardware where I could buy it by the foot.

This is why you just buy a spool of white 14 gauge and a box of those multicolored electrical tapes. For the 10 I just bought a length of 10-4 and stripped part of it down for components.
 
This is why you just buy a spool of white 14 gauge and a box of those multicolored electrical tapes. For the 10 I just bought a length of 10-4 and stripped part of it down for components.
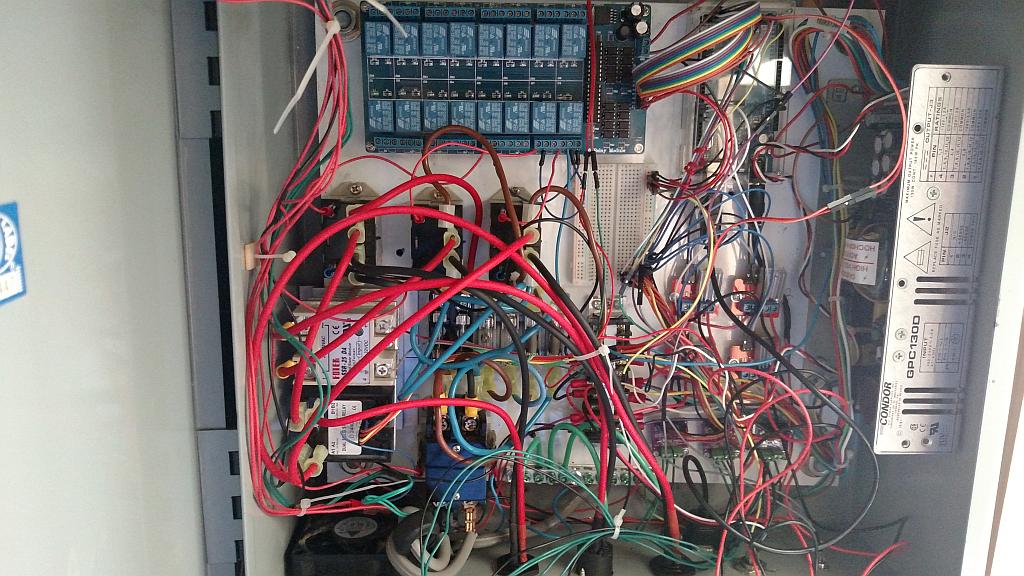
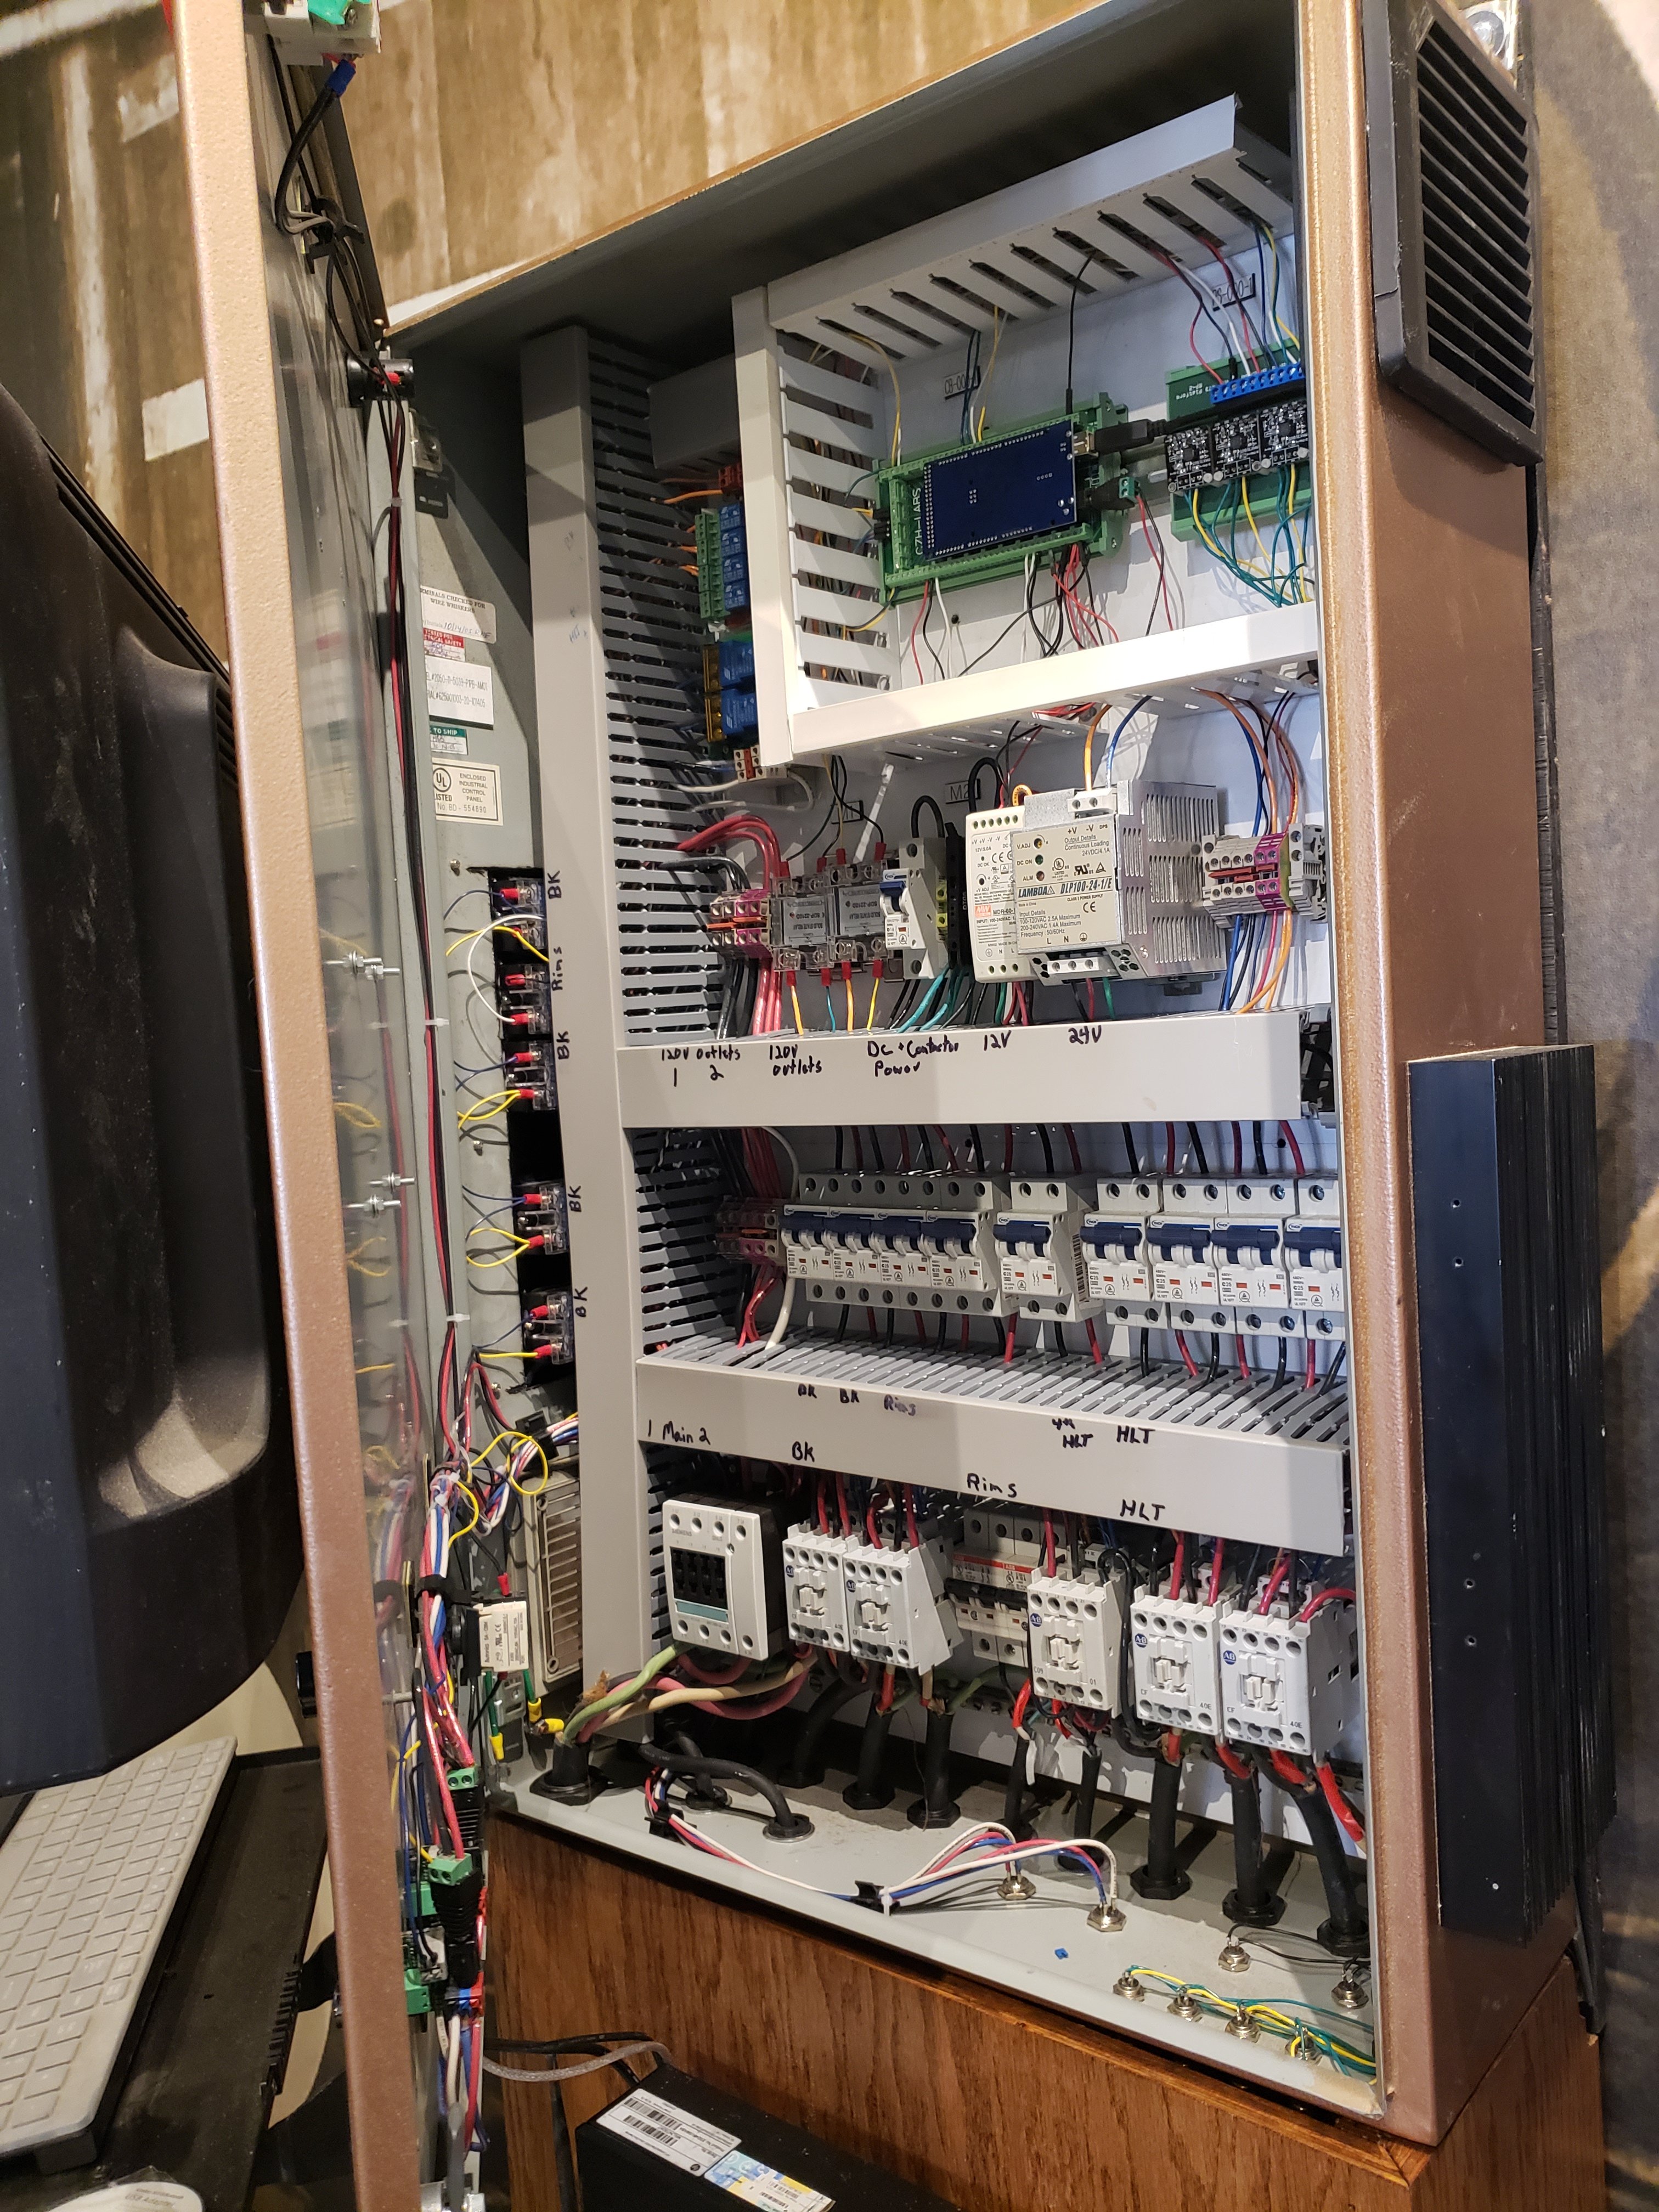
I'm not 100% sure but I dont think the rubber insulation on the 10/4 meets code when used in an open single wire installation... very unlikely you would have any issues but the thhn insulation is the stuff they want you to use. I kinda did the same in my panel below where they wire direct to the breakers.

I have had the frustration of trying to make changes to my panels later when I dont color code them and its very frustration deciphering whats what at times. I know marking the ends will for the most part solve this but its still not the same thing.

I bought kits of pre measured rolled multi colors of wire from ebay and found it was cheaper than home depot. kits like these
https://www.ebay.com/itm/18-GAUGE-W...k:sc:USPSPriorityFlatRateEnvelope!14120!US!-1

https://www.ebay.com/itm/NEW-10-AWG...312826?hash=item3d4b6b107a:g:FE4AAOSwgY9XdB0k

disclaimer I still ended up making multiple trips to the home depot for more wire on my last panel build. luckily they sell by the foot too.

I dont want to hijack here but I want to stress the importance of not taking too many shortcuts or rushing it.


as you can see from the progression of the wiring in my panels I'm learning from my shortcuts lol.. Mongoose is already way ahead of where I started as far as attention to detail.
IMG resized panel.jpg
(im redoing this whole panel btw)take it from me DONT RUSH you end up with a mess like this.
20180822_173734.jpg
3bbl brucontrol panel.
 
Last edited:
I'm not 100% sure but I dont think the rubber insulation on the 10/4 meets code when used in an open single wire installation
Interesting, never heard that. I'm curious though, how does that affect installing the feed? Generally you run the 10/4 to the panel, but once inside you have to cut back the black insulation and run the individual wires to their respective destinations right?
 
Interesting, never heard that. I'm curious though, how does that affect installing the feed? Generally you run the 10/4 to the panel, but once inside you have to cut back the black insulation and run the individual wires to their respective destinations right?
yes but the wires are in another jacket in the 10/4 wire I did it in my panel the same way you describe (as you can see) but I didnt separate those wires and use them elsewhere in the panel like you described above.. I guess it depends on what kind of wire and insulation we are talking about. do you mean solid core romex? or so or sj power cord wire?

I may be wrong here too, but I was told time and time again that for stand alone control panel ac wiring the thhn insulated wires was what I needed. maybe its simply because they dont sell those type of insulated wires separately for this type of work?
 
Back
Top