ANVIL FOUNDRY ALL-GRAIN BREWING SYSTEM

Homebrew Talk - Beer, Wine, Mead, & Cider Brewing Discussion Forum

Help Support Homebrew Talk - Beer, Wine, Mead, & Cider Brewing Discussion Forum:

This site may earn a commission from merchant affiliate links, including eBay, Amazon, and others.
Have those in my cart - one for recirc and other for SpinCycle. I cheaped out and used short hose and barb fitting. Ha -kicking myself right now. Will probably end up with these.

I was almost going to have them quote out this tube with a welded fitting but the angles need to be pretty spot on.

I reached out to Bobby prior to purchasing and he said it "should" fit, so it was a small gamble, but looks like one that will pay off. I worry that the inside tolerance between the tube and cam lock isn't tight enough that I will feel better about the ability to disassemble this to clean. It may be much ado about nothing, but better safe than sorry I figure. I have the nylon ferrule on it right now, and if disassembly does end up being not needed, I'll use the SS one that I had originally ordered with it as a more permanent solution.

I have the same whirlpool arm and just had them weld a cam lock fitting on there. It is really well done.
 
I have used my 6.5 Anvil for 26 batches now (it is the first generation purchased back last July).

I have only had issues with the support ring when I have not paid attention to the feet on the malt basket. One of the firs things I did with the ring was to gently stretch it so that the gap in the ring is about 1.5 to 2 inches wide. It now takes a bit of effort to push the ring in place, but it has not come out without my being stupid about it.

The silicone gasket is definitely a PITA. The silicone ring will actually hold into the rim of the top if you carefully press it in along the edge, for a while at least. Enough heating and cooling cycles and it pops out again. When it does, I just hang it up from the handle and wait until everything is cleaned up and cool before pressing it back in place. It is then good for another couple of brews before falling out again.

I have had no issues with the controller. I have found that I can ramp the temperature up to get to strike temp faster and then drop the power to around 55% to 60% at 240V and it holds temperature really well. I go about 10% higher at 120V.

It is really a BIAB system as are most of the all-in-ones. In fact, I have stopped sparging on most recipes and just go full volume mash. It saves time, is more predictable and reproducible this way. Now I sparge only for high gravity beers. I went to using my BIAB bag to line the mash pipe after a few brews mostly for the ability to crush a bit finer to get better efficiency and for a faster clean-up of the malt basket. THAT was a PITA, getting those grain particles out of the crevices where the bottom piece fit the walls of the mash basket. The bag allowed me to push the grind quality a bit finer without worrying about overloading the wort with grain debris.

I measured the dead space several times before I ran the system for the first time. Setting the unit flat, I ended up with 1.6 liters (1.7 qts) of wort left in the unit with the drainage arm aimed straight to the bottom of the kettle. Now, I place a block of wood under the unit to tip it forward when I am draining the wort and I end up with around 700 ml (0.75 qts) left in the kettle.

I have a SS chiller which is about two and a half times the length of the one supplied with the Anvil. The difference in chilling between the two of them is around 5 minutes to go from near boiling down to around 60F, less than 15 minutes with my chiller vs just under 20 minutes with the Anvil chiller. I guess a lot is based upon your tap water temperature and I have a deep well with the temperature barely creeping into the mid-50's in the heat of summer.

From my stove top BIAB process, I am finding the process is about the same with my total time from dough in to clean up relatively the same as before. It really comes down to being able to have the same system in the winter when I brew indoors to outdoors in the spring and early fall. It was a PITA to drag out the propane and burner, set everything up and then have to play around with the flame and boil off rate to get the outdoor brews to mimic the indoor brews. The Anvil is pretty consistent for me both indoors and out.

My process did change for hop additions. I used to just throw the hops into the kettle with BIAB. With the Anvil, I could get away with that for lightly hopped recipes but not with anything requiring a good amount of hops. I went to a hop sack and then purchased a hop basket. That caused me to make a slight adjustment up in my hops to replicate the bitterness I was getting with 'free range hopping'.

Maybe it is because I have a strong process background, but it took only a little work and thinking (that part hurt) to figure out how to get the system to reproduce close to what I was getting previously at about the same efficiencies.
Thanks so much for addressing concerns I have as I want to use BIAB as well. One question. Do you find it easy to come out with a full 3 G batch or do you fall short? I’d prefer 4 G but I’m trying to avoid the larger 10.5 G unit.
 
Oh..also, for anybody else that might interested. Happened across this little gem, haven't tested it yet but figure it will free up a little bit of time. This was the only bit of my current setup that didn't have a cam lock. Not having to switch tubing will be nice.

https://www.brewhardware.com/product_p/camcompression12.htm
View attachment 698448

I did the same thing. Ordered a Spincycle Overboard whirlpool arm with a welded cam lock fitting, and ordered that compression cam lock fitting for my recirculation tube. Already had a female cam lock fitting for the silicone tubing from the pump. Haven't tested it yet, but also looking forward to it!
 
Thanks so much for addressing concerns I have as I want to use BIAB as well. One question. Do you find it easy to come out with a full 3 G batch or do you fall short? I’d prefer 4 G but I’m trying to avoid the larger 10.5 G unit.

I end the boil with 11 liters (2.9) gallons which fits very well. The largest I have make was a 15.9 liter batch (4.2 gal) which did involve doing a batch sparge with one of my old kettles and I was about a couple of liters below the top of the Anvil. I used Fercap S just before the boil started to prevent a boil over and had no issues. I have projected that if I was brewing at 120v, I would have ended up with around 18 liters (4.75 gallons) at the end of the boil.

It would not be something that I would want to do all the time, but I usually make a double batch of Festbier (OG: 1.056) every winter and this worked out fairly well.
 
So for those that use a 400 micron bag, can I just set the mill as fine as I can get and do a double crush like I was with my previous BIAB setup?
 
So for those that use a 400 micron bag, can I just set the mill as fine as I can get and do a double crush like I was with my previous BIAB setup?

I tried a mill gap of 0.027" and after the boil there was a lot of debris stuck to the heat plate. Even though it cleaned off easily on my last brew I went to 0.037" and had great efficiency and little debris on the heat plate.
 
I tried a mill gap of 0.027" and after the boil there was a lot of debris stuck to the heat plate. Even though it cleaned off easily on my last brew I went to 0.037" and had great efficiency and little debris on the heat plate.
Sounds good. I'll give 0.037" a shot once my bag comes in. Did you double crush at that gap or just run it through once?
 
Great 4th brew. I hit 83.5% BHE and after water adjustments mash pH of 5.2! Think this even tops anything I previously brewed on my tun/kettle system.

One thing I didn't like was while cleaning a drip of water came off my hand and hit the corner of the display and it sucked it in like a sponge. So water was trapped between the glass display and plastic cover.

Was wondering do you see any issues if I silicone sealed around the display and black plastic controller cover that goes against the kettle?


Thanks

Wow this is a great success for you! Thats pretty great. If that was your Brewhouse efficiency, what was your mash/lauter efficiency? Also curious on what the grain bill was for that brew. I can hit 78% mash efficiency with simpler grain bills (not much adjuncts), but normally hitting 75-76% mash/lauter efficiency with grain bills higher in adjuncts (oats/wheat/etc) and OGs at 1.069-1.072ish.
 
Wow this is a great success for you! Thats pretty great. If that was your Brewhouse efficiency, what was your mash/lauter efficiency? Also curious on what the grain bill was for that brew. I can hit 78% mash efficiency with simpler grain bills (not much adjuncts), but normally hitting 75-76% mash/lauter efficiency with grain bills higher in adjuncts (oats/wheat/etc) and OGs at 1.069-1.072ish.


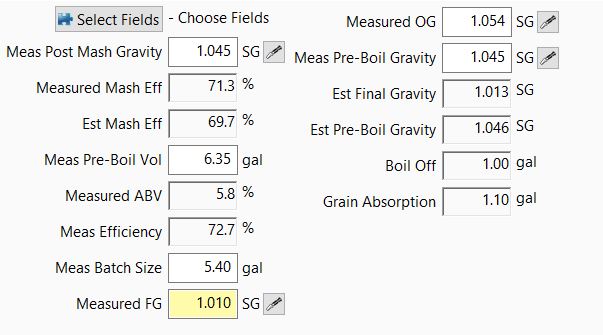
Sorry - After seeing your post I came down to earth - I must have read my hydrometer incorrectly for OG. I usually use a refractometer but recently purchased a set of brewers hydrometers to get more accurate results - ha. One is calibrated at 155F and the other at 60F. I'm guessing it was 1.052 OG @ 75F corrected to 1.054 @ 60F (puts in in-line with projected recipe numbers). Still good numbers for me:

BS eff.JPG


This was a NB kit - 11# grain. Mashed with 5-3/4 gal and sparged with 1.5 gal.
 
The OG of my current batch of IPA was low at 1.054 versus target of 1.064. I had added too much water. I weighed the mashed grains and found that only 0.2 qts/LB of water was absorbed. I had used the Brewfather ratio of 0.383 qts/lb. This issue accounted for most of the excess water. Next batch, I will hold back water and check the absorption rate again.

What absorbtion rates are you experiencing?
What are typical causes of this problem?

I used the 10.5 Anvil Foundry. I mashed for 60 minutes with circulation.

I appreciate any help. This is my third batch with the Anvil system.

I think your 0.383 qt/# is fine I use 0.4 in BeerSmith. Many years ago I tried weighing mashed grains and found a big difference like you in what I was thought measured grain absorption, but, the light bulb lit up and I thought - ahh the water is extracting solids from the grain and that's why gravity of the wort is higher than water alone!

For boil-off what power are you using 120 or 240V? Anvil says 1/2 gal/hr for 120V and 1 gal/hr for 240V. I find boil-off seems low on this system but next brew I'm going to ditch the hop basket because I think it's affecting boil-off.

I'm still adjusting my BeerSmith profiles even after my 4th brew. Look at the places in Brewfather where water is lost (or supposed to be lost). What profiles are you using for equipment in Brewfather? I know some are posted on the Foundry FB group.

Maybe post your recipe and I can plug it into BeerSmith with my profiles for comparison?

Mike
 
Mike

Thanks for the reply. I agree about the solids extraction. I should have thought about it.

I modified the Brewfather profile for the 10.5 Foundry. Here are the key parameters in my profile:
Running at 120 volts
Boil off 0.5 gallons
Trub/Chiller Loss 0.3 gallons. I confirmed this is accurate for the problem batch
Grain absorption 0.383 qts/lb
Mash/Sparge Water/Grain Ratio 1.5qts/lb

Recipe
11.0 lbs Pale Ale Malt 3.1L
1.5 lbs Munich Malt 7.6L
1.0 lbs Caramel Malt 59.6L

Yeast 1 pck Fermentis US-05 Safale American

4 oz Hops in the boil
2 oz Hops in fermenter

BF said to heat 6.23 gallons for the mass
and 1.34 gallons for the sparge

Thanks for your help. The Anvil instructions said to add a total of 7.25 gallons

I am still learning.

Rich
For a 5 gallon batch into the fermenter BeerSmith had around 6.8 strike water and .7 gallon sparge. So total water almost identical to yours. Although, I did not change the boil-off for 120v (I have 240V) so my total water volume would have been about 1/2 gallon less than yours.
 
BF said to heat 6.23 gallons for the mass
and 1.34 gallons for the sparge

6.23 gallons to mash 13.5lbs of grain is well over 1.5 qts per pound. It's OK to do it that way, but FYI.

Typically you'd be looking more like 4.5 gallons for mashing, and the rest of course sparge meaning something like 3 gallons or so (rough idea for example, not exact for you). That will be closer to 1.25 - 1.5 qts / lb and the additional sparge water should get you higher efficiency as well.

Again what you show is fine, but just FYi that the qts / lb thing is not what you listed. Plan for efficiencies accordingly.

**********

Edit: Forgot about the gallon or so dead space as mentioned in the post below after I made this one. Still, I'd consider ~ 5.5 gallons mash, the rest to sparge. for that small efficiency bump. Other plan would be to skip sparge and just throw it all in at once. But, as listed, should work as well.
 
Last edited:
Mike

Thanks for the reply. I agree about the solids extraction. I should have thought about it.

I modified the Brewfather profile for the 10.5 Foundry. Here are the key parameters in my profile:
Running at 120 volts
Boil off 0.5 gallons
Trub/Chiller Loss 0.3 gallons. I confirmed this is accurate for the problem batch
Grain absorption 0.383 qts/lb
Mash/Sparge Water/Grain Ratio 1.5qts/lb

Recipe
11.0 lbs Pale Ale Malt 3.1L
1.5 lbs Munich Malt 7.6L
1.0 lbs Caramel Malt 59.6L

Yeast 1 pck Fermentis US-05 Safale American

4 oz Hops in the boil
2 oz Hops in fermenter

BF said to heat 6.23 gallons for the mass
and 1.34 gallons for the sparge

Thanks for your help. The Anvil instructions said to add a total of 7.25 gallons

I am still learning.

Rich


Was looking at my equipment profile. There is a field for recoverable mash dead space. This is set to 1.17 gallons for the Foundry.
 
Was looking at my equipment profile. There is a field for recoverable mash dead space. This is set to 1.17 gallons for the Foundry.
This is interesting because my recoverable mash dead space and dead space losses were set to zero by default and Ive never changed them. I even checked with the 6.5g anvil equipment profile (which I've never used) and they are zero as well. FWIW, Ive done 26 batches now and still doing some tweaks to the profile.
 
The OG of my current batch of IPA was low at 1.054 versus target of 1.064. I had added too much water. I weighed the mashed grains and found that only 0.2 qts/LB of water was absorbed. I had used the Brewfather ratio of 0.383 qts/lb. This issue accounted for most of the excess water. Next batch, I will hold back water and check the absorption rate again.

What absorbtion rates are you experiencing?
What are typical causes of this problem?

I used the 10.5 Anvil Foundry. I mashed for 60 minutes with circulation.

I appreciate any help. This is my third batch with the Anvil system.
So just to be clear, if you think you had too much water because the grain absorption rate was too set higher than actual, did you have/measure your pre-boil volume to verify you had more wort than expected? If so, your pre-boil gravity would likely also been lower I assume. Ive had this happen to me a few times when playing with the grain absorption numbers myself. In those instances, I boiled a little longer to try to get to the projected post-boil volumes I wanted. For me, hitting my volumes pre-boil and post-boil have been key to sorting out efficiency issues overall and trouble shooting other parts of the hot side process.
 
For boil-off what power are you using 120 or 240V? Anvil says 1/2 gal/hr for 120V and 1 gal/hr for 240V. I find boil-off seems low on this system but next brew I'm going to ditch the hop basket because I think it's affecting boil-off.
I agree that boil off has some issues. When I started brewing on this, I calibrated a measurement stick to better measure my volumes. My stick measures in 0.25g increments all the way up to the top. I then proceeded to calculate boil off rate twice with water only and it measured to one gallon each time. However, this was at 100% power and I am routinely boiling at 87% power now (240v), so this may be the issue for me with having too much wort in the end (into the fermenter and losses due to trub). To compensate Ive moved to 75 minute boils and my end volumes have been more stable. I don't use a hop basket though because my hops tell me they like to be free in the kettle lol.
 
Thanks for all the help. Here are replies to the comments:

Mash to Grain at 1.5
As mentioned, the volumes are correct if the dead space is included. However, I agree with Tracer that the sparge volume should be larger and the strike volume lower, as long as the grains are swimming. I wonder why BF, GF and the Anvil instructions use such low sparge volumes?

Pre-Boil Volume
The volume appeared to be over 0.25 gallons above the projected. It is difficult for me to read the scale. I will follow Noob’s advice and build a measuring stick. I did not measure the final volume, unfortunately.

Next batch, I will do a better job measuring, increase the sparge volume and hold back some water just in case.

One new question: is anyone typically mashing longer than 60 minutes?

I use the 1.17 gallon recoverable dead space but this conversation brings up the thought that this may be incorrect. If you recirculate with the Foundry is this volume really dead? With a cooler tun there is dead space that is static until you tip the cooler to recover it but with the foundry you are always moving (recirculating) this liquid through the mash.

I've always had the question of volumes of non-room temperature liquid. As I recall the wort can expand about 6% in volume compared to room temperature so you probably need to consider liquid expansion (reduction) at mash temperature when calculating efficiency. In your case pre-boil volume needs to be reduced by about 4% if it's around 15F - this is probably your 0.25 gallon false overage.
I agree with the thermal expansion aspect of this increasing volumes. I have been taking this into account myself. I add the total volume (as indicated by my measuring stick) of tap water, heat all water together (mash and sparge) to strike temps. There is more water after heating. I then remove the amount I need for sparge which is typically 1-1.5g depending on grain bill size (holding off to side in a small pot until needed). I then remove more water until i am at my mash-in volume as measured with my measuring stick. This is usually about a cup I think. So I start with the volumes beer smith tells me at mash temp, not room temp. I also reduced my calling shrinkage to 2% instead of 4% which has also helped in minimizing excess wort at the end of the brewday.
 
Thanks for all the help. Here are replies to the comments:

Mash to Grain at 1.5
As mentioned, the volumes are correct if the dead space is included. However, I agree with Tracer that the sparge volume should be larger and the strike volume lower, as long as the grains are swimming. I wonder why BF, GF and the Anvil instructions use such low sparge volumes?

Pre-Boil Volume
The volume appeared to be over 0.25 gallons above the projected. It is difficult for me to read the scale. I will follow Noob’s advice and build a measuring stick. I did not measure the final volume, unfortunately.

Next batch, I will do a better job measuring, increase the sparge volume and hold back some water just in case.

One new question: is anyone typically mashing longer than 60 minutes?

For context, I am running the 10.5g anvil on 240V and use beersmith 3.

First, I honestly don't care too much myself about the water/grist ratio and I actually adjust it on every recipe to get as much water in the mash as I can while still having about 1-1.5g to sparge with. I am normally sparging with 1 gallon unless I have a large grain bill >16lbs. I find that my mash efficiencies are best this way. for example: I brewed a blueberry wheat that had 13.5lbs of grain (which included rice hulls) with 7.75 gallons of mash water which is about 2.29 Qts/lb with just over 1g sparge and I got 74.5% mash/lauter efficiency. I also brewed a oat cream IPA with 18.5lbs of grains (including rice hulls) with 7.86g of water which pretty much filled the foundry to the top even though beer smith said my mash volume space needed was 9.31g (I don't go over this limit). So this equated to 1.7qts/lb and I sparged with 1.5g water netting 75.8% mash/lauter efficiency. So adjusting the water/grist ratio in beer smith allows me to have consistent mash water volumes and the sparge varies somewhat.

The other reason why I don't put too much faith in the water / grist ratio with the anvil foundry is that not all the water/wort is actually in the malt-pipe with the grains at one given time. So my water/grist ratios mentioned above which relate ALL water to grist are actually off from what is actually in the malt-pipe. So with a 1.7 water to grist ratio, the actual mash is thicker in the malt-pipe than what the ratio would suggest. So I like to take 7.75ish gallons into each mash to make the mashing as loose as possible during the mash.

I think that sparging with more water would help with your lauter efficiencies but if your mash is too thick, this may impede your conversion efficiency perhaps or provide an opportunity for a stuck sparge as well. So there would be a trade off on this when both conversion and lauter efficiency affect the overall mash efficiency.

To answer your other question: I am doing 90 minute mashes with all of these brews.

I do think having my measuring stick has helped tremendously with dialing in the system.

Cheers
 
@Noob_Brewer Wish I had your mash/lauter efficiencies - I'll get there. I'm at right around 70%. I started to adjust my water pH and messed a little with mill gap. For my cooler tun system I always had my mill gap at 0.038" and had mid 70%'s MLE. I used this gap on my first two AF brews and my mash eff. was just under 70%. On my third brew I reduced the gap to 0.031" and my efficiency dropped but due to other issues I think not the mill gap (I tried something new and didn't hold mash temperature well). But, when it came to cleanup time I noticed a significant increase in debris accumulated on top of the heat plate even though I use a bag in the pipe. Do you see this?

I'm almost thinking on my next brew to reduce the gap to your 0.028" and put the milled grain in the bag and move it around a bit to remove the flour size particles - like a strainer bag. Any thoughts?
Ok, so yes, after each brew I do get some flour buildup onto the bottom right in the middle of the raised ring. I always do a hot (150) CIP with PBW with the pump after rinsing it all out with the hose and it always cleans up perfectly. I myself have locked my mill now and settled in at 0.028" on my cereal killer. When I was starting out with this system I tested gaps between 0.026 and 0.040 and found 0.026 was too small and was getting some stuck mashes. So 0.028 I feel gives me the best crush on any type of grain (Im looking at you malted oats!) and yields the best efficiency. I too, use a custom wilser bag so that helps but still get some debris on the bottom of the kettle. I also recirculate but pretty slow to help with temp stabilization. and I stir once every 15minutes, especially on big grain bills, to ensure everything is as loose as it can be and the grain bed isn't compacting. And as mentioned above, I sparge too on most everything.

I did try to do a no sparge on my last single hopped pale ale and I didn't use the malt-pipe but had the brewzilla false bottom in the bottom. My mash/lauter efficiency was 76.7% but that was because I ended up with about a quart more wort pre-boil and had a point higher on the gravity than expected. Once correcting for the volume overshoot, my mash/lauter was 74.3%. SO Im happy with that outcome to get that efficiency without sparging and just letting the bag hang. But that setup is limited to grain bill size for me if not sparging.

So like, everyone, still tinkering to see what methods suit me the best but overall happy with MLE in the mid 74-77 range
 
because I’m not brewing this weekend but still want to tinker around with brew stuff, I am going to do a water test today on my boil off rate (240v). Plan is to mimic what I do on brew days now, so I can dial in my boil rate better (hopefully). I’ve done two tests with water but %power was always 100% on testing and I’ve since settled on boiling at 87% power during brew days. Can’t think this will make a HUGE difference but nonetheless want to check it.
 
OK, so reporting back on these water tests today. I boiled 7.5g of water at 87% power for one hour and Im on 240V, 10.5g system. I actually did it twice! lol. First time I measured volume with my stick at 206 degrees (as close to boiling as I could get without the surface of the water too turbulent) prior to the boil and I measured it at ~210 degrees (thermapen measurement) immediately after the boil. I did this to try to eliminate the effect of thermal expansion/contraction. The first time, I measured 0.81 gallons lost to the boil. The second time, I put my immersion chiller (coming straight out of a bucket of star san mixture) into the kettle at 10minutes left in the boil and ramped power to 100% see if it had any measurable effect on boil off because putting the chiller into the kettle at this time stops the boil momentarily. At one hour, I removed the immersion chiller and shut off the power to measure volume again at about 210 degrees. This second test I got 0.80g boil off for the one hour. So for all purposes, I am confident that on 240v systems, the boil off when running at 87% power mostly is about 0.8gallons. I suspected this lower amount several brews ago which is why I compensated by boiling for 75 minutes after adjusting the boil off volume in beer smith to 0.75. So I will now set my boil off rate to 0.80g per hour and go back to my normal 60 minute boils. Hope this helps anyone wanting to setup equipment profiles in brewing software.

EDIT: Like others have experienced, I will add that during the first test, when the boil started the anvil reported 206 degrees while my thermapen measured 212 exactly from the top of the water. The second test, the anvil reported 208 degrees while my thermapen measured 212.3 degrees from the top. Bottom line, if its boiling, its 212 lol.

Cheers!
 
EDIT: Like others have experienced, I will add that during the first test, when the boil started the anvil reported 206 degrees while my thermapen measured 212 exactly from the top of the water. The second test, the anvil reported 208 degrees while my thermapen measured 212.3 degrees from the top. Bottom line, if its boiling, its 212 lol.

This is highly elevation dependent. At my homes ~1,200 ft. elevation the nominal/average boiling point of water is 209.9 degrees. One mile above sea level water boils at a nominal 202.5 degrees.
 
This is highly elevation dependent. At my homes ~1,200 ft. elevation the nominal/average boiling point of water is 209.9 degrees. One mile above sea level water boils at a nominal 202.5 degrees.
LOL after I posted that I knew some "elevation" police would call me out on that comment :) For me, water boils at 212 according to my Thermapen
 
OK, so reporting back on these water tests today. I boiled 7.5g of water at 87% power for one hour and Im on 240V, 10.5g system. I actually did it twice! lol. First time I measured volume with my stick at 206 degrees (as close to boiling as I could get without the surface of the water too turbulent) prior to the boil and I measured it at ~210 degrees (thermapen measurement) immediately after the boil. I did this to try to eliminate the effect of thermal expansion/contraction. The first time, I measured 0.81 gallons lost to the boil. The second time, I put my immersion chiller (coming straight out of a bucket of star san mixture) into the kettle at 10minutes left in the boil and ramped power to 100% see if it had any measurable effect on boil off because putting the chiller into the kettle at this time stops the boil momentarily. At one hour, I removed the immersion chiller and shut off the power to measure volume again at about 210 degrees. This second test I got 0.80g boil off for the one hour. So for all purposes, I am confident that on 240v systems, the boil off when running at 87% power mostly is about 0.8gallons. I suspected this lower amount several brews ago which is why I compensated by boiling for 75 minutes after adjusting the boil off volume in beer smith to 0.75. So I will now set my boil off rate to 0.80g per hour and go back to my normal 60 minute boils. Hope this helps anyone wanting to setup equipment profiles in brewing software.

EDIT: Like others have experienced, I will add that during the first test, when the boil started the anvil reported 206 degrees while my thermapen measured 212 exactly from the top of the water. The second test, the anvil reported 208 degrees while my thermapen measured 212.3 degrees from the top. Bottom line, if its boiling, its 212 lol.

Cheers!

Thanks for the test - not a surprise.

I'm in the Chicago area - pretty much sea level. My AF thinks it’s boiling around 206F but not much activity. When I get a nice rolling boil it reads 212F. The time between these readings is several minutes
 
Thanks for the test - not a surprise.

I'm in the Chicago area - pretty much sea level. My AF thinks it’s boiling around 206F but not much activity. When I get a nice rolling boil it reads 212F. The time between these readings is several minutes

Chicago is at about 600 feet of elevation above sea level.
 
Already a ton of great discussion in this thread so there's not much I can add. Just wanted to share a difference of BHE between two batches (no sparge and no bag, just the mash pipe for both) brewed a week apart. I brewed a Märzen last weekend, OG 1.058 and only single crushed my grains at the LHBS. I planned for 80% BHE and tested my pre-boil gravity after an iodine test showed complete conversion. I was under by 6 points (actual BHE 74%) and had to correct with DME. This morning I brewed a blonde ale, OG 1.042 and this time I double crushed my grains at the LHBS. I planned for 74% BHE based on last week and after the iodine test I had overshot my pre-boil gravity by 10 points! I guess my lesson learned for <1.060 gravity beers is to correct my BHE based on how I crush the grains at that one specific LHBS.
 
This is not necessarily an Anvil specific question. I am planning on adding a ball valve on the outlet side of the pump for better flow control than the included clamping device. I have both a brass valve and stainless. Normally, I wouldn’t even think twice and use the stainless but it is a good bit heavier than the brass valve and it will just be hanging with the tubing.

Is there any reason not to use brass for this application?
whats your plan on where you are going to put this @CaddyWampus ? I have been thinking about doing something similar because I would like better control of the flow as the included device can sometimes be a little finicky for me to nail down the flow rate I want as the tube isn't clamped uniformly. Were you just going to have barbs on both sides of the value so you can have tubing on both ends?
 
whats your plan on where you are going to put this @CaddyWampus ? I have been thinking about doing something similar because I would like better control of the flow as the included device can sometimes be a little finicky for me to nail down the flow rate I want as the tube isn't clamped uniformly. Were you just going to have barbs on both sides of the value so you can have tubing on both ends?

I do plan to just use barbs on both sides. As to where, I will be working on that tomorrow. The stainless valve I have is heavy so I will need to be mindful of it hanging and the potential of it pulling the tubing off the metal piece that goes in the lid.
 
Back
Top