• Please visit and share your knowledge at our sister communities:
  • If you have not, please join our official Homebrewing Facebook Group!

    Homebrewing Facebook Group

Another E-HERMS Build...

Homebrew Talk

Help Support Homebrew Talk:

This site may earn a commission from merchant affiliate links, including eBay, Amazon, and others.

joenads

Well-Known Member
Joined
Aug 9, 2011
Messages
114
Reaction score
1
Location
summerville
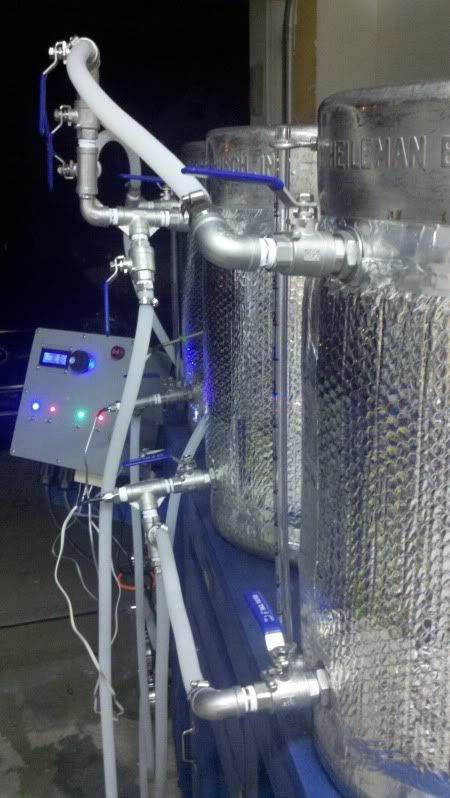
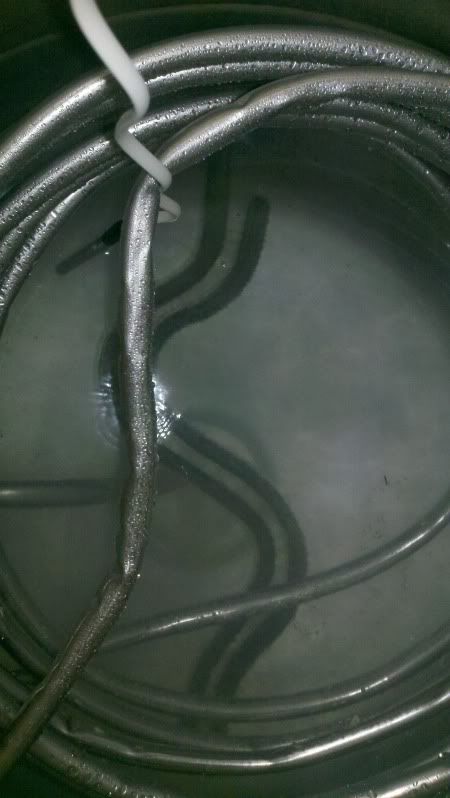
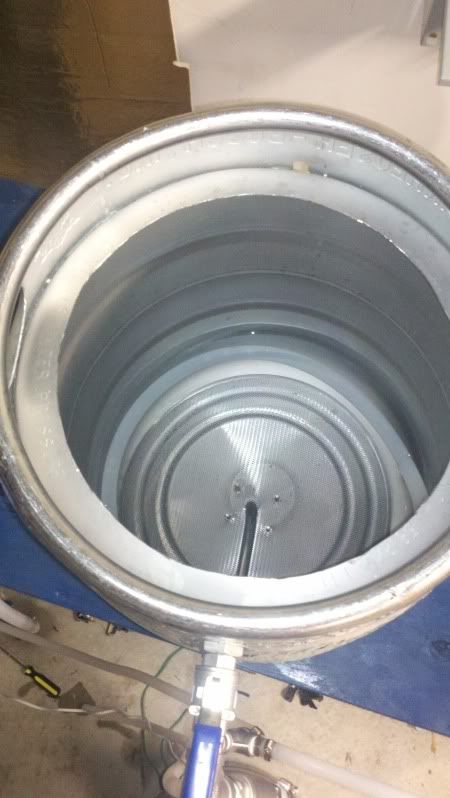
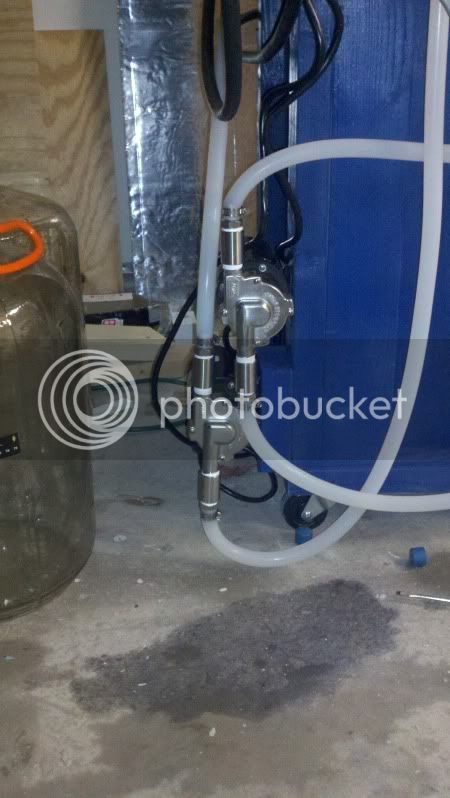
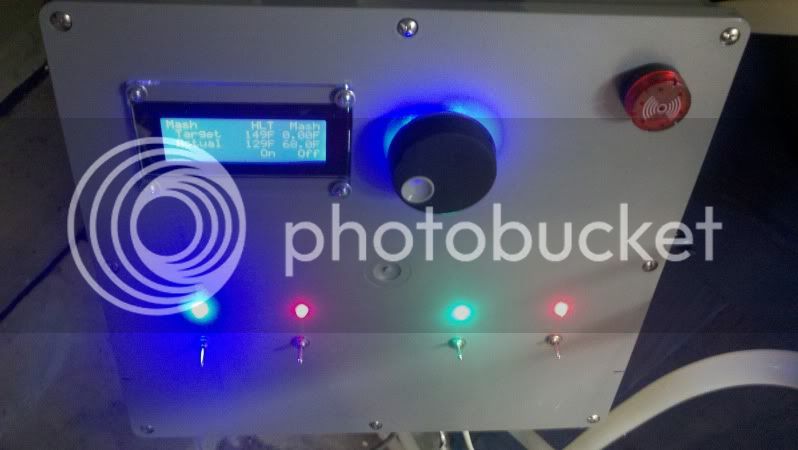
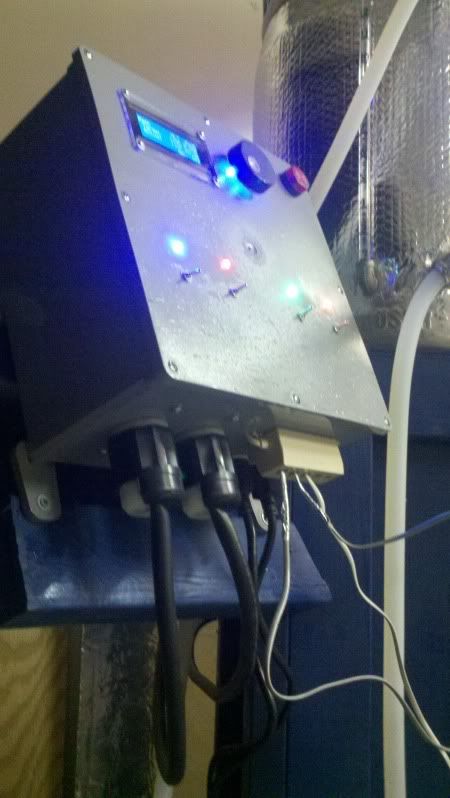
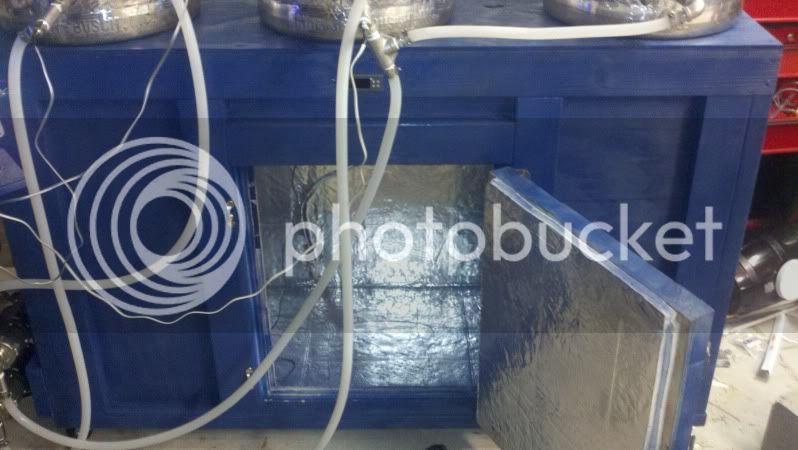
New guy here, been following this forum for about a month now. I got the itch to start making beer after being bored with a Mr. Beer kit. Please don't criticize me for jumping in head first with no brewing experience. I figure it would be easiest for me to learn hands on with my own system. I've definitely read a lot, but I know I've got way more to learn. Anyways, I am basing my E-HERMS from Kal's wonderful step by step electric brewery, and have also studied through black heart's automated HERMS build. I plan to go the keggle route vice the kettles though, and I want to have it piped with no hose changes. I plan to have is "semi" automated using a brewtroller. I am going to keep it simple for now though, but have the option for expanding. To keep the cost down, I am going to manually open/close my ball valves. I am OK with that, as I see it like a puzzle every time I would brew. I have started order and receiving parts, but have yet to cut the kegs up until I've gotten everything. I have a bunch of ball valves from duda diesel as well as elbows, got the nipples, washers, and silicon o rings from mcmaster, found some compression fittings from ebay, and got the heating elements from amazon. I still need to get the pumps (probably chugger pumps), silicon tubing, and brewtroller parts. Haven't decided on a false bottom/manifold/braid yet, but looking to be directed towards any.

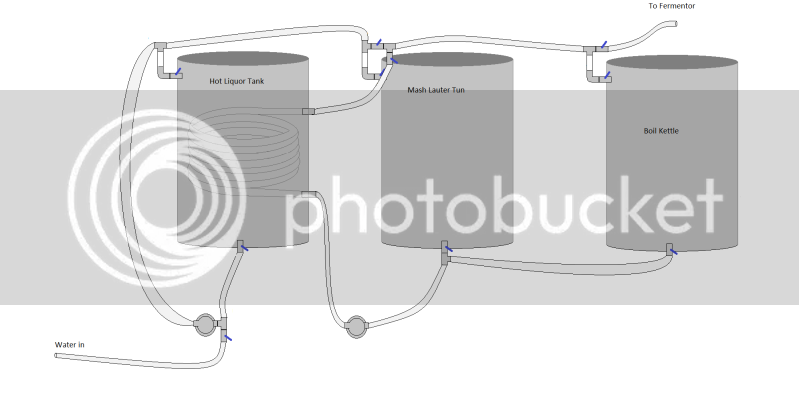
I've attached my crappy ms paint drawing of how I planned to plumb it up with 10 ball valves and silicone tubing. I'm sure there are faults, but I'm ready to try it out. Hopefully I can remember/find time to keep this post updated with images of my build. Thanks.
brewplumbdraft.png
 
No worries jumping in head first. This place is great for any kind of help. Good luck on the build.
 
Just a quick update, I've got all the piece parts for my keggles (hoping the hole saws come today from ebay), so I'm looking to get those built this weekend. I bought my kegs from a guy who I met at the local micro brew store (the store also has a license to serve!) and found out he lives down the street from me. I got 4 of them, planned on making one a fermenter. Been pondering what to do for a stand and was wanting some input good and bad on making my stand double as a fermentation chamber. I've been searching the board and seen a lot of good builds, and found a 1.7 cu mini fridge on craigslist for $30, although no response from it yet.
 
Attached a couple of pictures. I wasn't able to get the keggles built yet, I actually built some shelves in the garage to make room for the system. I got a mini fridge as well. Took it apart this evening so I can get into my fermentation chamber/brew stand.

2011-09-14_21-01-23_671.jpg


2011-09-13_19-35-02_141.jpg


2011-09-13_19-35-12_31.jpg
 
Good luck with the build. I just finished my e-brewery build and absolutely love it. On a side note, after looking at your diagram I think you may need to add one more valve. The top left of the HLT has a 90* into a T fitting, I think you need a valve on one side of the T, if not than the flow of liquid could go in any direction. Maybe I'm missing something? You have a valve on the BK and MLT on the same T.
 
ive found that mini-fridges dont have enough horsepower to cool anything more than a sandwich or a few beer cans. i had intended to use one for a ferment chamber and kegerator, but abandoned that in preference of a cheap air conditioner. it took my mini fridge running 24/7 for a full week to do what the air conditioner will in 2 hours. they are just not meant to sink large amounts of heat.

if waiting a week or two to chill a few kegs to serving temperature (... and then waiting a few weeks for them to carbonate after they get there) is no big deal for you, then great. but im not nearly that patient.
 
Jumping in head first saves you a ton of expense and time. My first batch was all grain (kit from B3) and it went into kegs. (Bottling to me seems entirely too much effort, if my friends want to take beer home with them they can bring growlers.) After that it was a matter of imagination and trying different malts.
If you've done your homework and decided on HERMS then by all means build it. You'll be much happier in the long run with your own design. (There are a million ways to skin this cat and everyone is convinced their system is the best.) What you have here will be quite functional.
Over time you'll tweak it but that's going to happen with any setup. The more you tweak, the more personalized YOUR BREWERY becomes.
Best of luck and I'm sure you'll be pleased with your rig and the beer it produces!
 
ive found that mini-fridges dont have enough horsepower to cool anything more than a sandwich or a few beer cans. i had intended to use one for a ferment chamber and kegerator, but abandoned that in preference of a cheap air conditioner. it took my mini fridge running 24/7 for a full week to do what the air conditioner will in 2 hours. they are just not meant to sink large amounts of heat.

if waiting a week or two to chill a few kegs to serving temperature (... and then waiting a few weeks for them to carbonate after they get there) is no big deal for you, then great. but im not nearly that patient.
This sounds a little dissapointing...especially after how much of a PITA is was tearing that fridge apart. Question though, I'm not looking for serving temps, I figured it should be enough to get a space large enough for 2 kegs and a carboy cool enough for Ales to ferment no? Isn't the upper 60's cool enough for that?
 
Good luck with the build. I just finished my e-brewery build and absolutely love it. On a side note, after looking at your diagram I think you may need to add one more valve. The top left of the HLT has a 90* into a T fitting, I think you need a valve on one side of the T, if not than the flow of liquid could go in any direction. Maybe I'm missing something? You have a valve on the BK and MLT on the same T.
What I am hoping for, when recirculating the wort, the T will actually be oriented vertically and the wort will flow down vice upand over...I was wondering if that would require some tweaking and/or another valve. I figured I could cut the cost first and try it out. If it doesn't work the way I hoped (most cases it doesn't...) I'll grab up another valve.
 
What I am hoping for, when recirculating the wort, the T will actually be oriented vertically and the wort will flow down vice upand over...I was wondering if that would require some tweaking and/or another valve. I figured I could cut the cost first and try it out. If it doesn't work the way I hoped (most cases it doesn't...) I'll grab up another valve.

That may work, only one way to find out... Worst case scenario is you have to spend another $15. I probably would try the same thing if I had thought of that. On a side note, I noticed your from Summerville. I lived on James Island until Hugo and then lived in Irongate for almost 8 years.
 
You ever make it back up this way? I've only been here for about 3 yrs now and in that time, there have been 3 amazing micro brews that have opened up. Coast, Westbrook, and Holy City, check em out.
 
This sounds a little dissapointing...especially after how much of a PITA is was tearing that fridge apart. Question though, I'm not looking for serving temps, I figured it should be enough to get a space large enough for 2 kegs and a carboy cool enough for Ales to ferment no? Isn't the upper 60's cool enough for that?

i had that same feeling when i was testing out what i had put together :(

one thing that i was doing, though, was using it to chill a water bath (large thermal mass). if you are using it to chill air and a few kegs (much less thermal mass), and insulated the living hell out of it, the results might be slightly better. i was expecting it to be able to chill 5-10 gallons of a water bath, plus 10-20 gallons (2-4 kegs) down to any reasonable temperature, which it just would not do. the thing was running 24/7 for literally 2 weeks (i had to put a box fan on the hot-side and compressor so they wouldnt burn out) and would not get more than 15-20 degrees below ambient. i didnt expect it to be able to get 10 gallons of 80 degree beer to serving temp in an hour, but i expected it to be able to eventually reach the desired temp, but i was still disappointed.

a $20 craigs' list 6300BTU (380 watt) air conditioner is what i have been using, and it will get 30 gallons from 60* to 35* in only a few hours. "overkill" here shouldnt matter too much as long as your insulation is good, as it will just kick on less often.
 
Alright, that's good to know. I am going to try it out since I have it, but now I know what I can do when/if it doesn't work.
 
Well, it's been a while, but I'm still "chugging" ahead. Got my ferm chamber/stand all built and had 2 gallons of water holding steady at 8 degrees C. Had to swap out the transformer in my controller (didn't realize there were ones for 220 and 110...). Solder a small fan into the out put of the transformer so now I have a fan on all the time.

ForumRunner_20111014_082659.jpg
Just a teaser with my 95% done keggles. It's a bit taller than most rigs, so I'll probably just build a stool so I can have a better view inside the keggles


ForumRunner_20111014_083238.jpg
Compressor and coils from the fridge I tore apart.


ForumRunner_20111014_083256.jpg
The door way, tight fit for a keg, not sure if I can get one in thru the door with the sanke ferm kit on it. I staggered 2 layers of insulation and added weather striping.


ForumRunner_20111014_083322.jpg
Just the inside.


more pics to come...


Edite: Oops, wasn't ready to put the last pic on (damn phone posting), but thats the bitch of a thin walled stainless herms coil. I kinked it pretty good at the top there...water from the hose passes thru no problem, but I don't have my pumps yet to test it out. Gonna wait and try it out before I see if I need to take the coil out and cut that piece...
 

Attachments

  • ForumRunner_20111014_083928.jpg
    ForumRunner_20111014_083928.jpg
    21.5 KB
Nice build so far! I recently build an E-HERMS system similar to yours, but as a lazy lurker I have not posted a thread about it. Keep up the good work.

more pics to come...

Edite: Oops, wasn't ready to put the last pic on (damn phone posting), but thats the bitch of a thin walled stainless herms coil. I kinked it pretty good at the top there...water from the hose passes thru no problem, but I don't have my pumps yet to test it out. Gonna wait and try it out before I see if I need to take the coil out and cut that piece...

I had the exact same issue when I formed my coil, and was worried about the kinks catching particles in the wort and clogging the system. I gave up on SS and rebuilt the coil using 1/2" copper, which turned out almost perfect. Copper is a reasonably important yeast nutrient so I considered its use in my "all SS" system beneficial. For more info on copper check out the Brew Strong on metals in brewing.
 
Brian_T.....start a thread, so I can steal your ideas! :D Seriously, if you have built one, I would love to see your process and final product. The more builds I can see, the better prepared I will be as I begin mine. Keep up the good work joenads. :mug:
 
Another little teaser...
2011-11-17_22-22-37_399.jpg

This was taken before I hooked my pumps up. I have water tested the pumps and boiled about 10 gallons. I have an issue with one of my pumps. It tends to start squealing when the water heats up. I switch the pumps around the squealing followed the pump...I need to find some SAE 20 oil and see if that takes care of it, but I noticed that the shaft of the pump has some perpendicular movement whereas the one that doesn't squeal doesn't move... If any one has any suggestion, please let me know. I've also ordered a brown ale and an IPA ingredient kit to get some pilot batches going! I've got a few friends that are willing to sell me some carboys so I can't wait to build up my supply of beer.:ban:
 
Picture time:

A few of the whole setup.
2011-11-22_21-31-50_545.jpg


2011-11-22_21-36-49_185.jpg


2011-11-22_21-36-18_200.jpg


2011-11-22_21-34-50_570.jpg


2011-11-22_21-38-37_283.jpg


Testing out the heating elements.
2011-11-17_22-23-26_140.jpg


Mash tun with "splatter screen" false bottom.
2011-11-22_21-35-56_417.jpg


My chugger pumps.
2011-11-22_21-37-00_781.jpg


Some of the control panel.
2011-11-22_21-38-00_92.jpg


2011-11-22_21-37-09_51.jpg
 
And my ferm chamber/stand.
2011-11-22_21-39-31_383.jpg


2011-11-22_21-39-55_940.jpg


2011-11-22_21-39-04_447.jpg


Grains come in Friday, unfortunately I'll be out of town till Monday. Getting excited to give my system a full test run!
 
Man, I thought I had some decent enough beer porn to not have any comments...:D
Nahh its just you've gone and made a huge percentage of us jealous! Nice setup, been toying with an all electric setup myself. And integrating the ferm chamber into the stand just makes too much sense
 
Question, what feature or function made you go with the brewtroller...ive been researching it vs using pid controls, and don't know which way I want to go.
 
Question, what feature or function made you go with the brewtroller...ive been researching it vs using pid controls, and don't know which way I want to go.
I went with the brewtroller mainly for the potential to expand to more heating/pumps/auto valves/temp sensing, even though I'm really only using it for monitoring temp and pid control on the HLT. It seemed like the board and supporting boards were the same price as 2 PID controls, so I figured the options would be nice. It also fits nicely in the control box.
I like the phone cords for temp sensor disconnects! I'll probably borrow that!
Don't know where from, but I also borrowed that idea ;)
 
Hi Joenads,
like your idea of the fermentation chamber stand as well. Do you have any more build pics of that? Is it all 2x4 framework and plywood? Did you work on the overall size/design based on the stand, or on what you needed/wanted to ferment?

What are the interior dimensions, and are you heating and cooling in SC, or just worried about keeping it cool? I'm in the process of designing one, and my NH basement is already in the 50's, and I need to get a unit built that can keep temps up, before I even worry about keeping them cool.

Thanks, and yes, keep the pics coming.
 
Back
Top