• Please visit and share your knowledge at our sister communities:
  • If you have not, please join our official Homebrewing Facebook Group!

    Homebrewing Facebook Group

AnBrew Garage brewery build (100L single tier eHERMS)

Homebrew Talk

Help Support Homebrew Talk:

This site may earn a commission from merchant affiliate links, including eBay, Amazon, and others.
Did you get a chance to get your first brew in it? Interested to hear about the process (with pictures!).

Is your sink drain sloped towards the house, or do you need a pump to move waste water?
 
Actually, yes! I've been meaning to update the thread with the last build pictures, but I've been really busy finishing the build and getting my two first brews in, and tomorrow I'll be going to the US for two weeks. Hopefully I'll have time to finish the build log when I get back!

In the mean time, here's what it looks like with some oatmeal stout going through the pipes :
m5OlztU.jpg


and here's the full album of my second brew day : http://imgur.com/a/rkq7Y


As for the drain, I haven't actually installed the sink yet since I haven't found the model I want yet. It's also not yet connected up to the main drain. We did however make sure that the pipe was sloped downwards all the way to the house. So far it seems to work fine with water, I hope the slope will be sufficient for when there's dirt in the water, or spent grains...
 
That looks awesome! I'm curious to see how the winter treats the space as it's largely unheated. Stainless will be fine, tubing as long as it's dry, pumps will be fine as long as water is emptied, control panel is fine etc. I don't think there are any issues as long as lots of water is not left in there.

Summer shouldn't be as bad, even if it gets very hot in there. Everything is meant to take heat pretty much.

Any thoughts on a cover for the brew table/setup?

Enjoy your trip to the States!

Cheers!! Thanks for the reply :mug:
 
Hey, thanks for checking in!

Two days ago I finished my 8th brewday on the new system, and I'm very happy with the way it's been behaving (and also identified a whole lot of things I want to fix/improve).

So far, I'm quite happy with the consistency of the results I'm getting. I've got my mill dialed in to a setting to produces a fairly consistent mash efficiency. Got the temperature setting for the HLT and the recirculation right to keep my mash temperature nice and stable. Moving everything around with pumps means no more moving heavy containers of boiling liquid (yay!).

For the moment, I'm chilling the wort with my immersion chiller, which actually works great. Just use the BK pump to recirculate the wort, check the temperature on the PID, it's easier and less stressful than checking the temperature every 2-3 minutes like I did before.

Things seem to be holding up pretty well to the winter. I've added a purge valve to empty the hot/cold water pipes from the house, in case the temperature drops too low, and make sure to empty all the pumps and pipes on my setup after every brew day. The only trouble is that cleaning is a bit of a pain right now (haven't installed a sink yet), and my fermentation chamber with its 60W heating element has trouble keeping temperatures up when it's 0°C in the brewery...

Starting this spring when it's a little warmer, I'm planning to tackle the final upgrades which should make the brewery completely autonomous and nice to be in :
  • Install a sink and finish plumbing (so I don't need to clean my kettles outside or in the kitchen)
  • Install ethernet connection for the BrewPis and internet radio
  • Repaint walls with cleanable paint and floor with smooth epoxy (easier to clean)
  • Remove garage door and install a wooden wall with a door (more ceiling and wall space, better insulation)
  • Build a second and/or bigger ferm chamber to ferment full batches with temperature control
  • Redo MLT filter with perforated steel sheet instead of fine mesh
  • Make a filter for the BK to keep trub out of the pipes and pump to prevent clogging
  • Install a cupboard for remaining tools and equipment that's still stored in the basement

So hopefully in a few months I'll have some more updates as I find the time and money to attack these projects, but in the mean time, I'm really enjoying being able to throw any kind of recipe at the system and have it turn out great. I'll soon be trying my hand at an imperial stout, possibly an imperial pilsner and a flanders red and looking forward to experimenting with new styles.

Thanks again for reading! Hope to be able to add some updates soon with more pictures!
 
Thanks for the detailed reply! Great to see that it's working out well for you, even when the temps drop. Right now I'm in a similar boat where most things are stored in the basement, then I lug it all outside for brew-day (propane burner BIAB currently).

I have 3x 20g kettles ready to go, next is the control panel and a mobile stand. My plan is a hybrid approach to yours, where the setup lives in the garage, and I can wheel it into location on brew day. Then tuck it all away under a custom cover when done. A mobile sink may be a problem, and I'll need to find a way to vent the garage from all the steam.

Looking forward to seeing how your (long) list of updates/upgrades progresses as well, thanks again!
 
As promised, now that spring is upon us again, I’ve picked up the brewery build for this year. I have a lot of plans (most of which I’ve outlined in the previous post), so we’ll see if I can find the time (and money :)) to get all of them done before the winter. I’m hoping to finally have a nice and cozy place to brew before it gets cold again, with storage for everything I need, a sink to clean everything in place, and sufficient space to ferment a whole double-batch if not two.

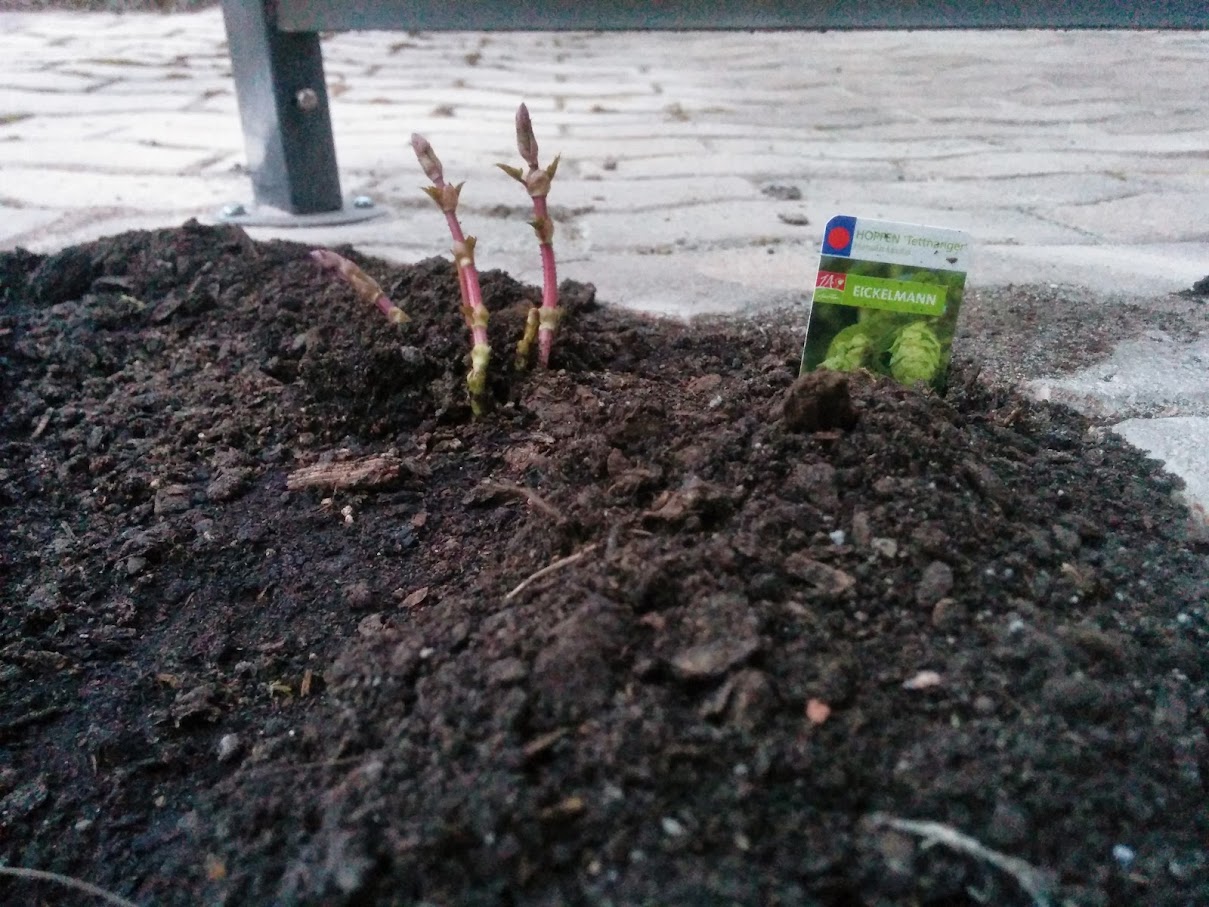
Before we get started, a little distraction. Ordered some hop rhizomes from France and planted them around the gazebo on the terrace
IMG_20150315_183818.jpg


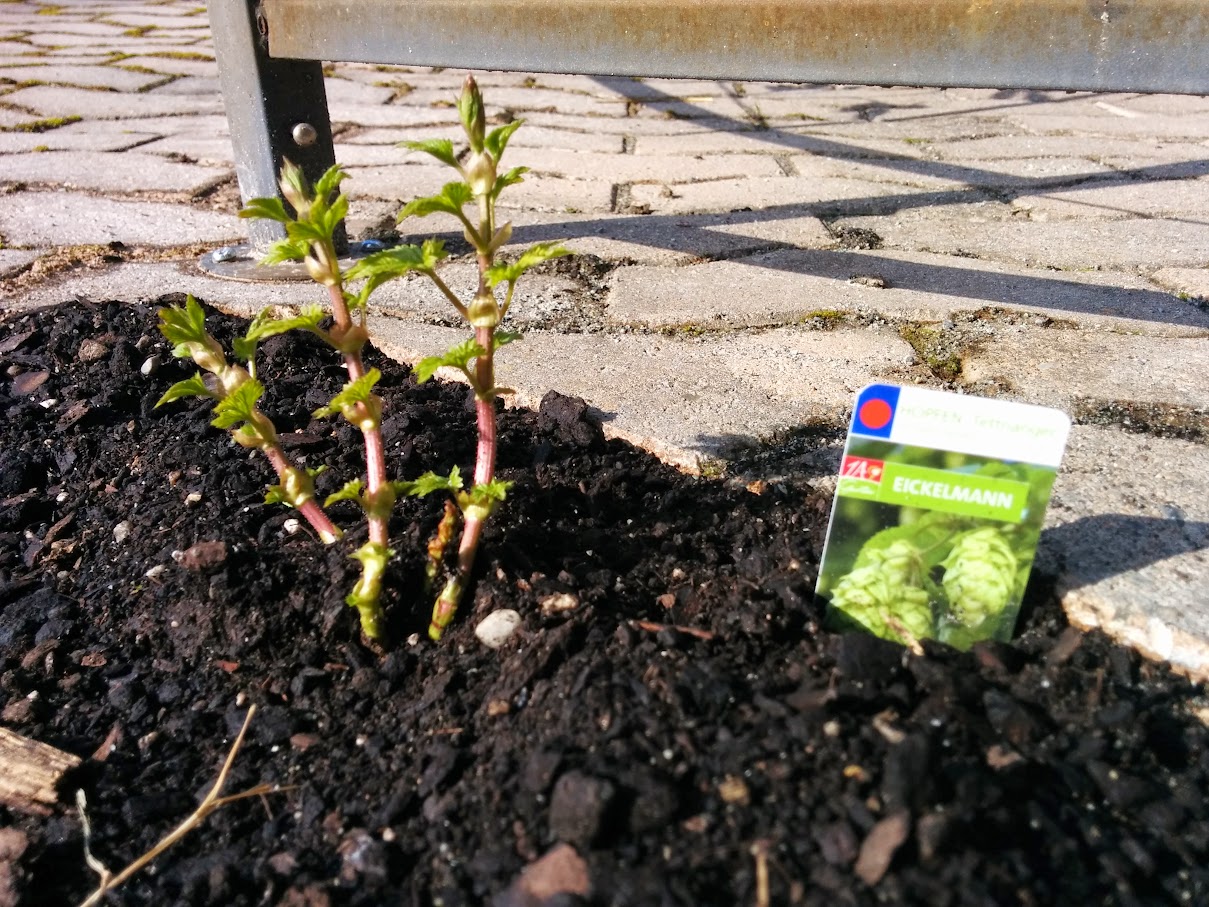
And here they are just a week later:
IMG_20150322_145811.jpg


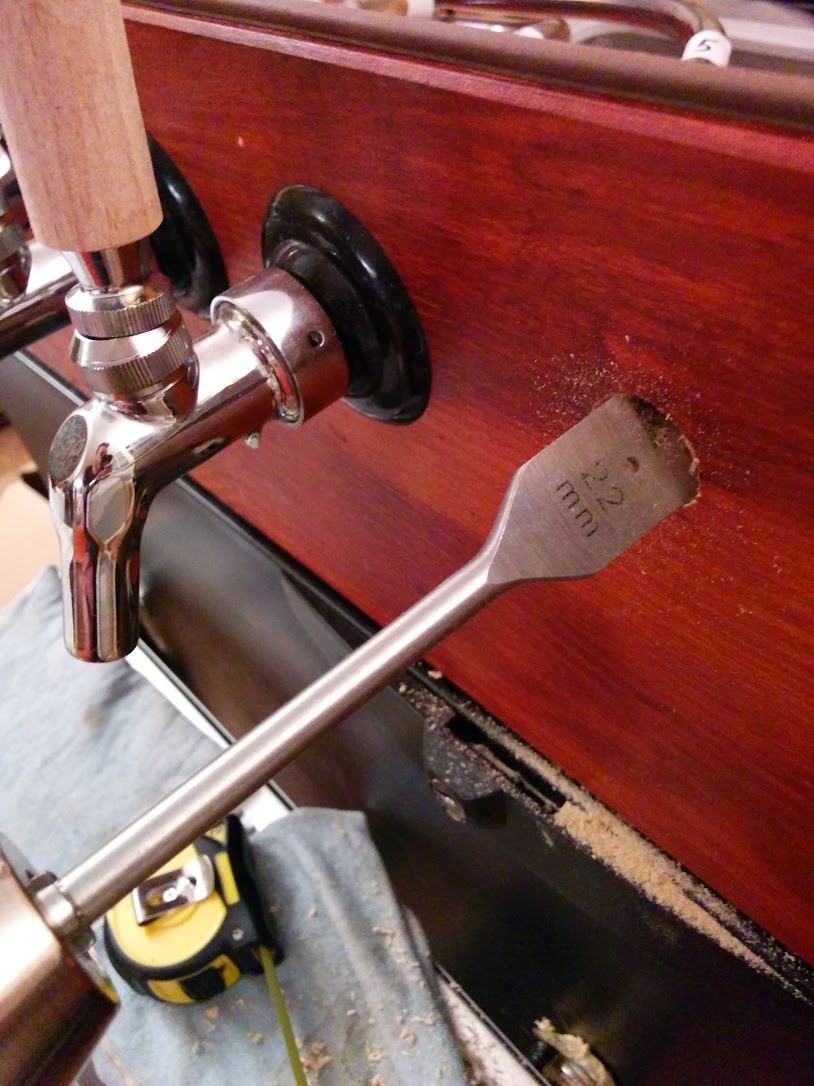
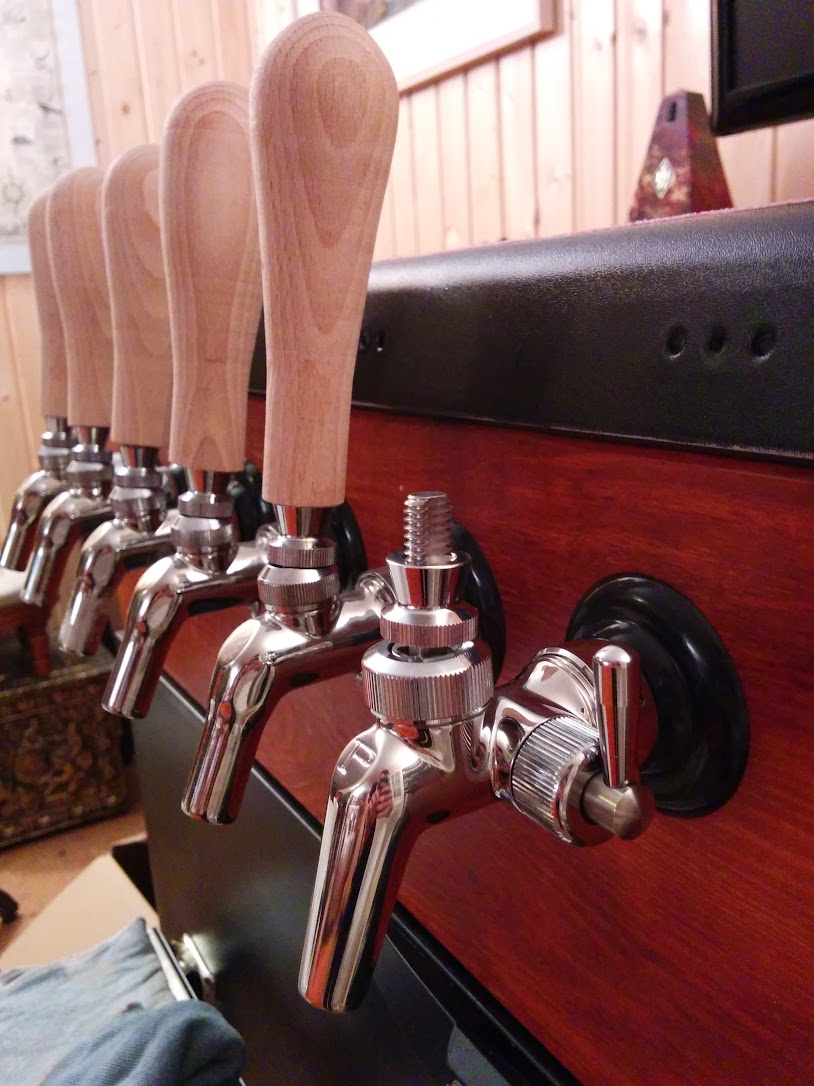
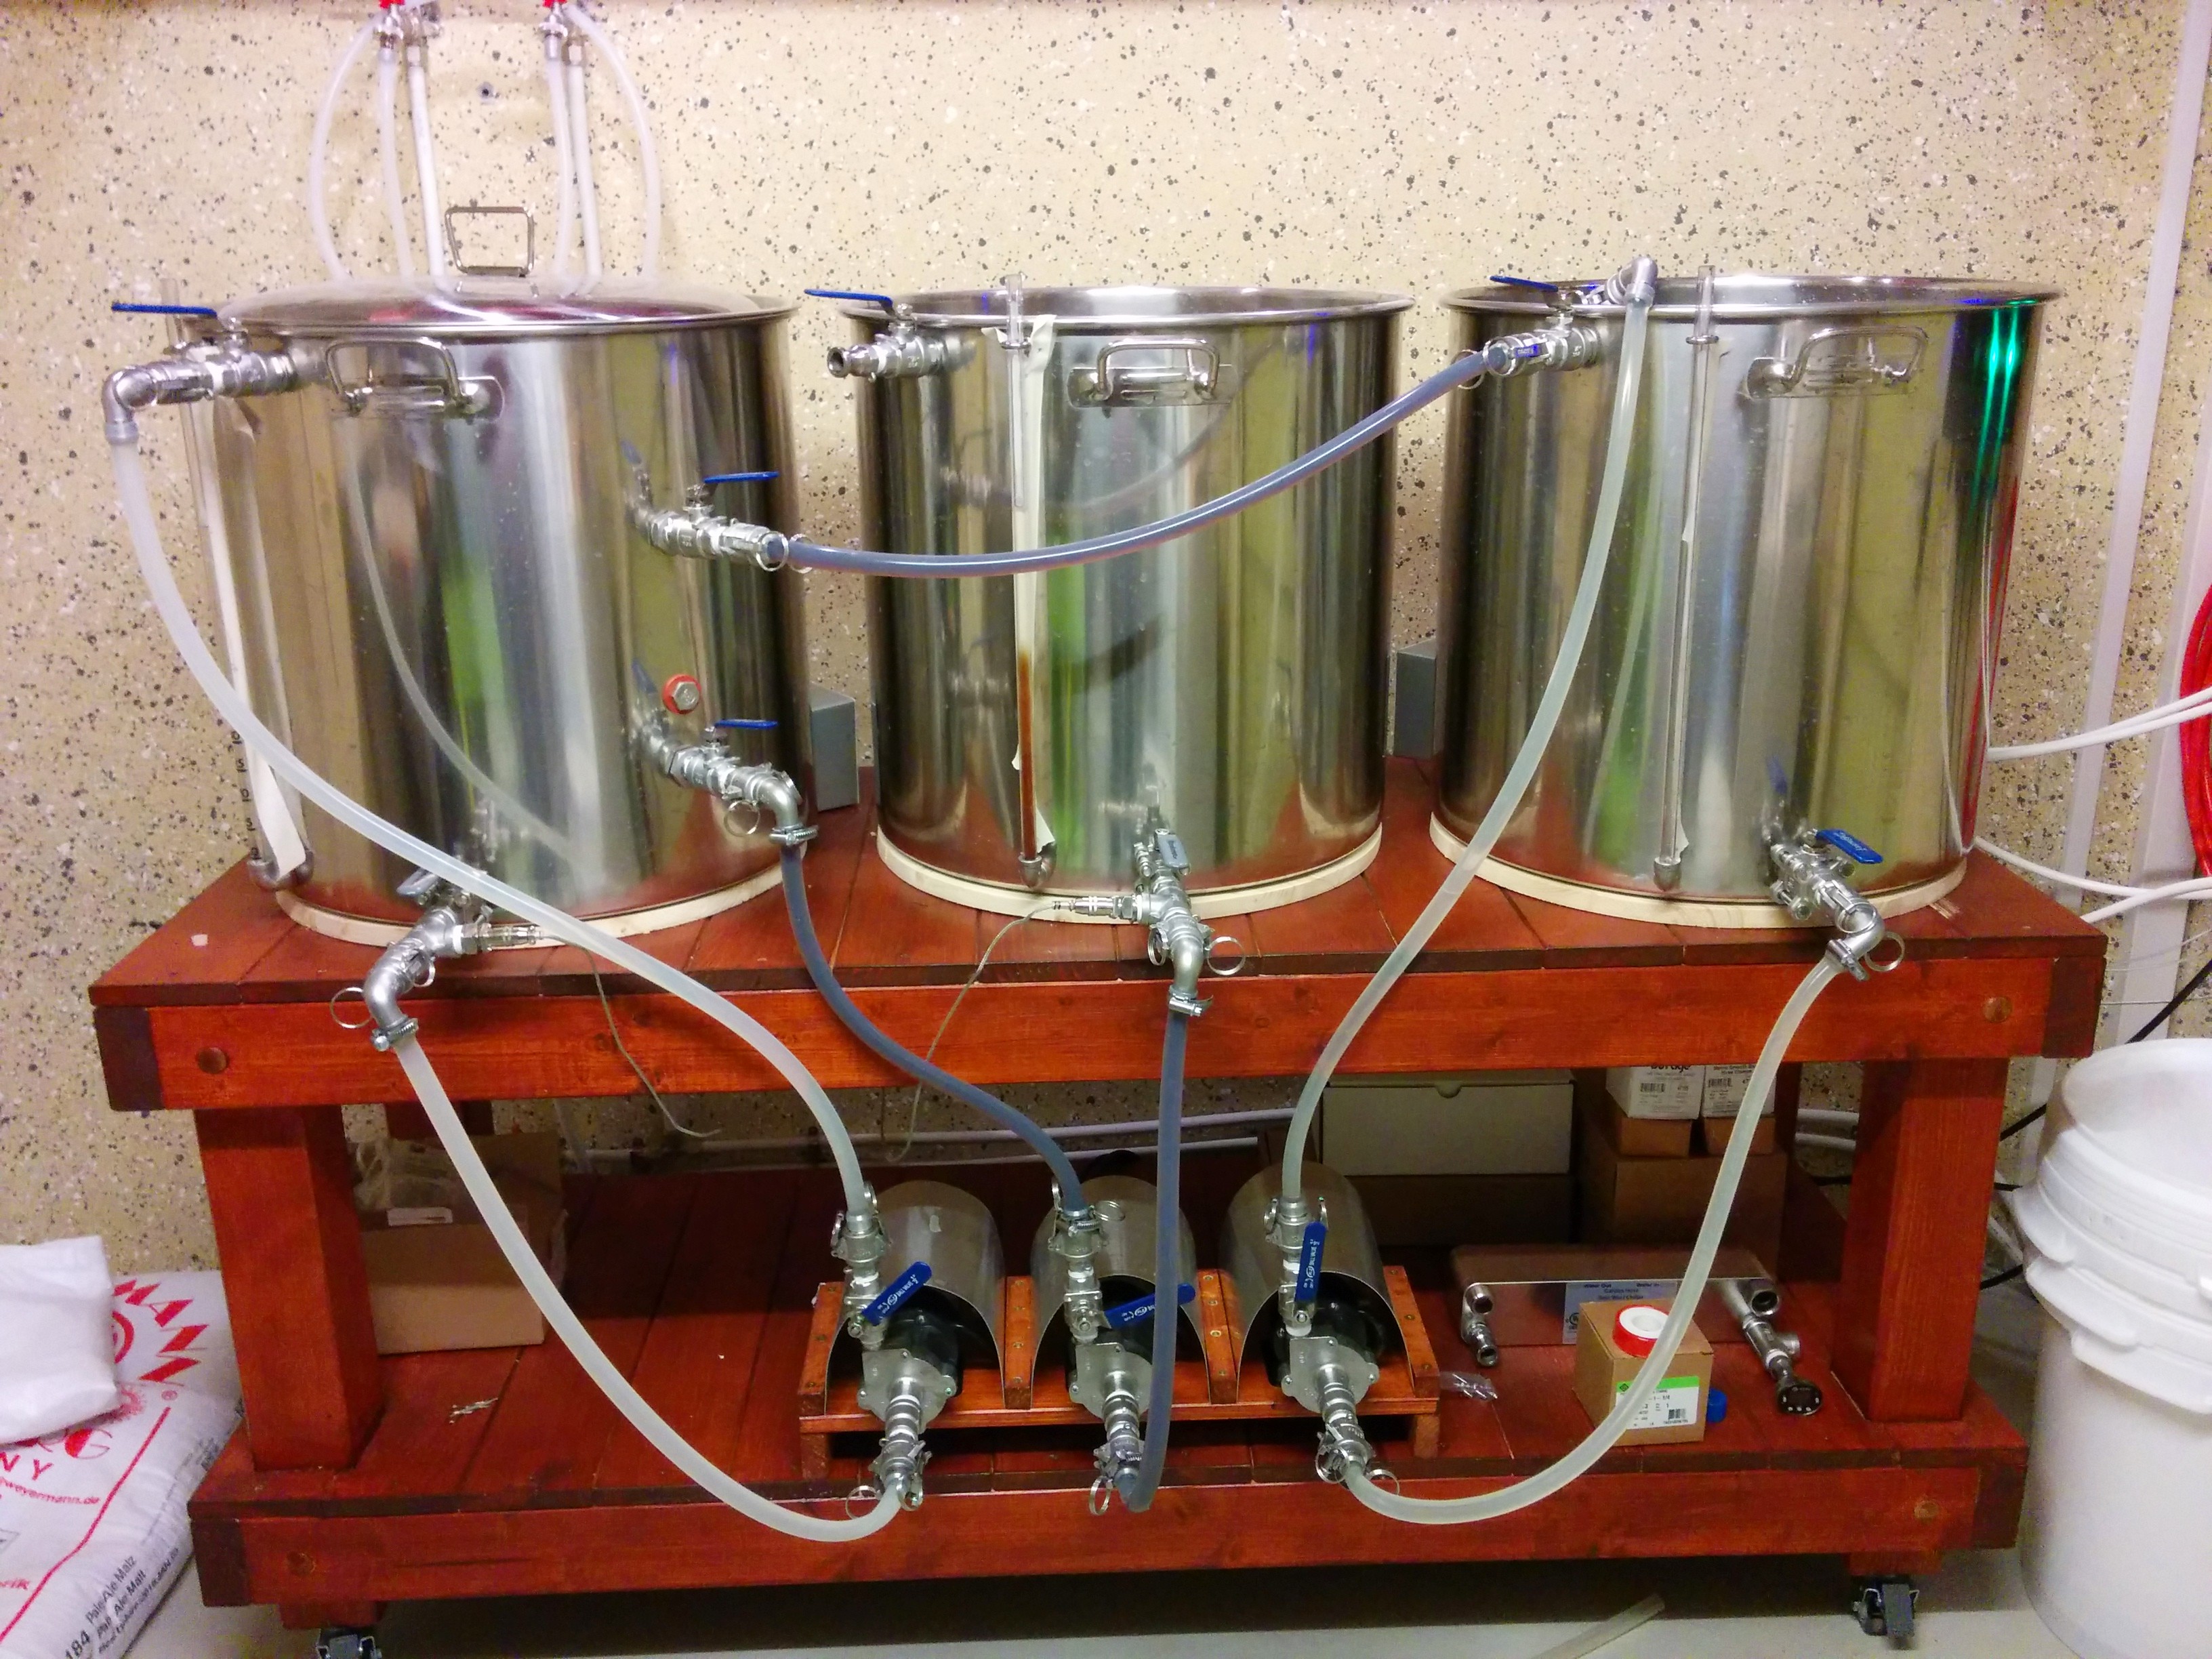
Decided I wanted to test the new flow control perlicks and put the 6th space of my kegerator to good use, so I drilled a new hole and installed another tap
IMG_20150321_121100.jpg

IMG_20150321_122515.jpg


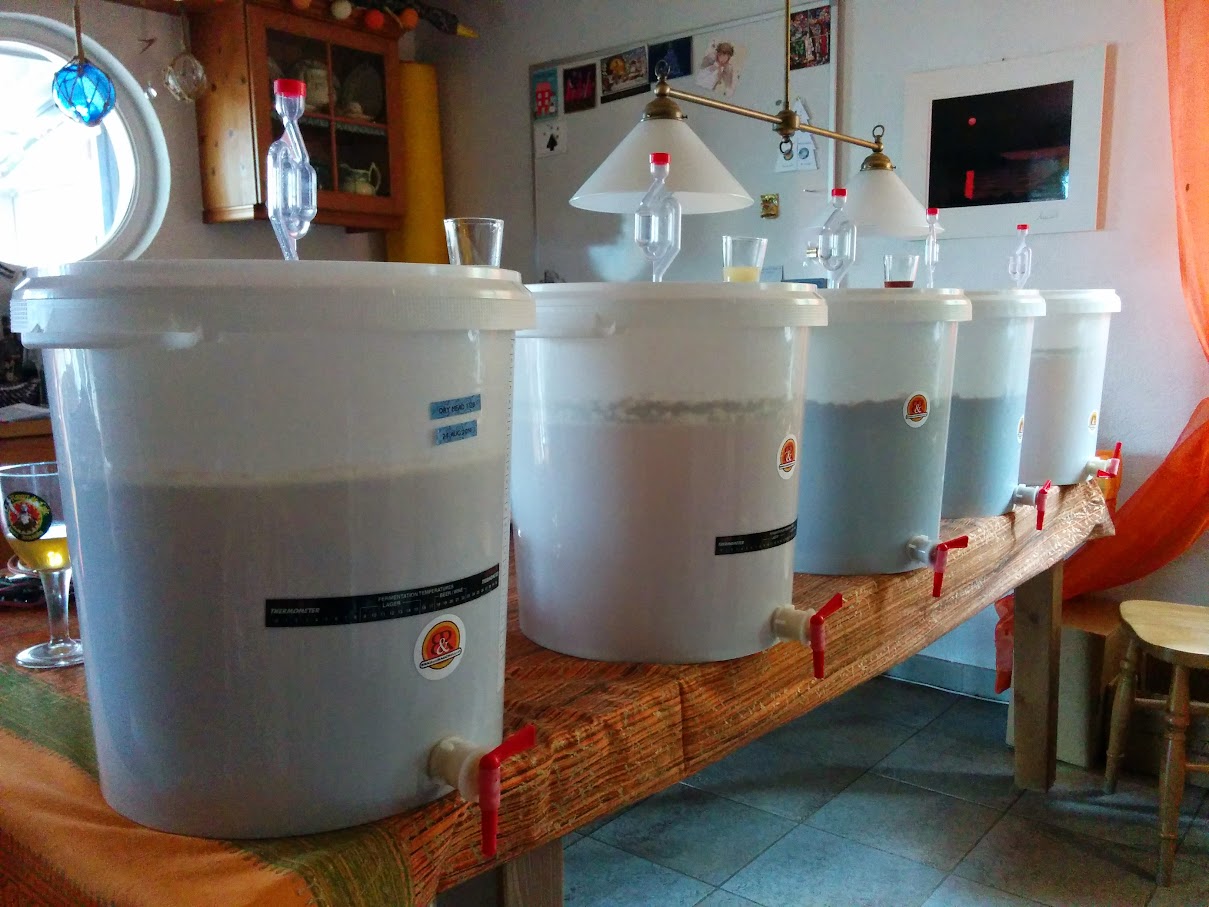
I also kegged a few more batches of homebrew for the upcoming “tasting” party :)

2015-03-29.jpg


Now for the real stuff.
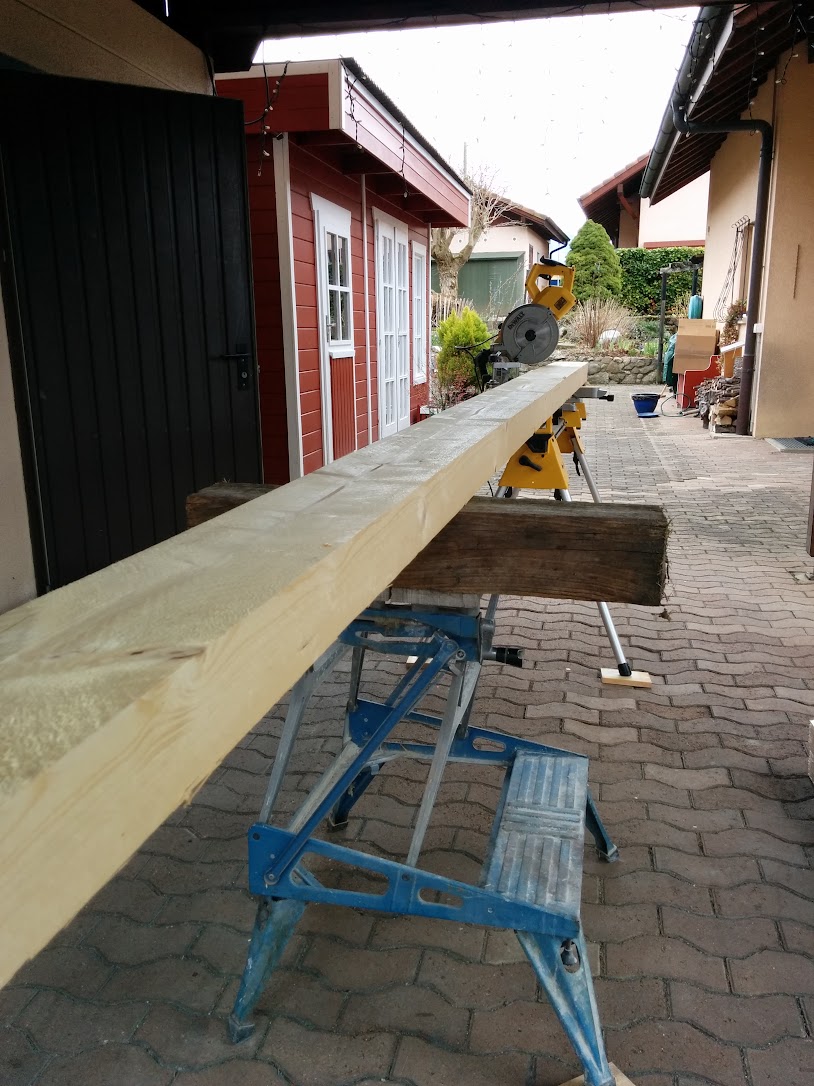
Chopped up some lumber
2015-04-02.jpg


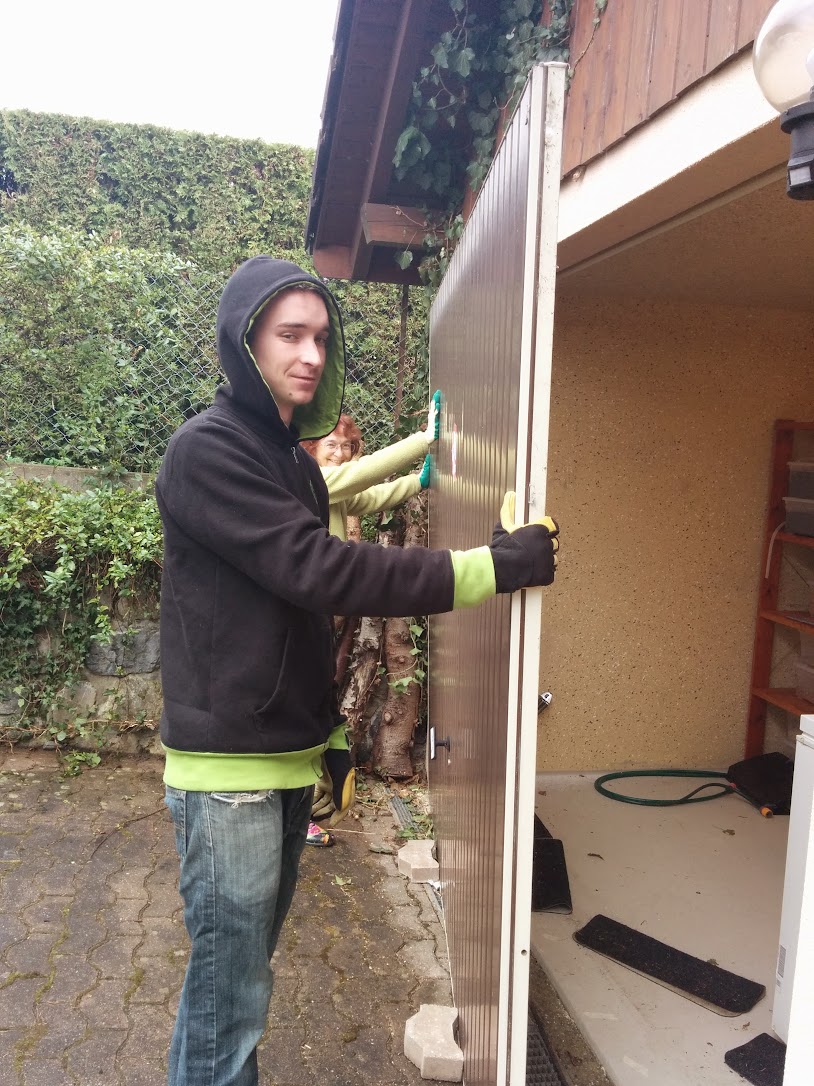
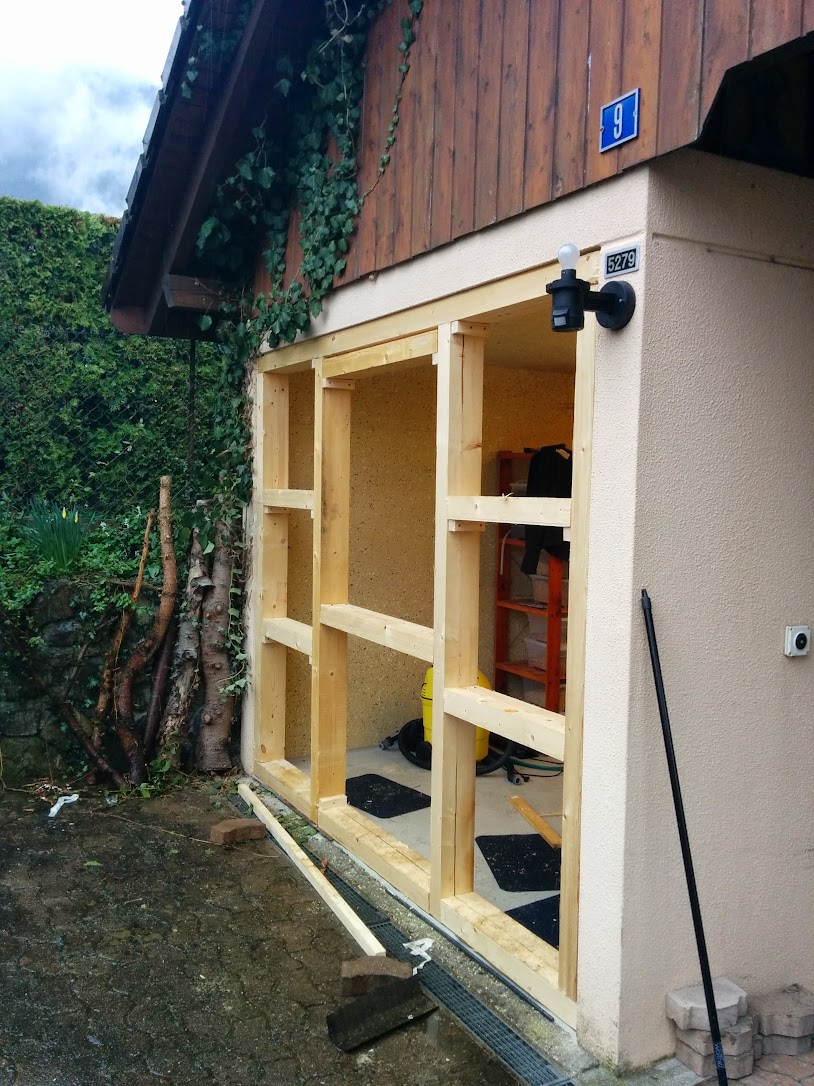
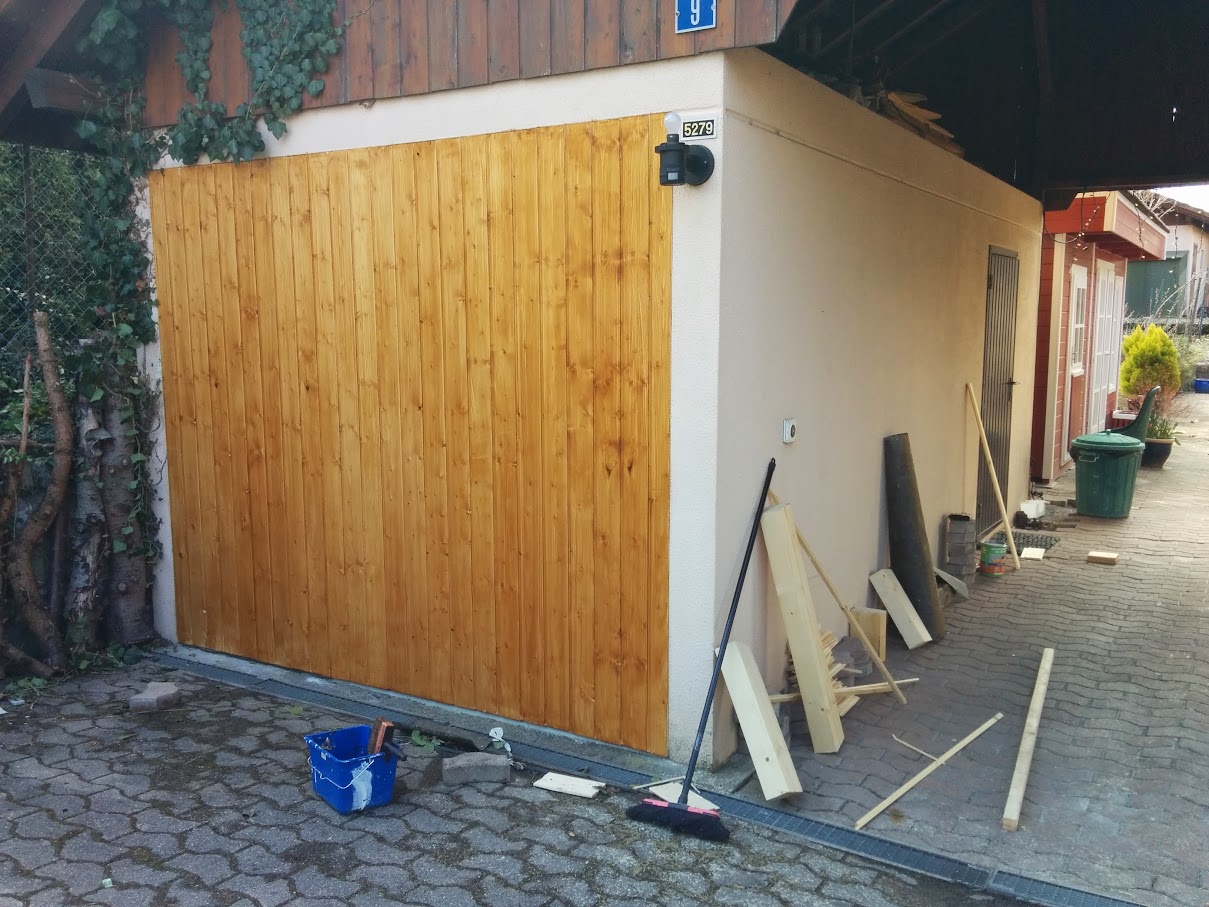
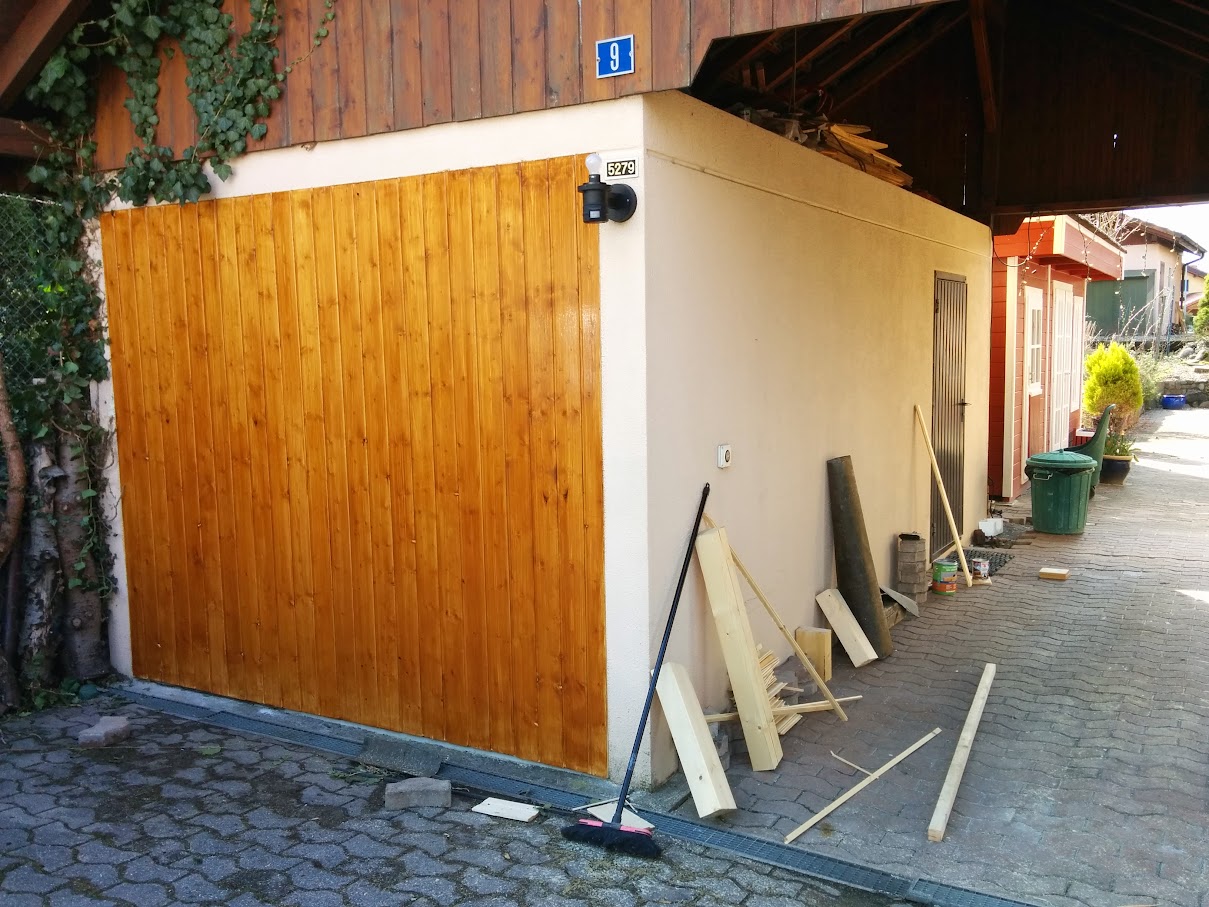
Removed the awful steel garage door
IMG_20150404_114905.jpg


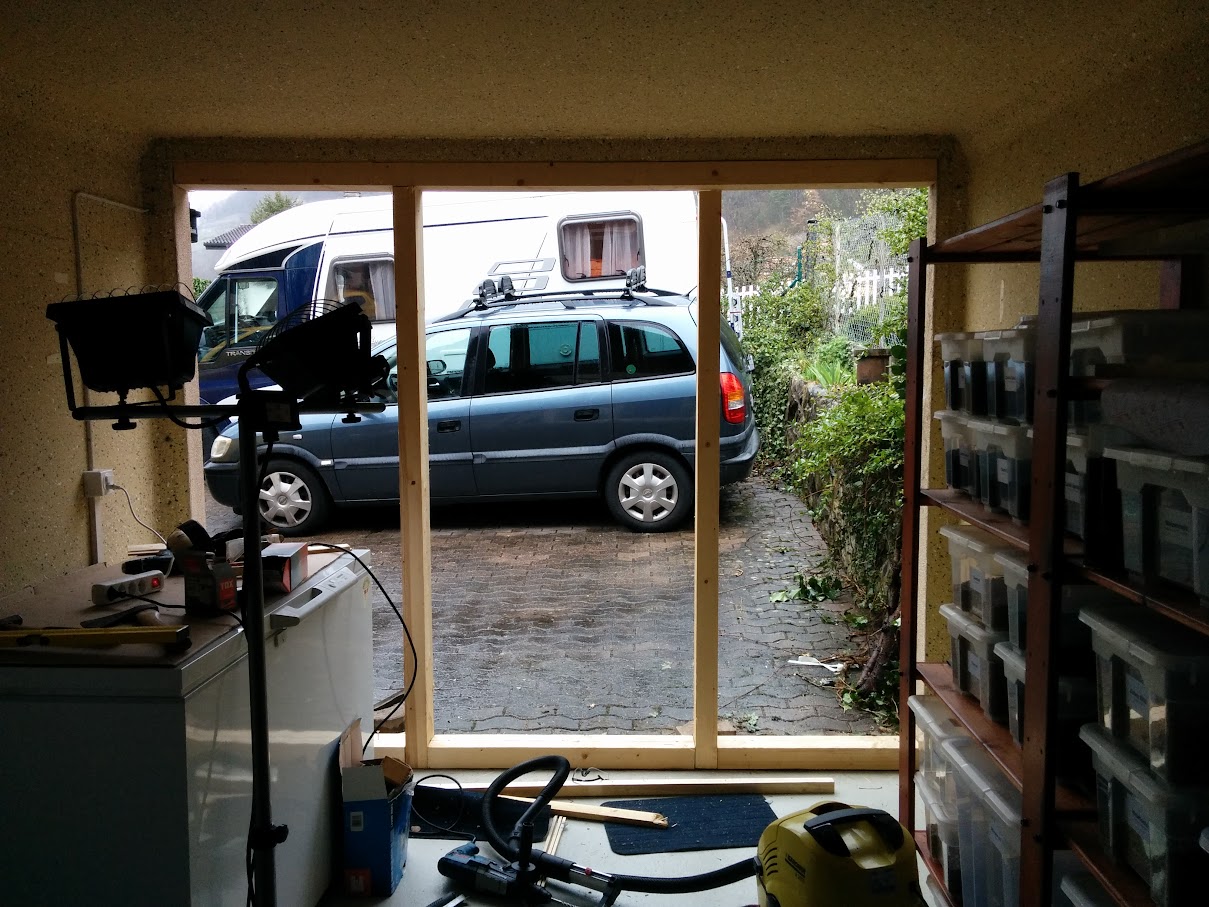
And started building a frame around the opening to support a wall
2015-04-04.jpg

IMG_20150404_173213.jpg

IMG_20150404_173240.jpg


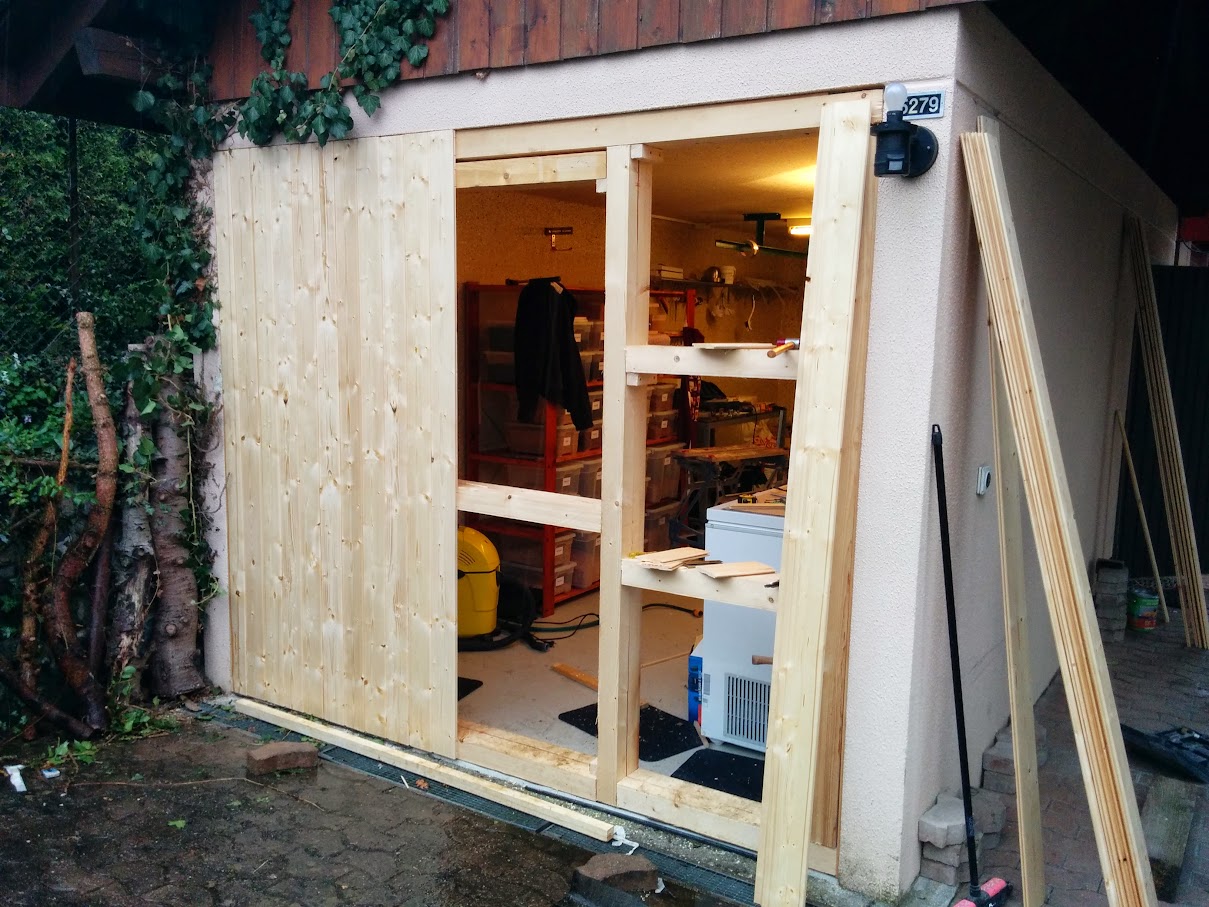
Next we got to work with the nail gun + compressor and the panels I had cut to length the previous day
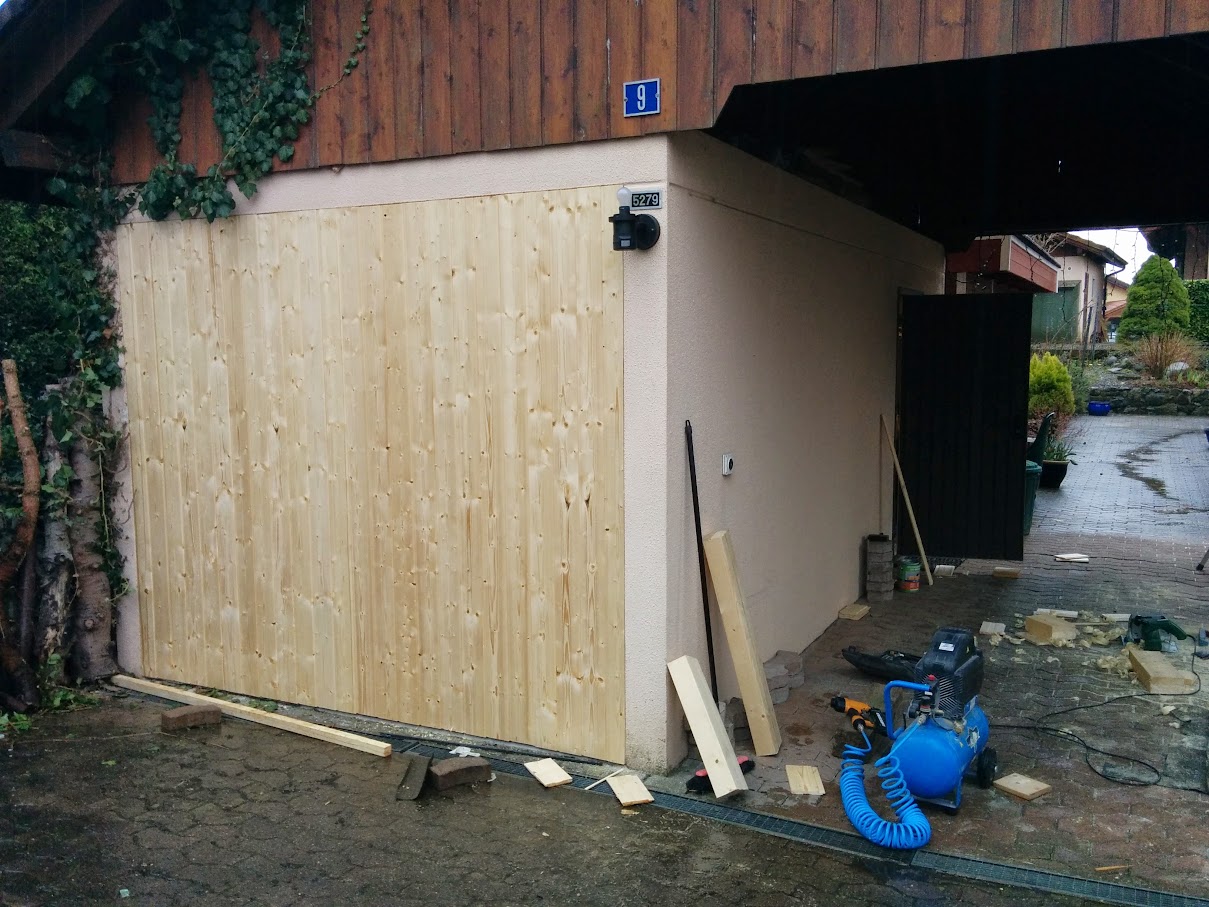
IMG_20150404_180113.jpg

2015-04-04.jpg

2015-04-04.jpg


And here’s what it looks like after one and two coats of wood stain
IMG_20150405_103310.jpg

IMG_20150405_105527.jpg


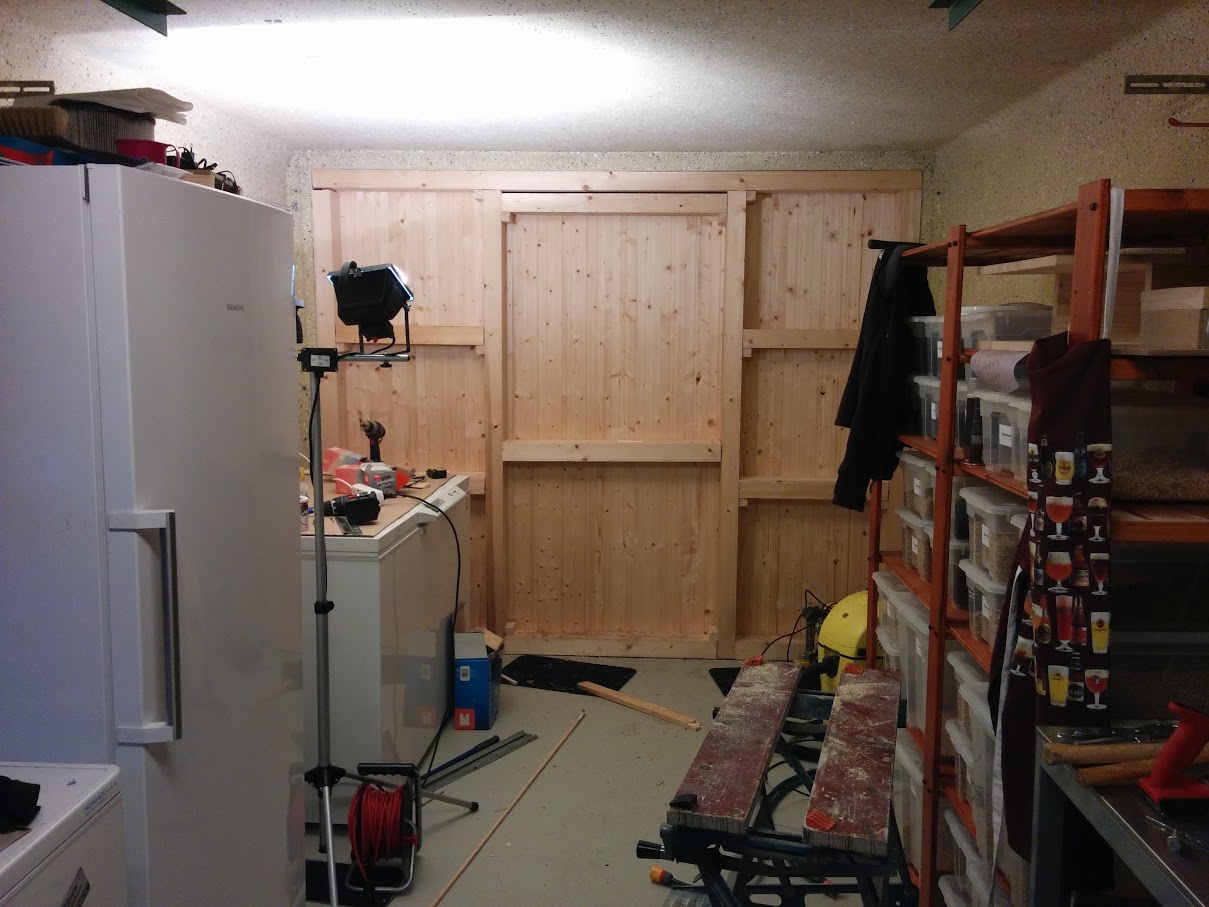
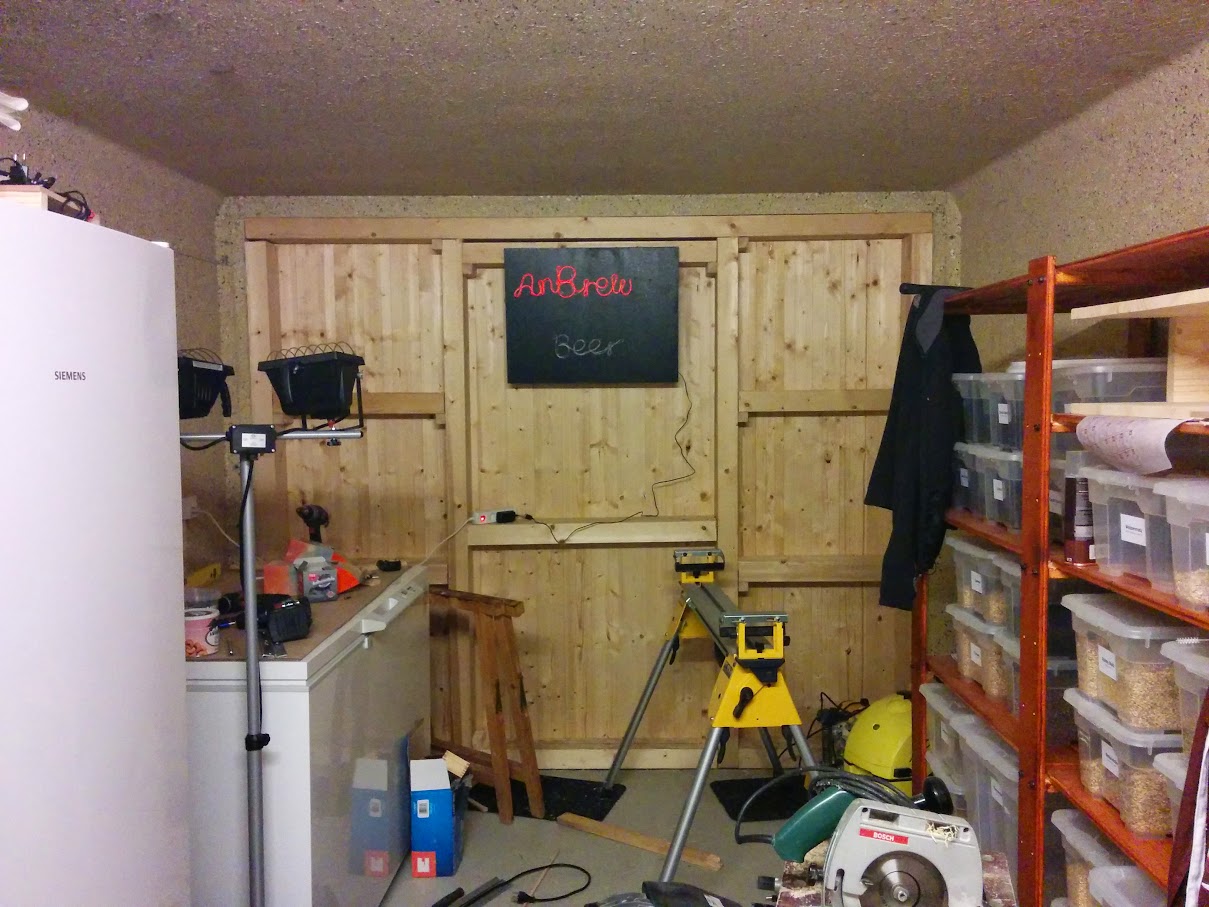
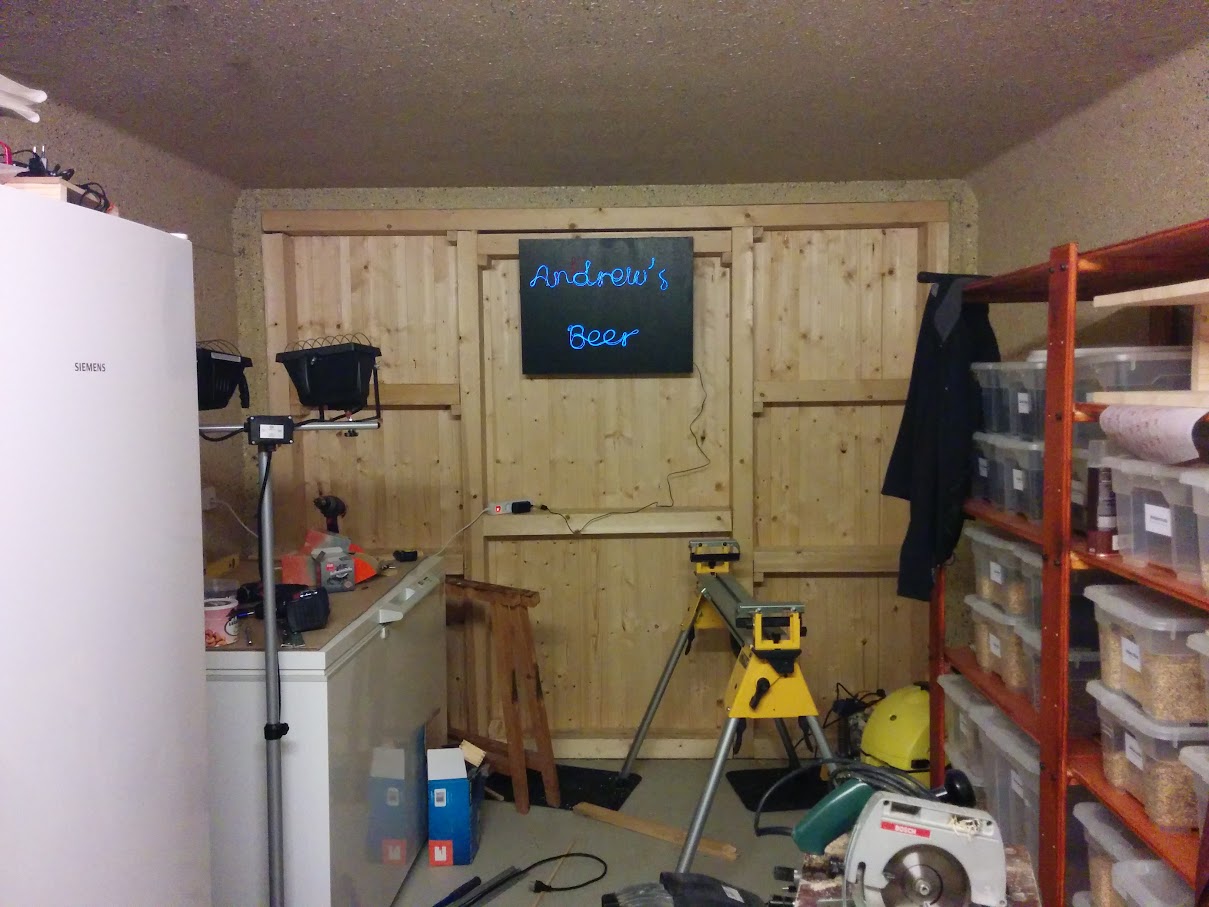
Now I can finally use all the space in the back of the brewery AND the ceiling (which was covered up when we opened the door), install some proper ceiling lights for the back, and most importantly, I have a space for this wonderful addition that some friends made for me for the first “tasting” party
IMG_20150405_195707.jpg

2015-04-05.jpg


Next step: remove absolutely everything from the brewery, sand down the paint, apply a fresh and smooth coat of paint on the walls and ceiling, and some smooth epoxy for the floor!
 
New wall looks great! It'll be a fun time moving every bit out of your garage to paint all the surfaces, but well worth it. Thanks for the update!
 
I really like your hood design. How well does it hold up? How much boil off do you have and does the hood handle it well? Do you have any plastic or any kind of special coating on inner portion of the hood? I plan to build mine out of wood but I was concerned about the wood becoming saturated.
 
It's been holding up quite nicely so far. I'd say the wood is the part that's holding up best for now.

I don't have exact number yet for boil-off rate, but if I turn on both elements (6000W for 40-50 litres), it's *very* vigorous. The extractor manages to pull out the steam quite well, but I still get a lot of condensation inside the aluminium piping, part of which tends to fall backwards just behind the kettle.

I used some aluminium sticky tape to seal the piping to the hood, and that's coming undone a little, so I'll try to find a more permanent solution at some point. Here's what I've learned so far
  • make sure the condensation has somewhere to go, preferably towards the outside (maybe angle the exhaust down slightly, or make a hole at the lowest part and use a tube for drainage)
  • put the fan above the boil kettle. Mine seems to do okay with dust from mash in and steam from filling and heating the HLT, but I don't think it would work for the boil if it weren't just above the boil kettle

Inside the hood, I just used three coats of "outdoors" wood stain, and the wood isn't showing any signs of absorbing humidity. Condensation forms but it just stays there. I think as long as I re-stain it every so often (2 years or so?) it should be fine! I usually wipe it down with a cloth after a long boil though.

Hope that helps.
 
It's going to get cold soon, and I've been putting off the big works for a bit
(mostly because I've been quite busy on the week-ends lately). But now that the new
kegerator is operational, it's time to focus on making the brewery livable for the
winter!

So this week-end I had a friend come over to help me, and we added rockwool insulation
to the rear wall of the brewery, in addition to removing almost everything that was
inside the garage.

rqMg4qNMbamOLLVOhwUqRYYc3SPB5WcE5_D-WGofKGkSPg0RuR4kZzs6aPKjC2gBZyrpu5ogS63_WE_T-efsyZiPVPEyIh73JSMLwMx0Hr73QBYt8ndfwPcoGlcqsSOTj-_YzhEAqDSlYtfhcDfjoBKa4Y2iWbYeinpLAEd2TG248E5VzAvqYUdmMDIT6az4ztkhqpsQ28iqBoDp0TwLppDl3rs9o74UoXj2-d6tqVgHnybFgC2e33Y3yD-6okG4Y7RY6lnJtoOmOv52lJRlY4SynEO2x4tsKVLppqQHPJBEYu62WVHjdYnIAkVgu-_SMLcuSX7Wv0hZJMHDaxLx1OVmDm-5Acq__XST3G7Qgep4h6OV7d7b2x_kNpYt8Y5ZCgzeeOkLbskLRo83fAhFiamAG9LFYiNTKJnd2TarhbU1IkV1VV7ReXoOlOmLJrt-GOly5aZ3e1-UsxOeX3Fwn05Y4ytMyqKU-4T4e3ZoePFisNyVIsOgrEDY6LiHsf_hOmiSPB_ltousS37P_pu0-6MJoogy9jnOpxnlHqvmXrii=w1047-h786-no


Vapour barrier stapled and taped

SKly2L_MqK6WfROVOTool5_XOUMArretCS_qODAy80ve3-eEN7xc4jmI4snuFtW_YB79LIE-Qj5J56lnSVhm0DR3Dv9mO9XWFYoLXiQ-eEbQ5llvgSdwlTY1a0Hi_a956c4Y2UM2Fgq50LI0-OL2DhzXPXNWJcFnmxoyeeQFqsmjH-5bleIG8-B-ftxUm3dTsFfOPHFBdF5kpCF5WDk3uxIHalXDWX54ruVsM5Uj8MAJmn9-OaDgjxTmvQCcp5VYZA0KnGx7UY4BtoktV3gCLqSsB1kW3Y7weghQeL55fO9WgZBgjm1q-_A58NwzhNQ4Am2azLHRB2LtqLSFUP8tcTytW5GHdaFLbKIi-re47SdYzKT7gNcoXHlg59k0ZrskpFcmNIQmO13EKkixgPPE_PDEADC5E8-I13SRhqMdgDE7gxL6A4qzXBk05qK-cjV5KfKj7thGzzgYCRpKHfrRL8jiv2q98TxJwU0JuisywIJqJqQSFsGJeQ84mxUoWCHRnOR9upkU91bShybZG3iM1hs0KIMSxIgwdheBZARIsYKM=w1047-h786-no


Starting to put up Fermacell (drywall)

vJjRiPpeag9_6dvWYt_tpQLrMTdL1BvN3XQM_qpcgOWLXy_OAVnY7eRjuAeg7UsgZHnVpzeEAgmHsYOz2Lh-5nkZZ0ACt9bT_aY9K1uF9HzymjB_72aeC1RwfUM0lND-CPDvlm5ooBatosILSuSDSscQBuTN0-OwYVp3GEVnm9W_CJAknU3NuHbdohpvgmVAC8_TyOv_XS-KPWy-YS7geW-B29tqwutNkOrp6jnu3ONf_D6TMaqfX3O3lJa6wyZ14XoORx8Oaceqm6Y-xNP6Ax9NyfRjy39ytfb0bFdUsR9Uqnzq6nQ3jZRLyfY0rU84l6tesoL9rGhU92bkCTEgH4CaFjHamWdXEMQvkNR6ntH1E-fx5ifpbKCiHcfOkEYiQx-y3DHAg2JaYGBnK7JAtEt3lcjaj_DYCcICPSzCzW8K3bGkSJhnQTWNdE0-_TtFUn7DZXqYgAdZ9mxeqBppoAeQGofO8rbqqKLgDGvYfK_ERX0QmOw74jE0jkz7u40MAkp-gBXQicYsDx3lr3uaR4zJ6pCvikbmuBCsNZWVK86J=w1047-h786-no


Laying the last piece

Oxej1IDPNtJwdmsQBM8J7clOEmhuUDDYapUuozPA_PQ757UVvj5I-dIrvTN_fJnQivCB8yR0Cul0rBP_16bunQEt6RJLTtBTxDnykNgkcx0XtqyjdZnoy7r9El3okbyrPPdFJ9WBkufm8hKT5Xo7s0mbrYiH0ZlyaOB_t_38uz7nRHph56CRXyR7JkgwhOg7mOaB0VkfZXLQhpebILhsgLfxv-NyQtjjUrw2LYgPmWr_OsicAcJRPJMwE3-sAF8ggqepG0TGmPzVpa6wkKOWDd9gpS5UodrRjg2lNCIjxnkrEIXFBHwTVJZWaeHU_X5c_393wWpIT1RuHOVieiBWsFagsQ1Op4cmld59sVrcjMs46m28jb4MLggPcGEhB8OAUYZwNhdiW1HNDJbToxQ-_3UeOC3s1BqB576jHKARrgmKV6K6WFMwC1y9HSqMhogx6HI-pbP-IXRZKpqL3keNqijtC9eKk-QAtrbnazOdiefXX8yHp_EO1_v-CBmcATbmwtElxq3kJcCSi-rynSLYLeSAbOpTWY7-FIk2I8Difr_k=w1047-h786-no


Drywall finished and ready for plastering

Rwqe55KWCj36GLuEpFiIWNwaXNGmJjOw-z-sIyOXnf8Rwy1fZdRq_4UW0qqXpILz_t5v5HxORrACDqGMfqcE0HVeDKOpyk6YBv2vTsaYP96b7Cy37WnmNYv-TzqvUwIXycv38O4o07rwtXLv8GSomCq0LuzdoomadJ_uAj9VCK6I2IX6Sz6-8vePDVTdY_KoHTicjo4WMRMFWcCs29rC8j9No_cDY5-FE9wE9maa9WpuAeMj46e_VeKajfLiqb7jg4TYCCFSfdBkuj5CgULlBxqtYITxL8VSrBYL94vdBbWVwEj7Q3vQdIIIrvdLgeW98Taz9eQjfsdYCDJvAaZ4A9MR8vBkeW2XzUba7mut3avPF_bq2ndhEkYOGCVmQwZFNB5W4q4V7AHZczqcSiKNc-jVyUbWeGSMxOvRT7cEHRg5Ff1NfH7AEh3wxXcjQzXB7g-LQasxezyShIXubYeSOoFrnfHQxLw_DSiiSKfoEEK9STUFXQ2xXvLX72_manzxkEc697D201Y24Os1vpJ-5seqIGhsG8XKHAgM90s8rZnm=w1047-h786-no


Plaster over the joints (I have no idea what I'm doing, but it's a fun learning experience)

PkPxY_ETB8ylE9LqesVr5PjNC2_4r14mdGA5uM51f4bpsgjri6zgtFEUS0bGIWcm_2bLATFO9JoXXn46vpk9NDZcTZRkT4bCGhawZ8JbKSpYn-N5cKQ2_uTcbRwQFFRdGKXbrPIy5dUlEerjlxOcj7ZzIW7dXYTQO4W8lE37vRVkqAt_jCmjyiaX5LVPyjj4Y5LY_t20H41CsD2qyWkXxBOuwHULQvMO25E5PdJg5OgUU_bT9-H54hZ3g7TYqMQfy202cNi27tXnD1F0LAiz15RhlIIyiGHA30EH3x5uviDOZf6v9E-_YXJfFgrfs0P5VieMT1r-WcsccFByYlBtfJwVnZovDl_ebH7dd7Otgu7ioyHmo62OWkLMJawZPUqJ9TiK5Mzb6IKIkpxo3w1swyzf68gVmnh113ZItC41fikqoGPJ0QQlaDEIkJNrdcLfZeCdzSjIS4g9a-nKty63efcJlEl2G9M6mjC8M4hFE47-WGWCBCb8GZ6DcdJtU1jdooKh-qR3aAuaK1azu6E8SpJznDSrovhDeruBUkUU58C7=w1047-h786-no


Two coats of plaster applied. I'm hoping it's good enough that I can sand it down and paint over it without needing to lay down a third coat...

DOmTU0kbOYTehfB1F1Q2V4hQ60to-PwXjokixexl5Z1nmoXlashpG2YgHkeGdOBgcuAQAEHfn-mpQXhMmVcLrwFJyB6qF5P_aGbPuvl42u22z0E7A6ICSmNkNQa7YN4tmDyApQIFqzl5yqwCqFRgb3Lh_qhYQWnxum9cEJ7YUNAknur7K0-Q2OzGkbYUCxEP8sthvyHRE_aeaoHHREsl3H0EWTw-vZ3Q-n73qdRoQ_0l5zNuGL20LTMmZRQAzHvuwPr1WedbI7zAhMxGWfrtQ5NbqMeie3pzDrZoo4DYHlbSWb7cxHtFmOVtbIWpJd5svgFRNb0jsV1yf2ezu9X2PA8I5s3hOAF_z1gOYuJH6fxwiKMVLnDj8VSnrROAooVolUl9E6kw2pg18Z1-mHmJ_x3j8iRV0U_1pHLzncQO3hr15XNGGvLNFeQBA-T2r08-xBgSMrSeU9Ybq-duMNs-jtk2viVmXhqXDqt2GKA35HeXcAim9fvt6cp5VSXLSUu0X4othSE1HfrSXwvfMRPTPTyhUWLDTwsCHOyxTknJxL2w=w1047-h786-no


While we were doing this, my brother started sanding down the paint from the walls. In a fortnight I'm hoping to finish removing the paint from the walls, sand the newly applied plaster, and maybe start painting the ceiling and/or walls.

KBqTG1fooaoTXLrpGPuKLXVpwTkNTGXjfIZueSoegvTemx7ZAxYAbGdKebEGPLV-jojTUZTUN9HCD5FCGn9FTJAHw87hzh_KC4nUk7Czqhxw3PchIt3Q0eBSkXpQOXumHJKxNmGMD6PWCZRinEh9_Qwz2T5wFwQjaZqnNCS_0UBfdSxbXTUEYJpw4xs8IFFkZN79k51NFe9HcWPFLa6SR0EwHiL8vuL-s4zHX_iuXck7duKXzDMdUg45gvhf5Madw3jTmMSxSuMC6xjgzjPzhuAl6TI3EclNnmGs75qqh23IzvNyVSwCLO9TKja8lbTM4o5CHEeO209j04QFOenFe1mUFqiHJ9rJgd67rNqdJXkFY5JhM--oU0idh3AsBkBUtYPbxYQnGEkIkEJmWlWEm7xMFd3O_jnr6ulIfzOtiT-xLuTZgXoQpUj0o5sLYFc1V3ESyWIjqZaeyxZntvWamtQbxWt5OPZ2RRJVNa6O1CTl5CxphEJRyVnSJwNp9jK3sYKFdWqOOWAALKjpaH3LzZc3cDfrSe3B8s_2tLnlka4P=w589-h785-no
 
Wow, this pretty much went dedicated brewery space, no shared garage/storage/brewery! Any plans for heating/cooling the space during the summer/winter months? Would it be warm enough in there just from the heat of brewing to make it comfortable?
 
Any plans for heating/cooling the space during the summer/winter months?

The rest of the garage is just reinforced concrete (uninsulated), so heating it would be a huge waste of energy, and here in Switzerland air conditioning isn't really a thing, at least in private spaces, since it doesn't often get unbearably hot outside of a couple weeks a year. I brewed this summer when the temps went above 35°C (95°F) and it was unpleasant, but doable.

Would it be warm enough in there just from the heat of brewing to make it comfortable?

Depends on your definition of comfortable :) Last winter I had a friend over for a brewday when the outside temps were well below 0°C, the garage itself was hovering around 0-3°C (32-40°F), so we brewed with gloves and jackets on and took turns hugging the boil kettle, and it was fine. I might get a small space heater next winter to make it more comfortable when it's really cold, but no dedicated heating/cooling planned.
 
Wow...I am super impressed with everything you've done! You have some insanely good skills! I have no idea where you guys get the skills and knowledge to do these things!
 
Depends on your definition of comfortable :) Last winter I had a friend over for a brewday when the outside temps were well below 0°C, the garage itself was hovering around 0-3°C (32-40°F), so we brewed with gloves and jackets on and took turns hugging the boil kettle, and it was fine.

0-3C would be fine by my definition (northeast US), good pro-tip with the kettle hugging!

Cheers :mug:
 
i love the control box you built do you have a wiring diagram i would love to build one
 
After reading this whole thread never once hit that you were not in the America. but i did see and read about you connecting a 3-phase system. i think kale system is really good but i enjoy looking at you panel more. i want to integrate kal"s system with your panel could you tell me where you got it from or if there is a file you can send me and then i can change where the holes will go. i am making my own brewery in the basement but if I'm going to be spending all this money. why can't it look good also. know what i mean
 
After reading this whole thread never once hit that you were not in the America. but i did see and read about you connecting a 3-phase system. i think kale system is really good but i enjoy looking at you panel more. i want to integrate kal"s system with your panel could you tell me where you got it from or if there is a file you can send me and then i can change where the holes will go. i am making my own brewery in the basement but if I'm going to be spending all this money. why can't it look good also. know what i mean

Sure thing. I had mine made at formulor.de, which is the German counterpart of https://www.ponoko.com/ and it cost me around 80€ including international shipping and customs fees. You can probably expect to pay half that much if you're ordering from Ponoko within the U.S.

Here's the file I used : https://www.dropbox.com/s/3t6ps53ypvco8rn/panel-cutout-v1.4-thinoutlines.ai?dl=0

You'll need Adobe Illustrator to edit it though. If you don't have that, it's pretty easy to design it yourself, using the template from ponoko.com and adding the lines (check the screenshot on page 2 of this thread to see what it looks like). Black is for a heavy fill, red for heavy lines, green for lighter lines, and blue is a cut right through the material. The documentation on the site is pretty thorough and full of examples.

Good luck!
 
Great setup Andrew! I am starting to build a setup quite similar myself. I already downloaded your files, but was wondering if you would have a parts list for the control panel available that you wouldn't mind sharing? Thanks!
 
Great setup Andrew! I am starting to build a setup quite similar myself. I already downloaded your files, but was wondering if you would have a parts list for the control panel available that you wouldn't mind sharing? Thanks!

Sorry, I'm afraid I don't have a detailed parts list, I sort of put together all the parts as I went along. I mostly followed Kal's setup and just changed the parts I needed to fit European 230V (so mostly the circuit breakers and contactors).
 
Back
Top