Hi fellas, I've recently purchased a 220v boil coil and rims rocket to start converting my home brewery over to an electric brewery. I need some advice on which panel I should go with. I'm somewhat handy and don't mind tinkering to much but at the same time I want a panel that works reliably. I really dig the hose head panel, it seems to have a nice balance when it comes to features and price. I've read a few of the threads on here about it and it seems to work okay, I have yet to be totally sold on it though after reading about intermittent shutdowns and the like. I really don't want to spend more than 600$ and would prefer to have dual element/pump support. I like the idea of being able to use a computer interface as my control and a built in gfci is not a concern as I have an electrician in the family who's willing to help me install a gfci in the panel. I've also been looking at the brew pi since the addition of their spark component which theoretically seems great but they seem to be having staffing problems and a slow turn around with updates and such, which concerns me. The blichmann tower of power is also an option as I'm sure it works great and I'd have the peace of mind knowing that it's a stable company and generally their stuff just works but I'd also be paying top dollar and not receive all the features I would prefer in a control. After weighing the pros and cons of these systems I'm still not sure what would be best for me and this a big investment which I dont want to regret and have to update at a later date. Any advice or options that I may be overlooking?
You are using an out of date browser. It may not display this or other websites correctly.
You should upgrade or use an alternative browser.
You should upgrade or use an alternative browser.
Advice on control panel
- Thread starter Daves1186
- Start date

Help Support Homebrew Talk:
This site may earn a commission from merchant affiliate
links, including eBay, Amazon, and others.
I went with a build it yourself 30a PID panel kit, built the box, pots/elements, and even the bench myself and I could not be happier.
The only thing I would change would be to bump all of my pots to 20 gal pots and switch out to SS elements (these were not out when I built mine) but I have not had an issues to date with my system.
Love it and have been brewing on it for a while now.
My build is in my sig if interested and I believe I included all supplier links and costing as of that time/date.
augiedoggy
Well-Known Member
ditto (although I am happy with my cheap 16 gallon bayou kettles...)
my build is also in my signature...
The nice thing about building your own is you know how to upgrade and configure as you see fit without spending a lot of money on something you would be afraid to modify or even repair yourself... building DIY vs buying is really not much different from buying beer vs brewing IMHO... There are those that just buy and will never understand the benefits of brewing your own...They come up with all sorts of reasons to justify their position and try to push their views on you without experience from both sides..... Well same here.. Doesnt make it wrong to do either. It is what it is though.. both have benefits and tradeoffs. Having a better understanding of how things work is never a bad thing though in any hobby... not having or wanting to learn this knowledge will certainly Cost you more in the long run. Possibly more than once.
Very nice setup guys, I can't wait to get my electric setup going. I understand what you guys are saying and I'm usually interested in going the do it yourself route. Unfortunately I have limited free time due to school/work and Im not able to accomplish a project like this in a timely period and I'm really hoping to get this thing rolling before my winter break is over in a few weeks. So I'm pretty stuck with purchasing something that requires minimal configuring/time, unless theres a kit available I've overlooked which does most of the heavy lifting for me and has the features I want. I forgot to mention in my last post, the ability to add automatic valve support which i could wire up at a later point. Is there such a kit out there that wouldn't take 37hrs to setup and within my 600$ budget. The brew pi sorta seems like it could fit this bill but I'm leery due to the lack of information about it.
augiedoggy
Well-Known Member
Very nice setup guys, I can't wait to get my electric setup going. I understand what you guys are saying and I'm usually interested in going the do it yourself route. Unfortunately I have limited free time due to school/work and Im not able to accomplish a project like this in a timely period and I'm really hoping to get this thing rolling before my winter break is over in a few weeks. So I'm pretty stuck with purchasing something that requires minimal configuring/time, unless theres a kit available I've overlooked which does most of the heavy lifting for me and has the features I want. I forgot to mention in my last post, the ability to add automatic valve support which i could wire up at a later point. Is there such a kit out there that wouldn't take 37hrs to setup and within my 600$ budget. The brew pi sorta seems like it could fit this bill but I'm leery due to the lack of information about it.
$600 isnt going to get you much if you want prebuilt components... maybe 3 kettles with the ports already added... MAYBE...
if you go BIAB there are some preassembled setups which might be close to your budget.
I dont know much about bru pi and the like, from what I read here the software seems to forever be under development and the fix is always coming soon in the next release... it seems to be a whole different involved hobby in itself but then again thats what some people say about a regular physical/ analog diy control and brewing system too...
If your looking at automated ball valves and the like it sounds like your looking at the engineering part of it as a hobby already Do you still want to brew the beer or do you want to build a machine that does it all for you
") Thats the argument that comes into play there. I put a lot of automated control in like stc1000+ units that have automatic temp profiles and ramping for fermentation and Ive found that I dont use it because its better to actually do it manually since the process is not always the same as far as the speed at which the fermentation takes place and such... If I was a production line always making the exact same beer recipes than yeah the stuff would have more merit I think but not as a home brewer.. Just my 2 cents from someone who learned it the hard way. I'm sure there are others who feel differently and I am not saying automation is bad I use plenty of it I just had to draw a line in the sand where I felt any more and I might as well have someone else push the brew button for me and buy it right?
Thats the argument that comes into play there. I put a lot of automated control in like stc1000+ units that have automatic temp profiles and ramping for fermentation and Ive found that I dont use it because its better to actually do it manually since the process is not always the same as far as the speed at which the fermentation takes place and such... If I was a production line always making the exact same beer recipes than yeah the stuff would have more merit I think but not as a home brewer.. Just my 2 cents from someone who learned it the hard way. I'm sure there are others who feel differently and I am not saying automation is bad I use plenty of it I just had to draw a line in the sand where I felt any more and I might as well have someone else push the brew button for me and buy it right?Yeah I hear you in regard to the cons of having to much automation. I just tend to go overboard with my hobbies and I could see myself wanting to add that functionality at some later point possibly, if only for the reason that it would something fun to do. Ive been looking at the the do it yourself builds you guys and many others have built and they do seem to be way better than anything you could buy. In particular the setups which have a BCS controller and touch screen displays, which is my ideal setup. I may push this project to a longterm deal and go that route, the options seem endless. So for the short term I still need something to get me up and running. I found this kit which is super cheap, seems like i could get it up in running in an hour or two and would hold me over in the interim. Unfortunately the only control is a spin knob, which is great for boil but i would also like to have the ability to set a temperature for my mash and have it stay without me having to make constant adjustments to dial the temp in while recirculating the mash. If i go this route I don't mind only having a bare bones setup where i could switch the power from my coil to rims rocket when necessary but i would like to have a PID also for dialing in the mash. You guys obviously have a good amount of knowledge when it comes to setting these things up. So i have these questions for you now, am i correct that this kit seem like it would only a few hours of setup time? Also how would i go about integrating a PID type control and temperature prob into this where I could choose to use that to mash and then switch element cords into the system and use the manual control via the knob to control the boil? Or is there a similar basic kit with a that you've heard of that has these or comperable features. Also i failed to mention I already have a 10 and 15 gallon kettles,brew tech mash tun, pump and plate chiller so I'm all squared away there, my 600$ budget is solely for a controller and whatever i need to get it running. Thanks for helping out.
http://www.stilldragon.com.au/diy-controller-kit-large-box/
http://www.stilldragon.com.au/diy-controller-kit-large-box/


$58.16
HUIZHUGS Brewing Equipment Keg Ball Lock Faucet 30cm Reinforced Silicone Hose Secondary Fermentation Homebrew Kegging Brewing Equipment
xiangshuizhenzhanglingfengshop

$176.97
1pc Commercial Keg Manifold 2" Tri Clamp,Ball Lock Tapping Head,Pressure Gauge/Adjustable PRV for Kegging,Fermentation Control
hanhanbaihuoxiaoshoudian


![Craft A Brew - Safale BE-256 Yeast - Fermentis - Belgian Ale Dry Yeast - For Belgian & Strong Ales - Ingredients for Home Brewing - Beer Making Supplies - [3 Pack]](https://m.media-amazon.com/images/I/51bcKEwQmWL._SL500_.jpg)

$10.99 ($31.16 / Ounce)
Hornindal Kveik Yeast for Homebrewing - Mead, Cider, Wine, Beer - 10g Packet - Saccharomyces Cerevisiae - Sold by Shadowhive.com
Shadowhive


$20.94
$29.99
The Brew Your Own Big Book of Clone Recipes: Featuring 300 Homebrew Recipes from Your Favorite Breweries
Amazon.com


$22.00 ($623.23 / Ounce)
AMZLMPKNTW Ball Lock Sample Faucet 30cm Reinforced Silicone Hose Secondary Fermentation Homebrew Kegging joyful
无为中南商贸有限公司


$53.24
1pc Hose Barb/MFL 1.5" Tri Clamp to Ball Lock Post Liquid Gas Homebrew Kegging Fermentation Parts Brewer Hardware SUS304(Gas MFL)
Guangshui Weilu You Trading Co., Ltd


$33.95
Five Star - 6022b_ - Star San - 32 Ounce - High Foaming Sanitizer
Bridgeview Beer and Wine Supply


$33.99 ($17.00 / Count)
$41.99 ($21.00 / Count)
2 Pack 1 Gallon Large Fermentation Jars with 3 Airlocks and 2 SCREW Lids(100% Airtight Heavy Duty Lid w Silicone) - Wide Mouth Glass Jars w Scale Mark - Pickle Jars for Sauerkraut, Sourdough Starter
Qianfenie Direct


$53.24
1pc Hose Barb/MFL 1.5" Tri Clamp to Ball Lock Post Liquid Gas Homebrew Kegging Fermentation Parts Brewer Hardware SUS304(Liquid Hose Barb)
yunchengshiyanhuqucuichendianzishangwuyouxiangongsi


$39.22 ($39.22 / Count)
Brewer's Best Home Brew Beer Ingredient Kit - 5 Gallon (Mexican Cerveza)
Amazon.com


$7.79 ($7.79 / Count)
Craft A Brew - LalBrew Voss™ - Kveik Ale Yeast - For Craft Lagers - Ingredients for Home Brewing - Beer Making Supplies - (1 Pack)
Craft a Brew


You can get both mash temp control and dial boil power control with a simple controller built around an Auber Instruments EZBoil controller (DSPR120 or DSPR300.) The mash control actually works better than a standard PID. Here's an example of a pretty simple design. You will need a separate RTD sensor in the mash vessel and boil vessel, and you would swap between them when you swap element cords. Note that this design uses an older version DSPR and the terminal assignments is different for the newer models. If you have specific features you're interested in, I can modify the design pretty quickly. You can omit the 1A switch for the DSPR if you don't mind if the DSPR comes on as soon as you plug the unit in.

Brew on

Brew on
@daves1186, I went the BIAB route with a single PID to get started. In the meantime, I picked up some kettles off Craigslist and plan on upgrading to a 3 vessel system in the next year. But I was able to get going under your $600 budget.
@doug293cz, I was going to start a thread about putting a DSPR1 in series with a PID for step mashes, but it looks like the DSPR120 or 300 would work great for that. You'd have to program a step at a time, though right?
@doug293cz, I was going to start a thread about putting a DSPR1 in series with a PID for step mashes, but it looks like the DSPR120 or 300 would work great for that. You'd have to program a step at a time, though right?
...
@doug293cz, I was going to start a thread about putting a DSPR1 in series with a PID for step mashes, but it looks like the DSPR120 or 300 would work great for that. You'd have to program a step at a time, though right?
Yeah, I did several designs that used the (really) old DSPR1 in combo with a PID, but when the DSPR110 (followed by DSPR120 & 300) came out things got really easy. The DSPR's don't have a temp step or ramp programming ability, so yes, each step temp needs to be set by hand. It's really simple though, just twist the knob to the new temp and then press the knob to enable the new temp.
Brew on
Yeah well that didn't take much convincing haha. So i guess I'm going to go the DIY route and thanks a-lot Doug for the willingness to help, i really appreciate it! Ive been looking into different controllers and a few different ones stood out to me. The ink bird STC-1000 seems pretty nice, 15$ and it looks polished as well. What do you think of that one in place of the Auber, is there any problems or reasons why the Auber would be a better choice? Also at the end of the day my tentative master plan would be to have a BCS controlled panel with an integrated touch screen. Im a total noob when it comes to being able to properly scope and know which parts I need to get these things working properly. Just a question would I be able to go the route of using a BCS controller and a inkbird? I would keep it for now as bare bones as possible, I'm thinking just those two components and 2 male L630 connection on the side, no external alarms, pump controls, etc. Obviously I would need a few extra parts in addition to those and thats where I get stuck. Would this me much more complicated than just using the Auber or ink bird and the boil control i mentioned earlier or would it involve many different switches and wiring? If its much more complicated I'm just going to to go the route you suggested. My terminology is most like not on point when I'm mentioning the different parts so hopefully you could decode my plans ha. Thanks again.
Yeah well that didn't take much convincing haha. So i guess I'm going to go the DIY route and thanks a-lot Doug for the willingness to help, i really appreciate it! Ive been looking into different controllers and a few different ones stood out to me. The ink bird STC-1000 seems pretty nice, 15$ and it looks polished as well. What do you think of that one in place of the Auber, is there any problems or reasons why the Auber would be a better choice? Also at the end of the day my tentative master plan would be to have a BCS controlled panel with an integrated touch screen. Im a total noob when it comes to being able to properly scope and know which parts I need to get these things working properly. Just a question would I be able to go the route of using a BCS controller and a inkbird? I would keep it for now as bare bones as possible, I'm thinking just those two components and 2 male L630 connection on the side, no external alarms, pump controls, etc. Obviously I would need a few extra parts in addition to those and thats where I get stuck. Would this me much more complicated than just using the Auber or ink bird and the boil control i mentioned earlier or would it involve many different switches and wiring? If its much more complicated I'm just going to to go the route you suggested. My terminology is most like not on point when I'm mentioning the different parts so hopefully you could decode my plans ha. Thanks again.
There are multiple versions of "STC-1000" from multiple suppliers (but not InkBird). InkBird makes something similar called the ITC-1000, and also the ITC-308. These are all dual acting thermostats, in that they can control both heating and cooling, but they are strictly on-off for above/below set-point. They are great for fermentation chamber control, but they are not good at mash temp control, and they are useless for boil control. They are also limited to 10A current output, which is inadequate for driving a heating element which may take 15A to 23A. They would not integrate with a future BCS controller.
The Auber EZboil is ideal for both mash temp control and boil power control. There is nothing else quite like it available, at least at the price point (if anyone knows of anything similar, please let us all know.)
It is possible to design controllers that are switchable between manual controls and a BCS, but they require a lot of additional internal switching and wiring to control manual vs. auto modes. They are not a beginner project (and based on your questions, you are obviously a beginner.)
The red highlighted phrase is particularly troubling. Anything supplying power MUST NEVER have male plugs on the output side, as these represent an electrocution hazard. The power supply side MUST ALWAYS have FEMALE receptacles. Male plugs are only to be used on the input side of the device receiving power.
Brew on
Alright that's what I assumed, I just figured I'd run it past to you know for sure. Thanks for pointing out where I said 2 male plugs, my hungry lady who was rushing me out of the house as I was trying to formulate my thoughts and I misspoke. I don't have a dedicated indoor brew area setup yet and I was going to purchase a L630 extension cord so I could use this setup outdoors as well as upstairs for the time being. The cord is pretty pricey and my thought was I could save a few bucks by having the control panel not have its own dedicated cord and just have a male plug on the power *input side and a female* on the output side to plug my boil coil and rims to. So don't worry I have no plans on having a live 220V male plug exposed to send me to an early grave. So yeah I think I'll take your advice and go with the Auber setup, it seems like it could provide me all the necessary functionality to get my system up and running. I'm going to take a look over your wiring diagram and see if there's anything I would like to add or omit and get back to you with my final plans. Obviously to have a solid understanding of these control panels, is there anything else you suggest I incorporate into this or look into?
As far as suggestions, it's all about the functionality and aesthetics that you want. Everyone is different. I can't tell you what you want, only what will work and what won't.Alright that's what I assumed, I just figured I'd run it past to you know for sure. Thanks for pointing out where I said 2 male plugs, my hungry lady who was rushing me out of the house as I was trying to formulate my thoughts and I misspoke. I don't have a dedicated indoor brew area setup yet and I was going to purchase a L630 extension cord so I could use this setup outdoors as well as upstairs for the time being. The cord is pretty pricey and my thought was I could save a few bucks by having the control panel not have its own dedicated cord and just have a male plug on the power *input side and a female* on the output side to plug my boil coil and rims to. So don't worry I have no plans on having a live 220V male plug exposed to send me to an early grave. So yeah I think I'll take your advice and go with the Auber setup, it seems like it could provide me all the necessary functionality to get my system up and running. I'm going to take a look over your wiring diagram and see if there's anything I would like to add or omit and get back to you with my final plans. Obviously to have a solid understanding of these control panels, is there anything else you suggest I incorporate into this or look into?
Brew on
@doug293cz Alright I think I almost have this figured out, I have all the parts you listed in you're wiring diagram sourced except for the two switches and fuses. I searched Auberins website and amazon but I don't think i found the right switches. Im think the build i would like to go with will use the ez boil controller, one female XLR panel mount connector, 10ft L6-30 male hardwired into the box, one female L6-30 power output, key selector switch wired to the element switch to make sure the element dosent come on when powering up and instead of the led in your diagram I'm thinking a led alarm combo that would sound if the temperature overshoots the set temperature. Im going to leave a picture of my cart from Auberins and a link to my amazon list, would you mind taking look when you get some free time to see if I chose the right components? Also how much more difficult would it be for me to add one or two pump controls to this setup? I foresee a package of beer landing on your door step once i get this thing running.
Cheers!
https://www.amazon.com/gp/product/3QJPPGRR6S/?tag=skimlinks_replacement-20


Cheers!
https://www.amazon.com/gp/product/3QJPPGRR6S/?tag=skimlinks_replacement-20
Last edited by a moderator:
@doug293cz Alright I think I almost have this figured out, I have all the parts you listed in you're wiring diagram sourced except for the two switches and fuses. I searched Auberins website and amazon but I don't think i found the right switches. Im think the build i would like to go with will use the ez boil controller, one female XLR panel mount connector, 10ft L6-30 male hardwired into the box, one female L6-30 power output, key selector switch wired to the element switch to make sure the element dosent come on when powering up and instead of the led in your diagram I'm thinking a led alarm combo that would sound if the temperature overshoots the set temperature. Im going to leave a picture of my cart from Auberins and a link to my amazon list, would you mind taking look when you get some free time to see if I chose the right components? Also how much more difficult would it be for me to add one or two pump controls to this setup? I foresee a package of beer landing on your door step once i get this thing running.
Cheers!
https://www.amazon.com/gp/product/3QJPPGRR6S/?tag=skimlinks_replacement-20
Your parts list is gonna need some work. Don't start buying things yet.
Most of the common control switches are limited to 10A max, so in order to control element powers of more than ~1000W @ 120V (2000@ @ 240V) you need to use them in conjunction with a contactor (usually a two pole power relay.) You also need to use contactors or relays if you want the interlock function that prevents the elements from being accidentally fired as soon as you turn on the main switch (known as a safe start interlock.) There are high powered switches, available for low cost, but they are just beefed up wall light switches, and many folks object to the aesthetics of using these (but they are used successfully.)
I'll work up a design proposal that incorporates you wish list in the next couple of days.
Brew on
Last edited by a moderator:
Adding pump controls is straightforward, but will require the panel to have a four wire (L1, L2, N, G) power feed, in order to split off 120V for the pumps If you already have a four wire outlet, then no problem. If you only have a three wire outlet (which needs to be L1, L2, N) there are a couple of options:
Brew on
- Run a new four wire circuit from the building's main panel.
- Use a spa panel to create a derived 4-wire feed.
Brew on
augiedoggy
Well-Known Member
there are alternatives like these as far as switches which should fit the bill perfectly.Your parts list is gonna need some work. Don't start buying things yet.
Most of the common control switches are limited to 10A max, so in order to control element powers of more than ~1000W @ 120V (2000@ @ 240V) you need to use them in conjunction with a contactor (usually a two pole power relay.) You also need to use contactors or relays if you want the interlock function that prevents the elements from being accidentally fired as soon as you turn on the main switch (known as a safe start interlock.) There are high powered switches, available for low cost, but they are just beefed up wall light switches, and many folks object to the aesthetics of using these (but they are used successfully.)
I'll work up a design proposal that incorporates you wish list in the next couple of days.
Brew on
http://m.ebay.com/itm/190818503022?_mwBanner=1
there are alternatives like these as far as switches which should fit the bill perfectly.
http://m.ebay.com/itm/190818503022?_mwBanner=1
Yeah, I'm familiar with those types of transfer switches. The aesthetics aren't much better than the Leviton 3032's, they are kind of bulky, and also can't be used in safe start interlock circuits (where a relay is required.) The price point isn't all that compelling either, although they might be a little cheaper than some options, it's a small difference in the overall price of a panel.
I have used them is a least one design, as there a certain functions for which they are well suited.
Brew on
augiedoggy
Well-Known Member
I'm apparently ignorant of what a safe start interlock is and how it relates to this use... My understanding is if you use a 3 position switch that switch would prevent two elements from being able to fire simultaneously and it instead only allow power to any one or no elements depending on position? I do use relays myself but if I had seen this when building my panel I would have considered it. Is this just to be sure that there is absolutely no live leg going to any element when off? Because I thought the 16 terminals on this switch could be wired to ensure that both legs of power are switched for each element? Working just like a contactor relay only with direct control no?Yeah, I'm familiar with those types of transfer switches. The aesthetics aren't much better than the Leviton 3032's, they are kind of bulky, and also can't be used in safe start interlock circuits (where a relay is required.) The price point isn't all that compelling either, although they might be a little cheaper than some options, it's a small difference in the overall price of a panel.
I have used them is a least one design, as there a certain functions for which they are well suited.
Brew on
Yes, the switch you linked works well for switching the power output between two outlets, and prevents the possibility of both being on at the same time. That's the type of place I might use it. The OP however won't have two outlets. OP will unplug one element and plug in the other (if I understand correctly.)I'm apparently ignorant of what a safe start interlock is and how it relates to this use... My understanding is if you use a 3 position switch that switch would prevent two elements from being able to fire simultaneously and it instead only allow power to any one or no elements depending on position? I do use relays myself but if I had seen this when building my panel I would have considered it. Is this just to be sure that there is absolutely no live leg going to any element when off? Because I thought the 16 terminals on this switch could be wired to ensure that both legs of power are switched for each element? Working just like a contactor relay only with direct control no?
A "safe start interlock" prevents any power from being applied inside the panel if certain switches are on. Typical switches you want to insure are "off" before applying main power are: element power enable switches, pump switches, etc. Then once the main power is on, the interlocked switches are enabled. The magic is done by using the main power contactor (or separate relay) to latch a bypass around NC contacts from the interlocked switches. You'll see an example when I post the schematic for OP's design. Then we can go thru how it works if needed.
Brew on
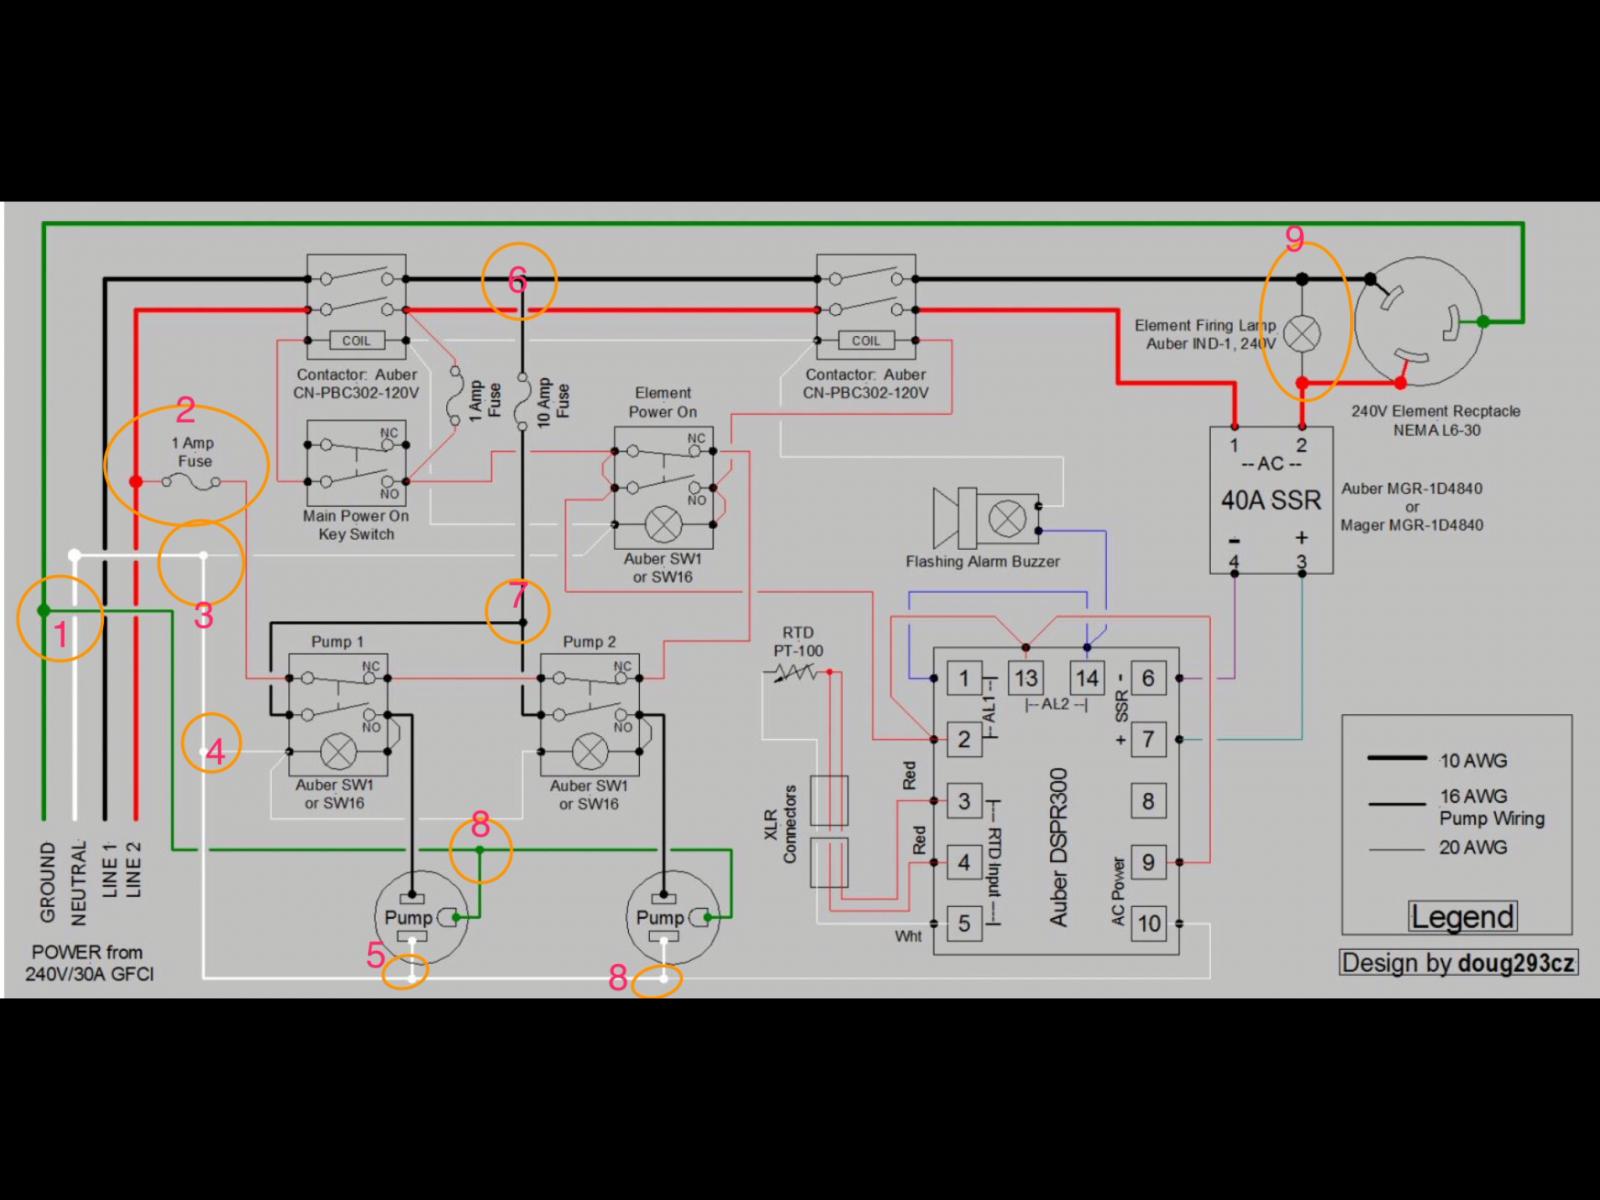
I couldn't get to sleep tonight, so I worked on @Daves1186 's panel design. Have fun trying to figure out how everything works. I'll add more explanation later, and answer questions. This design hasn't been completely double/triple checked, so don't start ordering parts/building yet. I need to get a good night's sleep before doing the verification. I deviated from "standard" schematic practice to show how some actual routing can minimize the need for terminal strips, by connecting two wires to device terminals where appropriate. I didn't do this quite everywhere, however.

You don't have to use the exact components specified. You can substitute similar components if they are rated as high or higher for voltage and current. The "Element Power On" and pump switches must have both an NC and an NO contact block. The keyed "Main Power" switch can be either 1NO/1NC or 2NO (or even 1NO.) I didn't include a separate "Alarm Disable" switch, but one could easily be added.
Brew on
I changed the design a little to improve the fuse protection of finer wiring. Of course, if you wire everything with 10AWG wire then the fuses aren't necessary, but using finer wire where possible makes the wiring job easier.

The design doesn't work quite the way I expected originally, but it still might be acceptable as is. The way the safe start interlock works is as follows:
Brew on

The design doesn't work quite the way I expected originally, but it still might be acceptable as is. The way the safe start interlock works is as follows:
- If the pump and element switches are "off", and the main power can be turned on, then the DSPR is powered up as soon as the unit is plugged into the power feed (display will light up.)
- If any one of the power or element switches are "on" when plugged in, then the DSPR will not be powered on (no display lights.)
- If the "on" switches are then all turned off, the DSPR display will turn on (displays will light), and the main power can then be turned on.
Brew on
YellowRiver
Well-Known Member
- Joined
- Jan 14, 2014
- Messages
- 84
- Reaction score
- 6
Wow great work Doug. Its great there are sources like you willing to help out the rest of us.
If I may ask.
Where would/could you add a switch to add a duplicate circuit such that one need not unplug and plug to switch elements? Am I oversimplifying it?
Its not what the OP wanted but my searches for the DSPR300 lead me to this thread and I want two element circuits but only one to be fired at a time.
Wow great work Doug. Its great there are sources like you willing to help out the rest of us.
If I may ask.
Where would/could you add a switch to add a duplicate circuit such that one need not unplug and plug to switch elements? Am I oversimplifying it?
Its not what the OP wanted but my searches for the DSPR300 lead me to this thread and I want two element circuits but only one to be fired at a time.
You interested in using a single DSPR to control the two elements, or a DSPR for each element and a switch so that only one element can be enabled at a time? If using a single DSPR, you need to switch temp probes at the same time you switch elements. And, to prevent the dreaded "Operator Error," the switching needs to be handled by a single switch.
Brew on
YellowRiver
Well-Known Member
- Joined
- Jan 14, 2014
- Messages
- 84
- Reaction score
- 6
Yes I was interested in only a single controller but I see your point. My guess is such a switch doesn't exist?. I got lost in the controller having a mash and boil mode. I've seen other schematics. The Dspr300 essentially takes the place of PIDs?
Yes the DSPR120 or DSPR300 replace a PID, and they do the job better than PID's as well (better control algorithm, at least for mashing.)Yes I was interested in only a single controller but I see your point. My guess is such a switch doesn't exist?. I got lost in the controller having a mash and boil mode. I've seen other schematics. The Dspr300 essentially takes the place of PIDs?
It is possible to switch both element and temp probe at the same time with the same switch, if that's what you want. What else do you want the control panel to do?
Brew on
I changed the design a little to improve the fuse protection of finer wiring. Of course, if you wire everything with 10AWG wire then the fuses aren't necessary, but using finer wire where possible makes the wiring job easier.
View attachment 381632
The design doesn't work quite the way I expected originally, but it still might be acceptable as is. The way the safe start interlock works is as follows:In order for the DSPR to be off when plugged in under all conditions, a separate safe start relay would need to be added. Not a problem if that's how you want it to work.
- If the pump and element switches are "off", and the main power can be turned on, then the DSPR is powered up as soon as the unit is plugged into the power feed (display will light up.)
- If any one of the power or element switches are "on" when plugged in, then the DSPR will not be powered on (no display lights.)
- If the "on" switches are then all turned off, the DSPR display will turn on (displays will light), and the main power can then be turned on.
Brew on
Hey Doug I've been pretty busy the past few day and just got some time to look over the diagram you provided. The safe start sounds like it will work fine as is. I just wanted to make sure that I don't accidentally dry fire the element when starting the control panel up. The wiring seems pretty straight forward the only question I have at this point is how connect the wires which don't go directly into a component? I circled the points I'm confused with in the diagram you provided, is there some sort of 3-way junction box I could use to split these connections or a method you suggest? Thanks a lot for the diagram it looks great and has everything I want at this point.
Attachments
Hey Doug I've been pretty busy the past few day and just got some time to look over the diagram you provided. The safe start sounds like it will work fine as is. I just wanted to make sure that I don't accidentally dry fire the element when starting the control panel up. The wiring seems pretty straight forward the only question I have at this point is how connect the wires which don't go directly into a component? I circled the points I'm confused with in the diagram you provided, is there some sort of 3-way junction box I could use to split these connections or a method you suggest? Thanks a lot for the diagram it looks great and has everything I want at this point.
One common solution for branch points is to use bus bars or terminal strips. Use Google Image search to get an idea what these look like. You can also do the same thing I did for other branches. I can redo the diagram to show how that is done, but the drawing will get ugly.
Brew on
Similar threads
- Replies
- 37
- Views
- 3K
- Replies
- 20
- Views
- 1K

Latest posts
-

-
-

-
Spike Conical Heater fails again--second in 3 years--ideas?
- Latest: Indian_villager
-
-

-

-
