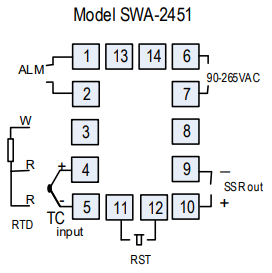
About eighteen months ago I took Augiedoggy's advice and bought a 1/2" NPT PT100 probe off of eBay. I put it aside and waited for the existing flimsy wired probe to fail. Today was going to be brew day, so of course today would be the day the old wires failed. I get a temp reading of "HH" when I connect the probe to my Auber SWA 2451. That seems to be the way it says there is a problem with the signal from the probe, and that, in turn, doubtless means a wire has broken or otherwise shorted.
The problem is that the replacement probe has four wires, while the existing probe has three wires. Will the replacement work? If so, how do I connect it?
I lack the vocabulary and understanding to know just what is going on here, so I will simply describe what I see:
All of the wires, old and new, terminate with spade connectors. The Auber SWA 2451 has three connections marked RTD that are numbered 3, 4 and 5. The current probe has a red wire with a red cover over the spade attached to #3, a blue wire with a blue cover over the spade attached to #4 and a white wire with a blue cover attached to #5. Does the fact that both the blue wire and the white wire have blue covers imply that the two were interchangeable when this unit still worked? Could I have attached the white wire to #4 and the blue wire to #5?
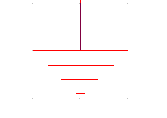
The four wires to the new probe do not have covers, but they do have labels. A red wire is marked A. Two white wires are marked B. The remaining wire has a clear cover over silver wire and it has a graphic symbol that is not easy to describe. It has a T at the bottom and three increasingly smaller horizontal times above and parallel to the top of the T.
Assuming a 4-wire RTD can be connected to a 3-wire input, it seems a safe bet to assume the new red wire goes to terminal 3 in place of the old red wire. What should I do with the other three wires?
Am I going to be able to brew with this tomorrow, or is it time for me to start looking for a Plan B?


![Craft A Brew - Safale S-04 Dry Yeast - Fermentis - English Ale Dry Yeast - For English and American Ales and Hard Apple Ciders - Ingredients for Home Brewing - Beer Making Supplies - [1 Pack]](https://m.media-amazon.com/images/I/41fVGNh6JfL._SL500_.jpg)


