Mini-Fridge Fermentation Chiller Project

Homebrew Talk - Beer, Wine, Mead, & Cider Brewing Discussion Forum

Help Support Homebrew Talk - Beer, Wine, Mead, & Cider Brewing Discussion Forum:

This site may earn a commission from merchant affiliate links, including eBay, Amazon, and others.

TwoHeadsBrewing

Well-Known Member
Joined
Feb 28, 2008
Messages
3,949
Reaction score
53
Location
Chico, CA
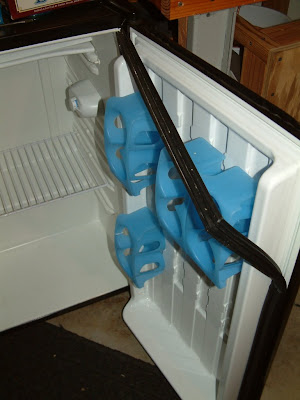
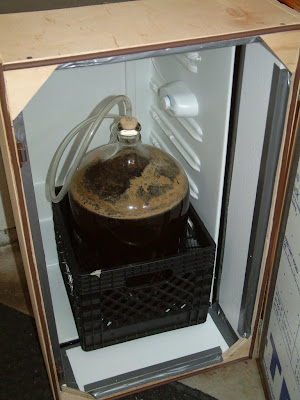
Around here it gets around and above 100F in the summertime, and even as I speak it is 80F inside my house. Therefore, I needed to build/buy some kind of fermentation chiller. As luck would have it, a good friend offered a mini-fridge he no longer used - score! The only problem was that it was just a wee bit too shallow to fit my 6.5 gallon carboy inside. So I thought perhaps it would be big enough without the plastic door material:

DSCF0165.JPG


I took the seal off for reuse later, and then cut/ripped off the plastic stuff:
DSCF0166.JPG


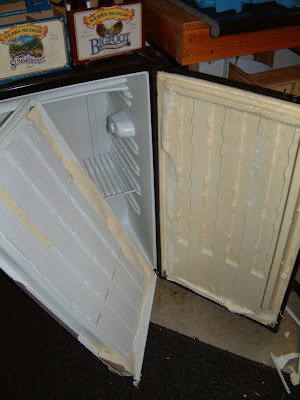
I suppose I could have measured first, before destroying the door...this still was not enough room.
DSCF0169.JPG


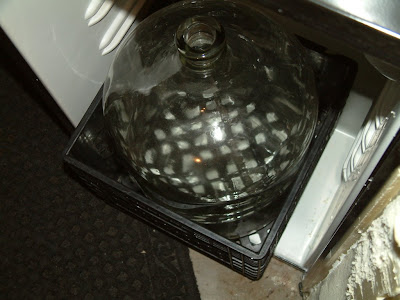
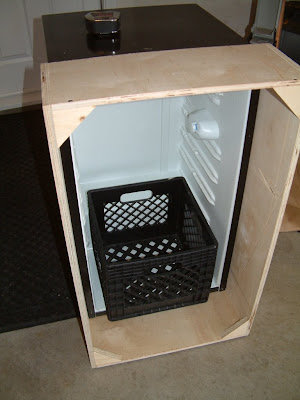
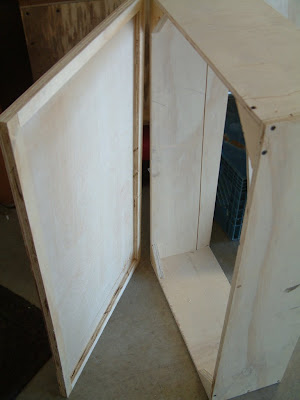
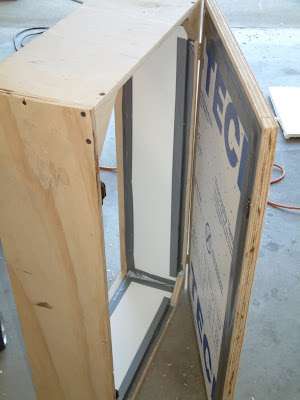
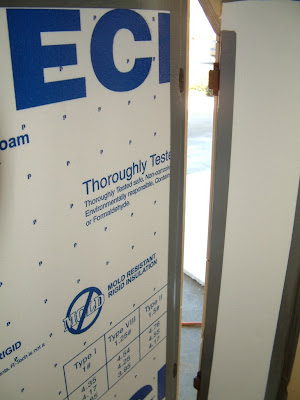
So, I decided to make a collar and door out of plywood, and insulate with 1" styrofoam:
DSCF0176.JPG
 
Next I needed to make the door, and insulate everything:
DSCF0010.JPG


Insulation:
DSCF0017.JPG


Added some simple hinges and two magnetic door latches:
DSCF0019.JPG


Seems to work well so far...and doesn't look too bad:
DSCF0024.JPG


More pics here: Fridge Project
 
Only a few things left to do:

1. Completely seal plywood on the interior. There are a few places that are exposed, so I think I'll seal those places with marine-type paint or varnish.

2. Sand and finish the exterior (maple stain, satin finish).

3. Get a temperature controller.

The temperature in here gets down to 60F in under an hour at the lowest setting. For now, I'm just clicking it on once or twice a day and it holds that temp just fine throughout the day. I don't expect that to work once my garage gets 100-120F in the middle of summer.

All in all it was a very easy project; took about 3 hours of work and under $15 in hardware and insulation. Sweet!
 
deathweed said:
Looks good!


A lot simpler than my idea:

https://www.homebrewtalk.com/showthread.php?t=54562

which I plan on starting to build this week...... Hopefully...:D


Love that idea! But, yes this is much simpler...although I like the idea of being able to "hide" the unit inside. Now if I could just figure out a single unit to hold my HDTV, DVD player, home theater setup, my HTPC, AND a couple fermenters I'd be set!
 
UPDATE: Over the past few days we've had some warm weather (88-90F), so it was a great time to test out the new fermentation chiller. I've held off on getting a temperature controller thus far, and have just been fiddling with the analog temp control knob in the fridge. With VERY fine adjustments I am able to keep the temp between 65-68F. Sweet!!! The only bad thing is that it took me a couple days of adjusting it to get it there, and I aint touching it again! I guess that means I'm stuck at that temp unless I want to buy a temp controller.
 
Well, it's a bit early here in Northern CA for 100F days...but they are here nonetheless. My garage is about 115-120F right now, and that is where my fermentation fridge is. To my relief the fridge is holding steady at 62F, which is perfect for 65F-68F fermentation temps. It seems to cycle on about 1-2 times per hour...hopefully this isn't to frequent to do any damage to the compressor.

So...operation frankenfridge successful! Just took a sample of my first all grain wheat beer, and it is downright tasty! The sample temp was 65F, which is perfect. Hopefully this fridge will hold up for a long time...works great for a single primary. I've thought about building an entire new box to hold 2 carboys, and using the internals of this fridge...but I don't drink that much beer. Guess I better get to work drinkin!
 
I was planning to screw the wood collar into the metal exterior of the fridge, but ended up scrapping that idea. When I put the collar around the fridge, it was so tight, it needed no extra attachment. I guess I made some good measurements and cuts, and it came out just right.
 
Very nice. I have an almost identical setup for my fermentation fridge.
Pretty much same thing, free fridge, not quite big enough. Unlike your model, the insulated plywood box is actually the door itself.

I built it so the hinge pins for the original door could be used and added a couple of 'foot locker' latches to make it seal tightly. I had to add a little platform so the fermenter would sit in the fridge (and the door would slide into place under it).

I like your design better.

Also no temp controller yet, and since my basement is at 75F, I can only run it a few hours before the temp drops too low (though it holds temp pretty well, only rising a couple degrees a day). I'm just going to have to buy one, before too long though since the basement is too warm in the summer and not reliably cold enough in winter for lagers.
 
It was a fun project to build, and cost effective too! I recently was given a gigantic freezer, which is now my fermentation/lagering chamber. The little fridge is now bottle storage...and in a couple months maybe a kegerator!
 
Wow! Now that is a fermentation chiller! I wonder what the power bill is for that thing. The only thing I would add to his project would be fans at each level that would turn on and off depending on temperature. That way you could have 3 different temperature zones.
 
Wow! Now that is a fermentation chiller! I wonder what the power bill is for that thing. The only thing I would add to his project would be fans at each level that would turn on and off depending on temperature. That way you could have 3 different temperature zones.

well he has to have flow because of the design. he is pulling the air from below into the coils which is warmer then the out flow. but yea its not the best design in the world but it works. like the walk in freezer i would plumb a return from the furthest point so it will pull the warm air into it and pull the cool air with it to create a flow if that makes sense. just like your home has a warm air or cold air return. but i think this makes sense to do since i already have the mini fridge and i really dont want to rip it apart. i just need it bigger. so i was thinking about doubling the chest size for 2 carboys. i am thinking of making the chest insulated with fiberglass instead of foam board. since it has a higher r rating. maybe i can make it like a hutch for the dining area.
 
Not that I want to discourage you from building a kick ass setup, but I would figure out how much this will all cost. His website stated he spent $358 in materials for the project. That's a little steep considering a VERY nice and roomy chest freezer can be had for under $300, and decent ones for around $200. After that, you just need a temperature controller and you're done! Plus it can double as a keezer/lagerator.

I just built my little unit because the fridge was free, and I had some scrap plywood laying around. That made it the most cost-effective solution...the only things I purchased were one sheet of styrofoam insulation, latches, hinges and some weather stripping for the door.

haha oh no i dont plan on building that same thing. i want to do like you but encase the thing in all wood using the mini-fridge instead of tearing it apart. and then doubling the size of the actual fridge so i can house 2 carboys. nothing too big. something the height of my 4foot fridge and 3 wide. then i can see how it works out. if it doesnt i can remove the fridge and use it for storage and build another one smaller. trust me when i say i lack existing furniture. the case can be used in the office am am finishing.
 
How well does this keep at temps now? would more insulation be better?

~M~

It holds temps quite well, but I would definitely go for the more expensive 1.5 inch thick "R-Max" stuff from Home Depot next time. It has a refelctive foil backing on both sides, and the styrofoam insulation is a lot easier to cut. The sheets are about $25 each, but well worth the money IMHO. I think a lot depends on where you intend to use the fridge. If it is inside an air conditioned house, then I would say the 3/4" styrofoam stuff is just fine. However, mine is outside in the garage that gets up to 120F in the summer so the extra insulation would keep the fridge from running all the time.
 
have you tried getting this down to lager fermentation temps yet??

Got a pilsner in it as we speak! It easily holds 45F in my 56F garage right now, but I'm pretty confident it would work for lagers in the summertime as well. With all the insulation, it really only works hard to get all that thermal mass down to temp. Once the wort is down to fermenting temp, the fridge doesn't cycle on but maybe once an hour.
 
sweet, i'm definitely building one of these.

I would definitely use the 1.5" RMAX sheathing, as opposed to the 1/2" styrofoam insulation. It offers quite a bit more insulation, is easier to cut, and makes less of a mess during the build. It's a bit more money, but a 4x8 sheet is still just $20 and goes a long way.
 
Hope you don't mind me asking, but how did this fridge hold up as a kegerator? were you able to get it down to serving temps? I'm on the fence about extending my mini, or just buying a chest freezer or kegerator. My mini keeps beer nice and cold and it's not even on the highest setting, so I"m hoping with a temp controller, I can keep two kegs at serving temp even with the extension. Any help you can offer would be greatly appreciated
 
I no longer have the setup, but I sold it and to my knowledge it's still working fine. I built the chamber in such a way that the fridge could be pulled out and replaced with another unit. It would get down to serving temps, but since this was in my hot garage it would have taken DAYS and probably run up my power bill. I served out of my fridge kegerator.

If you had a smaller chamber and it was very well insulated then it would work fine for serving. I really think the best option is a fridge. I got mine for $30 on craigslist and just painted it black. Adding taps and a CO2 manifold ran my up to around $100 which is a total steal I think.

Hope you don't mind me asking, but how did this fridge hold up as a kegerator? were you able to get it down to serving temps? I'm on the fence about extending my mini, or just buying a chest freezer or kegerator. My mini keeps beer nice and cold and it's not even on the highest setting, so I"m hoping with a temp controller, I can keep two kegs at serving temp even with the extension. Any help you can offer would be greatly appreciated
 
Hello TwoHeadsBrewing,

I made this box too (8" deep), and I cannot get the bottom to go on more than 1/4" without removing the casters. Did you remove the casters? or cut the bottom around the casters? Per your photos it doesn't look like you cut the bottom out at all?

Thanks,
Lorne

Next I needed to make the door, and insulate everything:
DSCF0010.JPG


Insulation:
DSCF0017.JPG


Added some simple hinges and two magnetic door latches:
DSCF0019.JPG


Seems to work well so far...and doesn't look too bad:
DSCF0024.JPG


More pics here: Fridge Project
 
Back
Top