3-in-1 "Boil Kettle, Jacketed Chiller, Conical Fermenter" by Brewha

Homebrew Talk - Beer, Wine, Mead, & Cider Brewing Discussion Forum

Help Support Homebrew Talk - Beer, Wine, Mead, & Cider Brewing Discussion Forum:

This site may earn a commission from merchant affiliate links, including eBay, Amazon, and others.
Need recommendations for my first batch using RO only water.

Brewing 11 gallon Heady Topper clone with 33 pounds of 2row and the following is what I get using Martin Brungard’s spreadsheet:

Adding to 18 gallons RO water before mash in:
12g gypsum
3.7g kosher salt
9.3g calcium chloride
0.4ml lactic acid

Results:
Calcium 76
Sodium 28
Sulfate 97
Chloride 99
Sulfate/Chloride ratio 1.0
RA -45
Mash PH 5.55 (about 5.2 hot)

Does this look about right, or does anybody have suggestions when brewing with RO water in the BIAC. Thanks!
 
RO doesn't make any difference in the 3 in 1. Do what you usually do.

I don't agree. If your municipal water has a high residual alkalinity, the added volume in the 3 in 1 is going to make it hard to get the mash pH down to acceptable levels without adding quite a bit of acid.

It's easier to start from RO water and then add minerals than to start with high RA water. That's especially the case for pale beers.
 
Need recommendations for my first batch using RO only water.

Brewing 11 gallon Heady Topper clone with 33 pounds of 2row and the following is what I get using Martin Brungard’s spreadsheet:

Adding to 18 gallons RO water before mash in:
12g gypsum
3.7g kosher salt
9.3g calcium chloride
0.4ml lactic acid

Results:
Calcium 76
Sodium 28
Sulfate 97
Chloride 99
Sulfate/Chloride ratio 1.0
RA -45
Mash PH 5.55 (about 5.2 hot)

Does this look about right, or does anybody have suggestions when brewing with RO water in the BIAC. Thanks!

I use RO in my BIAC and have ended up within 0.1 ph of the prediction from Bru'n Water for all of my batches (7 so far). Just make sure you put in the correct water volumn and you should be fine.
 
The question was would using RO in the BIAC be different than the recommended additions form the spreadsheet. The answer was NO.
 
I'm planning to brew a KBS clone to put into a 15gal whiskey barrel I'm getting. My grain bill will be 50lbs+ based on my expectations for lower efficiency (target OG is 1.092)

I was wondering what is the maximum grain bill anyone has used in a Medium BIAC? BREWHA website says 35lbs, but I have gone over 30lbs for a 10gal batch and still had plenty of extra space in the colander. This is my first time going for a 15gal batch. I have an old BIAB set up that I could do a separate mash in, but would prefer not to have the extra setup/clean up.

It gets tight but I've thrown a most of a bag of malt in but I second the suggestion to mash with the colander raised. If not, wort will run out the conical and down the walls, big mess. Good luck.
 
Need recommendations for my first batch using RO only water.

Adding to 18 gallons RO water before mash in:
12g gypsum
3.7g kosher salt
9.3g calcium chloride
0.4ml lactic acid

Does this look about right, or does anybody have suggestions when brewing with RO water in the BIAC. Thanks!

Especially if using RO, it would be a good idea to get yourself some MgSO4. Mg+ is an undervalued ion for many brewers but your yeast will thank you for the contribution. It acts as an enzyme cofactor for yeast, especially in high gravity environments. It also helps to have a salt that adds SO4 in case your calcium number is climbing high.

While you are on the hunt for additions to your blank slate water build, it may be worth it to source a zinc product (several commercial options), add diammonium phosphate, and research yeast vitamins (I toss in a couple grams of expired dry yeast the last 10 minutes of the boil).
 
Got my kegco 3 roller mill (see https://www.homebrewtalk.com/showthread.php?t=542542 - Edit: noticed I had the wrong link better one is here: https://www.homebrewtalk.com/showthread.php?t=500657). Seems very nice for half the price of the MM3. I did a few tests with gap and settled on 0.038, but will use a grain conditioned crush. Basically spray the grain down with 2% by weight of water from a spray bottle and give it 10 minutes to soak in. Huge difference. I am hoping this will give me great efficiency and not lead to the slow mash recirculation issues I have seen with finer crushes.

First pics are normal dry crush and the others are a grain conditioned crush at the same settings of 0.038 on the kegco mill.

I'll post my experience on the BIAC later, but this is a hell of a lot better hull structure with the same sized particles I was getting 83-88% efficiency on. This definitely should help speed up recirculation.

View attachment 305777View attachment 305778View attachment 305779View attachment 305780

How's your experience with this mill? I'm thinking of picking one up. Did you find a gap setting that maximized efficiency and recirc flow?
 
I've brewed multiple kettle sours on this - there's no concern with souring in the BIAC. The lacto is present in the BIAC, regardless of kettle souring..it's all over the malt that you're putting in there during the mash - the boil will kill any trace of lacto.

Most recently I did a kettle soured raspberry berliner weisse that turned out fantastic!

Thanks. A few weeks ago I finally got to brew on my medium BIAC. Followed your recipe/process and it turned out wonderfully!

I was really surprised at how quickly the kettle souring finished. In just about 24 hours the pH had dropped to 3.2! My beer yeast seemed to struggle mightily in the acidic wort. Lag time was around 20 hours. But slow and steady won the race, and it eventually finished fermentation in 7 days with a final ABV of 2.9%.

The beer is delicious, and I'm really excited at the prospect of experimenting further with kettle souring. This system is perfect for it.

Glad to hear it turned out for you :mug:
 
So what do people use to house their pump, power box, and controller?

I was thinking of buying/building a utility cart so I can wheel the whole unit along with the conical. It'd be great to get some ideas from the good people here.
 
So what do people use to house their pump, power box, and controller?

I was thinking of buying/building a utility cart so I can wheel the whole unit along with the conical. It'd be great to get some ideas from the good people here.

This is my setup…Cart with the power supply on it so I can wheel it around. The temperature controller is attached to 2 pieces of wood screwed together so I can hang it on the handle. After the mash is done, I wheel the BIAC out the door for the boil where two fans blow the steam out the hallway door. I then wheel it over to the sink to cool the wort down to 80F, then over to the chiller for fermentation. My pump just sits on the floor.

20160708_091016.jpg
 
That's exactly what I had in mind, thanks!

I've been reading more about spunding valves and I know some people here are fond of the PRV on the BIAC. Are people using this merely as a safety mechanism or are people retaining some dissolved CO2 as well?

It looks like 3 psi is on the low end of spunding approaches but I'd be interested in giving it a try. Naturally, building pressure in a unit that cannot handle close to carbonation is a concern so I wanted to get some feedback.

Edit:

I just looked on the Brewha site and it says that PRVs should not be used for main blowoff. What I had in mind was to use a blow off for the first 3-5 days and then begin retaining headpressure. There must be a work-around, maybe a ball lock valve closed to protect the PRV from debris from high kreussen you can open and cap the blowoff.
 
If I'm remembering correctly from college, rate of heat transfer depends on the temperature delta. So injecting coolant at the bottom when it is coldest, where the fluid you're cooling is also cooler, gives that wider delta, rather than trying to cool that fluid with a coolant that has been warmed up by injecting it at the top where the target fluid is hottest.

Someone correct me if I'm wrong.

So what is the problem that needs to be solved?
 
Did my 2nd brew on my medium system today. Went for a 10 gallon batch of an IPA recipe I'm working on:

Code:
Ingredients:
------------
Amt                   Name                                     
24 lbs                Pale Malt (2 Row)
3 lbs                 Munich Malt
1 lbs                 Crystal Malt 20L
1 lbs                 Crystal Malt 60L
1 lbs                 Melanoiden Malt
1.00 oz               Nugget - First Wort 60.0 min
3.00 oz               Azacca - Steep 30min
3.00 oz               Citra - Steep 30min
3.00 oz               Simcoe - Steep 30min

OG: 1.065
Pitched @ 65*F w/ 3 packs US-05


My efficiency was quite a bit lower than I hoped (60%) but a bright spot was being able to recirculate during the chill, having picked up a racking arm mentioned earlier in the thread (http://conical-fermenter.com/Racking-Arm-for-400mm-Diameter-Fermenters.html) and using this to whirlpool by recirculating back into the conical through the racking port.

I chucked all my steeping hop pellets into the hop basket included with the system, and lowered it into the recirculating wort. The basket was pretty packed... hope there was enough contact with the wort. I guess I'll know soon.

Anyway, recirc during chilling is pretty nice. After a 30 minute recirculating hopstand @ 160*F I knocked it down to 100*F in ~30 minutes with tap water, then had it down to 65*F in another 15 minutes with recirculating ice water courtesy of a grossly underpowered submersible pump. I know I could improve my time further with a stronger pump for the ice water, but I'm pretty pleased at the moment.
 
Just started doing some research for electric brewing and came across this. Skimmed through most of the pages and have a few questions:

1) For any of you that got the small BIAC, do you regret not going with the medium?
2) How easy would it be to use a therminator to chill into a carboy?

I don't see myself brewing more than 5 gallons at a time (I've been doing extract brewing for a few years), and I'm not sure the extra $1,400 to go to a medium is worth the cost.

I have the medium because I want to brew 5-6 gallon higher gravity batches. The small won't manage that. Keep in mind your going to need a 240 volt with GFE and probably an extension cord.
 
Hi all,

I’ve made it to the end of this thread and learned a lot of terrific information about BIAC brewing! Thanks to all for all the helpful hints and confirmation of many of the things I’ve been experiencing.

Background:
I got my medium BIAC last summer (2015) and have 15 10 gallon batches through it (batch 15 is fermenting). I’m in the mountains of New Mexico, so have garage brewed on 100F and 20F days. The thermal controls that come along with the system are great and the modes I’ve learned from this thread - as well as a few of my own - have helped tune this system to make highly drinkable beer. Only one bad batch in the lot when I errantly left the power control on 100% after I heated my strike water that ended up scorching my grains at dough in (shall I say DOH!-in). Lesson learned. Ended up with a “smokey” weizen bock. If only there was a way to “concentrate” this valuable alcohol into some other beverage - hmmm.

Mods:
Wort chilling in the summer when my tap water temps are ~80F is a challenge. I run my tap water through an immersion chiller in a 10 gallon cooler (which doubles as my keg cooler for picnics) of iced salt water to lower the temperature of the water going into the water jacket - still takes 45-60 minutes to cool to pitch temps. I’m installing a few other fixes (thanks to father’s day gifts from my kids) that will route my boiled wort through a hop rocket and therminator into a racking arm to whirlpool/hopback/filter and chill (all thanks to posts on this thread).

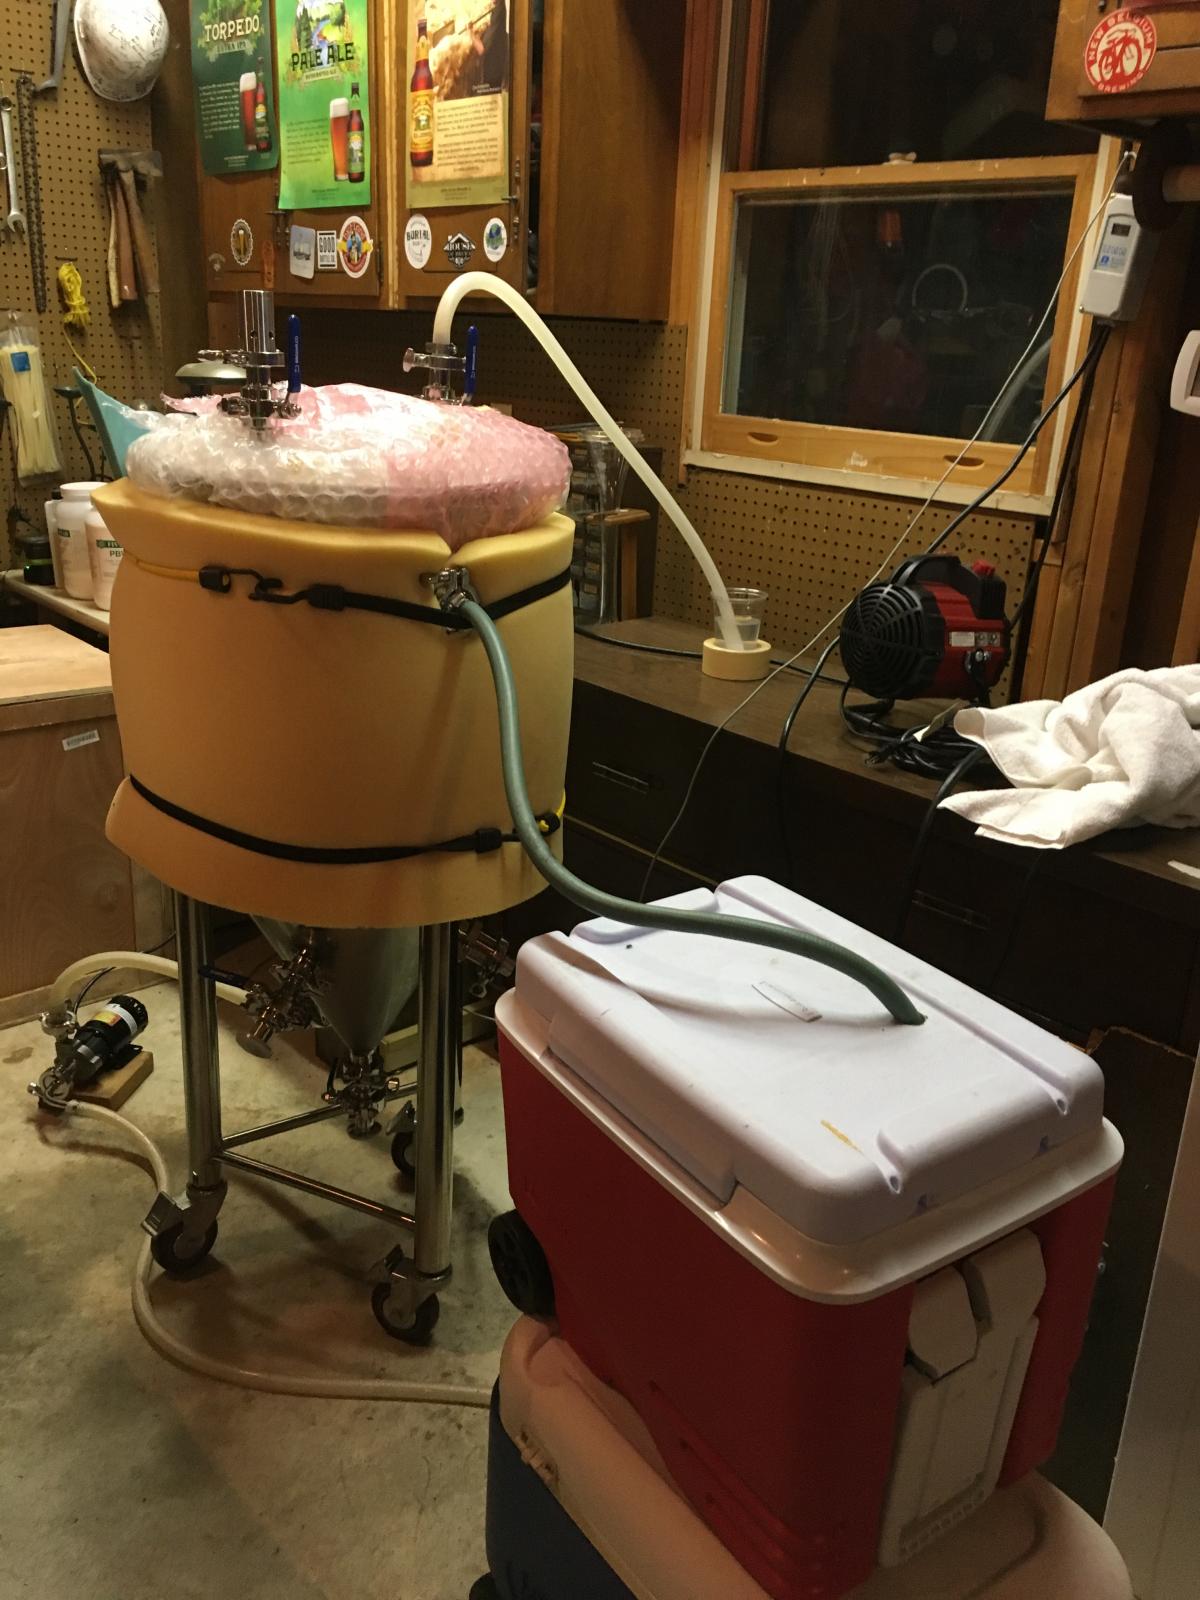
Ferm temp was solved with a couple of mods: I use the temp controller with the heating element on 1-2% for those cold nights - easy. For cooling, I roll my whole medium into an insulated box (2” foam) with an old window AC unit blowing into the "BIAC-erator" with the temp controller the show - heating or cooling. In the arid SW, it can be 100F in the day and in the 50’s at night - BIG SWINGS. However, as most have noted, once that big thermal mass is close on temperatures, it just takes some gentle nudging and a good temp controller to keep things on track. With the AC unit, I can get the beer to ~40F in a couple days - even with it’s near 100F outside (about 90-95 in my insulated, but un-cooled garage). I’d love a glycol system, but my kludged up AC system is holding it’s own for now and was a bit cheaper.

Anyway, enough for this post. Just wanted to say Hi and thanks for all the answers to my unasked questions on efficiencies, cooling, heating, grinding, dumping, hopping, whirling and everything else.

One last thing: Nathan is Awesome - no question!

Kent :mug:
May I ask: Are you using the analog power controller or the digital one? I bought my medium BIAC when the analog controller was standard. Are you able to fine tune the analog controller to 1 or 2% power input to the element? I have thought of using the element for heating during fermentation so that I could use my pump/jacket loop for cooling during the first few days of rapid fermentation. But I am hesitant to spend %500+ to get the digital one.

Thanks!

Unfortunately no, the analog will not put out such low output accurately. It is a big hike to spend when you have a power box that works fine.
 
My efficiency was quite a bit lower than I hoped (60%)

My efficiency has been about 60% as I just about always brew a higher gravity IPA (1.060-1.086). I usually add about 20% more malt and bump up the hops for a 5 gallon brew that I scale to 11 gallons. (I scale it to 11 gallons then add malt to make up for a high gravity no sparge brews). I brew 11 gallons because I want to get 10 clear gallons into 2 carboys.

I have recently gone to brewing with RO water and if you haven't read this forum I think you should check it out:
https://www.homebrewtalk.com/showthread.php?t=198460

The reason I started brewing with RO water is because I wanted to get consistent results when brewing and because I was over salting my brewing water. I use Martin Brungard's spreadsheets and his spreadsheets are spot on for water chemistry, but be careful about his recommendations for a pale ale profile as far as sulfide is concerned. Unless you know you want a high profile sulfate brew, keep the sulfate to chloride ratio lower, like less than 2 to 1 sulfide to chloride. You can experiment with the beer by adding sulfate to a glass finished beer to see if you want to increase the sulfide on the next batch you brew.

I brewed several batches that were just....not very good because I over salted my water. I thought I was doing the right thing in adding lots of gypsum to bring the PH down, but I should have been cutting the water with distilled water and/or adding more calcium chloride to lower the PH. So now, I just start with RO water and add the salts I want to get the profile I need.

Read the entire thread above from ajdelange for water chemistry and it may change the way you prepare your brewing water.
 
Has anyone used the 3-in-1 for any sour beers other than the kettle soured ones with lacto, IE Brett? Curious if you just got separate racking tubes/kegs/lines for the sour/bug beers vs standard.

I'm assuming the heat from the 3-in-1 during boiling kill off anything remaining within the 3-in-1 itself? Any thoughts of pasteurizing the beer post-fermenatation?

I suppose most people would rack off into another vessel to ferment with as brett tends to take it's time and would tie up the 3-in-1 for a while.
 
Has anyone extended their thermowell? I am having a new one made that with wide enough to accommodate two sensors (one for control, and one for data logging) and since I can modify the length I wanted to get a feel from others here who have done the same.

Anyone got 6"? I know the element needs to be avoided, but I have a batch of beer conditioning in my vessel so I can't measure myself. I was thinking 4.5" might be a good middle ground.
 
I've had so much global travel and freaking stress in 2016 that I have brewed very little beer and I've also let a lot of wine sit in bulk aging for waaay too long. I sure hope 2017 is better.
 
I have recently gone to brewing with RO water and if you haven't read this forum I think you should check it out:
https://www.homebrewtalk.com/showthread.php?t=198460
Right on, I use the same spreadsheet and *did* use his recommended Pale Ale profile. As I've been drinking on the beer for a few weeks now, I can say the hop flavor profile isn't precisely what I desired - it's beautifully complex and fruity but only after lingering on the palate for quite some time. I was hoping for more of a "punch" of flavor up front. I'm still not experienced enough with water chemistry to know if changing the salt additions will impact this, but I do thank you for the link. Will definitely make time to read it before my next brew.

Has anyone extended their thermowell? I am having a new one made that with wide enough to accommodate two sensors (one for control, and one for data logging) and since I can modify the length I wanted to get a feel from others here who have done the same.

Anyone got 6"? I know the element needs to be avoided, but I have a batch of beer conditioning in my vessel so I can't measure myself. I was thinking 4.5" might be a good middle ground.
I use a BCS for temp control/logging and I'm eagerly awaiting Brewer's Hardware (or any other vendor) to stock a 5" triclamp BCS probe. I currently use their 3" model and it just barely protrudes into the lumen of the vessel. Every time I email them they're always "a few weeks" from being stocked... Been thinking about having my own made, as well.
 
I use a BCS for temp control/logging and I'm eagerly awaiting Brewer's Hardware (or any other vendor) to stock a 5" triclamp BCS probe. I currently use their 3" model and it just barely protrudes into the lumen of the vessel. Every time I email them they're always "a few weeks" from being stocked... Been thinking about having my own made, as well.

It looks like a 6" thermowell would sit nicely into the vessel and keeps clearance from the element. I am putting in an order for one to be made withh 1/2" ID tubing to fit both sensors.

I don't know how to use the BCS system, it has all looked so daunting to me when I look at the schematics. It's not my area of comfort.
 
Has anyone used the 3-in-1 for any sour beers other than the kettle soured ones with lacto, IE Brett? Curious if you just got separate racking tubes/kegs/lines for the sour/bug beers vs standard.

I'm assuming the heat from the 3-in-1 during boiling kill off anything remaining within the 3-in-1 itself? Any thoughts of pasteurizing the beer post-fermenatation?

I suppose most people would rack off into another vessel to ferment with as brett tends to take it's time and would tie up the 3-in-1 for a while.

No issues with kettle sours in the system if you accommodate the system. Mash, sparge, pitch lacto at 110F and hold until the pH is to your liking (I like 3.3 for tart and 4.2 for subtle sour) then boil and add hops as you would another beer. There shouldn't be any contact with a surface that could cause long-term contamination.

I was worried about keeping separate lines for Brett but so long as you have good sanitary practices you should be fine. I make a point of cycling boiling wort the last five minutes of a brew, if you do that you can further sanitize your hard to reach areas like in the pump.
 
It looks like a 6" thermowell would sit nicely into the vessel and keeps clearance from the element. I am putting in an order for one to be made withh 1/2" ID tubing to fit both sensors.
That sounds pretty rad, from where are you ordering this custom probe?

I don't know how to use the BCS system, it has all looked so daunting to me when I look at the schematics. It's not my area of comfort.
Apologies if I missed it, but what are you currently planning on using for logging?
 
I have had pieces made by Brewers Hardware and Brew Hardware. I had a through-wall whirlpool arm made so I can recirculate the wort post-boil through the racking port and into the lid. The exit into the kettle is at a 90 degree turn so you get a ton of movement fully open. My beers have been so juicy since and crash cooling can be done in a fraction of the time. They both do good work and are fair in their pricing.

Data I'm looking to log is temp (temp probes), gravity (gyroscope sensor), and fermentation activity (pressure sensor on a spunding valve) to establish fermentation benchmarks for each varietal. It is good to know your yeast and I haven't yet set up a way to measure characteristics.

edit:

In terms of the pressure sensor, I want to measure the lag period (from pitch to start of CO2 production), growth phase, and then slowed conditioning by seeing when pressure builds to a set psi and then releases with an adjustable pressure relief valve. When CO2 gets kicking hard the measurement should show greater frequency and short wavelength, as things slow the inverse becomes true.

I haven't tried this yet but I hope to get started on my next batch of beer.
 
Right on, I use the same spreadsheet and *did* use his recommended Pale Ale profile. As I've been drinking on the beer for a few weeks now, I can say the hop flavor profile isn't precisely what I desired - it's beautifully complex and fruity but only after lingering on the palate for quite some time. I was hoping for more of a "punch" of flavor up front. I'm still not experienced enough with water chemistry to know if changing the salt additions will impact this, but I do thank you for the link. Will definitely make time to read it before my next brew.

I use a BCS for temp control/logging and I'm eagerly awaiting Brewer's Hardware (or any other vendor) to stock a 5" triclamp BCS probe. I currently use their 3" model and it just barely protrudes into the lumen of the vessel. Every time I email them they're always "a few weeks" from being stocked... Been thinking about having my own made, as well.

Jubalon on your BCS can you share any best practices for temp management? I have a full BCS control nit I have been slowly modifying to work with the BIAC and I think, but I am not positive I am now able to get it to cycle the element at lower power (3%) when I dont want to scorch anything. I am curios what others may be using in this area outside of Nathan's model (which is severely lacking)
 
Jubalon on your BCS can you share any best practices for temp management? I have a full BCS control nit I have been slowly modifying to work with the BIAC and I think, but I am not positive I am now able to get it to cycle the element at lower power (3%) when I dont want to scorch anything. I am curios what others may be using in this area outside of Nathan's model (which is severely lacking)

TL;DR: Aside from the boil State, all of my hot side temp control is via PID with the pump On - except for during kettle souring, where PID is used but the pump is off. Cold side is all Hysteresis/Cool. I use the element kit supplied by Nathan and have had no problems with scorching. Read on if you want details.

Caveat, I don't think I'm using the BCS to its full potential wrt to automation (I change between states and processes manually), so I'm sure process improvements exist. This works for me, though. Also please note I use a control panel with physical switches that allow me to interrupt the output signals from the BCS as a backup safety measure. I'm also going to assume you're familiar with BCS terminology and wiring practices. With those disclaimers out of the way, here goes...

I've got three Processes defined: Mash, Boil, and Fermentation. I have one Temperature Probe and two Outputs (Pump and Element) which control SSRs that in turn control electrical outlets mounted to my panel.

Mash: Two states, Strike Heating and Mashing. In both, I have my pump output in Direct Mode, permanently set to On. Element output is in PID Mode, set to whatever I want my strike or mash temp to be depending on what state I'm in.

Boil: Three states, Boil Heating, Boil, Hop Stand. Again, pump output is Direct On in all three. In Boil Heating the element output is PID controlled with a setpoint of 208*F; in Boil I use a 75% duty cycle to keep a vigorous boil; for Hop Stand the element out is PID controlled to 160*F.

Fermentation: For this I disconnect the Chugger pump from my BCS-controlled outlet and plug in a submersible pump which sits in an igloo cooler full of ice water. Pump out goes to the jacket inlet, and jacket outlet goes back to the cooler courtesy of silicone tubing. On the BCS I have the pump Output in Hysteresis/Cool Mode, set to whatever temp I want with a 0.5 degree Swing. I have a few different States set up with some of my frequently used temps, and a Cold Crash state preset to 45*F.
 
I currently use the system that Nathan sells, which is the 10G BIAC and the Lindr chiller. Got to say that the setup is pretty awesome except that mash temperature control is somewhat inconsistent in that actual mash temperatures varies significantly throughout the mash even though the temperature controller says it is at a specific temperature, ie. 152F. I have a 2 foot long temperature probe sold by Thermoworks where I can measure the temperature at all depths in the mash. The temperature can be 154F at the surface, 147F at the base of the mash-tun, and all temps in between. With 18 gallons of water, 32 pounds of grain, and 2 pounds of rice hulls, getting a consistent 152F throughout the mash-tun is difficult. Just because the temperature controller says 152F and the recirculation looks good, doesn’t mean that the entire mash is at 152F. The variation in the mash temps have not effected the amazing quality of beer I can make with this system.

What I have been doing is mashing in with 168F water with the 34 pounds of grain and hulls, and keeping the temperature controller at about 157F to get a grain temperature near 152 (BTW, 18 gallons of water and 34 pounds of grain maxes out the 10G BIAC). I stir the mash about 4 times during the hour. After an hour, I start raising the temperature by a few degrees every 5 minutes or so until I get to 174F on the controller. The grain temperature never gets past about 167F all the while I am raising the controller temperature. I have done thirteen 10 gallon batches now in my BIAC and the results are consistent.

Temperature control with the chiller and during fermentation is excellent, within 1 degree. I normally chill the wort with Chicago city water to near fermentation temps, then hook it up to the chiller. Precise fermentation control is achieved by using the chiller, and using the heating probe set to 3% power setting. I only use one or the other, but because my basement is near 66F, I have to switch to the heating element near the end of fermentation to raise the temps to 67F and above to finish off.

When fermentation is done (I usually wait for 2 weeks), I set the temperature controller to chill the wort to 37F. After a day or two, I generally fine with gelatin and leave it for 2 more days at 37F (this is the lowest setting I can achieve with the water chiller). Then rack the clear beer to 2 corny kegs.

I recently had a problem with the chiller that confused me. My chiller sat on the floor and for the first 11 batches the system worked as advertised. Then I started getting back-flow from the jacket into the chiller through the input hose when the temperature controller shut off the chiller. The result was 2 gallons of water into the overflow bucket, then icing of the coils in the chiller the next time the chiller was turned on. The fix (Nathan’s advice) was to elevate the chiller to be at or slightly above the jacket so the back-flow does not happen. That fixed the problem.

Have any of you experienced the same things I have???
 
Apologies if I missed it, but what are you currently planning on using for logging?

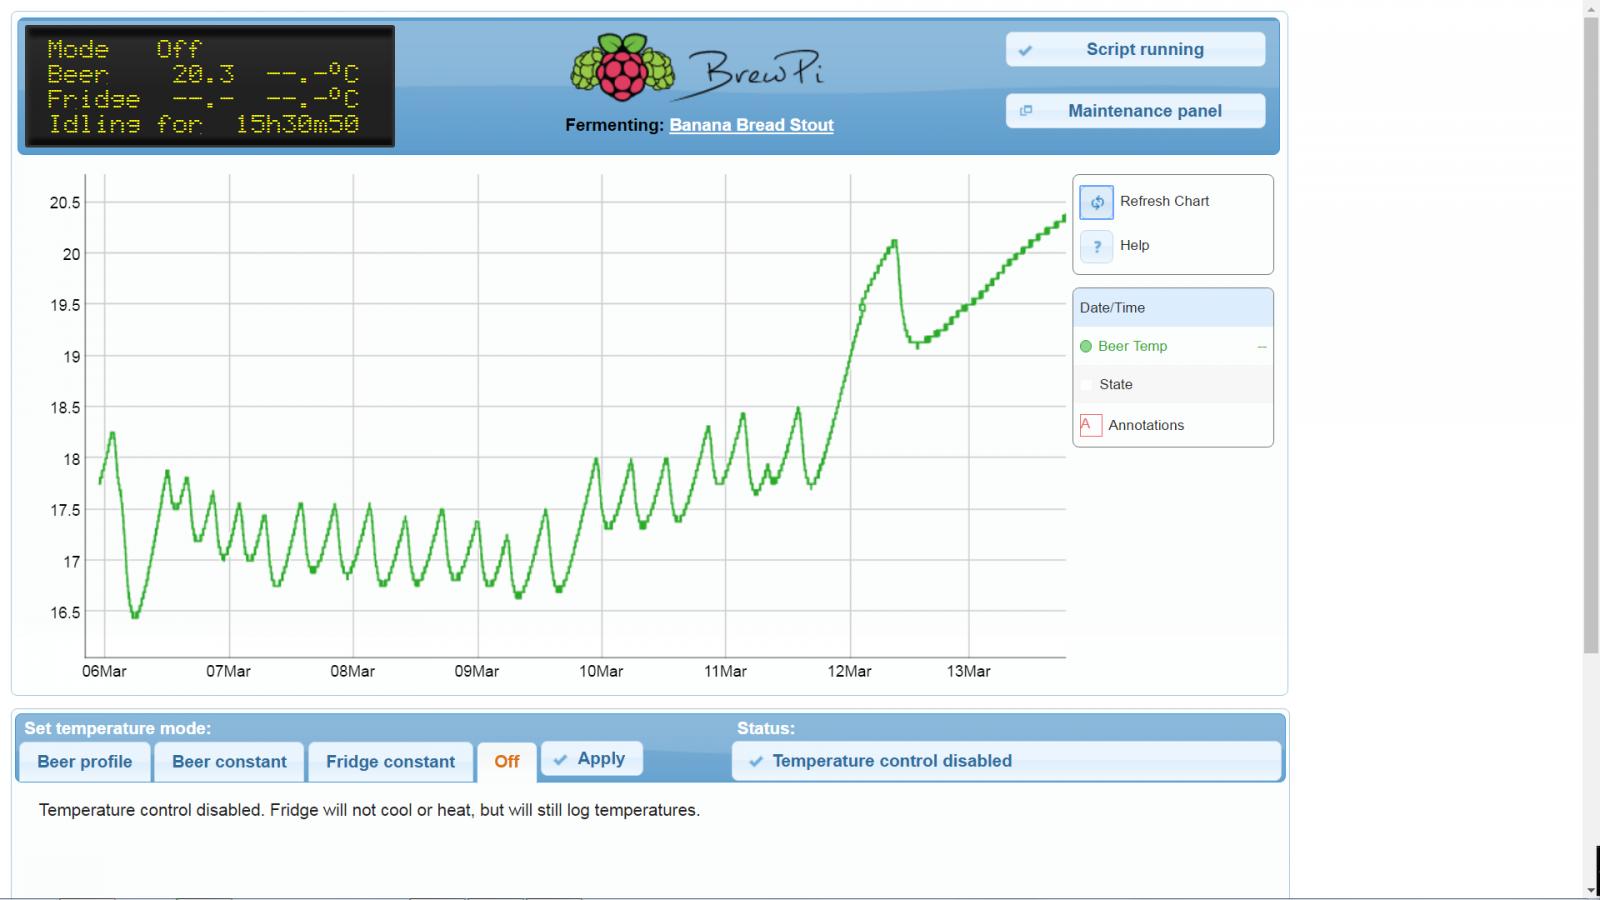
This is my first run with the system. It was clunky to get started to say the least but I will be able to attach SSRs, solenoids, many more sensors (wireless hydrometer is on the list), and store the data on a Raspberry Pi. The reading is from the new thermowell I had made that fits both sensors for the Aubrey ETC and the BrewPi.

As per the conversation regarding temp fluctuations in the mash, I will have to examine this more closely my next brew day. A 10 degree difference might say to me there may be some channeling going on where flow is rushing past sections of your grain bed. You may not have it as bad as dough balls, but overmixing, suction from recirc, and a host of other possibilities could be reducing the temp distribution. In a conventional system with no recirc during the mash, these cold spots are common enough but I would be surprised to have such a large range in the mash with constant recirc.

I am pulling an average of 82-83% batch efficiency off the system. I stopped recirculating into an open line in the mash vessel. I got channeling from the flow and needed to babysit it to make sure as density increased that the flow was consistent. Now I have an automatic valve I adjust to 2 inches above the grain bed, and hook up a 4 way manifold and the grain bed doesn't budge through sparge.

Brew day log.jpg


primary fermentation and diacetyl rest of banana bread stout.jpg
 
I recently had a problem with the chiller that confused me. My chiller sat on the floor and for the first 11 batches the system worked as advertised. Then I started getting back-flow from the jacket into the chiller through the input hose when the temperature controller shut off the chiller. The result was 2 gallons of water into the overflow bucket, then icing of the coils in the chiller the next time the chiller was turned on. The fix (Nathan’s advice) was to elevate the chiller to be at or slightly above the jacket so the back-flow does not happen. That fixed the problem.

Have any of you experienced the same things I have???

I've been using the chiller raised barely off of the ground for the past year and haven't had any problems with over flow. The key is to secure the end of the return hose so that it's completely under the tank water level. This prevents the siphon effect from pulling water from the BIAC jacket to the tank.

As for mash stratification I can't really comment because I've never probed the temp in different areas. I also stopped using the mash colander completely in favor of a large BIAB bag. By adding a SS rack that sits just above the element I can use an XXL Wilser BIAB bag. It's provides better filtering than the colander, makes the grain easier to squeeze, and is much easier to handle.

When doing a smaller batch with the colander I found that I really had to monitor the pump flow rate to prevent the water level from falling below the heating element. With the BIAB bag I haven't had this problem at all, even with a high wheat content grain bill.
 
I don't like name dropping the folk I got it from, they don't need any help getting play time. But I looked for alternatives and nothing is steel. Blichmann Auto Sparge attached to a tri-clover fitting with a 1/2" FPT threading so the whole unit can be attached in one go.

I am brewing on Friday and will take photos to show the set-up.
 
I have been reading thru the thread again for mention of using a bag in the colander. I've done 8 batches in my medium BIAC and waiting for the raised colander to drain is a PIA. Plus I think dumping a bag and cleaning would be easier than a colander. Anyone have experience with a bag? If so how did it work.
 
I currently use the system that Nathan sells, which is the 10G BIAC and the Lindr chiller. Got to say that the setup is pretty awesome except that mash temperature control is somewhat inconsistent in that actual mash temperatures varies significantly throughout the mash even though the temperature controller says it is at a specific temperature, ie. 152F. I have a 2 foot long temperature probe sold by Thermoworks where I can measure the temperature at all depths in the mash. The temperature can be 154F at the surface, 147F at the base of the mash-tun, and all temps in between

I don't mean to discredit your experience friend, but I tested this yesterday on my brew and I'm within 1 degree C from ETC and anywhere in the grain bed. It could be that I made a Berliner (1.037) and therefore didn't have a big enough grain bed to cause inconsistencies. I will check again next brew and see. But my initial conjecture may still hold up that you have a channeling issue going on.

I will send along images of how we use the medium system and maybe that might give you some ideas on how to adapt. It took us a long time to learn how to use the equipment the best way.
 
Hello All,
Have any of you found a good way to store the lid to the 3-in-1? I normally keep the mash tun inside the 3-in-1 with the lid on. However, that lid is not as important as the 3-in-1 which does not need to get scratched. As you all know, that lid is bigger and only fits the 3-in-1. I guess I can keep storing it in a large plastic trash bag. But this is a creative group...
 
Back
Top