• Please visit and share your knowledge at our sister communities:
  • If you have not, please join our official Homebrewing Facebook Group!

    Homebrewing Facebook Group

Water saving cooling solutions

Homebrew Talk

Help Support Homebrew Talk:

This site may earn a commission from merchant affiliate links, including eBay, Amazon, and others.

Mike T

Member
Joined
May 8, 2019
Messages
18
Reaction score
8
Hi All,

wanted to post to see if people had some really good cooling solutions that save water and are inexpensive. I also wanted to share an idea I had and wanted to get some feedback.

my idea:

I was thinking of getting some glycol and making a glycol/water combination and putting it in a freezer in a cooler to get as cold as possible (this would act to get it below freezing temperature and make it thicker so it absorbs more heat). I would use this to pump into my wort chiller and have it exit into another cooler filled with ice. I think some combination like this might work, even though this might be better for late cooling (from 110 - 65). Thoughts? I like this as it allows me to reuse the water/glycol solution and has minimal water waste.

I haven’t made the investment in a plate chiller due to concerns over clogs.

happy to hear any suggestions.

thanks!
 
Could you set up a closed system of cold, hot (wort) and back to cold using a pump? Basically a radiator but with ice.
 
Could you set up a closed system of cold, hot (wort) and back to cold using a pump? Basically a radiator but with ice.
That’s what I am thinking. Have it pass through ice and then recirculate back
 
I use an immersion chiller and a method many here use. I run it normally with tap water straight through for a few minutes -- you can collect the hot water coming out in buckets for cleanup after brewday, if you really want to conserve. This gets the wort to 90-100°F pretty quickly. Then I switch to using a utility/sump pump in a tub of ice water (mostly ice at the start, maybe 20 or so pounds) to recirculate through the IC. This gets me down to lager pitching temperature before all the ice is melted, usually less than a half hour total chilling time.
 
I use an immersion chiller and a method many here use. I run it normally with tap water straight through for a few minutes -- you can collect the hot water coming out in buckets for cleanup after brewday, if you really want to conserve. This gets the wort to 90-100°F pretty quickly. Then I switch to using a utility/sump pump in a tub of ice water (mostly ice at the start, maybe 20 or so pounds) to recirculate through the IC. This gets me down to lager pitching temperature before all the ice is melted, usually less than a half hour total chilling time.
That’s kind of what I was thinking was necessary. Using a cold bath right away for a temperature delta of close to 200 degrees would certainly turn the bath warm quickly. I agree my method is best used for later stage chilling.
 
That’s what I am thinking.
That's cool (no pun intended). Unfortunately, I'm not the guy who could design such. There are plenty here who could do it without blinking. Some of the stuff I see created here is impressive.
 
I save the water from the wort chiller in a barrel to be used in a non-potable way. I have considered making a second wort chiller for the summer months that sits in homemade ice where the water from the faucet can travel through that, then the wort and finally into the barrel. That's about maxing my skill level.
 
I save the water from the wort chiller in a barrel to be used in a non-potable way. I have considered making a second wort chiller for the summer months that sits in homemade ice where the water from the faucet can travel through that, then the wort and finally into the barrel. That's about maxing my skill level.
I used to do that, and it wasn't nearly as effective as recirculating ice water in the second stage, and as such used much more time and water without chilling to as low a temperature. I'm not an engineering oriented brewer either. The only skill required for the method I described is taking the feed hose off the faucet at some point and screwing onto the sump pump, which is ready to use out of the box from the hardware store, and sticking the other hose into the ice bath. I've found it to be a much better solution, and a utility pump costs less than a second immersion chiller.
 
Are you in an area that has water restrictions or where water is unreasonably expensive? Most of the time water is the cheapest way to do this. If your water isn't cold enough to make fast work, making your own ice and then pumping ice water through the chiller and out into a holding tank is the next best thing. A closed loop will just add heat into your cold storage. Ice has a lot more heat capacity than water with antifreeze due to the energy needed for the phase change.
 
I used to do that, and it wasn't nearly as effective as recirculating ice water in the second stage, and as such used much more time and water without chilling to as low a temperature.
That is good to know. Thank you.
 
Are you in an area that has water restrictions or where water is unreasonably expensive? Most of the time water is the cheapest way to do this. If your water isn't cold enough to make fast work, making your own ice and then pumping ice water through the chiller and out into a holding tank is the next best thing. A closed loop will just add heat into your cold storage. Ice has a lot more heat capacity than water with antifreeze due to the energy needed for the phase change.
Second that. Melting one gram of ice absorbs the same amount of heat that warming the same amount of water by 80 degrees Celsius (!) would. To cool your wort from whirlpool temp to pitching temp just by recirculating a glycol mixture you'd need a huge amount of solution that surely won't fit in your freezer. I actually use my glycol chiller to cool the wort to pitching temp but that's only after I've cooled it down to within at most 10°C of pitching temp with a plate chiller to save time and cooling water as those 10°C over pitching temp already speed up the process enormously. Closed-loop systems will give the greatest water saving but at the expense of speed as nothing beats a counterflow chiller for taking wort down from near boiling temps to slightly above room temperature in the shortest possible time.
 
I use an immersion chiller and a method many here use. I run it normally with tap water straight through for a few minutes -- you can collect the hot water coming out in buckets for cleanup after brewday, if you really want to conserve. This gets the wort to 90-100°F pretty quickly. Then I switch to using a utility/sump pump in a tub of ice water (mostly ice at the start, maybe 20 or so pounds) to recirculate through the IC. This gets me down to lager pitching temperature before all the ice is melted, usually less than a half hour total chilling time.
This is what basically what I do but I fill a cooler with ice from work so I don't know how much 50qt of ice chips weighs and with a small 600GPH pond pump instead. Since I don't pay anything for the ice I start off with it and just let the ice water recirculate. I just set it up with a probe thermometer with a low temp alarm and clean the rest of the brew equipment.
 
I use an immersion chiller and a method many here use. I run it normally with tap water straight through for a few minutes -- you can collect the hot water coming out in buckets for cleanup after brewday, if you really want to conserve. This gets the wort to 90-100°F pretty quickly. Then I switch to using a utility/sump pump in a tub of ice water (mostly ice at the start, maybe 20 or so pounds) to recirculate through the IC. This gets me down to lager pitching temperature before all the ice is melted, usually less than a half hour total chilling time.

This is what I do as well. Careful though. It works really well and if brewing an Ale you’ll find yourself heating the wort back up. (Happened to me yesterday)
 
I use an immersion chiller and a method many here use. I run it normally with tap water straight through for a few minutes -- you can collect the hot water coming out in buckets for cleanup after brewday, if you really want to conserve. This gets the wort to 90-100°F pretty quickly. Then I switch to using a utility/sump pump in a tub of ice water (mostly ice at the start, maybe 20 or so pounds) to recirculate through the IC. This gets me down to lager pitching temperature before all the ice is melted, usually less than a half hour total chilling time.

This is what basically what I do but I fill a cooler with ice from work so I don't know how much 50qt of ice chips weighs and with a small 600GPH pond pump instead. Since I don't pay anything for the ice I start off with it and just let the ice water recirculate. I just set it up with a probe thermometer with a low temp alarm and clean the rest of the brew equipment.

This. These.
Garden hose through 25 ft 3/8 copper immersion chiller, 5gal batches, filling 2 5G buckets with hot/warm outflow, 6-7min. Gets me to 90-100F. Then outflow to std cooler w ice, either from fridge icemaker and ice packs, or snow, or 16 lb ice from store during summer, filling cooler just enough to cover pond pump. Then switch garden hose out for pond pump and recirc. Chill to 60 in 15-20m consistently.
 
I just run my IC into a bucket and collect hot water for cleaning. after about 5 gal I'm close to 100'. after that I'm done with forced chilling. nature & ferm chamber finishes the cooling process.
 
If you really calculate the cost of tap water and/or electricity, I bet you find that if you are buying 20+lb of ice from the gas station, etc, you are likely not saving a dime; probably the opposite. So right from the jump, if you aren't making your own ice, I don't see the cost effectiveness in the recirculating chiller setup. I really don't have the space to easily make or store 20lb+ of ice cubes without emptying out my freezer, and/or using the chest freezer, which is normally fermenting something.

In the summer at least, I collect most of the water off the chiller in buckets and use it to water the shrubs. You could use it for cleanup, etc of course as well.

Once I get down to 100-110 or so, I put it in the fermenter and use my chest freezer fermentation chamber to drop it the rest of the way to pitching temp... takes about 3 hours for a five gallon batch.

Probably not as fast as is possibly could be without additional expense and equipment, but I think it is probably about as cost effective as I can get with my existing setup.
 
after about 5 gal I'm close to 100'. after that I'm done with forced chilling. nature & ferm chamber finishes the cooling process.
That's still within the "danger zone" temp range for keeping your wort at. Commonly it's advised to drop it below 80F, ASAP.
 
So right from the jump, if you aren't making your own ice, I don't see the cost effectiveness in the recirculating chiller setup. I really don't have the space to easily make or store 20lb+ of ice cubes without emptying out my freezer, and
Even making your own ice isn't quite free either, it does take energy (freezer), but goes almost unnoticed as the thing is running anyway. Maybe someone has some concrete numbers on that?

Once the wort has dropped to around 120-90F (depending on tap water temps/season) I use a few (6-10) cold packs and frozen water bottles in a pre-chiller bucket containing an old copper immersion chiller and cold water and run that through the plate chiller. As soon as the output temp of the chilling water drops below that of my tap water, I switch to a small pump and recirculate.
 
You could measure the demand of your freezer and determine the actual electricity cost (.13 per Kwh for me) for the time it took to freeze the ice, but realistically it is going to be a small, small fraction of the cost of purchased ice.

Like paying $1.50 for a bottle of Dasani at the gas station vs. whatever tiny fraction of a penny that 20oz of water from your tap costs.
 
I use an immersion chiller and a method many here use. I run it normally with tap water straight through for a few minutes -- you can collect the hot water coming out in buckets for cleanup after brewday, if you really want to conserve. This gets the wort to 90-100°F pretty quickly. Then I switch to using a utility/sump pump in a tub of ice water (mostly ice at the start, maybe 20 or so pounds) to recirculate through the IC. This gets me down to lager pitching temperature before all the ice is melted, usually less than a half hour total chilling time.
I do almost exactly this. I freeze 4 gallon jugs of water before brew day and after initially cooling with tap water though an immersion chiller down to around 100 I switch to water from an old 5 gallon Igloo cooler which has the ice from those jugs in it. I use a pond pump to send the water though my immersion chiller and then back into the Igloo.

Before pumping cooling water I cut the plastic jugs in half with a box cutter and then use a hammer to break their ice into pieces which go in the Igloo. Of course, recycle the pieces of plastic jug and use the opportunity at the recycling center to restock more jugs.

This method allows me to get 10 gallons of wort as low as 60F though I don't typically try to get it that low unless I'm brewing a lager. I also collect in buckets the initial hot tap water output of the chiller and use it for cleaning equipment.
 
You could measure the demand of your freezer and determine the actual electricity cost (.13 per Kwh for me) for the time it took to freeze the ice, but realistically it is going to be a small, small fraction of the cost of purchased ice.
Challenge accepted. ;)

Initial temperature: 20°C
Final temperature: -20°C

To go from 20°C to 0°C:

20 * 4.186 = 83.72 KJ/Kg

To freeze the water:

333.5 KJ/Kg

To cool the ice from 0° to -20°C:

20 * 2.22 = 44.4 KJ/Kg

Giving a grand total of:

83.72 + 333.5 + 44.4 = 461.62 KJ/Kg

Since 1 KWh equals 3600 KJ we have:

461.62 / 3600 = 0.128 KWh/Kg

Assuming a COP of around 1.5 (typical for a freezer) this becomes:

0.128 / 1.5 = 0.085 KWh/Kg

At 0.13 $/KWh 1 Kg of ice costs:

0.13 * 0.085 = 0.011$

or a little over a cent per kilogram.

Most of the energy consumption for a home freezer comes not from freezing stuff but just from keeping the interior cold while sitting in a warmer environment with poorly (compared to industrial equipment) insulated walls and that's irrespective of whether the freezer is full to the brim or completely empty.
 
Last edited:
[...] or a little over a cent per kilogram.
That's surprisingly very low! Much, much lower than I would have estimated with a wet finger.

Maybe it's time to start bagging ice cubes from the side by side hopper and store them in the deep freezer. That is, if there was any space left. :drunk:
 
That's surprisingly very low! Much, much lower than I would have estimated with a wet finger.

Maybe it's time to start bagging ice cubes from the side by side hopper and store them in the deep freezer. That is, if there was any space left. :drunk:
I bag ice between brew days and never have to buy it.
 
Nice... I was just going to measure the actual demand of my freezer and assume a few hours to freeze some ice for less math-ing, but your numbers are in the ballpark of what I'd expect.

Since I can just put the carboy right in the freezer, I cut out the middleman... might take a little longer, but, don't have to bother with all the extra equipment.
 
If you live in an area with low air pollution, collecting rainwater can work really well. With a rainwater collecting tank off the roof of your house, you can use the water from the tank for chilling with a return back into the water tank - zero water loss! As above, it only works to within a few degrees of your water temp though.

You could measure the demand of your freezer and determine the actual electricity cost (.13 per Kwh for me)

$%$#! I pay nearly $0.40 per Kwh!
 
If you really calculate the cost of tap water and/or electricity, I bet you find that if you are buying 20+lb of ice from the gas station, etc, you are likely not saving a dime; probably the opposite. So right from the jump, if you aren't making your own ice, I don't see the cost effectiveness in the recirculating chiller setup. I really don't have the space to easily make or store 20lb+ of ice cubes without emptying out my freezer, and/or using the chest freezer, which is normally fermenting something.

In the summer at least, I collect most of the water off the chiller in buckets and use it to water the shrubs. You could use it for cleanup, etc of course as well.

Once I get down to 100-110 or so, I put it in the fermenter and use my chest freezer fermentation chamber to drop it the rest of the way to pitching temp... takes about 3 hours for a five gallon batch.

Probably not as fast as is possibly could be without additional expense and equipment, but I think it is probably about as cost effective as I can get with my existing setup.

Also, remember that some people are more limited by time than they are by money. Time effectiveness is more important to me at the current moment than cost effectiveness. I'm also lucky that I have an under utilized ice machine at my office. Or if I forget I can buy a 22 lbs bag of ice for ~$2.
 
Hi All,

wanted to post to see if people had some really good cooling solutions that save water and are inexpensive. I also wanted to share an idea I had and wanted to get some feedback.

my idea:

I was thinking of getting some glycol and making a glycol/water combination and putting it in a freezer in a cooler to get as cold as possible (this would act to get it below freezing temperature and make it thicker so it absorbs more heat). I would use this to pump into my wort chiller and have it exit into another cooler filled with ice. I think some combination like this might work, even though this might be better for late cooling (from 110 - 65). Thoughts? I like this as it allows me to reuse the water/glycol solution and has minimal water waste.

I haven’t made the investment in a plate chiller due to concerns over clogs.

happy to hear any suggestions.

thanks!

I pump pool water through my chiller, then return to pool. No water usage, submersible pump electricity is cheap. I'm aware that not everybody has a pool, but many do and this is a great solution that I've been using since day 1.

In the winter, this works fine, but in summer I have to let the fermentation fridge drop the wort that last 20+ degrees before I pitch yeast, which I typically do the following morning.
 
For folks that have significant cold weather months, one trick is to setup two scrap 50 gallon barrels outside. Fill one with water with enough glycol to keep it from freezing. Run a hose to each barrel and then use a diaphragm pump to pull coolant from the full one, push through the chiller and then back into the other one. The benefit of a diaphragm pump is that it's self priming so you can keep it inside and just swap lines for each use so you're always pumping from the full tank. Here in NJ, this kind of setup would be useful for 6 months out of the year with no significant energy usage. Not only that but the chilling speed would be fantastic.
 
What demonic madness is this "spare freezer space" of which you philistines speak?!
[...] That is, if there was any space left.
I still have a 30 yr old Gibson 14 cubic foot chest freezer chugging along nicely. It's efficiently and tightly packed with boxes containing bagged hops, quite a bit of food, 5-quart containers with soup stock, misc items that need to remain frozen and probably 10# of reclaimed ice in total. There's not much spare room, especially for anything large, such as additional bags of ice.

I used to cold crash bucket fermenters and kegs in there, 1 at a time in a corner. Now use an upright freezer/ferm chamber for that.
 
For folks that have significant cold weather months, one trick is to setup two scrap 50 gallon barrels outside. Fill one with water with enough glycol to keep it from freezing. Run a hose to each barrel and then use a diaphragm pump to pull coolant from the full one, push through the chiller and then back into the other one. The benefit of a diaphragm pump is that it's self priming so you can keep it inside and just swap lines for each use so you're always pumping from the full tank. Here in NJ, this kind of setup would be useful for 6 months out of the year with no significant energy usage. Not only that but the chilling speed would be fantastic.

I like this idea, but I'm fairly sure my wife would have an issue with two blue 55-gal barrels sitting outside all the time. I did do the reverse with my greenhouse. A few 55-gal barrels on the back wall, and a pump to a solar water heater in the day time. Cut the energy costs down significantly.
 
I pump pool water through my chiller, then return to pool. No water usage, submersible pump electricity is cheap. I'm aware that not everybody has a pool, but many do and this is a great solution that I've been using since day 1.

In the winter, this works fine, but in summer I have to let the fermentation fridge drop the wort that last 20+ degrees before I pitch yeast, which I typically do the following morning.

I put the kettle IN my pool. I have an overhang that extends partially over the pool that I’ve attached a hunting block and tackle that I use to lower the kettle into the pool.

When the pool is heated I’ll run the immersion chiller runoff into the pool.
 
I put the kettle IN my pool. I have an overhang that extends partially over the pool that I’ve attached a hunting block and tackle that I use to lower the kettle into the pool.

When the pool is heated I’ll run the immersion chiller runoff into the pool.

I've done similar, but not with the block and tackle. I went full-tech, with pool noodle and duct tape.

full
 
I live in a desert, so I try to conserve water. I've used a recirculating pump with an immersion chiller and a drink full of ice water (ice saved throughout the week). You can make the ice slurry even colder by adding salt.

If you really want to save water, you can use the aussie no chill method (or a variation of it). For my last brew, I covered the hole in the lid of the Mash & Boil with a star San soaked eraser magic sponge covering the hole in the lid. Since the M&B is double walled, it can take a while to get to pitching temps. The aussie approach is to transfer to a container that can handle the pressure change.
 
That's still within the "danger zone" temp range for keeping your wort at. Commonly it's advised to drop it below 80F, ASAP.

No chill... sounds like blasphemy, but I use this method with fine results and it is my understanding that it is also popular in Australia where there is a water shortage, according to @Denny.

After flameout I put the lid on the kettle use stationary clips to keep it tight and start cleaning up... Once the temp has dropped a little on the lid and upper area of the kettle the clips come off the lid stays on and I wrap some Saran around the edge of the lid, and the clips go back on. The Saran keeps any insects out, and the inside is sanitized by heat. Typically after 8 or so hours it is ready to move to a fermenter. Remove the plastic film before opening the valve, doing so once the wort is draining may cause a mess as the change in pressure increases the flow. (Learned the hard way and cleaned up a mess).

Granted if there is a lot of lag time before the yeast get active it can be worrisome, but even with that happening on a couple batches I haven’t had a problem with wort becoming foul.
 
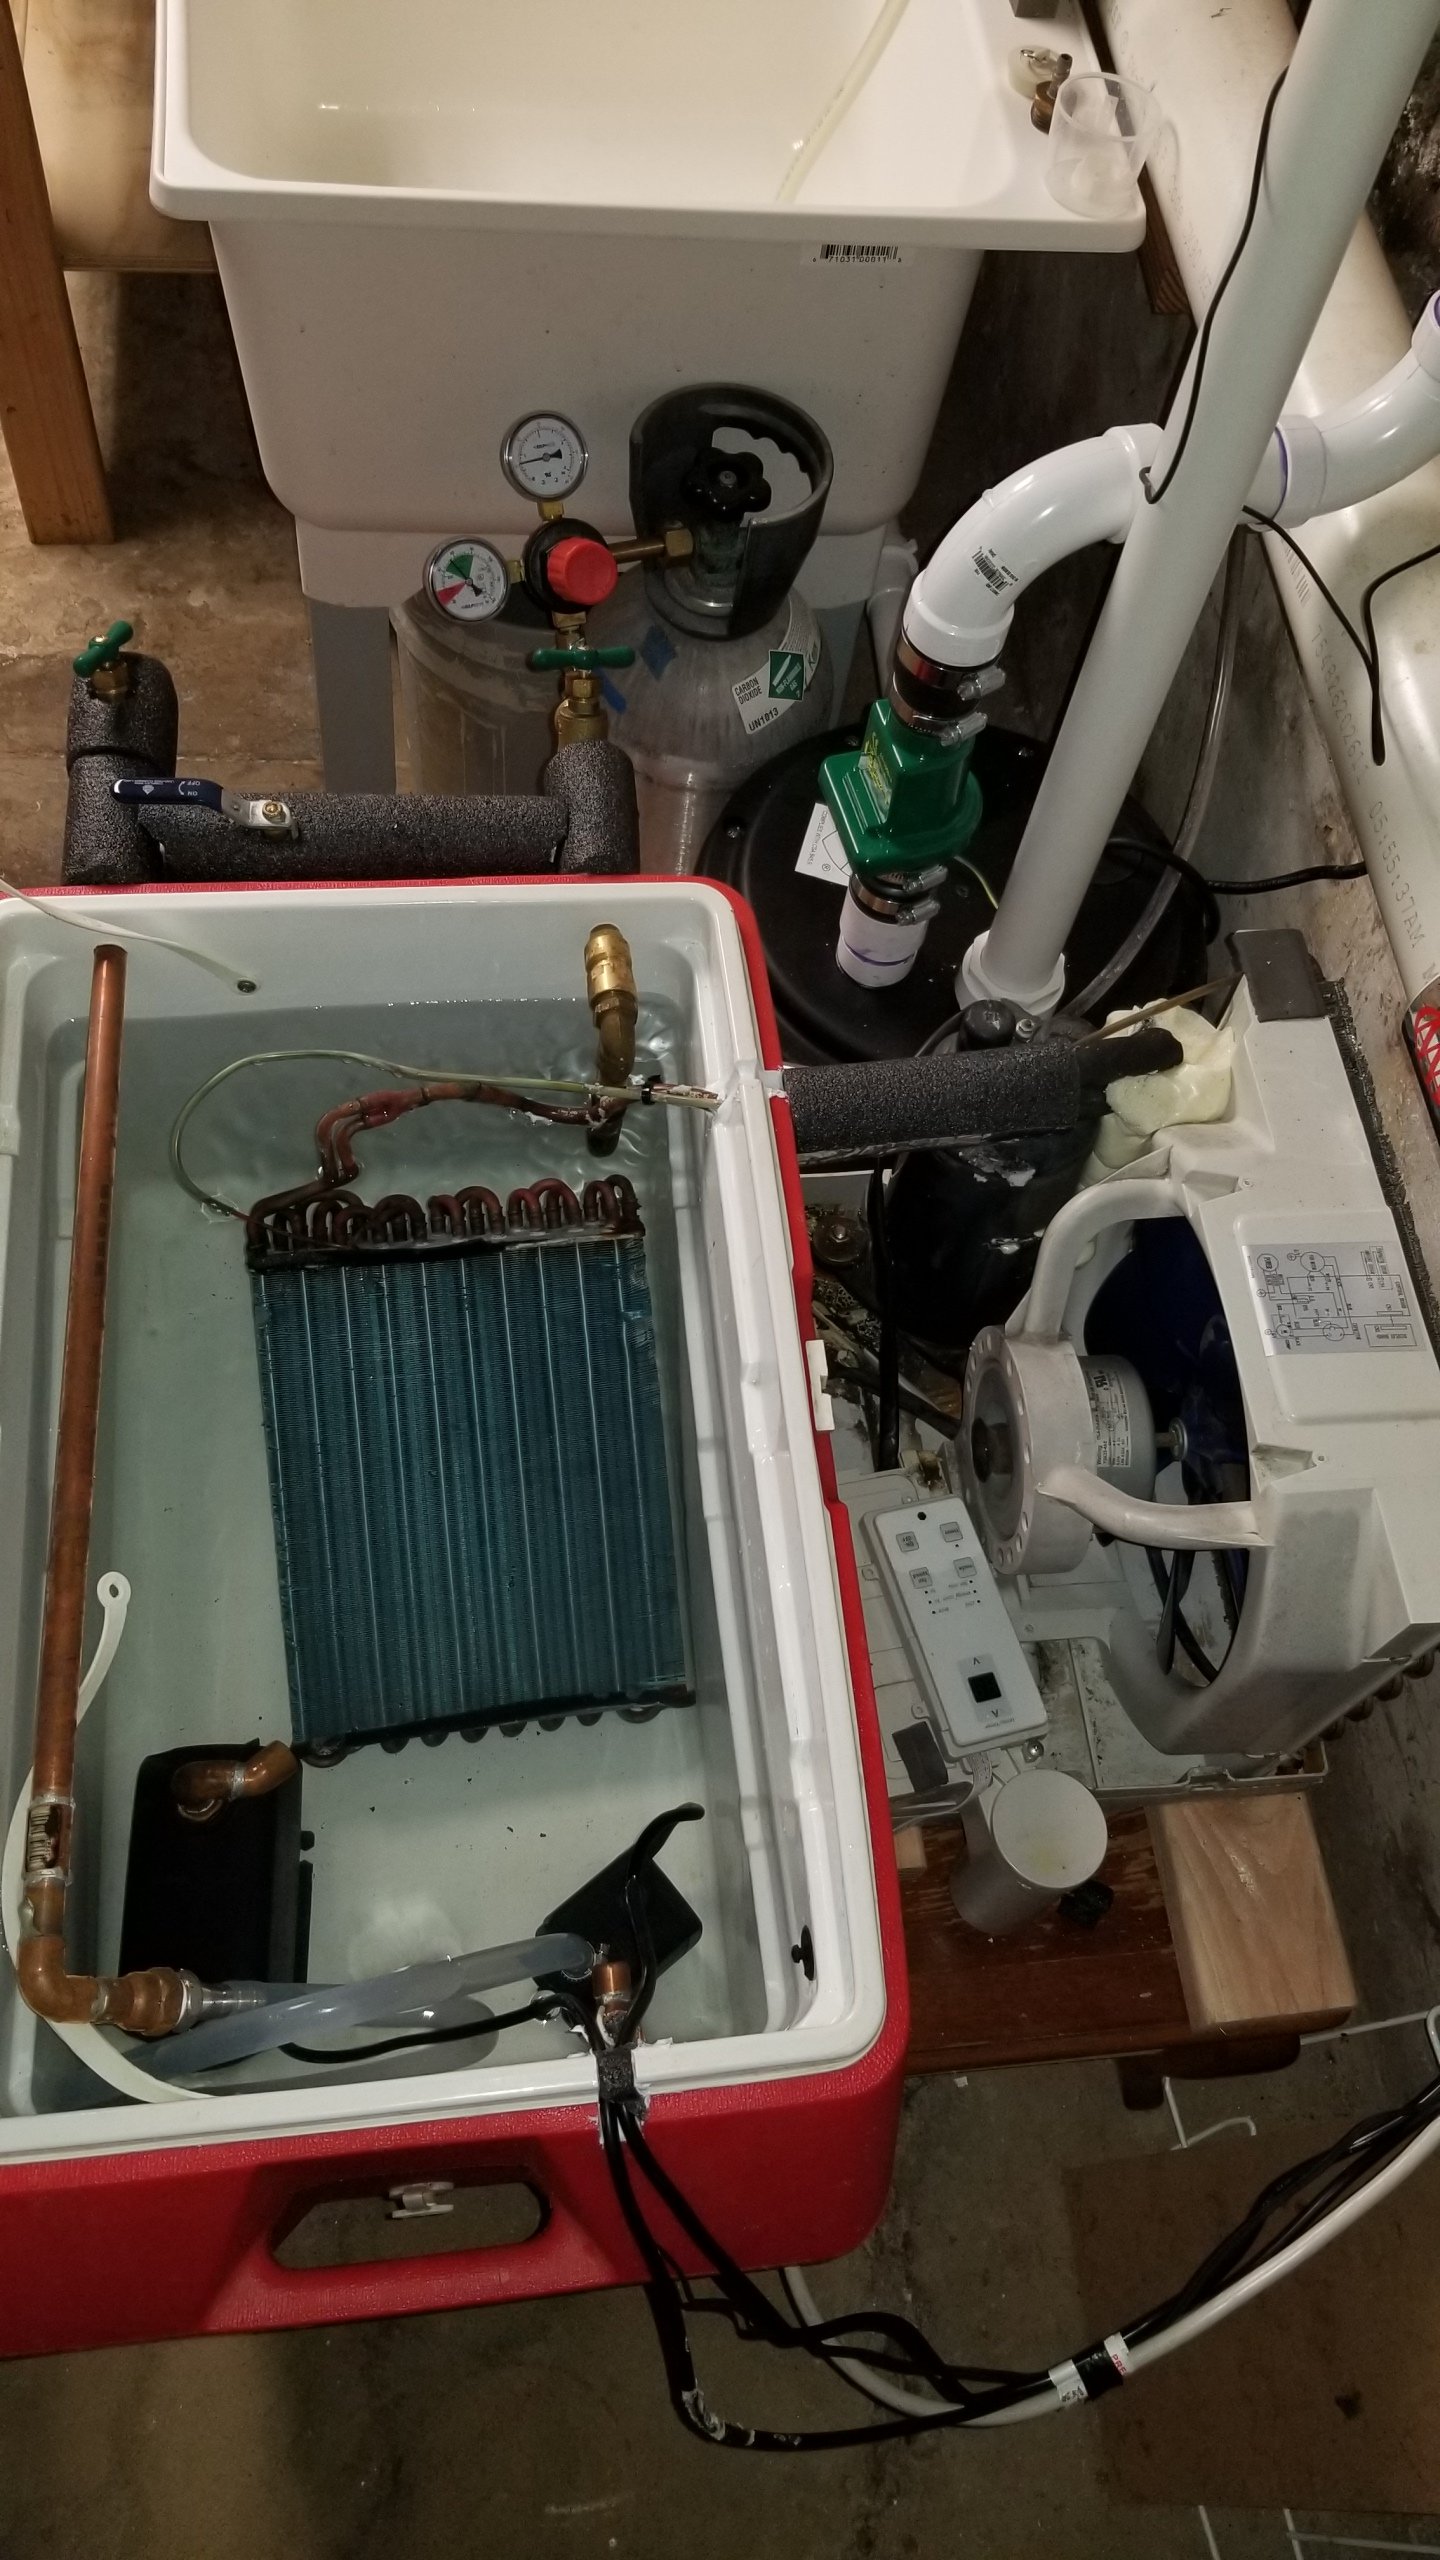
I was fortunate enough to have all the parts laying around. For the cost of 2 inkbirds and a ball and keg stainless loop I use little to no water for post boil chilling and fermentation temp control. I don't miss the ice collection or buying the morning of a brew.
20191012_092534.jpg
 
I was fortunate enough to have all the parts laying around. For the cost of 2 inkbirds and a ball and keg stainless loop I use little to no water for post boil chilling and fermentation temp control. I don't miss the ice collection or buying the morning of a brew.
View attachment 656587

Very cool. What's on the other end for fermentation temp control?

~HopSing.
 
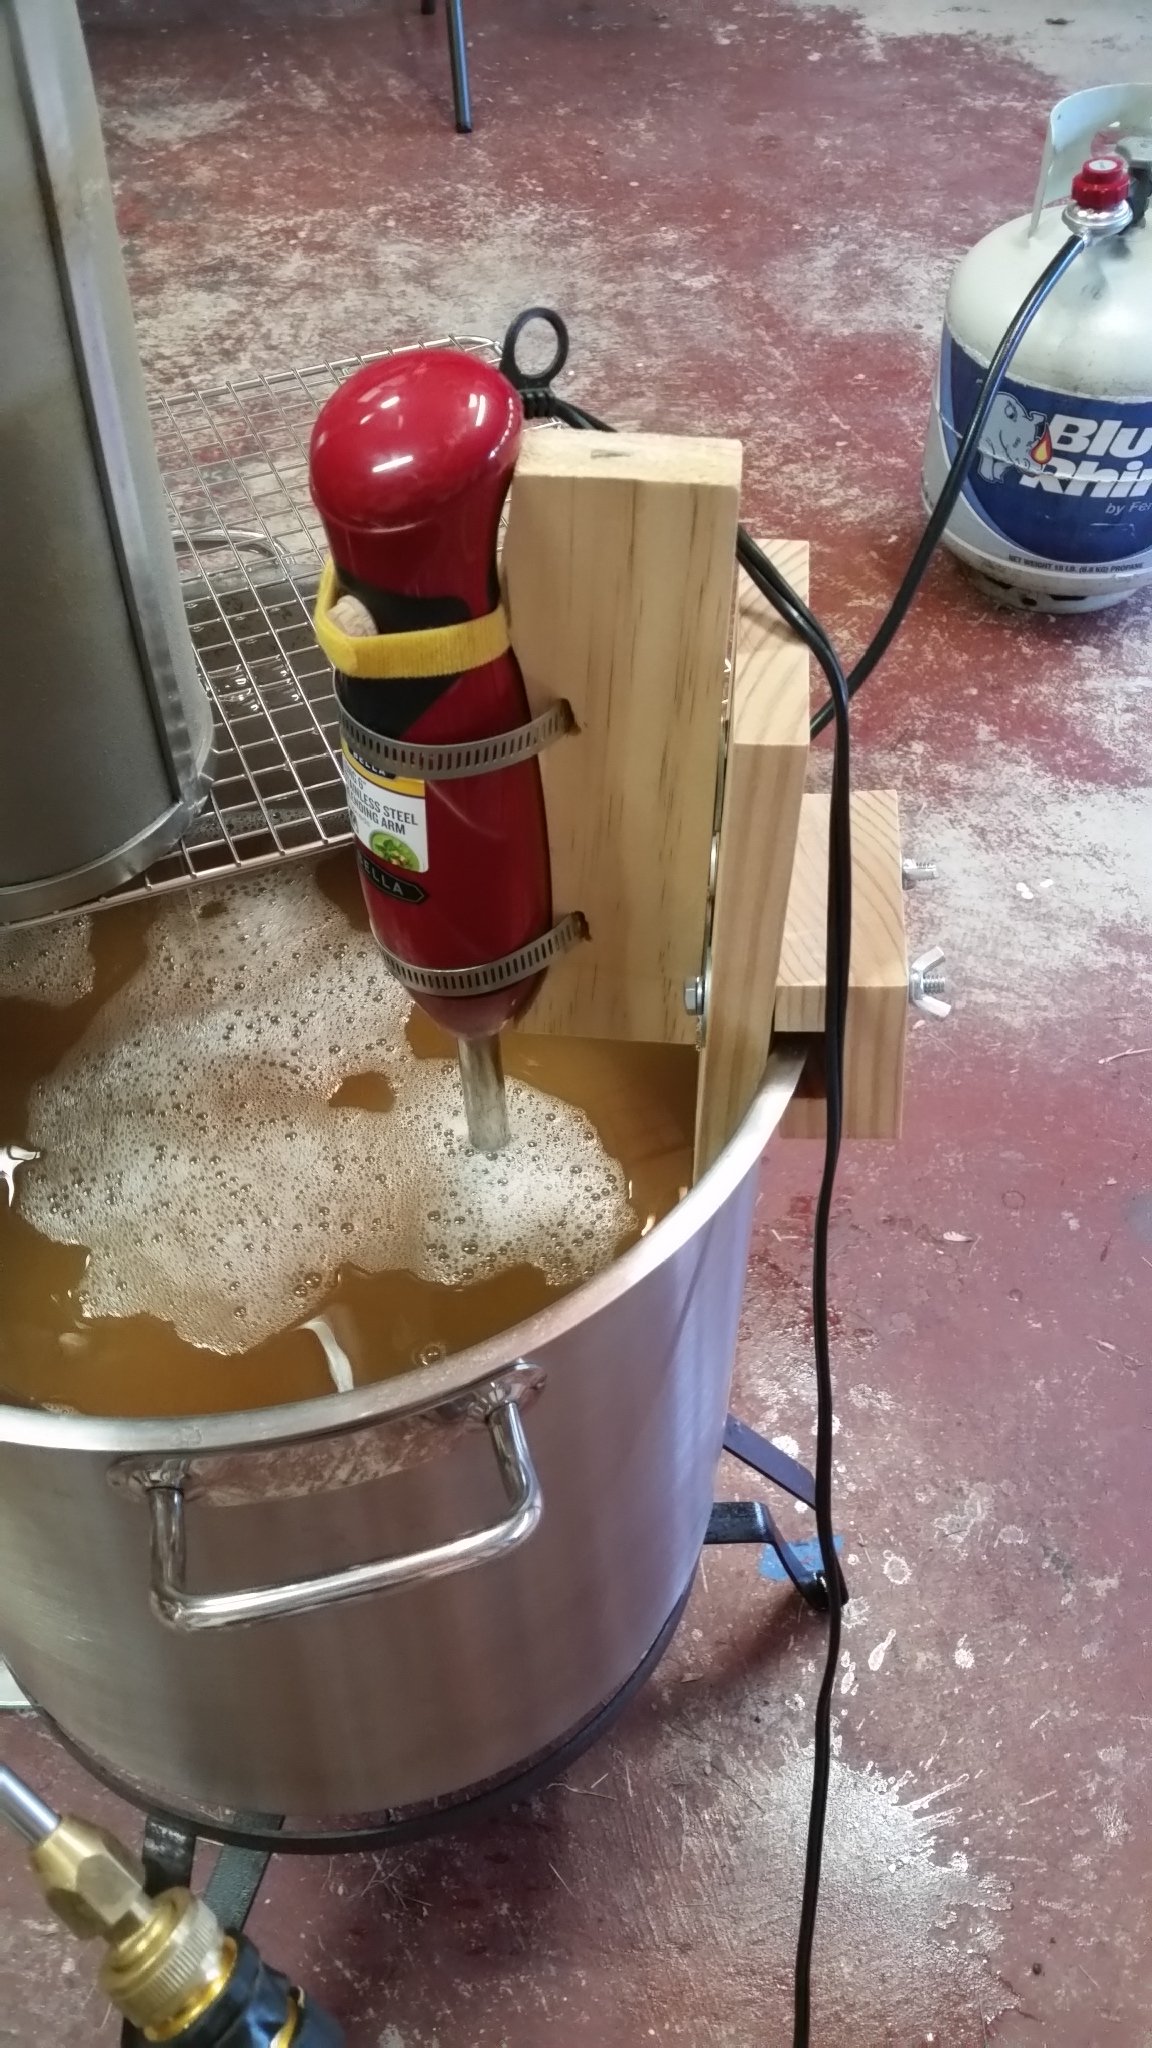
I'm also using the immersion chiller with homemade ice in a cooler with pond pump. Moving the wort around the chiller greatly reduces the chill time. Some use a pump to recirculate the wort, but for $26 I use a stick hand blender hooked up to a timer that cycles the blender for 7 seconds then turns it off for 30 seconds before repeating the loop. This cut my chilling time down considerably and did not require pump, hose, or poking holes in my kettle. It also aerates the wort.

Here's the timer:
https://www.amazon.com/gp/product/B01G6O28NA/ref=ppx_yo_dt_b_search_asin_title?ie=UTF8&psc=1

The blender came from WalMart for $13. I connect the blender to the base using these:

https://www.homedepot.com/p/OOK-20-lb-Large-Keyhole-Hangers-2-Pack-50236/100018911

If the blender you're using is too powerful, you can slow it down using one of these:

https://www.amazon.com/gp/product/B00U3LD1WA/ref=ppx_yo_dt_b_search_asin_title?ie=UTF8&psc=1

I have one of the speed controllers hooked up to my drill to control the speed of my grain mill. Works great there too.

Here's a picture:

20190521_093348.jpg
 
No chill... sounds like blasphemy, but I use this method with fine results and it is my understanding that it is also popular in Australia where there is a water shortage, according to @Denny.

After flameout I put the lid on the kettle use stationary clips to keep it tight and start cleaning up... Once the temp has dropped a little on the lid and upper area of the kettle the clips come off the lid stays on and I wrap some Saran around the edge of the lid, and the clips go back on. The Saran keeps any insects out, and the inside is sanitized by heat. Typically after 8 or so hours it is ready to move to a fermenter. Remove the plastic film before opening the valve, doing so once the wort is draining may cause a mess as the change in pressure increases the flow. (Learned the hard way and cleaned up a mess).

Granted if there is a lot of lag time before the yeast get active it can be worrisome, but even with that happening on a couple batches I haven’t had a problem with wort becoming foul.

You are correct. In Australia, it's the way 99% of the homebrewers do it. The beers I tasted there that did it were great. Drew has tried it a couple times too, with great results. Seems like the only people who think it doesn't work are those who haven't tried it.
 

Latest posts

Back
Top