** Adding a huge thanks to all the folks who have posted their trials and tribulations, notes, How-Tos's and any other useful info on building these things. You have all been incredibly helpful!**
And so it begins...
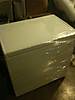
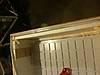
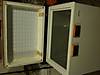
Got this scratch and dent from my local home depot on the cheap. It's a Sunbeam 7.2 ft3 and I can't wait to start this project. More pics as I take them.
I am ordering a kit from kegconnection.com soon, Once it gets here, I'll add those parts to the list.
Tools List
Circular Saw (adjustable angle)
Square edge
Quick clamps
Level
Power Driver/Drill
Caulk Gun
Parts List
KegConnection.com 2 tap, 2 keg Standard Fridge Conversion Kit $264.95
(includes 5# CO2 cylinder, dual regulators and all hoses/fittings)
Johnson Controls Analog Thermostat $59.95
^^They were shipped free! ^^
Sunbeam 7.2 ft3 Chest Freezer scratch'n'dent $150
4 corner fasteners 3/4x3/4 $2
1 can spray foam insulation $4
3 section 1x6x4 finishing wood $21
Sanding sponge $3
0.5 pint Stain $5
0.5 pint Poly Semi-gloss sealant $6
Sponge brush $2
Liquid Nails Heavy Duty $3
1" spade bit $5
Foam board insulation $9
Weatherstripping $3
Total: $552.90
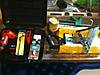
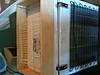
Quick snap of the parts I purchased. Running total for cost is at the top.
The Process
I bought this scratch and dent, so I tested to make sure the thing ran first. It has a warranty but I'd hate to start taking it apart or worse, finish the project and find out it doesn't work.
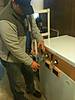
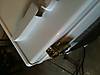
Remove the covers for the hinges, these simply snap off. Put nails into the hinges so they can't swing open and unscrew 3 bolts.

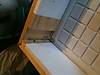
The seal for the lid simply snaps out. This not only makes it easy to remove, but leaves it in a reusable condition for the final steps of the process.
Take measurements and assemble collar. Mine was 34x22.5 so I cut 2 pieces of each length. I measured the top of the freezer to ensure a good fit, not the bottom of the lid. They should both have the same measurements but you never know. I cut 45 degree angles in each end and a single 1x1 piece to liquid nail and screw into. In hind sight, I should have used a larger piece, like 2x2 because one split when I drilled a screw into it. You can't tell from the outside, but I know its there.
A note on cutting. Its much easier to make a 90 cut by hand than 2 45s that will match up... I went out and got a circular saw because the miter box 1) didnt fit the 1x6 I used and 2) My attempt at using the box to make 2 cuts was a miserable failure.
Liquid nail 2 sections together at a time and leave both pieces to dry, I waited 24 hours just to be sure. The following day I liquid nailed the two pieces together and waited another 24 hours to screw into the corner pieces.
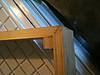
Here it is. Its not the prettiest thing in the world, but it'll hold!
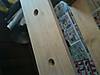
Time to drill. The shanks I'm using call for a 1" hole. Remember to drill guide holes with a smaller bit before using a spade bit. Make sure its square to the surface. Also remember when measuring that the actual hole when drilled will take up a half inch on either side of where you mark, this is only really important if you want a set amount of space between the faucets. (I left enough room in between to eventually add a nitrogen tap since my freezer will hold 3 kegs)

Here it is with the first coat of stain. The stain I'm using calls to be wiped off after 15-20 minutes on the wood. and 4-6 hours to dry between coats. This picture is with 1 coat, another coat will be applied before sealing. After sealant dried, i buffed surface with a Tshirt to smooth it out.

Before going on to insulating, I cut 2 sections of 2" wide board and liquid nailed them to the back of the collar at the points where they will be connected to the hinges to help support the weight and strengthen the collar.
To be continued...
And so it begins...
Got this scratch and dent from my local home depot on the cheap. It's a Sunbeam 7.2 ft3 and I can't wait to start this project. More pics as I take them.
I am ordering a kit from kegconnection.com soon, Once it gets here, I'll add those parts to the list.
Tools List
Circular Saw (adjustable angle)
Square edge
Quick clamps
Level
Power Driver/Drill
Caulk Gun
Parts List
KegConnection.com 2 tap, 2 keg Standard Fridge Conversion Kit $264.95
(includes 5# CO2 cylinder, dual regulators and all hoses/fittings)
Johnson Controls Analog Thermostat $59.95
^^They were shipped free! ^^
Sunbeam 7.2 ft3 Chest Freezer scratch'n'dent $150
4 corner fasteners 3/4x3/4 $2
1 can spray foam insulation $4
3 section 1x6x4 finishing wood $21
Sanding sponge $3
0.5 pint Stain $5
0.5 pint Poly Semi-gloss sealant $6
Sponge brush $2
Liquid Nails Heavy Duty $3
1" spade bit $5
Foam board insulation $9
Weatherstripping $3
Total: $552.90
Quick snap of the parts I purchased. Running total for cost is at the top.
The Process
I bought this scratch and dent, so I tested to make sure the thing ran first. It has a warranty but I'd hate to start taking it apart or worse, finish the project and find out it doesn't work.
Remove the covers for the hinges, these simply snap off. Put nails into the hinges so they can't swing open and unscrew 3 bolts.
The seal for the lid simply snaps out. This not only makes it easy to remove, but leaves it in a reusable condition for the final steps of the process.
Take measurements and assemble collar. Mine was 34x22.5 so I cut 2 pieces of each length. I measured the top of the freezer to ensure a good fit, not the bottom of the lid. They should both have the same measurements but you never know. I cut 45 degree angles in each end and a single 1x1 piece to liquid nail and screw into. In hind sight, I should have used a larger piece, like 2x2 because one split when I drilled a screw into it. You can't tell from the outside, but I know its there.
A note on cutting. Its much easier to make a 90 cut by hand than 2 45s that will match up... I went out and got a circular saw because the miter box 1) didnt fit the 1x6 I used and 2) My attempt at using the box to make 2 cuts was a miserable failure.
Liquid nail 2 sections together at a time and leave both pieces to dry, I waited 24 hours just to be sure. The following day I liquid nailed the two pieces together and waited another 24 hours to screw into the corner pieces.
Here it is. Its not the prettiest thing in the world, but it'll hold!
Time to drill. The shanks I'm using call for a 1" hole. Remember to drill guide holes with a smaller bit before using a spade bit. Make sure its square to the surface. Also remember when measuring that the actual hole when drilled will take up a half inch on either side of where you mark, this is only really important if you want a set amount of space between the faucets. (I left enough room in between to eventually add a nitrogen tap since my freezer will hold 3 kegs)
Here it is with the first coat of stain. The stain I'm using calls to be wiped off after 15-20 minutes on the wood. and 4-6 hours to dry between coats. This picture is with 1 coat, another coat will be applied before sealing. After sealant dried, i buffed surface with a Tshirt to smooth it out.
Before going on to insulating, I cut 2 sections of 2" wide board and liquid nailed them to the back of the collar at the points where they will be connected to the hinges to help support the weight and strengthen the collar.
To be continued...