My Keezer Build

Homebrew Talk - Beer, Wine, Mead, & Cider Brewing Discussion Forum

Help Support Homebrew Talk - Beer, Wine, Mead, & Cider Brewing Discussion Forum:

This site may earn a commission from merchant affiliate links, including eBay, Amazon, and others.

Biking_Brewer

Member
Joined
Sep 12, 2011
Messages
20
Reaction score
1
Location
Rochester
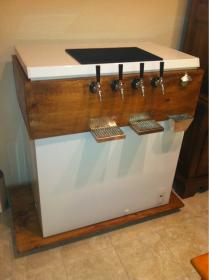
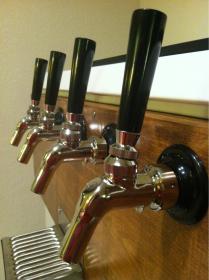
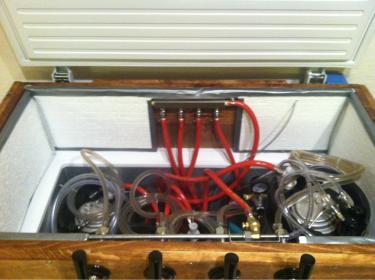
Thought I would share my keezer build with everyone. It's a 7 cu ft freezer from Lowes. 1x10 inside colar, 1x12 outside colar, and insulated with foam board. Fits four cornies and a 5# co2 tank perfectly. Overall I'm super happy with the end result. Definitely one of the more rewarding weekend projects one can invest in! Thanks to all those that have posted on this forum with ideas and how to's. They really helped me complete this project successfully.

Sent from my iPhone using HB Talk
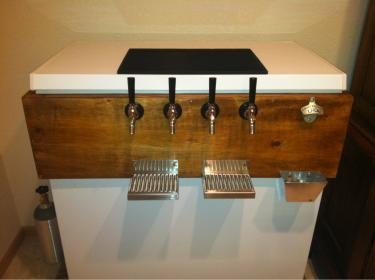
image-2989271182.jpg


image-2786375744.jpg


image-1174302632.jpg


image-1104468401.jpg


image-1053772728.jpg
 
What the purpose of the 1 by 12 outside collar? It hangs down over the freezer 2 inches and is flush with the top?
 
If I may, it creates room not only for shanks and tubing, but it also allows useful space located over the compressor compartment so that a full 5 gallon corny can sit there as well.
 
Regulation said:
What the purpose of the 1 by 12 outside collar? It hangs down over the freezer 2 inches and is flush with the top?

The 10 inch collar sits flush around all sides, then the 12 inch hangs down two additional inches. This secures the collar on the freezer without needing any additional materials or methods of locking it in place. It also allowed me to drill the drip trays into the wood as opposed to the freezer. There is plenty of room for the corny on the hump as well, which is nice.

Sent from my iPhone using HB Talk
 
I have the same freezer and all my keezer parts sitting in my garage might just have to borrow that trick. Was gonna attach the collar to the lid but I think this may be easier.
 
Regulation said:
I have the same freezer and all my keezer parts sitting in my garage might just have to borrow that trick. Was gonna attach the collar to the lid but I think this may be easier.

Definitely easier and it's a huge plus that it doesn't damage the freezer in any way.

Sent from my iPhone using HB Talk
 
Brewnoob1 said:
Don't you still need to attach it for insulation purposes?

Thought about caulking the wood to the freezer, but it's already a nice, snug fit and sits perfectly flush. I doubt it would make much of a difference. Additionally, I didn't want to damage the freezer in any way.

Sent from my iPhone using HB Talk
 
Are those ball or pin lock kegs? I am getting the same fridge and was hoping to fit 4 without using the hump. Thanks to your mad skills however, I will be getting 4 kegs in my fridge but now I am intrigued about the possibility of 5?
 
BullGator said:
Are those ball or pin lock kegs? I am getting the same fridge and was hoping to fit 4 without using the hump. Thanks to your mad skills however, I will be getting 4 kegs in my fridge but now I am intrigued about the possibility of 5?

They are ball lock. You could maybe fit 5 using the hump. It would be pushing it though, and you definitely wouldn't have space for the co2 tank inside. Four fits nicely with the co2 tank and still gives enough wiggle room with all the tubing.

Sent from my iPhone using HB Talk
 
BullGator said:
Are those ball or pin lock kegs? I am getting the same fridge and was hoping to fit 4 without using the hump. Thanks to your mad skills however, I will be getting 4 kegs in my fridge but now I am intrigued about the possibility of 5?

Also, definitely let me know if you have any specific questions on the build I can help with.

Sent from my iPhone using HB Talk
 
Great design!

I like what you did with the double collar. I was planning to add an extra set of hinges to my design so the freezer top and the collar opened independently. But I think this can only work if there is no overhang in the back.

Does the collar overlap in the back? If is does, wouldn't that shift the top by 3/4"? If it doesn't, is there an issue with leaks/efficiency?

Thanks and cheer!
 
mojito65 said:
Great design!

I like what you did with the double collar. I was planning to add an extra set of hinges to my design so the freezer top and the collar opened independently. But I think this can only work if there is no overhang in the back.

Does the collar overlap in the back? If is does, wouldn't that shift the top by 3/4"? If it doesn't, is there an issue with leaks/efficiency?

Thanks and cheer!

The back actually uses a shorter piece of 1x12 between the hinges so the hinges still attach to the 1x10, the shorter piece of 1x12 still hangs down, and the lid fits perfectly. I'll snap a pic tonight. It will be easier to understand if you see it.

Sent from my iPhone using HB Talk
 
Only downfall if you want to call it that is the collar is not moveable like the ones that use double hinges. You need to lift kegs over the collar to get them in and out. Still a great build IMO. Making me think of which way I want to go with mine.
 
tojo said:
Only downfall if you want to call it that is the collar is not moveable like the ones that use double hinges. You need to lift kegs over the collar to get them in and out. Still a great build IMO. Making me think of which way I want to go with mine.

Yeah the full kegs can be a little PITA to put in, but not terrible by any means. Just think of it as a little extra workout.

Sent from my iPhone using HB Talk
 
Regulation said:
Question. How did you attack the 1 by 12s to the inner 1 by 10 collar?

Well i didn't "attack" them at all. That wouldn't be nice. They are just pieces of wood. Never did anything to me. Haha.

That being said, I "attached" them with standard wood screws. Build the inner collar first, outter collar second, slid the one over the other and screwed them together.

Sent from my iPhone using HB Talk
 
Another question. Did you remove the price that sticks out that surrounds the top of the freezer under the lid?

I am going to be making a 1 by 8 with a 1 by 12 outer collar in the same way you did.
 
I have built a similar collar and am planning my pluming order and have a few of questions.

1) what length faucet shank did you use
2) how far down on the collar did you drill for the faucets
3) how far apart from each other (I am planning 3 1/2")

Cheers!
 
I really like this design. I have a deep freeze sitting around that I'm holding on to with the sole purpose of converting. It's funny...not too long ago a friend was talking to me about building a collar around it and I thought the idea sounded stupid...I was just going to drill into the unit itself. Now, seeing it completed, I think it looks pretty damn sharp. I like it alot and I'm on board with the collar idea.
 
Back
Top