• Please visit and share your knowledge at our sister communities:
  • If you have not, please join our official Homebrewing Facebook Group!

    Homebrewing Facebook Group

Hunter's Basement E-Brewery Build

Homebrew Talk

Help Support Homebrew Talk:

This site may earn a commission from merchant affiliate links, including eBay, Amazon, and others.
I wasn't thrilled about cutting a 6 hole into the bond of my house, but with that long of a run


My sentiment as well as it's a huge hole and dryer duct on side of house but did it anyway. What speed controller did you use for your fan? I have tried 2 of them and neither worked on the two lower speeds.
 
Wow, a whole bunch of replies that I missed from yesterday!

Looks awesome but that 2 tap dorm fridge looks way too small beside it. Better get a keezer going too!

When I was doing straight steep/extract batches I'd end up with about 5gals which would last well over 6 weeks in the fridge. I just put that together recently, because I got tired of bottling (same ole' story). I have seriously considered upgrading to a stainless model since I started this project though!:tank:

Looking at the hood (very nice and shiney), are you planning on draining the drip edge? Are you worried about it?

Good question. Taking the wait-and-see approach on the drain. I noticed Kal mentions on his ventilation pages that he doesn't *really* need to drain his, so I'll likely see how much water accumulates the first couple of brews and simply remove with a sponge/towel. If it's significant, I'm not opposed to plumbing a drain!

Was gonna' ask........How does that vent fan sound.....upstairs in the house?

Just curious, what with "telegraphing" through the floor joists and whatnot.

Very good question as well. The simple answer is: While I have fired up the fan on the bench (It's reasonably loud) I haven't tested it mounted in the currently location. I suspect that we'll be able to hear it from the kitchen (which is directly above the joist you see the fan mounted too). The upside is that I usually brew during Saturday/Sunday afternoon, so it's not likely to interfere with anyones sleep. ;)
 
I pretty much have the same vortex fan as you (same stats, just a different manufacturer) and it's directly under the kitchen. Granted, mine is mounted to the top of my vent. hood, not to the joists, but the hood is mounted to the wall, which ties into the joist above. Here is a pic of my vent setup before running the ducting, but you should get the idea. Not pretty and shiny like yours, but it does the job. In the kitchen, there is a subtle hum, but not bad at all. Granted it is directly below the kitchen cabinetry in the kitchen, so that may be dampening the sound as well, but my wife does not find the noise offensive thus far. I'm not sure if I mentioned or not here, but I am working on my drop ceiling tomorrow and over the weekend in the brewery. I plan on insulating the joist space above the fan and framing a box around the sides of the fan itself, so that I can wrap insulation around that as well. I'm still going to get noise from the fan from inside of the hood, but even without insulation, it's not that bad. I figure that with a little insulation and the drop ceiling in place, the noise should be minimal. It was much louder on the work bench when I plugged it in than it is up high over the hood. Here are few somewhat recent pics of the brewery from a few weeks ago if your interested in taking a peek.

Roadie......to answer your question, I do not have my fan hooked up to a speed control switch. It's all or nothing! I get minimal steam from my HLT and MT, so I really don't use the hood until I get to the boil anyways. I have a new flat screen down there as of last weekend, and a stereo system soon to come, so that will take my mind off of the fan noise. :mug:
 
Bit of a slow go of things mid-week here. I got the extension cords in for my pumps yesterday evening, as Chuggers pumps come with a dismally short 3.5-4ft cord from the box. Also started staining the 'Pump Tray' which will have the two fitted pumps bolted down to it for transferring liquid. Couple quick pictures, I went with two of the Center-Inlet Stainless head chuggers:

ebrewery_145.jpg


ebrewery_146.jpg


Planning on getting the 'pump-tray' finished up this weekend and finally plumbing these kettles so I can get my first brew going.
 
Spent yesterday afternoon assembling the pump-tray and hooking it into the panel:

Installed some rubber feet on the tray and predrilled the pump mount holes:
ebrewery_147.jpg


ebrewery_148.jpg


Attaching the Chuggers to the tray:

ebrewery_149.jpg


ebrewery_150.jpg


All the hardware to plumb out the pumps:

ebrewery_151.jpg


Attaching the elbows and ball valves:

ebrewery_154.jpg


ebrewery_153.jpg


Finished Tray assembly:

ebrewery_152.jpg
 
@Roadie -- The pumps will be below the kettles on the lower shelf, so they should just gravity prime when I open the ball valves on the blichmanns. I haven't actually tested it yet though!

@Chocolate -- Glad to hear you're having success with this configuration!
 
Started to assemble the Elements this afternoon, but had to stop for the JB Weld to set. Here's a little bit of assembly from today:

Filing down the tabs on the back to allow the cover plate to sit flush:

ebrewery_155.jpg


ebrewery_156.jpg


Drilling out the larger holes in the boxes:

ebrewery_157.jpg


Drilled and tapped for plate cover screws:
ebrewery_158.jpg


ebrewery_159.jpg


Sanded off the paint to allow the JB Weld to form a good bond:

ebrewery_160.jpg


ebrewery_161.jpg


Mixing up the JB Weld:

ebrewery_162.jpg


Sealing up the box, Added some clear silicone around the edge as a secondary barrier against splash/water intrusion:

ebrewery_163.jpg


Clamped and curing for the evening:

ebrewery_164.jpg


I'll probably start working on the cords while I'm waiting for this to cure.
 
@Roadie -- The pumps will be below the kettles on the lower shelf, so they should just gravity prime when I open the ball valves on the blichmanns. I haven't actually tested it yet though!

@Chocolate -- Glad to hear you're having success with this configuration!

If you've got ball valves on the kettles, why put them on the pump outlets, too?
 
If you've got ball valves on the kettles, why put them on the pump outlets, too?

Ball valve is on the output, from the recommendations I've read if you're trying to control flow, it should be on the pumps output side (not the inlet side, where the kettles valve is...)
 
Not to be "that guy" (considering I've put together a system exactly 0% as cool as yours is/will be) but wouldn't it be easier to control the ball valves on the output of the chuggers if the valve handles were pointed toward the operator?

Sorry if this is a stupid question.
 
I saw Kal from the electric brewery has those elbows on his setup but I plan on just running mine vertically as I won't be connecting/disconnecting while brewing like the other ends and it just seemed simpler. If my idea doesn't work THEN I'll be doing something similar.
 
Not to be "that guy" (considering I've put together a system exactly 0% as cool as yours is/will be) but wouldn't it be easier to control the ball valves on the output of the chuggers if the valve handles were pointed toward the operator?

Sorry if this is a stupid question.

Not a bad question at all. I consciously rotated them to face backwards as they extended out the front when in the closed position and it was really ackward to operate them. This way, I just grab the handle and pull it forward and it's open. I think it's a matter of taste though, if you setup your pumps, try both ways and choose the way that works best.
 
Not a bad question at all. I consciously rotated them to face backwards as they extended out the front when in the closed position and it was really ackward to operate them. This way, I just grab the handle and pull it forward and it's open. I think it's a matter of taste though, if you setup your pumps, try both ways and choose the way that works best.

As I was typing I thought it might be something like that. Great build! Drooling with envy over here.
 
Hunter,

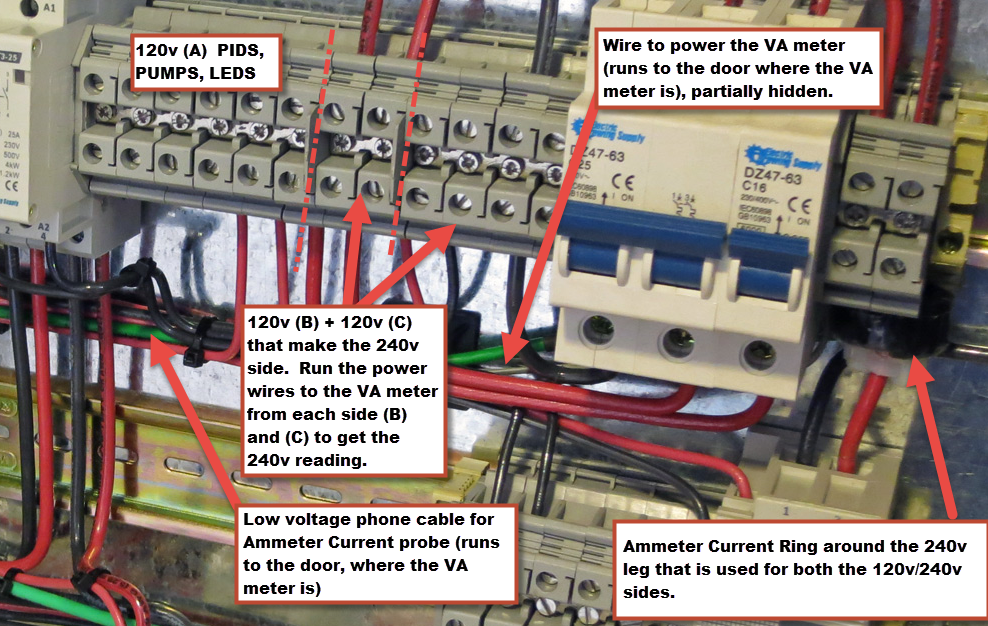
Sorry to go backwards in your postings but I'm have a hard time with that volt/amp meter you recommend. I've read your reply a dozen times and have stared at your pictures at every angle possible. I'm just not understanding how you have it set up. Is there any way you could draw a dumbed down picture and post it? Lol

Thanks
 
I'm wondering why you have to do so much build work for your elements. Not having done electric brewing before, I was of the impression that elements were something you would purchase, ready to go. Is that not the case? I've considered getting heat sticks to supplement my stove top burner so I can do all grain inside in the winter. But I don't know if I feel it's safe if I build something like this on my own.

You appear to be an electrical engineer or something. I am competent with electrical work, wiring, etc, but I don't have the skill set you have to put this together.

Here is a really good write up step by step to put together a heating element:
http://theelectricbrewery.com/heating-elements
 
Yep, BKnifeFight nailed it, just bought the DIY element kit to save some money on the build. I'm comfortable enough with working in the shop to do some assembly if it means saving a few bucks.

Although I do have some general DC electronics knowledge, this is my first effort in wiring an AC 240v project of this scale. I think if you have the ability to follow diagrams and pinouts, you'll be in fine shape to build something like this.
 
Hunter,

Sorry to go backwards in your postings but I'm have a hard time with that volt/amp meter you recommend. I've read your reply a dozen times and have stared at your pictures at every angle possible. I'm just not understanding how you have it set up. Is there any way you could draw a dumbed down picture and post it? Lol

Thanks

I tried to illustrate it a bit more clearly here. Basically you want to pull your Voltage reading from the 240v breaker, and you want to put your Ammetere Current Probe around the shared 120v leg in the panel.

01.27.2014-09.35.png
 
Very nice description of the ammeter meter hook up. Now where is that schematic you mentioned? :)
 
I tried to illustrate it a bit more clearly here. Basically you want to pull your Voltage reading from the 240v breaker, and you want to put your Ammetere Current Probe around the shared 120v leg in the panel.

01.27.2014-09.35.png

Thanks man. This definitely clears it up a little. It's quite hard to follow those wires in the pictures. I should have my panel ready to fire up tonight now
 
@docubrew, If I get a few minutes, i'll look into some software to do a decent diagram. I feel like MSPaint might be offensive ;)

On the element construction front, I started to build the cables yesterday night and found that unfortunately, the braided sleeving included in the kit was out of spec. I contacted Ebrewsupply and Ryan has been super helpful in getting this known problem corrected, so I expect I'll be back on track to continue building the elements this weekend.

Basically, the included sleeving was just a hair too small, leaving it about 2ft too short to fully sheath the cables.
 

Latest posts

Back
Top