craigmw
Well-Known Member
I'm very happy with my Blichmann burner, but found it a bit of a pain to have to manually light it, especially during mashing with a 20g kettle sitting on it. I thought of using an electronic grill ignitor kit:
(http://www.homedepot.com/p/Brinkmann-Universal-Electronic-Ignitor-Kit-812-7220-S/203016464#).
I found inspiration for a similar mod on the web:
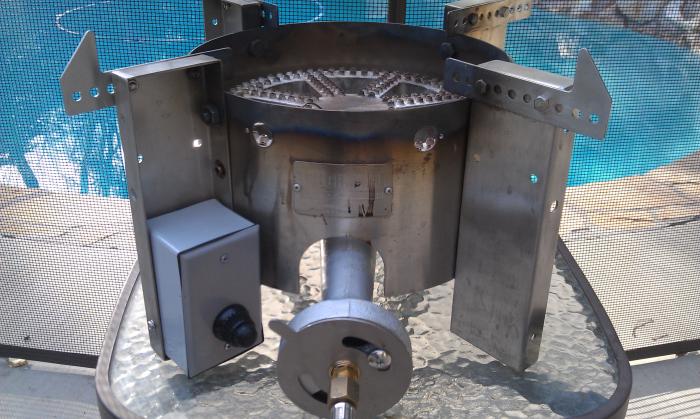
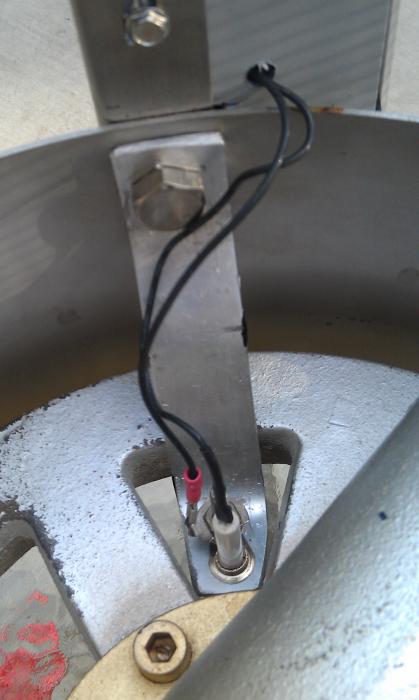
However, I decided I wanted to position the sparker closer to the center of the burner to promote quicker ignition and reduce flashbacks. The available sparker probes were not long enough to reach the center of the burner when mounted to the wind blocker on the burner stand. Instead, I fashioned a piece of aluminum 1" x 1/8" part (sourced the stock from Home Depot) to serve as a mount for the ignitor probe. This was cut and shaped using an angle grinder, and then bent to hold the ignitor between the banjo burner as shown. I then bend the probe itself so that it was about 1/4" above a burner hole near the center. I mounted the ignitor power source inside of a 1 gang outdoor PVC electrical box on one leg of the burner stand toward the bottom of the leg. This was a tight fit and required me to cut the side of the box with a multitool blade so it would fit around the large nut that holds the leg to the burner wind blocker. This ignitor kit has three output terminals, so one was routed via an included high voltage wire to the bottom of the ignitor (mounted via a hole in the mount). A second wire was run from another terminal to "ground" the mount itself. This second wire is needed to prevent the control box from grounding to the burner leg. If this is not included, the unit will not effectively spark.
As can be seen, no permanent modifications of the stand itself were required to add this, so if I want to remove it, it returns the burner to its original state. I had to play around with this a bit to get the ignitor to work properly and not ground to itself (which will prevent high voltage from getting to the ignitor itself). It works quite well and there are no flashbacks when propane is turned on. It is also much easier to light the burner because you only need to hold the button down while it continuously sparks.


Last edited by a moderator:


