• Please visit and share your knowledge at our sister communities:
  • If you have not, please join our official Homebrewing Facebook Group!

    Homebrewing Facebook Group

My FULL-ON electric build thread

Homebrew Talk

Help Support Homebrew Talk:

This site may earn a commission from merchant affiliate links, including eBay, Amazon, and others.
I look forward to receiving the custom heat exchanger coil inlet tubes you built for me!

No close up pics of that thing. It won't match the beautiful rig you got going here. If your not happy send it back and we'll start fresh from a new and not a pre-coiled...coil. I think that may have been another issue with it too being that it was already at 10".
 
I know this should be obvious from the thread but can i just ask are all 7 of the ball valves going to have 0-100% flow control & does that mean a stepper motor is required at each one?

I think given the fact that this project has been underway for less than a year you've achieved an awful lot in a very short time span:rockin:

Yeah, each of the 7 ball valves are planned to use one of the blue actuator shown. For clarification, the actuators use a small 24VAC motor and gearing system, not a stepper.

This plan has been slowly building momentum for the last 2 years or so. It will be nice to finally get some AG brews run through it.
 
Can we be friends?. I am sure we can be BEST friends!! really I promise.........:eek:

But seriously can we???

(this is blowing my mind!!!!)
jokes aside (and im sure this was mentioned before) but, what would be the cost if I where to comission a system like this?
 
Can we be friends?. I am sure we can be BEST friends!! really I promise.........:eek:

But seriously can we???

(this is blowing my mind!!!!)
jokes aside (and im sure this was mentioned before) but, what would be the cost if I where to comission a system like this?

Makes me think of the Dog from the movie Up.

This build would be hard to put a price tag on as many of the components were snapped up through deals that came along at the right time. For example, most of my tri-clamp parts were purchased on eBay and the timing/pricing of those can be hit or miss. One day you might find a Tee for $10 or if you wanted to purchase it retail it could go for $35. There is thousands of dollars tied up in items just purchased regularly and it is hard to keep track of all the little items purchased through many trips to Lowes or HD. I am really in this for the adventure/challenge, there are obviously many ways to produce an awesome system without some of the costs I have incurred.

That being said, I have built up the front panel potentiometer assemblies:
Potentiometer%20assemblies.jpg


Still waiting on the front door to begin assembling everything. Over time more items on the control board are being tested. The solenoid valve control circuits work well and so does the serial port for comms with the PC. Next on the software hitlist is the 1-wire comms for the temp sensors.
 
You gonna use your peristaltic pump with this system?

Oh yeah, there are going to be two of them running for sparge and transfer. You can't see it but under the blue microcontroller board on my controller is a small secondary microcontroller that will be used as the motor controller for the pumps. This keeps the motor timing unaffected by the other control operations.
 
Thought I would make another quick update today. The wood cabinet/self setup I made will have solenoid valve controlled outlets for the HLT, HEX tank, and plate chiller.

Here is the valve I am using for two of those (slightly different model for the HLT):
Water_Valve.jpg

It has 1/2" NPS threads on each end.

I am mounting them to the lower right wall of the cabinet using some electrical back boxes and cover plates as they fit well and didn't cost much. Here is what it should look like on the outside:
Water_valve_mounted_front.jpg


And on the inside:
Water_valve_mounted_back.jpg


Each valve requires 12VDC to open which will be controlled by my main brewery controller.
 
I havent gone through all 16 pages yet (but I definitely will) how did you mount the touchscreen in your panel ?
 
kosmokramer said:
I havent gone through all 16 pages yet (but I definitely will) how did you mount the touchscreen in your panel ?

An opening that fits the screen of the monitor is being cut out of the door of my control panel. The monitor has 8 mounting holes around the perimeter as it was pulled from a similar application.
 
An opening that fits the screen of the monitor is being cut out of the door of my control panel. The monitor has 8 mounting holes around the perimeter as it was pulled from a similar application.

Ahhh thanks,,I really like the design and was thinking of doing something similar with the panel, just trying to figure out how to mount a touchscreen
 
Very busy week for the build so this is going to be a long update, now where to start?

I finished the water cabinet and installed it. Connecting all of the water lines and components will take a little longer as I am still waiting on the water storage tank. The sink is now attached to something and finally feels sturdy. Also, I will no longer be fumbling around looking for paper towels!

Brewery_Cabinet_Finished.jpg


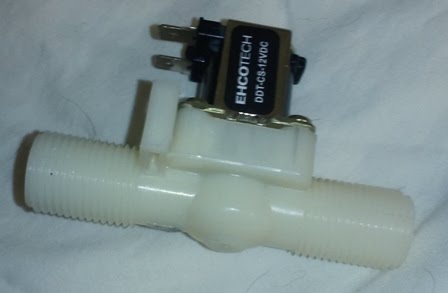
The shelves turned out great and I think they will be very useful. The cross bars are 1/2" stainless tubing for a bit of added flare. The board sticking out at the very top is a swing arm that will have some places to hang hoses from. This will allow me to disconnect everything at the end of the day and hang dry them. On the right side is where all of the solenoid valve controlled outlets will be located.

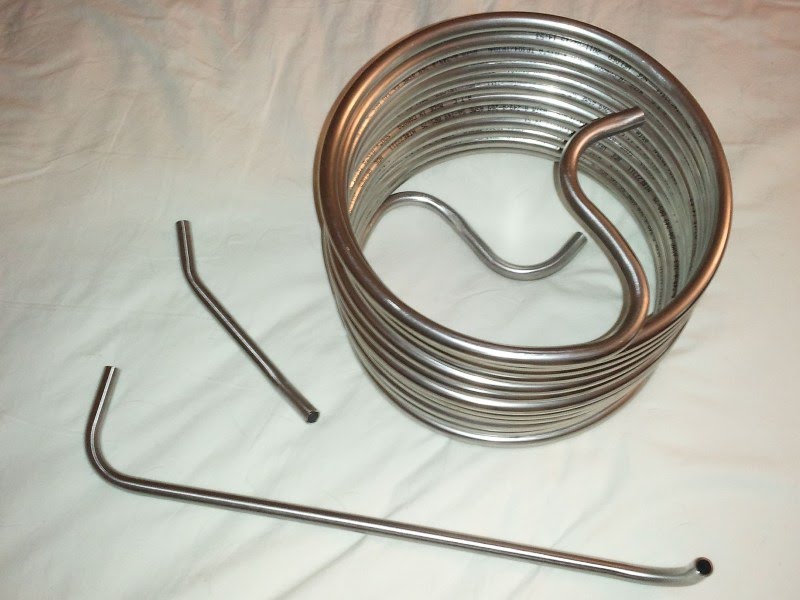
Next, I received a package from Zach at 
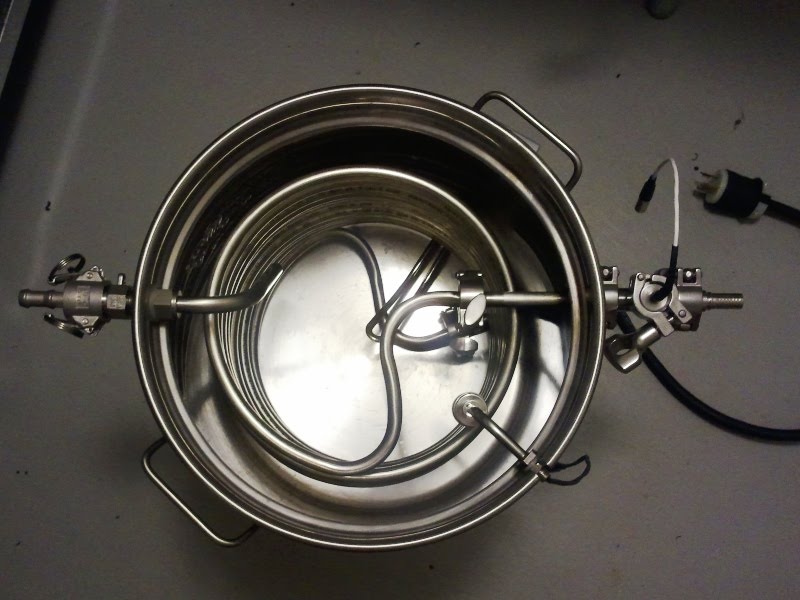
Stainless Brewing that contained a very custom coil for the HEX tank as well as a couple custom inlet tubes for my HLT and BK. He did great work on all three.

Custom_Stainless_Tubing.jpg


I will be posting more on how these will be used in the future. If you need stainless tubing or components definitely check his site out! The coil was one of the last remaining question marks for this build that I now get to cross off the list.

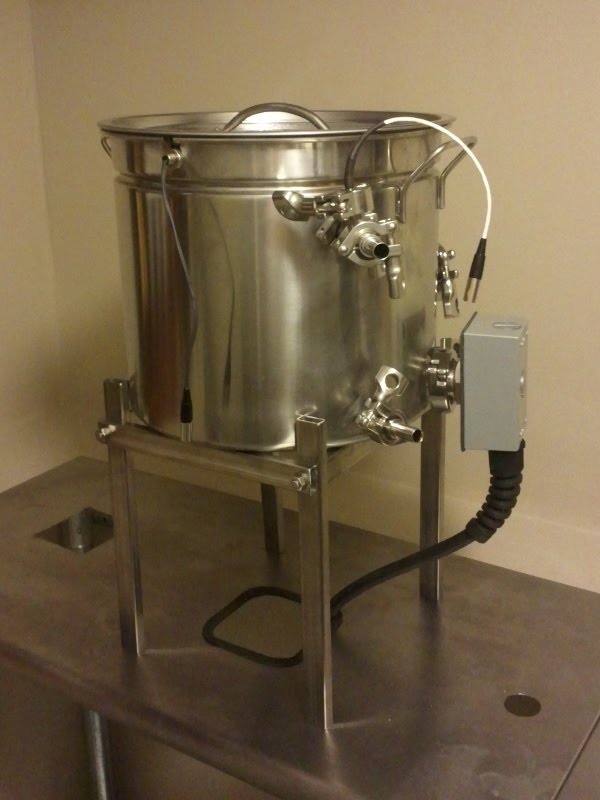
Coil inside my 24qt HEX pot:
HEX_Coil1.jpg


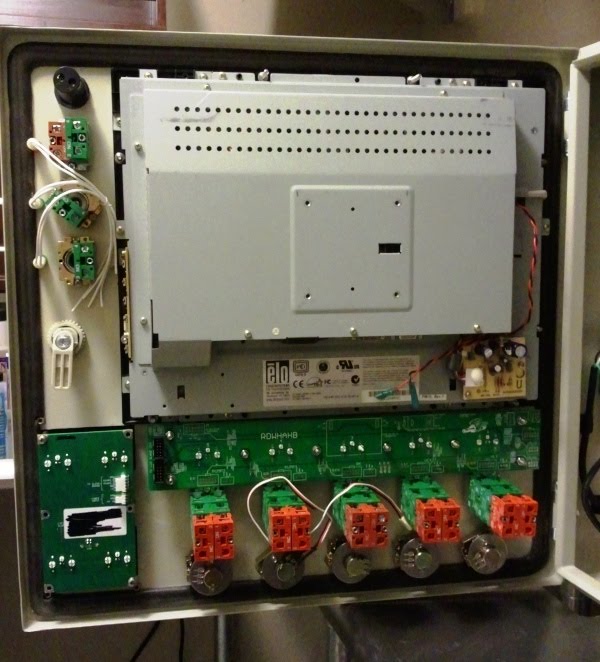
Today I received one of the most exciting packages from UPS in a very long time. My control panel door that was waterjet cut finally arrived so I got right to work putting the components together:

HMI_Assembled1.jpg


Everything fits like a dream, it is very rewarding to see the hours and hours spent modeling, designing, and choosing parts pay off with something tangible. The enclosure and door will be painted black like my power control box. Some up close shots of the switches and indicators:

HMI_Front_Close.jpg


HMI_Front_Close2.jpg


Everything on the inside of the door is a very tight fit but it works. I have a lot of work ahead of me wiring and testing it all.

HMI_Door_Inside1.jpg


Taking a day trip tomorrow so I have to wait impatiently to continue working on this. There will be a lot going on over the next few weeks.
 
Ludicrous speed!

Sweet panel. The look is unique and awesome.

It'd be sweet if you could get the startup of that screen to do the plaid bit in Space Balls.
 
jtkratzer said:
Ludicrous speed!

Sweet panel. The look is unique and awesome.

It'd be sweet if you could get the startup of that screen to do the plaid bit in Space Balls.

*blink* :)

This is a thread I wish I had found after the project was finished. The waiting feels like I am stuck in-between tv seasons. Haha No breaks! Keep cranking out episodes for us!
 
Makes me think of the Dog from the movie Up.

This build would be hard to put a price tag on as many of the components were snapped up through deals that came along at the right time. For example, most of my tri-clamp parts were purchased on eBay and the timing/pricing of those can be hit or miss. One day you might find a Tee for $10 or if you wanted to purchase it retail it could go for $35. There is thousands of dollars tied up in items just purchased regularly and it is hard to keep track of all the little items purchased through many trips to Lowes or HD. I am really in this for the adventure/challenge, there are obviously many ways to produce an awesome system without some of the costs I have incurred.

That being said, I have built up the front panel potentiometer assemblies:
Potentiometer%20assemblies.jpg


Still waiting on the front door to begin assembling everything. Over time more items on the control board are being tested. The solenoid valve control circuits work well and so does the serial port for comms with the PC. Next on the software hitlist is the 1-wire comms for the temp sensors.


Ok, but then a good question would be, would you do this for someone for the right price?
 
Awesome! That panel looks like something from a 70's era Mad Scientist's Lab!:mug:

Keep in mind the flux capacitor wasn't invented by Doc Brown until the early 80's, so this has to be after that!

As always flyingbeer, you have made me proud to be an Earthling.
 
Ok, but then a good question would be, would you do this for someone for the right price?

Everyone has a price... but I honestly don't have enough time attend to my own matters. If you need assistance or have specific questions please let me know, you can PM if you want. Advice is cheap, however, time is a precious resource.

Thanks to everyone else as usual, the kind words keep me chugging along. Before the weekend hits I should have the heat exchanger tank done, brazing the fittings tonight or tomorrow night. I will be sure to post pictures.
 
A couple days overdue but here goes. The heat exchanger (HEX) tank is nearly complete, only the drain is left to be finished. This was the most complicated of all of my vessels with a SS coil, water inlet, float switch, temperature sensor and heating element.

HEX_Brazed.jpg


HEX_Brazed2.jpg


HEX_Brazed3.jpg


The tee on the top output is to monitor the temp of the mash returning to the MLT. The coil can be quickly removed by taking apart two interior triclamps. Water inlet has a 1/2" camlock to barb fitting which will be connected to a waterline and then to one of my solenoid valves. Brazing was a bit of a pain due to the small gauge of the pot walls.

Water tank for the RO system should arrive tomorrow, I hope to have the water system assembled by the end of the week.
 
TheFlyingBeer,
This is a beautiful build, amazing in all aspects. Do you have a full system pic with the new heat exchanger pot?

-G
 
TheFlyingBeer,
This is a beautiful build, amazing in all aspects. Do you have a full system pic with the new heat exchanger pot?

-G

A full system picture will take a little while. I have to mount the pumps and finish up the plumbing before it will all be assembled again.
 
HMI_Assembled1.jpg


Everything fits like a dream, it is very rewarding to see the hours and hours spent modeling, designing, and choosing parts pay off with something tangible. The enclosure and door will be painted black like my power control box. Some up close shots of the switches and indicators:

HMI_Front_Close.jpg


HMI_Front_Close2.jpg


Everything on the inside of the door is a very tight fit but it works. I have a lot of work ahead of me wiring and testing it all.

HMI_Door_Inside1.jpg


Taking a day trip tomorrow so I have to wait impatiently to continue working on this. There will be a lot going on over the next few weeks.

I want one!!!
 
I don't know whether I missed it or if you talked about it, but what are you using to control the ScreenKeys? I ended up with a few that I didn't use on a project, and I'd like to incorporate them into my controller box. I don't mind trying to figure out the driver software, but it would be nice to get a little nudge in that direction.
 
Back
Top