Multi-chamber fermentation control with CellarWarden

Homebrew Talk - Beer, Wine, Mead, & Cider Brewing Discussion Forum

Help Support Homebrew Talk - Beer, Wine, Mead, & Cider Brewing Discussion Forum:

This site may earn a commission from merchant affiliate links, including eBay, Amazon, and others.

craigmw

Well-Known Member
Joined
Dec 29, 2012
Messages
339
Reaction score
78
Location
Villa Park
I released the original CellarWarden application for monitoring temperature and humidity on a Raspberry Pi (RPi) about a year ago. I've recently updated CellarWarden to provide controller functions, including PID, hysteresis and manual output via the GPIO pins on the RPi. This app was inspired by BrewPi, but takes a different approach because it functions natively on the Raspberry Pi. Thus, a microcontroller such as the Arduino is not needed; all processing occurs on the RPi itself, simplifying setup and configuration. CellarWarden 1.0.1 is now available for beta testing with the application and installation instructions found here:

https://github.com/craigmw/CellarWarden

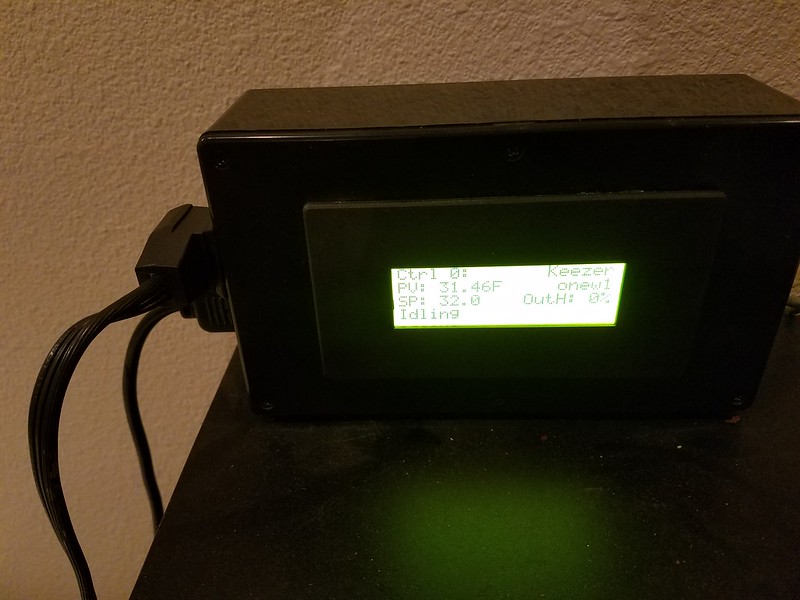
CellarWarden supports 20 x 4 LCD optional character displays using either parallel or I2C modes. It also supports as many as two DHT22 humidity/temperature sensors and 8 DS18B20 1-wire temperature sensors. In addition, up to 2 GPIO pins may be designated to monitor door open events. These sensors can be directly connected to the RPi, as shown in the hardware examples in the help pages. CellarWarden also provides as many virtual controllers as needed. These controllers can be set to monitor and control temperatures for multiple fermentation vessels (e.g. using FermWrap or other heating pads), kegerators, keezers, etc. The following is the current feature list for CellarWarden:

1. Monitors temperature and humidity sensors using a Raspberry Pi.
2. Provides a web interface to the CellarWarden server for viewing and adjusting parameters.
3. Supports 2 DHT-type humidity/temperature sensors.
4. Supports 8 1-wire temperature sensors (e.g. DS18B20).
5. Supports as many as two door sensors via microswitches.
6. Provides an unlimited number of virtual controllers.
7. Controllers can control humidity or temperature using hysteresis (e.g. thermostatic), PID or manual output modes natively via GPIO pins on an RPi.
8. Controllers can be one- or two-sided (e.g. heat only, cool only or heat/cool).
9. Each controller can have a primary and optional secondary sensor, with factoring between their values to control output.
10. Provides a PID autotuning routine for each associated actuator.
11. Each controller can be set to run temperature/humidity profiles.
12. Load and save profile templates.
13. Resumes set temperature, even profiles, with reboot.
14. Can send alarms via email and/or text/SMS messages if temperatures or humidity values are outside of a set range, or if door(s) have been open for too long. Alarm monitoring currently supports two DHT, two DS18B20 and two door sensors.

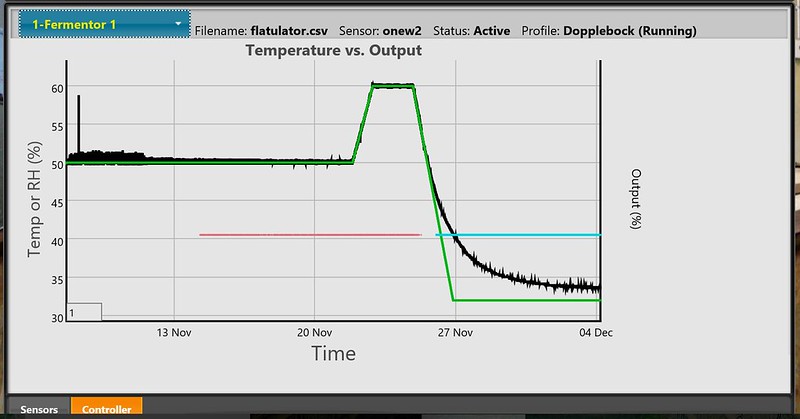
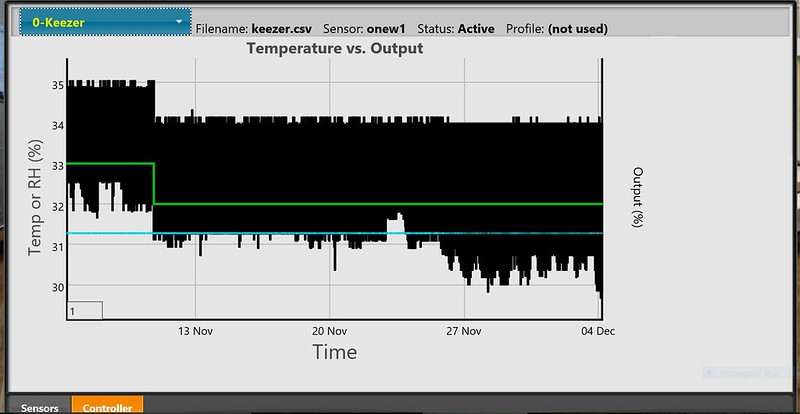
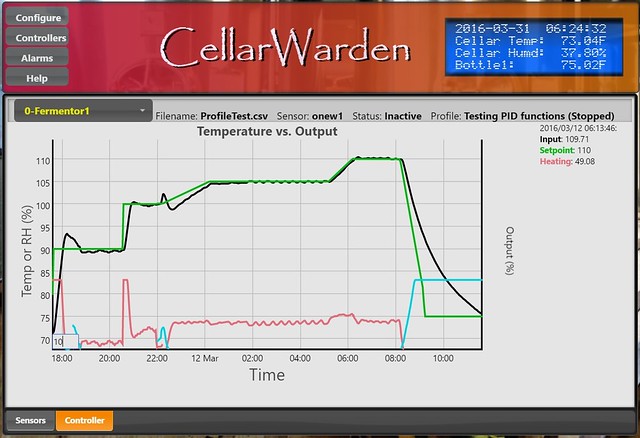
Shown is the graph from a particular PID controller under test:

MainController[/url]

Note that the output from this controller was set to follow a temperature profile such as:
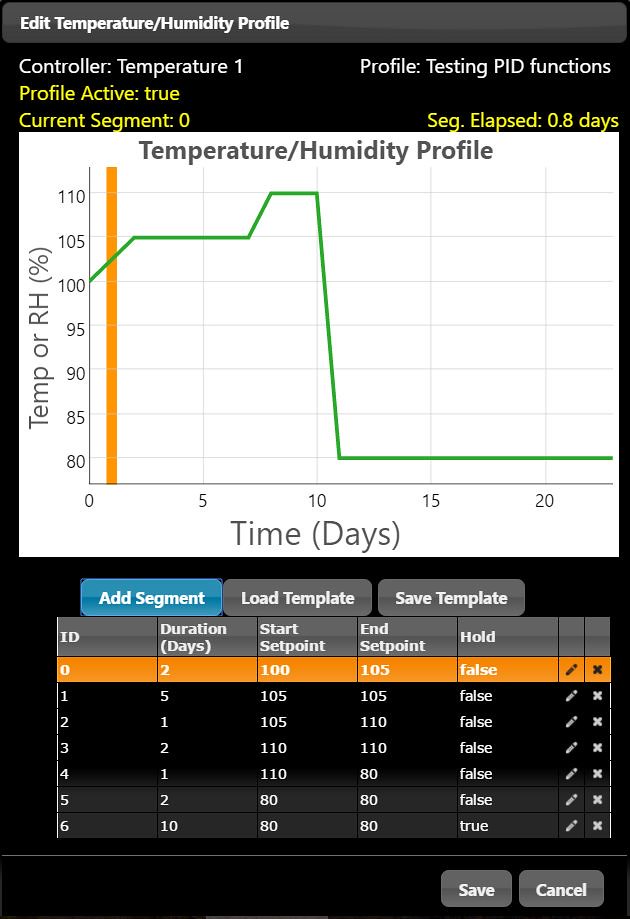
Profiles [/url]

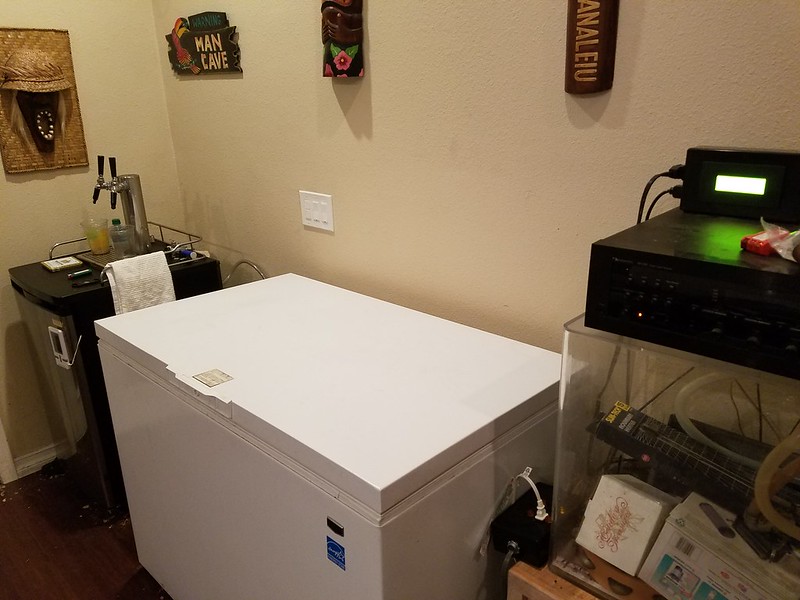
Here's an example of a very simple monitoring setup:

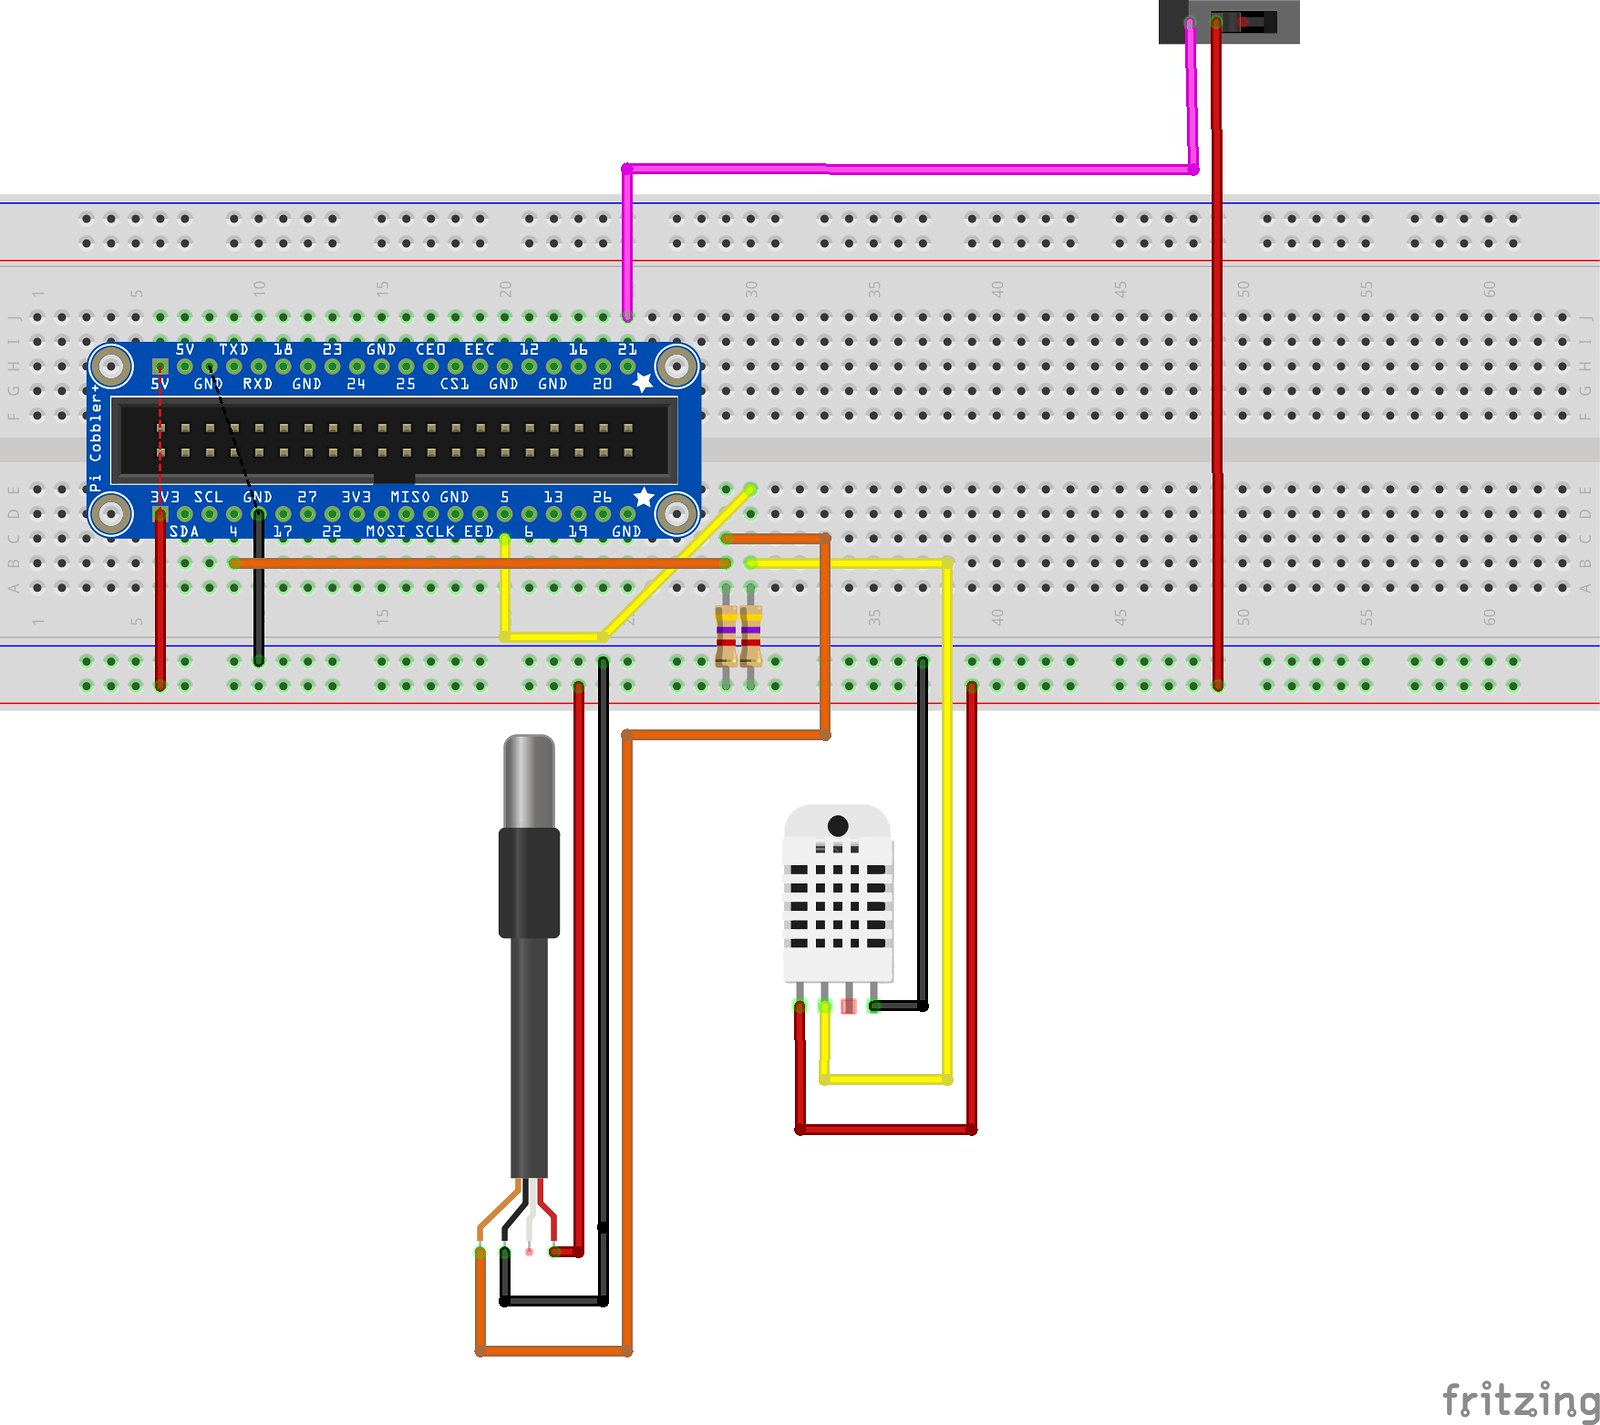
https://flic.kr/p/FmcZNp

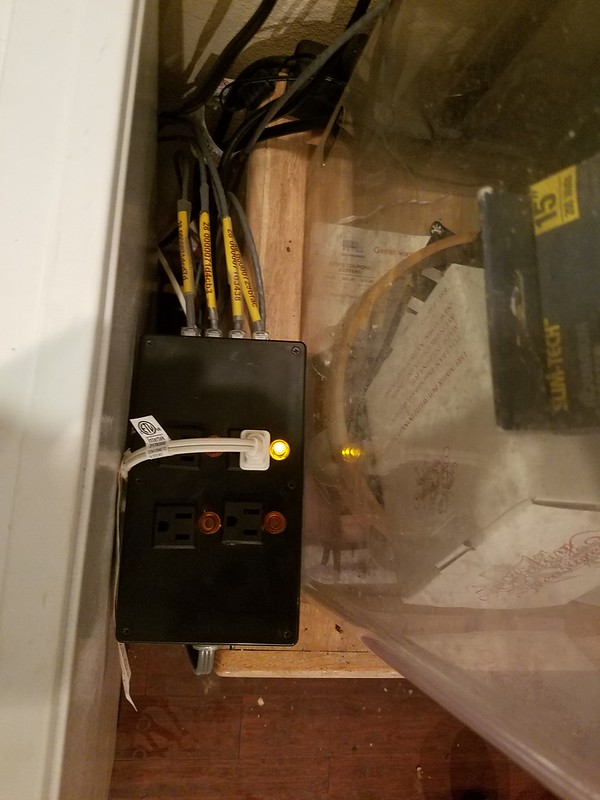
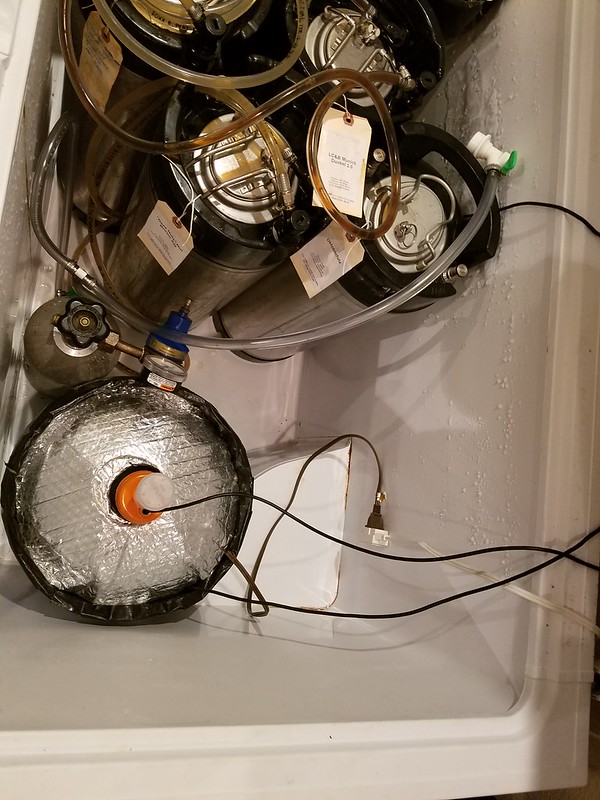
A Sainsmart relay board could be added to some free GPIO pins to control a chest freezer and some FermWrap heaters (or other heaters) to provide individual fermenter control. Here's a more complex configuration that uses bidirectional level shifters to buffer the GPIO outputs and provide 5V I/O:

https://flic.kr/p/G8jgqJ

This more complex setup is realized using an Adafruit PermaProtoPi Hat:

https://flic.kr/p/G8jh5E

Feel free to try out CellarWarden 1.0.1 and let me know what you think.
 
Nice. I may have to try this for the keezer/fermentation chamber I am currently building.

Can it control both the refrigerated chamber that holds the kegs and the fermentation chamber at different temps and use relays to turn on/off the cooling/heating to each chamber?

Or does it just monitor the temps of each chamber?
 
This looks really promising... I'm a little wary of relying on an RPi for control as mine seems to crash occasionally, but otherwise this looks really good. I currently use BrewPi and it seems like this provides all that functionality and much more. Reading the docs, I couldn't tell whether you could handle a 'free rise' period in a profile; basically setting a max temperature for a period. So I might want to start a period at 62 and rather than ramp to, say 68, let the fermentation handle the temp rise but make sure that the temp did not go ABOVE 68.
 
Nice. I may have to try this for the keezer/fermentation chamber I am currently building.

Can it control both the refrigerated chamber that holds the kegs and the fermentation chamber at different temps and use relays to turn on/off the cooling/heating to each chamber?

Or does it just monitor the temps of each chamber?

Yes, you can do both. Each controller can be single- or dual-sided, and acts independently of other controllers. So, if you had multiple fermentors in say a chest freezer and you wanted to control each fermentor temperature using FermWrap heaters, you would just set up individual heat only controllers. You would also set up a cool only controller for the freezer to hold its temperature below the lowest temperature of all of the fermentors. On my setup, I use a chest freezer for both serving and fermentation control, so I just set the freezer to serving temp and use individual carboy "coozy's" with a FermWrap in each one. This allows for independent control of each carboy.
 
This looks really promising... I'm a little wary of relying on an RPi for control as mine seems to crash occasionally, but otherwise this looks really good. I currently use BrewPi and it seems like this provides all that functionality and much more. Reading the docs, I couldn't tell whether you could handle a 'free rise' period in a profile; basically setting a max temperature for a period. So I might want to start a period at 62 and rather than ramp to, say 68, let the fermentation handle the temp rise but make sure that the temp did not go ABOVE 68.

I agree that crashes on the RPi could be problematic, although I have not encountered any difficulty with this after a few weeks of testing. Nevertheless, I am working on implementing a "watchdog timer" method to force a reboot if the RPi becomes unstable. Controllers resume from where they left off after a reboot, so a reboot shouldn't negatively impact a fermentation schedule. Nevertheless, stability is obviously very important and something that requires more testing.

CellarWarden doesn't explicitly allow for a "free rise," although you could set up hysteresis values to essentially provide this, but only in hysteresis mode.
 
CellarWarden doesn't explicitly allow for a "free rise," although you could set up hysteresis values to essentially provide this, but only in hysteresis mode.

Could you elaborate a bit more on that? I think a free rise function would be really useful regardless of how it's implemented. I can do it now with brewpi but it means I have to remember to start a new profile once the temp hits the max... Defeats the purpose of having an automated profile to begin with!
 
Could you elaborate a bit more on that? I think a free rise function would be really useful regardless of how it's implemented. I can do it now with brewpi but it means I have to remember to start a new profile once the temp hits the max... Defeats the purpose of having an automated profile to begin with!

I'm not exactly following what you mean by a "free rise." If you mean that you want to keep the temperature in a range, then hysteresis mode will provide for that. For example, if the profile calls for 65F and the temperature is 63F, if you set your hysteresis value for the heating actuator to 2, then heating will not be activated until the fermentor's temperature drops below 63F. I have implemented this only in hysteresis mode though, and not in PID mode. Also note that hysteresis values can be different for the heating and cooling side, and hysteresis values are currently not part of the profiles. Thus, you can specify a single hysteresis value for the actuator, not for a particular segment in the profile.

What would be the reason why you would want to do this, btw? If the purpose is to hold your fermentation temperature steady, then these control algorithms should suit your purposes.
 
Could you elaborate a bit more on that? I think a free rise function would be really useful regardless of how it's implemented. I can do it now with brewpi but it means I have to remember to start a new profile once the temp hits the max... Defeats the purpose of having an automated profile to begin with!

Actually, I think you could do this by setting up two independent controllers to control heating and cooling of your fermentor using different actuators. You would set up the two controllers to run independent profiles, with one controller set to control the heating actuator and one to control the cooling actuator. You can use the same temperature probe as the input for both of these controllers. For the "free-rise" segment, you would set the heating setpoint to the lowest temperature you want and the cooling actuator to the highest setpoint. You then start the two profiles at the same time and this should work, whether in PID or hysteresis mode. If the purpose of this to allow the fermentor to reach a temperature set by fermentation activity, this should work though I've not tested it explicitly.
 
Nothing is free, including free rise. Put your fermenter in a 120 F attic and let it free rise -- too fast. Put it in a 10 F garage and let it free rise -- too cold. If, instead, you know how you want the temp to rise, just ramp accordingly.
 
I think the two controller approach would work. I don't have any evidence to prove or disprove the notion that letting the exothermic activity of fermentation rise on its own rather than force it to adhere to a ramp makes any difference in the end, but you do read about brewers just letting the yeast go to town until a given temperature, so was just looking for a way to mimic that.
 
I think the two controller approach would work. I don't have any evidence to prove or disprove the notion that letting the exothermic activity of fermentation rise on its own rather than force it to adhere to a ramp makes any difference in the end, but you do read about brewers just letting the yeast go to town until a given temperature, so was just looking for a way to mimic that.

I'd be curious to hear how this works out.
 
Here's a simple controller implementation with a single DS18B20 and a 2-relay board. This could be used to control both a refrigerator compressor and a fermentor heater. The DS18B20 is set up on the 1-wire bus on GPIO 4, with a 4.7k resistor connected between Vcc (3.3V) and the data line on the sensor. The two outputs controlling the relay board are on GPIO 18 and GPIO 23. Note that this relay board requires 5V and enough current to drive the relays, not enough current provided by the RPi's GPIO pins. However, if you run the 5V output on the relay board to the JD-VCC pin on the board (and remove the jumper), this will provide enough power to activate the relays. A similar method can be used to drive solid state relay boards directly from the RPi without the need for level shifters.

SimpleController_bb.jpg
 
Last edited:
Hi there,

In your diagram you show the Vcc - JDVcc jumper is still present. It must be removed or the Pi will be damaged.

Incidentally, this is the same setup I am using on my Python fermentation controller. I am glad to see I am on the same track.

Cheers!
 
Probably copied the image from somewhere - it'd be a trick to attach a Dupont jumper wire to a header with a cap on it.

In any case, it's not clear what point was being made.
I think we've progressed well beyond spec'ing hardware for RPi thermostats...

Cheers!
 
Here's a simple controller implementation with a single DS18B20 and a 2-relay board. This could be used to control both a refrigerator compressor and a fermentor heater. The DS18B20 is set up on the 1-wire bus on GPIO 4, with a 470 ohm resistor connecting between Vcc (3.3V) and the data line on the sensor. The two outputs controlling the relay board are on GPIO 18 and GPIO 23. Note that this relay board requires 5V and enough current to drive the relays, not enough current provided by the RPi's GPIO pins. However, if you run the 5V output on the relay board to the JD-VCC pin on the board (and remove the jumper), this will provide enough power to activate the relays. A similar method can be used to drive solid state relay boards directly from the RPi without the need for level shifters.


Im sure most people know this but ill mention it, its a 4.7k resistor not a 470 ohm resistor.
 
Yeah, I had mentioned in the post to remove the jumper, but I agree that was confusing. I've edited the image to remove the jumper. I hope that helps.

Hi there,

In your diagram you show the Vcc - JDVcc jumper is still present. It must be removed or the Pi will be damaged.

Incidentally, this is the same setup I am using on my Python fermentation controller. I am glad to see I am on the same track.

Cheers!
 
I've edited the image to remove the jumper so it's clearer. There are several hardware examples in the help files for CellarWarden, but I wanted to post a simple controller configuration to show how this could be set up using a common relay board made for Arduinos.

Probably copied the image from somewhere - it'd be a trick to attach a Dupont jumper wire to a header with a cap on it.

In any case, it's not clear what point was being made.
I think we've progressed well beyond spec'ing hardware for RPi thermostats...

Cheers!
 
Good catch, FuzzeWuzze! I've modified the image and description to show a 4.7k resistor, not a 470 ohm resistor. I've been working on a hardware watchdog circuit for this, and my brain was stuck on that design!

Im sure most people know this but ill mention it, its a 4.7k resistor not a 470 ohm resistor.
 
Resurrecting this thread... I've just bought a Zymatic with the intention of brewing much more often. Now my issue is going to be temp control for multiple fermentations at once. I'm a bit loath to buy a fridge, mini or otherwise, for each fermenter, as that seems really inefficient. I'm toying with going with a glycol chiller solution instead but in looking for multi chamber support using glycol and with profiles and logging, I'm hitting a bit of a dead end. Would CellarWarden be a solution to my problem? Does anyone have any experience using it with a glycol approach? I know BrewPi doesn't yet support multi chambers and also has some inherent issues with glycol chilling too.
 
Resurrecting this thread... I've just bought a Zymatic with the intention of brewing much more often. Now my issue is going to be temp control for multiple fermentations at once. I'm a bit loath to buy a fridge, mini or otherwise, for each fermenter, as that seems really inefficient. I'm toying with going with a glycol chiller solution instead but in looking for multi chamber support using glycol and with profiles and logging, I'm hitting a bit of a dead end. Would CellarWarden be a solution to my problem? Does anyone have any experience using it with a glycol approach? I know BrewPi doesn't yet support multi chambers and also has some inherent issues with glycol chilling too.

I didn't buy a fridge, and instead made a "Son of Fermentation Chiller" from 50mm styrofoam. It works well, but you have to remember to change the ice regularly, and of course you need space in your freezer to re-freeze the water bottles.

BrewPi does not support multiple chambers natively, but the hardware is so cheap these days that you can just have one BrewPi for each one. My fuscus project gets rid of the Arduino, so you connect your temperature sensors and relays to the Pi GPIO pins, and you can run several copies of the controller software at the same time on the same Pi (driving different I/Os of course). It will run on a Pi Zero, so it can be built very cheaply (if you can get hold of one).

There are also ports of BrewPi to the ESP8266 module, which allows you to build a cheap WiFi connected controller. Thorrak's version implements the BrewPi Arduino code, so you need a Raspberry Pi to log data and show the graphs. Pocketmon's version does everything on the ESP module, so no Pi is needed.

My code thread:
https://www.homebrewtalk.com/showthread.php?t=575724

Thorrak's:
https://www.homebrewtalk.com/showthread.php?t=586476

Pocketmon's:
https://www.homebrewtalk.com/showthread.php?t=587425
 
Resurrecting this thread... I've just bought a Zymatic with the intention of brewing much more often. Now my issue is going to be temp control for multiple fermentations at once. I'm a bit loath to buy a fridge, mini or otherwise, for each fermenter, as that seems really inefficient. I'm toying with going with a glycol chiller solution instead but in looking for multi chamber support using glycol and with profiles and logging, I'm hitting a bit of a dead end. Would CellarWarden be a solution to my problem? Does anyone have any experience using it with a glycol approach? I know BrewPi doesn't yet support multi chambers and also has some inherent issues with glycol chilling too.

I haven't used CellarWarden for controlling glycol chilled fermentors, but there is no reason that it wouldn't work. You could set up motorized ball valves (connected via a relay board to the RPi) to accomplish this. In my case, I use a 15 cubic foot chest freezer as a dual use fermentation chamber and keezer to store extra kegs. I keep the chest freezer at around 33F (serving and lagering temp) and then use "carboy coozies" made up of Reflectix wrapped around my carboys. In my current setup, I can control up to four individual carboys as well as the chest freezer from a single RPi3. This method works pretty well. I'll post some pictures to show my setup.

 
Here's an example of my setup fermenting a Doppelbock. I have made a carboy wrap using Reflectix and a Fermwrap warmer. The Fermwrap is connected to an extension box to the main unit via a CAT5 cable and the 1-wire temperature sensors are also wired via CAT5 and connect to the extension box. Inside the extension box is a Sainsmart SSR board with 4 2 amp SSRs. This extension box will ultimately be mounted onto a keezer collar once I build that (been too busy working on CellarWarden!).

Note that this extension box will allow control of up to 4 individual Fermwrap/carboys. In this case, I was testing the use of two individual temperature sensors to control this one fermentor. The primary sensor was placed between the Reflectix and carboy, and the second was placed in a thermowell to measure the interior of the fermentor. The purpose of this was to minimize overheating around the edges of the fermentor while enabling faster responses. You can specify one or two sensors per controller. You can also configure as many controllers as you wish, with each one controlling a fermentor (in this case, using the Fermwrap/Reflectix combo, but this could also be done using ball valves with a glycol chiller, fans to blow from a colder source, etc).


Shown below is the main unit with the RPi3, an I2C 20x4 LCD display and a Sainsmart 2 channel relay board stuffed inside. The chest freezer is plugged into an outlet on the side of this box.


Here's the extension box. Each of the four outlets is controlled by a 2A SSR on the Sainsmart SSR board. Note the CAT5 wires connecting to the side of the box. These are the temperature sensors and one CAT5 wire that connects to the main unit.


This is a single 6 gallon PET carboy sitting inside a Fermwrap/Reflectix "coozie." Note the position of the two sensors, one in the thermowell and one between the carboy and Coozie.
 
Here's the Sensors tab window for this fermentation showing fermentation of a Doppelbock. While I only have one fermentor in this example, I've done three simultaneously so far.


This shows the Controller logfile demonstrating the profile I used for this fermentation (Doppelbock misspelled in profile name). Note how closely the process variable (e.g. the fermentor temperature; black line) tracked the setpoint (green line) except during the cold crash phase. The fermentation temperature seemed to cool down exponentially, likely due to Newton's Cooling Law (http://en.wikipedia.org/wiki/Newton's_law_of_cooling).
 
This is the controller logfile for the keezer. This controller was set up to use hysteresis mode with a two degree hysteresis setting:


Here is this same plot, just zoomed in to show what is happening with the controller. It is apparent that the keezer turns on when it reaches 34F (due to the hysteresis setting) and turns off again once it reaches a setpoint of 32F).


Incidentally, the broken blue line indicates when the compressor was activated. It is noteworthy that the freezer did not struggle against the Fermwrap too much. Cycling of the compressor was not frequent. To prevent this possibility (though it did not occur here), I use a 10 minute delay for this controller. So the compressor will not reactivate after it stops until the delay has surpassed to prevent rapid cycling of the compressor that might cause it (or its start relay and run capacitor) to fail. In runs with three independent fermentors, I have not observed significantly increased cycling times, suggesting that the 40W output from each of the Fermwrap heaters does not significantly impact the cooling of the freezer.
 
Here, I've zoomed in on the Sensors plot around the two temperature sensors monitoring the fermentor. Note that the lighter line is from the sensor between the Fermwrap and the carboy and the darker purple line is from the sensor in the thermowell. It's interesting that the darker line started rather high and then dropped down below the lighter one with time. This corresponded to the initiation of krausen, so the higher internal temperature at the start likely was due to strong initial fermentation. Since this controller used two sensors (with 50% sensor 2 priority, e.g. averaging), the decrease in internal temperature necessitated an increase in outside temperature to maintain a steady process variable that tracked the setpoint.


Also note that the external sensor had much more variation with time, which makes sense since it is not surrounded by the large thermal mass that the internal probe encounters. Thermodynamics can be fun :rockin:
 
I didn't buy a fridge, and instead made a "Son of Fermentation Chiller" from 50mm styrofoam. It works well, but you have to remember to change the ice regularly, and of course you need space in your freezer to re-freeze the water bottles.

BrewPi does not support multiple chambers natively, but the hardware is so cheap these days that you can just have one BrewPi for each one. My fuscus project gets rid of the Arduino, so you connect your temperature sensors and relays to the Pi GPIO pins, and you can run several copies of the controller software at the same time on the same Pi (driving different I/Os of course). It will run on a Pi Zero, so it can be built very cheaply (if you can get hold of one).

There are also ports of BrewPi to the ESP8266 module, which allows you to build a cheap WiFi connected controller. Thorrak's version implements the BrewPi Arduino code, so you need a Raspberry Pi to log data and show the graphs. Pocketmon's version does everything on the ESP module, so no Pi is needed.

My code thread:
https://www.homebrewtalk.com/showthread.php?t=575724

Thorrak's:
https://www.homebrewtalk.com/showthread.php?t=586476

Pocketmon's:
https://www.homebrewtalk.com/showthread.php?t=587425

CellarWarden runs everything natively on the RPi (v.2 or 3 preferred), so no need for an Arduino or other microcontroller for each fermentation chamber. I do plan to eventually provide a driver to support communications with Arduinos and other microcontrollers so that it will be compatible with existing BrewPi hardware. But there are other items that I'd like to address first, primarily other sensor and actuator/output types. I'm currently working on incorporating Brewometers so that it will be possible to track fermentation progress, and possibly to control profile operations based on this.
 
Hmm - this sounds like maybe a good alternative and a heck of a lot cheaper... so basically you keep the keezer between 30 and 34 degrees and let the fermwrap around the fermenters keep them nice and warm. I have a spare Pi3 actually, so this might be the approach I take... have to read up on the Fuscus project, although as I think I've said in one thread before, the idea of relying on the Pi only for control concerns me a little due to instability experiences I've had with the platform.

Just saw the bit about the brewometers... love that... I have one and think it's been really valuable - not accurate enough for temperature control, but certainly good enough to tell me when I'm close or at FG.
 
Well, both Cellar Warden and Fuscus run directly on the Pi, so it's certainly possible. My Pi currently has an uptime of 127 days, and Fuscus has been running that whole time (the same process, started 4 months ago).

I have considered turning on the Pi watchdog process, but it hasn't seemed to be necessary.

It's up to you what you do of course. If you try out the software you can decide for yourself.
 
Hmm - this sounds like maybe a good alternative and a heck of a lot cheaper... so basically you keep the keezer between 30 and 34 degrees and let the fermwrap around the fermenters keep them nice and warm. I have a spare Pi3 actually, so this might be the approach I take... have to read up on the Fuscus project, although as I think I've said in one thread before, the idea of relying on the Pi only for control concerns me a little due to instability experiences I've had with the platform.

Just saw the bit about the brewometers... love that... I have one and think it's been really valuable - not accurate enough for temperature control, but certainly good enough to tell me when I'm close or at FG.

I have two RPis running CellarWarden. One is on my wine cellar and that has been running for nearly two years, over the last year controlling the cooling unit. I have been using a second RPi with CellarWarden controlling my fermentation chamber/keezer for six months. I haven't run into any problems thus far. However, I do agree that a microcontroller is going to be more stable in the long run. For this reason, I do recommend implementation of a couple of safeguards.

First, I recommend devoting the RPi to CellarWarden duty using a minimal image of Raspbian. I also recommend using a realtime clock board if at all possible. I also recommend using a watchdog timer of some sort to reboot the RPi if it fails to respond. I intend to implement a watchdog function in CellarWarden shortly to talk to external hardware watchdog timers, but in the meantime, you can use a watchdog timer built into the chip on the RPi for this (this is described on the GitHub page for CellarWarden). Lastly, I recommend unplugging any appliances that are not being actively controlled by CellarWarden to prevent the RPi from tripping those appliances.
 
Interesting, have to take a closer look at this solution (y) Looks like very impressive work :mug: :yes:
 
Back
Top