HDPE 2 - 13 Gallon Fermenter?

Homebrew Talk - Beer, Wine, Mead, & Cider Brewing Discussion Forum

Help Support Homebrew Talk - Beer, Wine, Mead, & Cider Brewing Discussion Forum:

This site may earn a commission from merchant affiliate links, including eBay, Amazon, and others.

theCougfan97

Well-Known Member
Joined
Feb 17, 2013
Messages
199
Reaction score
1
Location
Seattle
The listing's title reads "Beer Cooler Food Grade HDPE 2".

It appears to be a poor man's Big Mouth Bubbler, on crack.

Is there any reason I cant just drill a hole in the lid, throw a grommet in said hole, and insert my airlock. Would this not result in a stackable, 13 gallon, easy to clean, fermentation bucket?
 
I use one as well.
Drilled a hole in the center of the top for a stopper/airlock.

Works great and does 10gals with ease, no blow off tube.
 
I have a couple of these have been using them over 14 months now

I do 11 1/2 gallon batches in them with beer of 1.05X or below no need for blow off tube

get up over 1.06X I use a blow of tube in the beginning

all the best

S_M
 
I have a few of these and have used them for years. I even modified the tops to work with tri-clamp fittings so I could use some of the other accessories I have, mainly for closed transfer.
1530363_10152714159614657_1870251908_n.jpg
 
For those of you that commented and said you are using these, where did you find them?

The cost of the ones in the OP are good, but the cost of shipping them makes them not such a good deal. I am just wondering if there is somewhere that I could look that may be a better overall cost or perhaps a place that I could find these locally in Ohio. I have contacted a preppers supply store that shows them in a picture on their web site, but doesn't have any pricing. Hopefully, they will get back to me.
 
I have a few of these and have used them for years. I even modified the tops to work with tri-clamp fittings so I could use some of the other accessories I have, mainly for closed transfer.
1530363_10152714159614657_1870251908_n.jpg

Can you expand on your closed transfer process? I was about to go with corny kegs as fermentation vessels simply because they enable closed transfer. If I can closed transfer with larger plastic vessels, that saves a bit of money AND allows me to brew full 5gal batches instead of reducing the volume to 3.5-4 to give room in the corny.
 
Can you expand on your closed transfer process? I was about to go with corny kegs as fermentation vessels simply because they enable closed transfer. If I can closed transfer with larger plastic vessels, that saves a bit of money AND allows me to brew full 5gal batches instead of reducing the volume to 3.5-4 to give room in the corny.

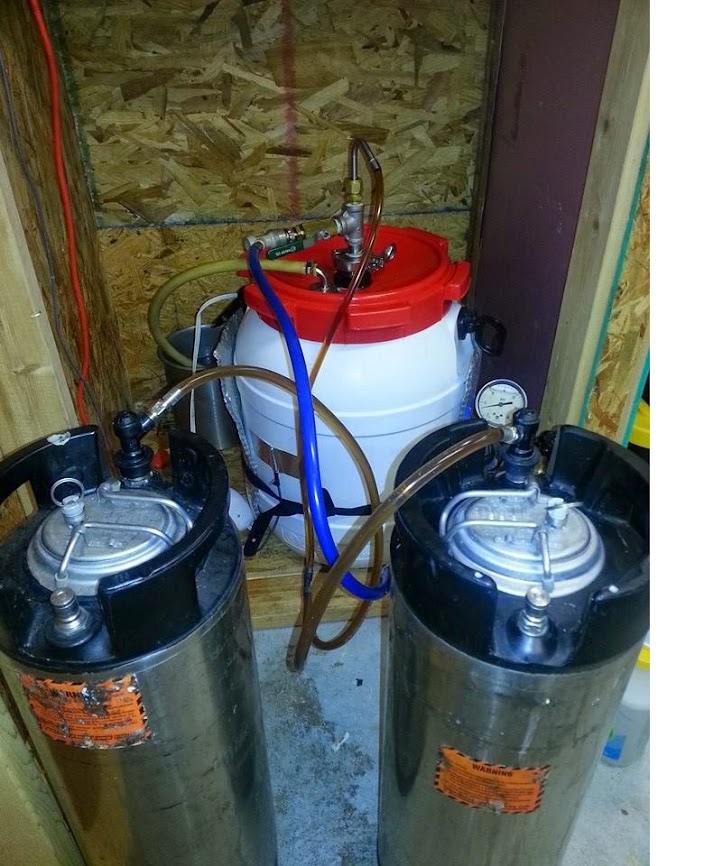
Here is a picture where I am filling 2 kegs at once from the fermenter. Works like a charm.

closed%2Btransfer.jpg
 
Ok I *definitely* want to know how you're doing that. From the photo it looks like your CO2 in and beer out are connected to the same T-fitting....which doesn't seem possible. Mind detailing that? that looks like my ideal setup. Easy to clean, cheap, pressure transferable...
 
That is pretty awesome. I'm guessing its a t setup for your triclamp. Pressure fitting to hold the racking cane through the t. Gas goes in around the cane to push the beer out.

What pressure do you transfer with?
 
That is pretty awesome. I'm guessing its a t setup for your triclamp. Pressure fitting to hold the racking cane through the t. Gas goes in around the cane to push the beer out.

What pressure do you transfer with?

Pretty much. On the top of the tee I have a compression fitting for the racking cane and to the left I have a corny gas in port. I connect the co2 to the gas in port and set it to about 2-4 psi to push the beer out. The hose comes out of the racking cane and has a tee to split it so I can have a hose go to the beer out of each keg. The key is to make sure the beer out disconnects are the same. I had issues once with one keg filling faster and when I took it all apart I found this.
20140223_144723-1.jpg


I use this same set up with 60l speidel fermetners.
 
Would you mind posting pics of your spiedel transfer setup? I just got two of those bad boys and would really like to do pressure transfers
 
Hey Drez77 do you mind posting these pictures of your closed transfer setup again? Several of your pictures in this thread don't load anymore. One did and I am very impressed and intrigued and want to learn from your skills.

Pretty much the same setup.

4.jpg


3.jpg
 
Thank you Drez77! Your pressure transfer setup really was my first peek at what you can do with a racking can and the right fittings. There is a lot of potential in that type of setup.

These post really helped me figure out what I wanted to do...

https://www.homebrewtalk.com/showthread.php?p=5867800#post5867800

http://www.milkthefunk.com/wiki/Eccentric_Beekeeper_Bulldog

Just ordered parts from BrewHardware.com to start using my CurTec 55L drums to ferment in, can't wait to put it together. I'm going with a rubber stopper in lieu of the tri-clover because I could not find a reasonable 2" tri-clover bulkhead. I'd like to stick to 2" so I can upgrade to fermenting in Sankes eventually.

There are two companies out there that do weldless tri-clamp fittings. Still Dragon has a 2" and Brewhardware has a 1.5". The Brew Hardware one is the least expensive. https://www.brewhardware.com/product_p/tc15wlf.htm

Hope it all works out for you.
 
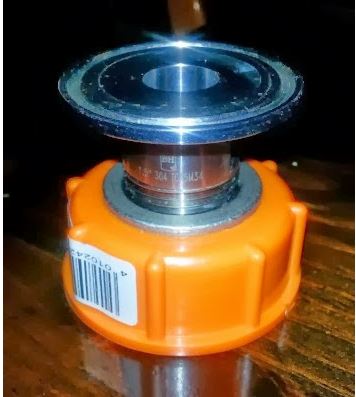
Thanks Drez, I got it except for this (I found this in a old archive I have of this thread)

How do you do this? What is that coupler attaching to the orange lid?

drez coupling.JPG
 
Thanks Drez, I got it except for this (I found this in a old archive I have of this thread)

How do you do this? What is that coupler attaching to the orange lid?

It was a piece of SS that was turned down to fit in the opening the original valve left. the Tri-clamp screws into that and it is siliconed to the cap. If you went with an undrilled cap you can drill it to fit the fitting and just have a nut on both sides like a traditional weldless fitting.
 

Latest posts

Back
Top