I'm going to preface this post by saying that I own a Blichmann Therminator counterflow chiller for a few years, and I've been happy with it. I recently built a new HERMS system with the goal of ditching propane (cost of gas and tired of storing multiple tanks) and getting rid of many threaded fittings as possible, which lead me to use Stout Tanks for my kettles.
Now onto my reasons to switching to immersion chiller.
1. First and foremost, cleaning the plate chiller is a bit of a hassle and more time consuming than an immersion chiller. The backflushing with PBW and then with equal temp. clean water adds more time and water usage. Also, I toss it in the oven to "dry" and bake any remaining crud. I still don't know if I'm getting all coldbreak and debris out.
2. I use a SS hop basket to keep hops out of the plate chiller and that just adds to another piece of cleaning. I also feel it kills my utilization a bit, all-be-it a small amount. I don't want late addition or whirlpool hops to sit in near boiling water while waiting to be put through the counterflow chiller.
3. My stout tank has a tangential port that is to be used to whirlpool and collect break, hops, etc. in the middle of the domed/concave bottom. There is no dip tube so a gallon or two of break hops etc. are left behind.
4. I do 10 gallon batches and store in two separate 6.5 gallon carboys. I live in Florida that has hot ground water. So my HLT becomes my cold liquor tank by adding ice and roughly 15 gallons of water (refilled once) and is pumped the opposite direction of the counterflow chiller. It becomes a balancing act with discharge valves on the pump, between balancing flow of wort and flow of cold ice water. If I don't watch the temp, one carboy could be warmer than the other which results in different fermentation temps, at least early on during fermentation. With an immersion chiller, all wort will be the same temp.
5. Ok. I could probably go on but just read Jamil's article.
http://www.mrmalty.com/chiller.php
So, in short.
Pros
-No need to use the hop basket (hop utilization and another piece to clean)
-No need to clean or back-flow the counter flow chiller (time)
-No need to clean the inside of the immersion chiller, rinse and put away.
-No need to clean the hop basket (time)
-All wort is the same temperature
-Can leave cold break behind and aid in a reduction of DMS (read the article above)
-In reading, it should help retain hop oils and aroma of late hop additions since you are chilling everything at once vs. near boiling wort waiting to be chilled by the CFC.
Cons
-Damn more money.
-Not sure how well my idea will work (ground water temp is the X factor)
-Just another piece of equipment
-It will more than likely take a few more minutes to chill than it normally would.
-There is time involved in waiting for hops and cold break to settle in the middle
Onto the chiller. I loved the concept behind Jaded Hydra chiller. I love the fact that they used three shorter runs of copper fed simultaneously from one cold water source to chill wort vs. one long coil. Visit jadedbrewing.com that shows their chiller comparisons. FYI - They have great customer service, replying to my emails and saying the would make a stand to sit it off the bottom.
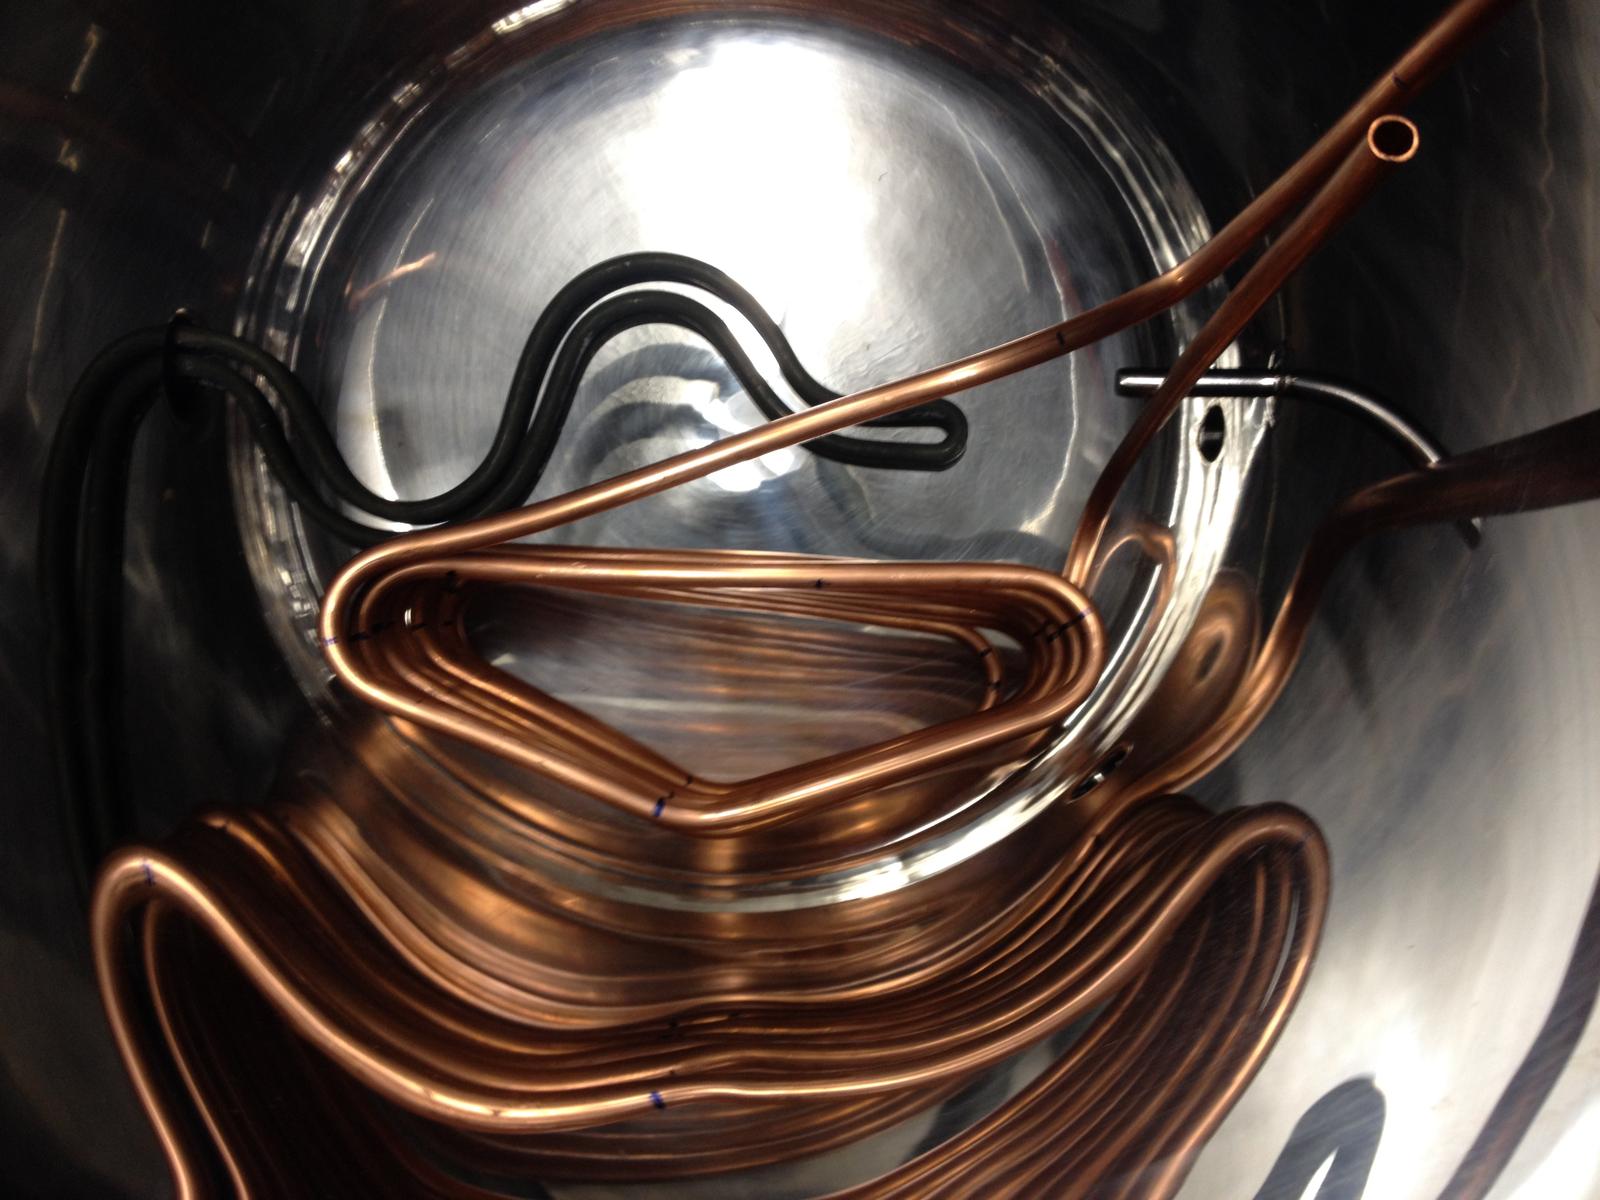
However, my dilemma was that I didn't like the chiller resting on my heating element, which roughly sits about 5 inches off the deepest part of the domed bottom. This would make the bottom of the immersion chiller roughly 5.5 inches off the bottom. This makes a lot of underutilized space in the few cases where I do a high OG beer that requires a large grain bill and 5 gallon batch size. With the chiller sitting at this height, there will be some coils not sitting in the wort or not utilized.
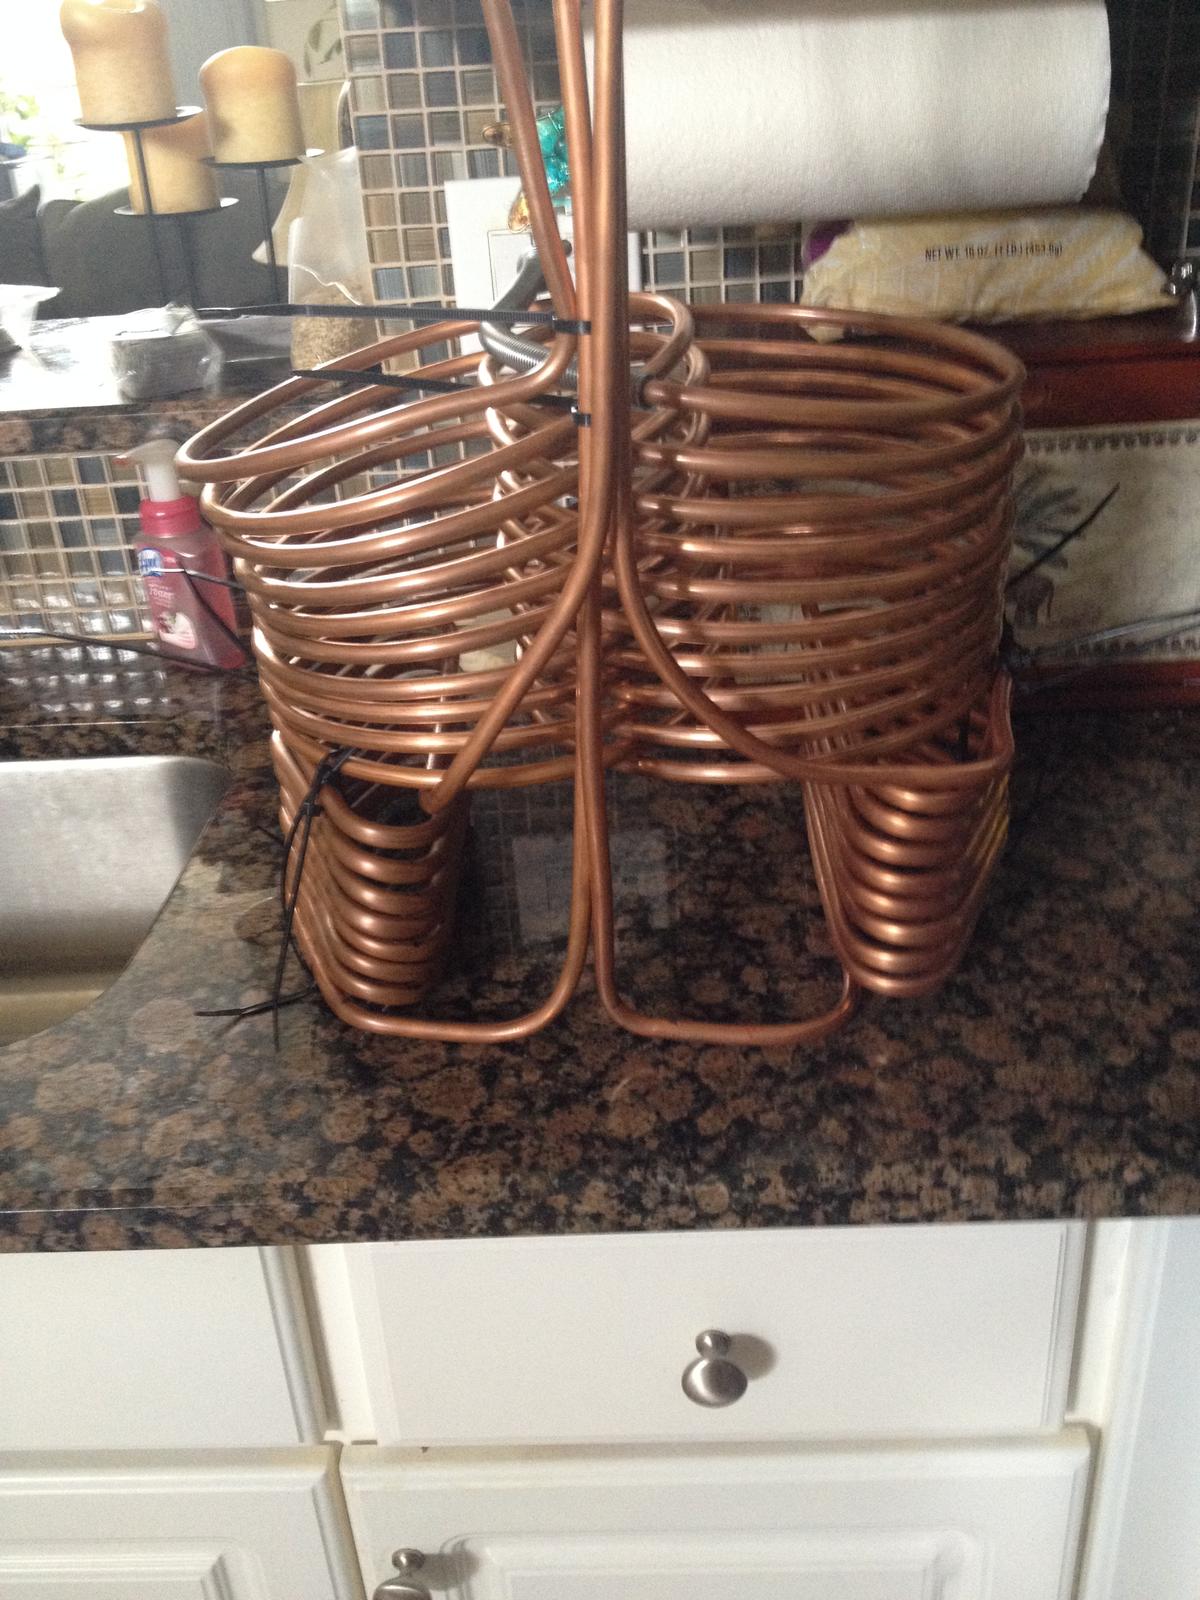
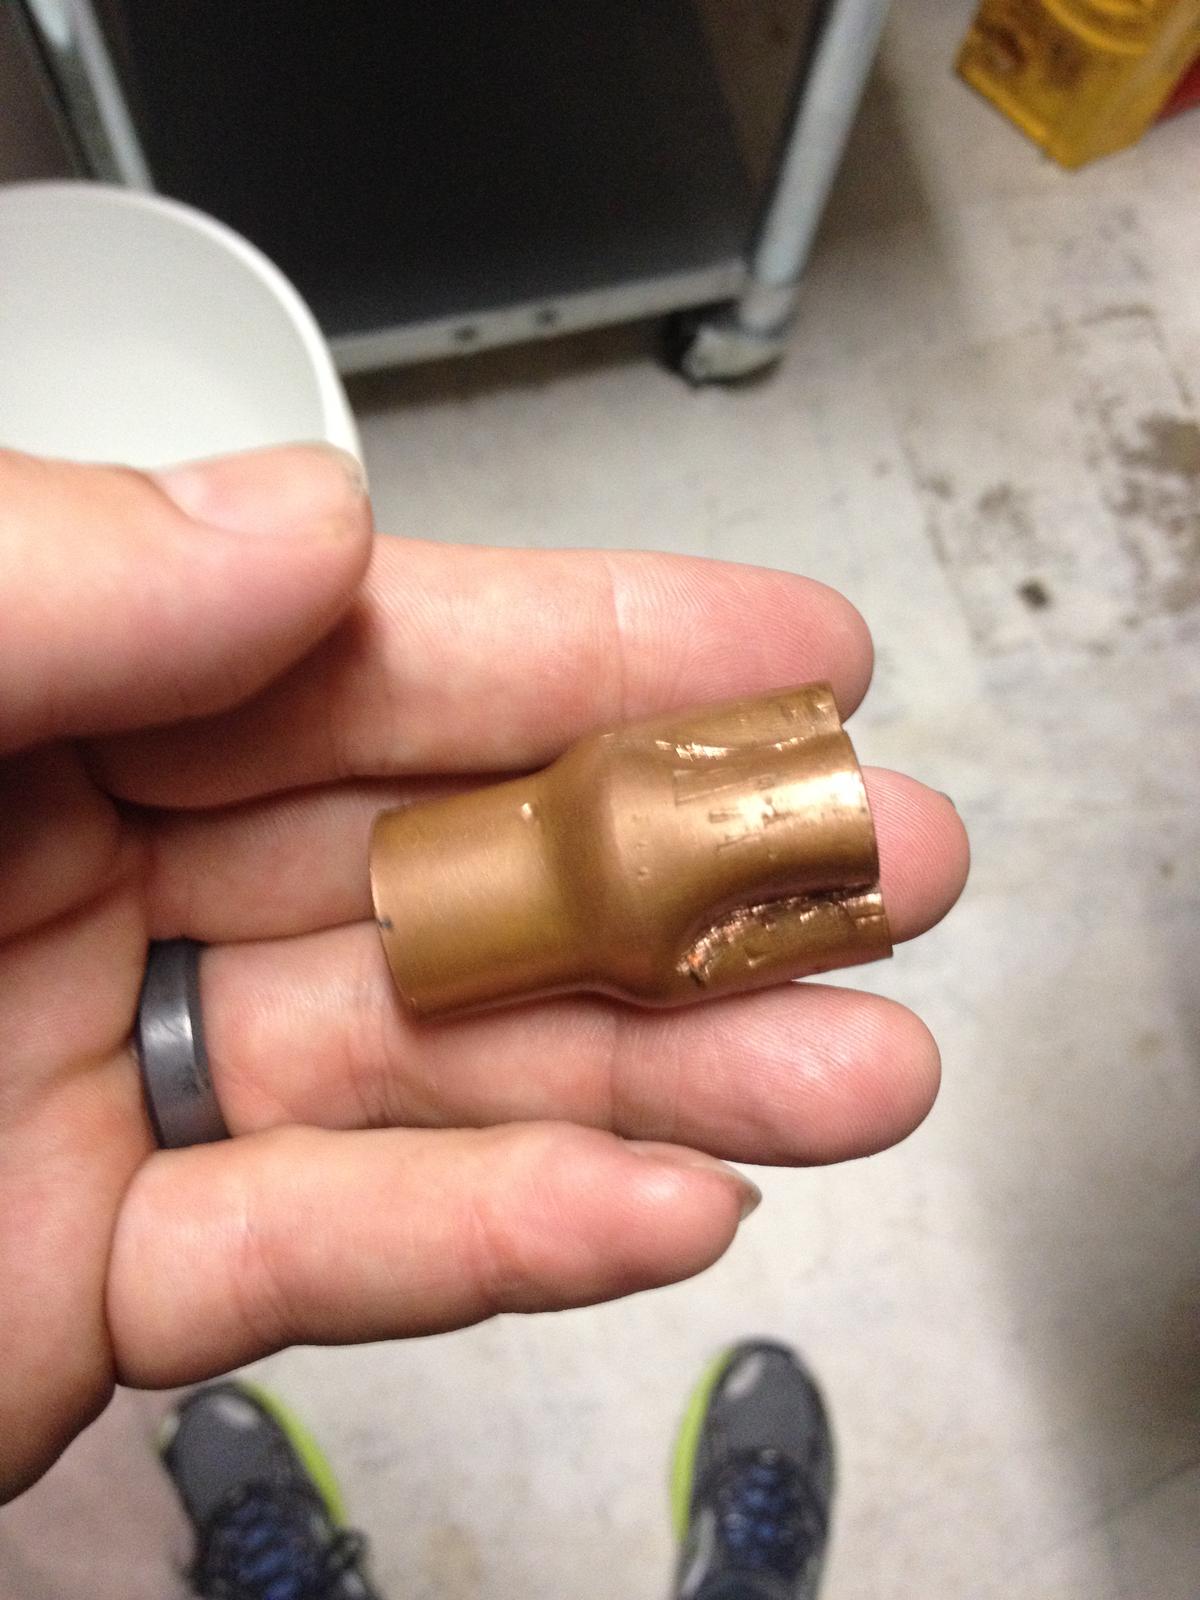
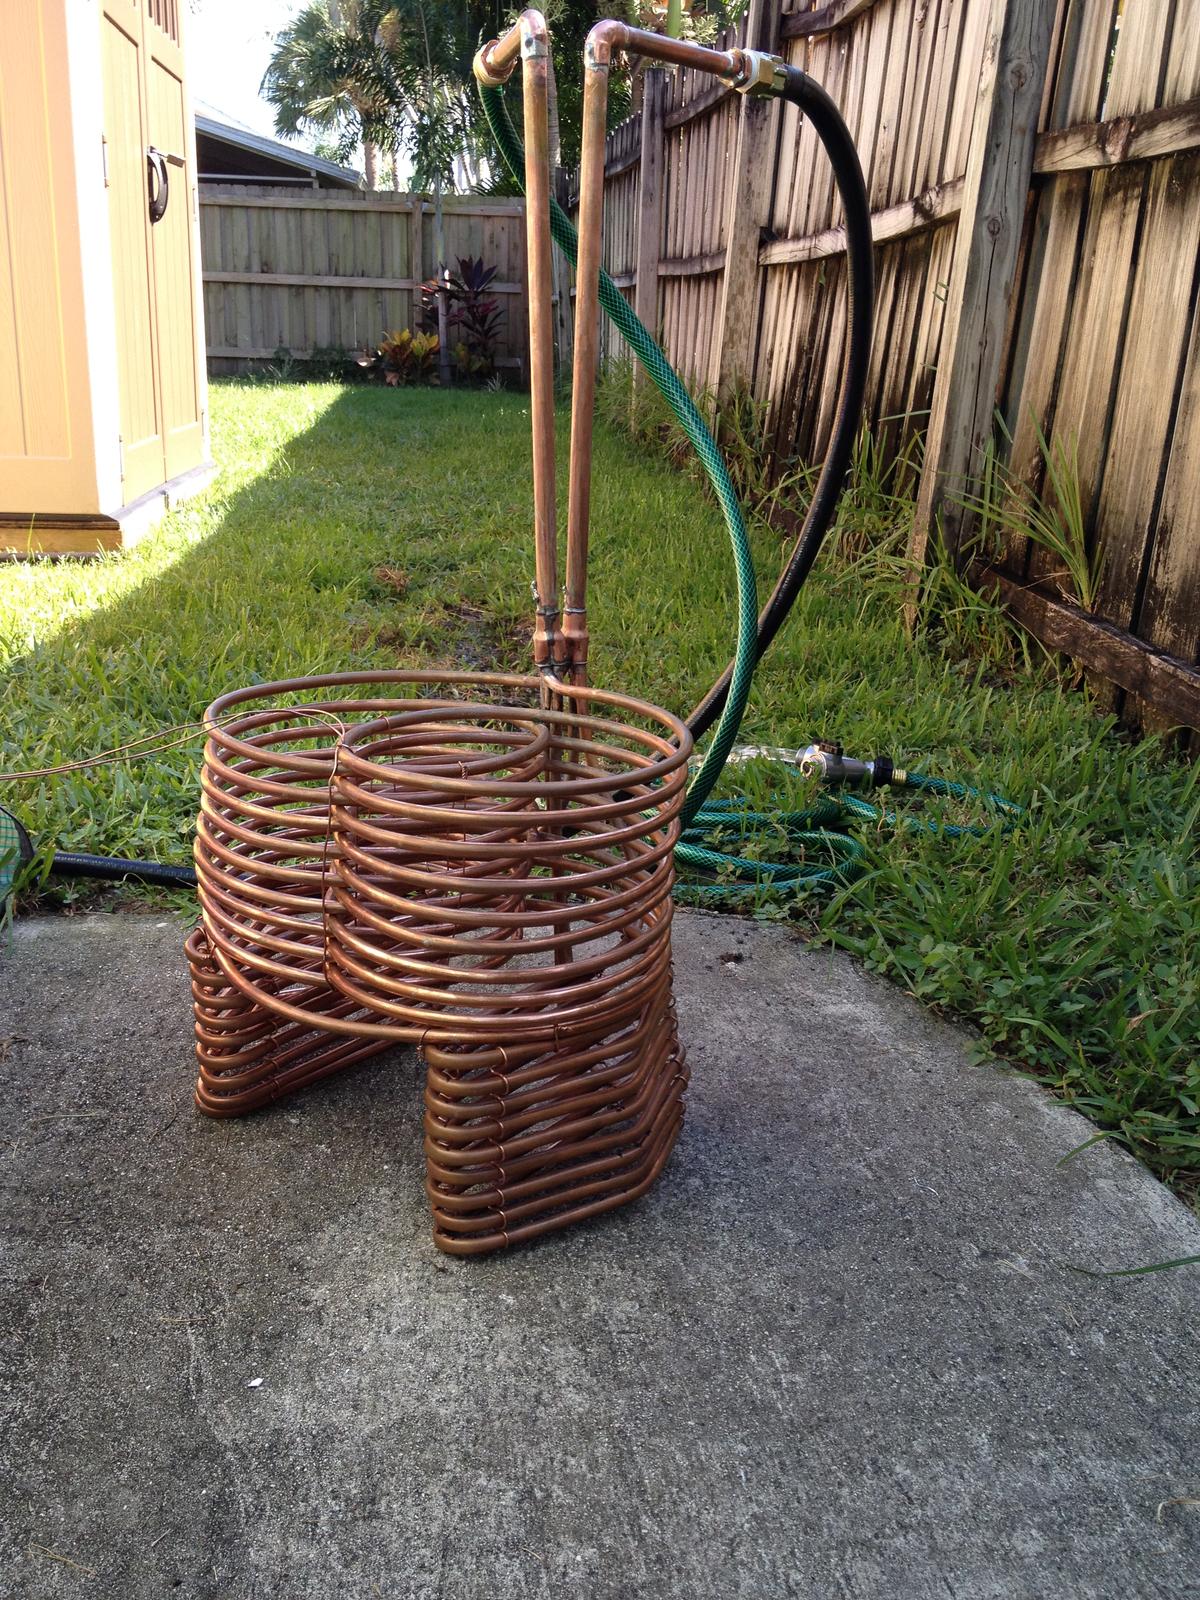
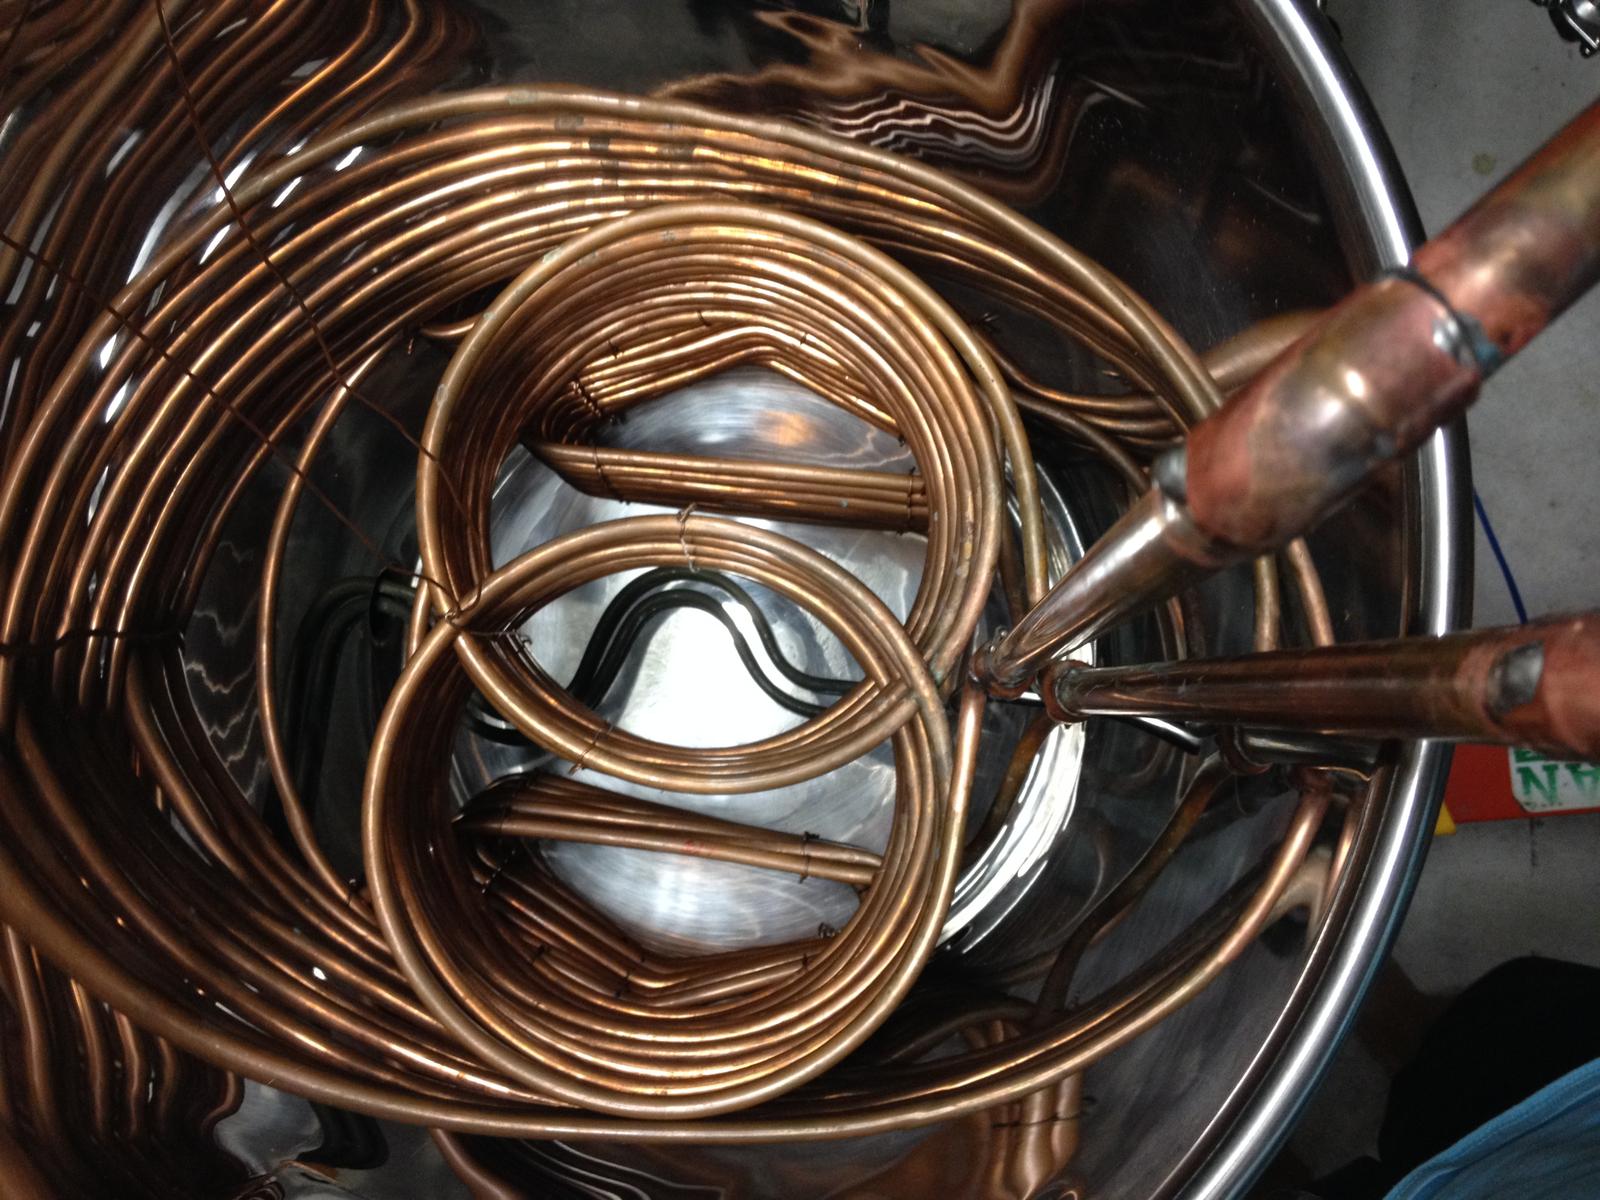
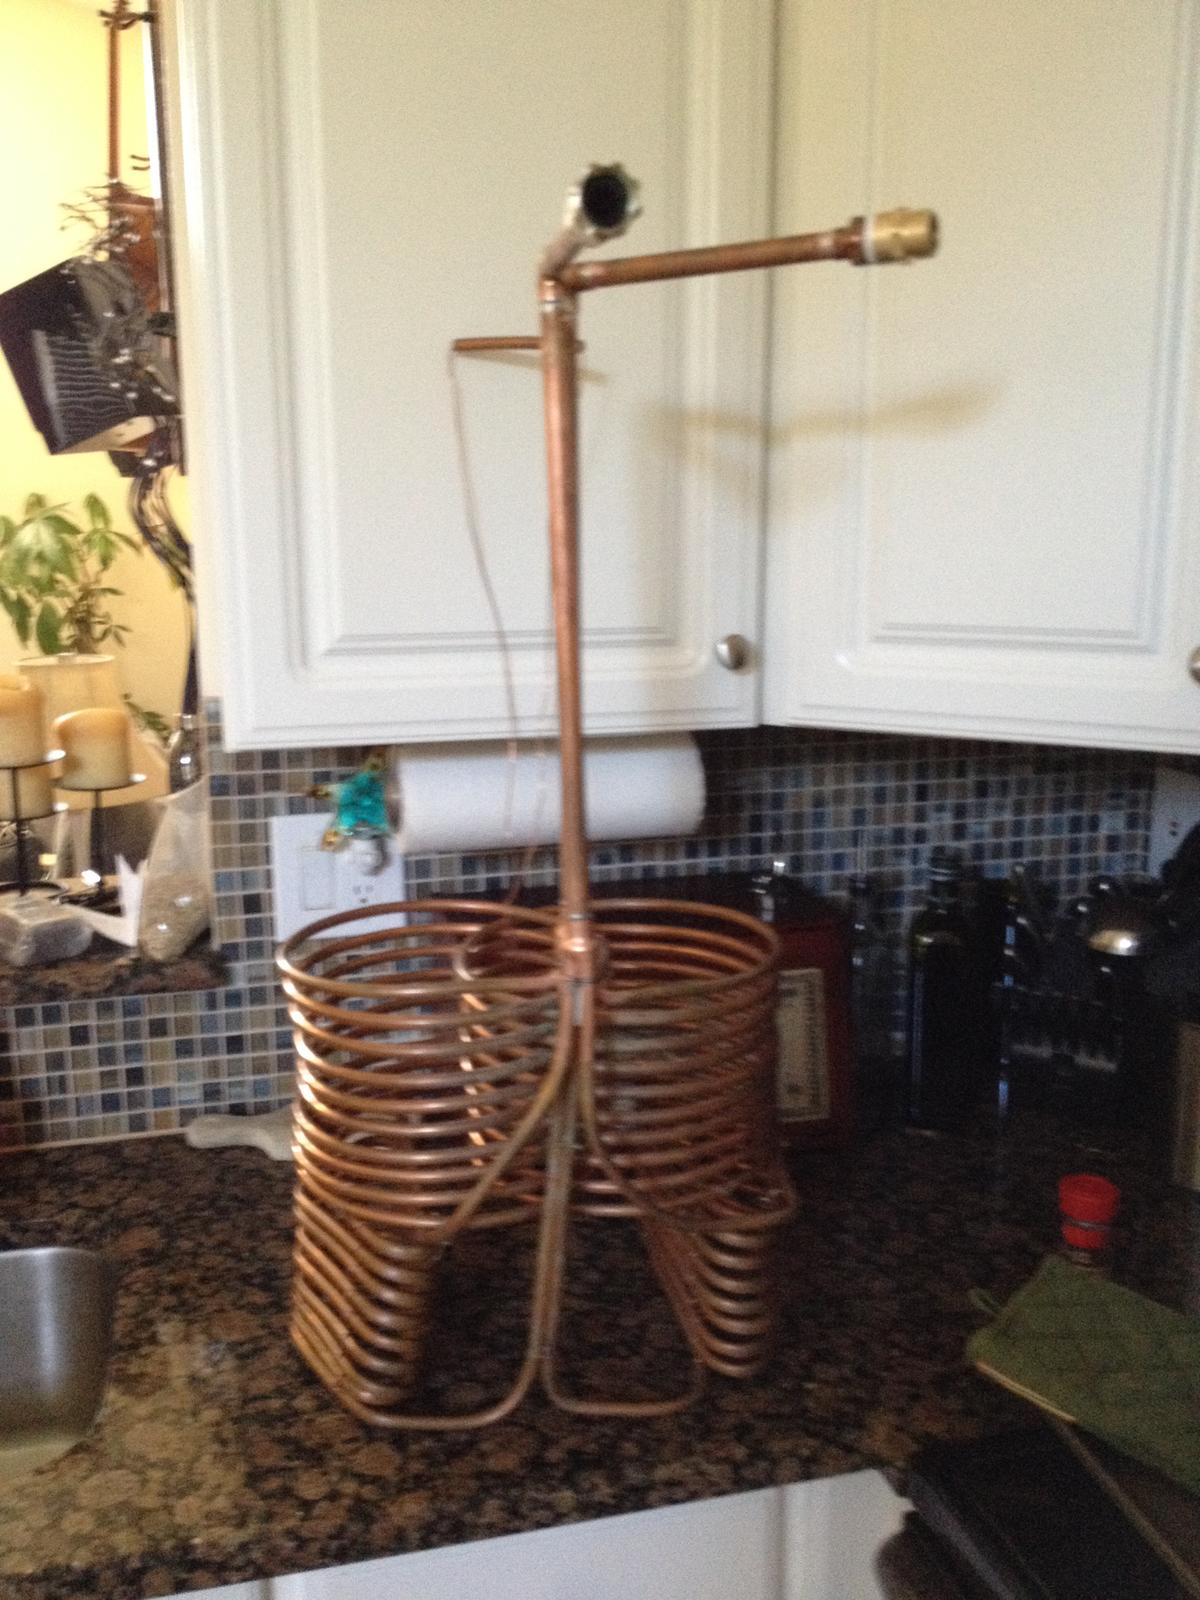
So I went ahead and designed my own custom immersion chiller. It uses 3/8 x 50' tubing "rib-cage" design that you can find on the forums here. It then uses two - 3/8 x 20' custom made triangles that each point roughly touches the same elevation on the domed bottom to make it level and not want to fall down the slope to the middle. I also made a custom coupling by taking a 1/2 x 3/4 copper coupling and hammering the 3/4 side around 3/8 diameter rod that was used to solder all 3 inlet and 3 outlet 3/8s tubes together. You could just make a little header with copper tees or what not, which will be quicker and less frustrating. However, I like all 3 tubes fed with water at the same time and it looks cleaner. Doing the custom coupling like I made requires patience to shape and requires a lot of flux and solder to keep it from leaking (I did pressure test it). I also soldered it upside down, with the coils up in the air and the 1/2 hard pipe (type m) touching the ground. When soldering the 3/4 side of the coupling, I didn't want solder flowing into my 3/8 tubes. I would say the total coils add up to about 85' after chopping a few small bits of 3/8 tube off.
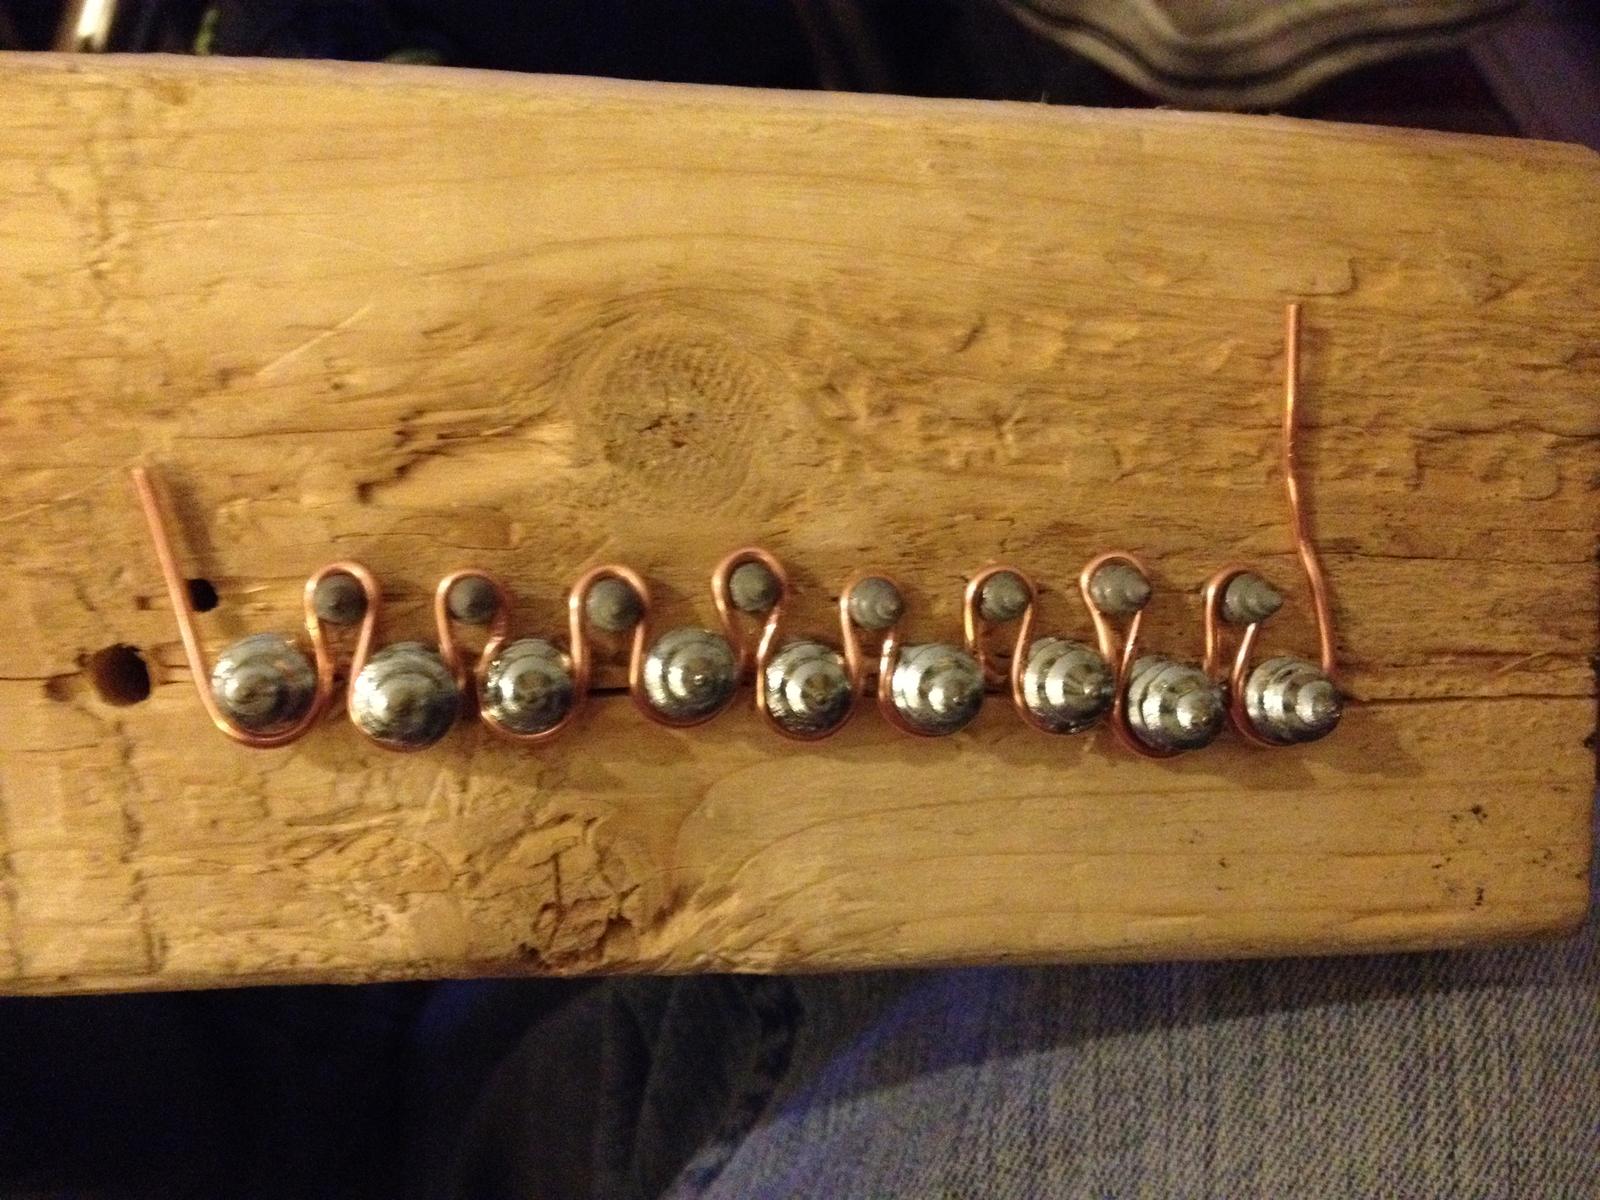
You will also see below my rig to weave 14 gauge bare copper wire to help separate each coil. It took a few seconds to make the rig, but I think it works better and looks nicer than trying to weave, twist, bend, etc. copper wire between each tube to separate. I tried doing that and didn't like the separation, took too long to weave, and I felt like it could hide hop debris the more twists I had in it.
My plan is to test this in the next few weeks. I have an old immersion chiller that will be sitting in cold ice water that will be used as a pre-chiller due to my ground water temp. I'm hoping it will work well and that the ribcage design with copper spread-out throughout the vessel. I plan on using my pumps in series, pump from the vessel to the second pump, and back into the tangential port. The faster I can get wort moving around the copper coils, the quicker it will cool. It is roughly 12.5 inches to the top of the coils. If I feel that is too tall, I can compress the coil gaps slightly.
Anywho, I went on for too long. See pics below.
Cheers!
Karl



Now onto my reasons to switching to immersion chiller.
1. First and foremost, cleaning the plate chiller is a bit of a hassle and more time consuming than an immersion chiller. The backflushing with PBW and then with equal temp. clean water adds more time and water usage. Also, I toss it in the oven to "dry" and bake any remaining crud. I still don't know if I'm getting all coldbreak and debris out.
2. I use a SS hop basket to keep hops out of the plate chiller and that just adds to another piece of cleaning. I also feel it kills my utilization a bit, all-be-it a small amount. I don't want late addition or whirlpool hops to sit in near boiling water while waiting to be put through the counterflow chiller.
3. My stout tank has a tangential port that is to be used to whirlpool and collect break, hops, etc. in the middle of the domed/concave bottom. There is no dip tube so a gallon or two of break hops etc. are left behind.
4. I do 10 gallon batches and store in two separate 6.5 gallon carboys. I live in Florida that has hot ground water. So my HLT becomes my cold liquor tank by adding ice and roughly 15 gallons of water (refilled once) and is pumped the opposite direction of the counterflow chiller. It becomes a balancing act with discharge valves on the pump, between balancing flow of wort and flow of cold ice water. If I don't watch the temp, one carboy could be warmer than the other which results in different fermentation temps, at least early on during fermentation. With an immersion chiller, all wort will be the same temp.
5. Ok. I could probably go on but just read Jamil's article.
http://www.mrmalty.com/chiller.php
So, in short.
Pros
-No need to use the hop basket (hop utilization and another piece to clean)
-No need to clean or back-flow the counter flow chiller (time)
-No need to clean the inside of the immersion chiller, rinse and put away.
-No need to clean the hop basket (time)
-All wort is the same temperature
-Can leave cold break behind and aid in a reduction of DMS (read the article above)
-In reading, it should help retain hop oils and aroma of late hop additions since you are chilling everything at once vs. near boiling wort waiting to be chilled by the CFC.
Cons
-Damn more money.
-Not sure how well my idea will work (ground water temp is the X factor)
-Just another piece of equipment
-It will more than likely take a few more minutes to chill than it normally would.
-There is time involved in waiting for hops and cold break to settle in the middle
Onto the chiller. I loved the concept behind Jaded Hydra chiller. I love the fact that they used three shorter runs of copper fed simultaneously from one cold water source to chill wort vs. one long coil. Visit jadedbrewing.com that shows their chiller comparisons. FYI - They have great customer service, replying to my emails and saying the would make a stand to sit it off the bottom.
However, my dilemma was that I didn't like the chiller resting on my heating element, which roughly sits about 5 inches off the deepest part of the domed bottom. This would make the bottom of the immersion chiller roughly 5.5 inches off the bottom. This makes a lot of underutilized space in the few cases where I do a high OG beer that requires a large grain bill and 5 gallon batch size. With the chiller sitting at this height, there will be some coils not sitting in the wort or not utilized.
So I went ahead and designed my own custom immersion chiller. It uses 3/8 x 50' tubing "rib-cage" design that you can find on the forums here. It then uses two - 3/8 x 20' custom made triangles that each point roughly touches the same elevation on the domed bottom to make it level and not want to fall down the slope to the middle. I also made a custom coupling by taking a 1/2 x 3/4 copper coupling and hammering the 3/4 side around 3/8 diameter rod that was used to solder all 3 inlet and 3 outlet 3/8s tubes together. You could just make a little header with copper tees or what not, which will be quicker and less frustrating. However, I like all 3 tubes fed with water at the same time and it looks cleaner. Doing the custom coupling like I made requires patience to shape and requires a lot of flux and solder to keep it from leaking (I did pressure test it). I also soldered it upside down, with the coils up in the air and the 1/2 hard pipe (type m) touching the ground. When soldering the 3/4 side of the coupling, I didn't want solder flowing into my 3/8 tubes. I would say the total coils add up to about 85' after chopping a few small bits of 3/8 tube off.
You will also see below my rig to weave 14 gauge bare copper wire to help separate each coil. It took a few seconds to make the rig, but I think it works better and looks nicer than trying to weave, twist, bend, etc. copper wire between each tube to separate. I tried doing that and didn't like the separation, took too long to weave, and I felt like it could hide hop debris the more twists I had in it.
My plan is to test this in the next few weeks. I have an old immersion chiller that will be sitting in cold ice water that will be used as a pre-chiller due to my ground water temp. I'm hoping it will work well and that the ribcage design with copper spread-out throughout the vessel. I plan on using my pumps in series, pump from the vessel to the second pump, and back into the tangential port. The faster I can get wort moving around the copper coils, the quicker it will cool. It is roughly 12.5 inches to the top of the coils. If I feel that is too tall, I can compress the coil gaps slightly.
Anywho, I went on for too long. See pics below.
Cheers!

Karl


