CPVC Manifold Help

Homebrew Talk - Beer, Wine, Mead, & Cider Brewing Discussion Forum

Help Support Homebrew Talk - Beer, Wine, Mead, & Cider Brewing Discussion Forum:

This site may earn a commission from merchant affiliate links, including eBay, Amazon, and others.

mcar1919

Member
Joined
Apr 22, 2016
Messages
15
Reaction score
4
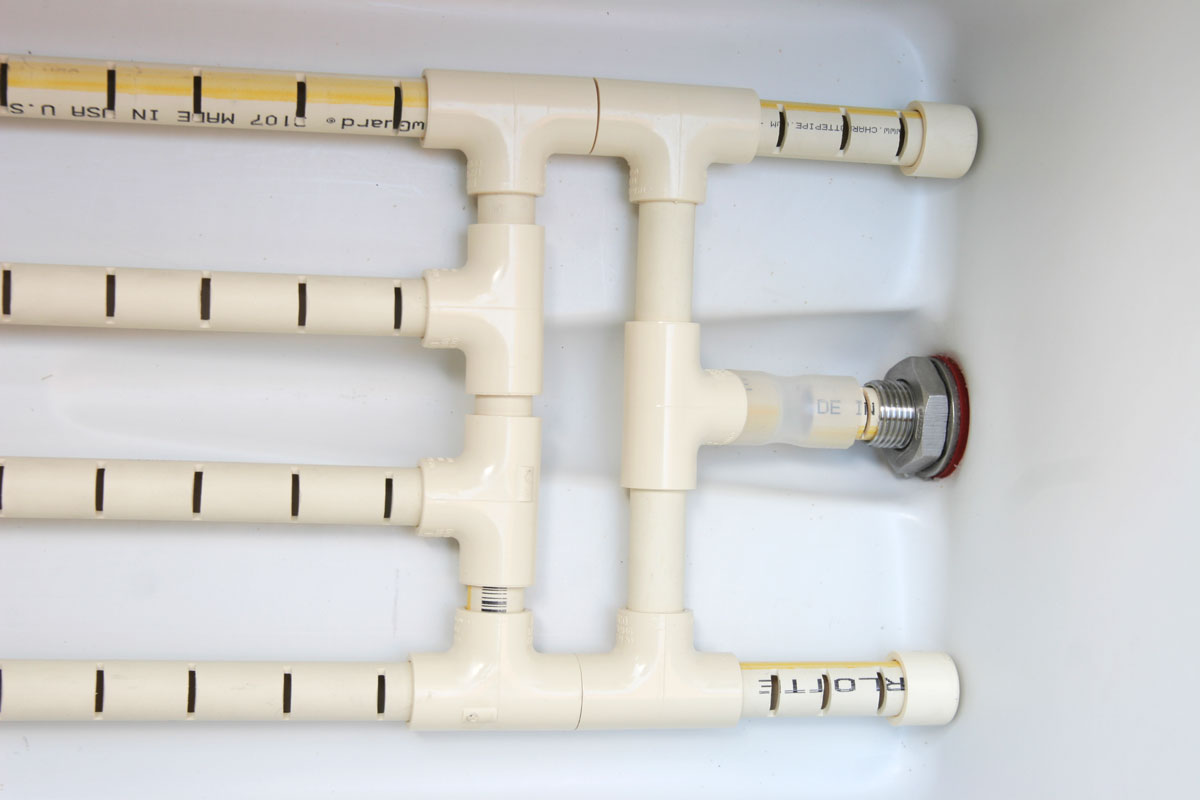
Hello HBT! As you will see in the attached photo, I am in the midst of creating a CPVC manifold for my cooler mash tun (52 qt. Coleman Xtreme). My original design was for four evenly spaced longitudinal pipes utilizing Palmer's guidelines as closely as possible (evenly spaced longitudinal pipes and half that distance between the outer pipes and cooler walls to discourage channelling). Upon assembling the components, it became obvious that it is simply not possible to evenly space out the 4 longitudinal pipes due to the spacing required for the 3 T's in the center used to direct the flow to the drain. The pipe spacing as-is is ~3" between center pipes, ~1-1/2" between center and outer pipes, and ~3/4" between outer pipes and cooler walls. Other than leaving it, my other idea to "improve" it would be to put a '+' piece where the center 'T' currently resides and simply add a fifth longitudinal pipe in the center; this would create ~1-1/4" spacing betwen center pipes while leaving the rest of the spacing effectively unchanged. In describing the problem here, I now realize this is probably the best option for me, but I will post anyway to (hopefully) promote discussion. My question for you folks is whether or not you think I will have any kind of channeling or other issues resulting from this design as-is? Should I add the fifth longitudinal pipe as outlined above or make some other kind of design change entirely? Let me know what you think! Any and all thoughts and inputs are much appreciated! Happy National Homebrew Day all!

20170507_001855.jpg
 
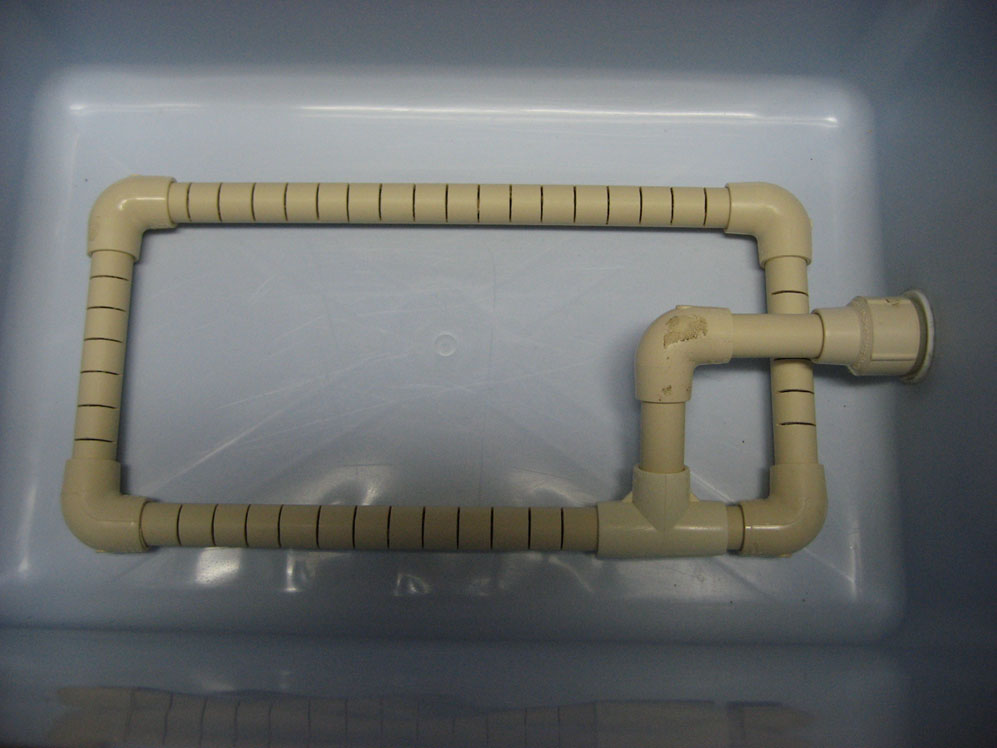
Here's the way I did mine. Gives great flow. The manifold is shown upside down, of course. ;)

Part of the design is to prevent knocking it apart. An extra set of side spacers in between the 2 "horizontals" where the drain connector is would be ideal, but also adds more bulky Ts that don't drain. They don't make cross connectors, AFAIK.

Now for batch sparging the geometry is not all that important, since you're draining the tun completely each time. After draining the mash, I do 2 sparges with about equal volume. Yours should be fine as is. Try to get at least one slit where the bottom recess is, to drain that little deadspace. A little tilt toward the end of the lauter will help to drain the very last wort.

CPVC Manifold_1200.jpg


CPVC Manifold_Detail_1200.jpg
 
I appreciate the input, guys; thank you! Thanks for sharing your own experience and builds as well. @islandlizard I am sitting here laughing as I write this because your design is one of the ones I looked at for inspiration as I contemplated my own design since we seemingly have similar/the same coolers. Do you think I need to modify mine at all to prevent shifting/coming apart during mashing or do you think I'll be ok? Did you cement the horizontal pieces or does your manifold come entirely apart? As for cross connectors, they do seem to exist, but are certainly hard to find (not carried by local hardware stores)--I have a buddy that's a plumber that I enlisted to track one down so we'll see what happens there if anything. I wanted a manifold design that would be functional in both batch or fly sparge and also in 5, possibly occassional 10 gallon, batches; this is why I am somewhat concerning myself with the geometry of it. I plan to do double batch sparges most of the time since most 5 gallon grists will have too thin of a grainbed to effectively fly sparge in a tun this size/shape imo.Thanks for the tip about putting at least one slit in the pipe going directly to the drain to help empty that front recess; I likely would have overlooked that otherwise. Thanks again for your input (both of you)! I look forward to my first brew day on the new setup!

Oh, one more quick question for both of you: what kind of mash efficiencies do you typical achieve with your setups? I assume @JLeuck64's will be slightly higher since he flys, but I am really interested to know @islandlizard's since we have similar coolers, manifold designs and processes. I know I am over thinking it, but I don't like going into brewing blind to my efficiency (I know crush size, mash pH, grist contents etc. will certainly affect this too) since I know efficiency is going to affect ABV, and IBUs among other things. Thanks!
 
I won't take credit for the design, which I copied from another thread. He used a 70qt cooler, I scaled it to my 52qt one. His design included the end stubs to prevent it from knocking loose, while the geometry is close to ideal, except for the areas where the fittings are.

Mine is friction fit, no glue, and haven't knocked it loose yet, but I'm always careful for that. I use a large stainless stirring spoon with holes it in it. It has a slightly pointed tip, so I can scrape in between the long CPVC channels, bringing the mash up from there. I do mostly 5.5 gallon batches between 1.054 and 1.072 so the cooler is filled a little above halfway at a 1.5 water/grain ratio. I've done only a few 11 gallon batches, but the 52qt cooler is a bit tight, even at a water ratio of 1.25. It's easier to mash those in my 15 gallon kettle, which also allows for easier step mashing, and use the cooler just for lautering. When I need to do step mashes for 5.5 gallon batches I mash in my 8 gallon kettle, and again use the cooler only for lautering. Or as a holding vessel when performing decoctions.

Mash efficiency is around 85%, with those gravities, but I mill my own which helps to achieve that. Regular Credit Card gap (0.032-0.034") on a Monster Mill 2.0 (regular 1.5" rollers) for barley, American Express junk card gap (0.022-0.024") for small kernel malts such as wheat, rye, oats, and all flaked goods. I get a fair amount of powder, but the grain bed filters quite well. I recommend using a piece of aluminum foil (with some small holes poked into it) on top of the mash to keep the heat loss to the headspace at bay. It doubles in function when pouring the vorlauf on top of it preventing disturbance of the (shallow-ish) grain bed.

At the time I built it, I wanted it to be ready for fly sparging, but the speed and efficiency of batch sparging is hard to beat, so I never did. As you already said, the halfway fill level is likely too shallow for fly sparging anyway. The level of 11 gallon batches may be a bit high. You definitely need an inch of wort on top.

After the 2nd sparge there's really not much sugar left in the grist. 3rd runnings are typically in the low 1.020s. The few times I came up short on points I tried to eek out some more (a gallon) with a 3rd sparge. Those were usually in the 1.012-1.014 range. So yes, you could possibly increase your efficiency a little with fly sparging. But is it worth the time and effort? And when fly sparging you should do a solid mashout if you want to lock in your wort profile, which is not that easy to do in a cooler.

Because of heat loss during mashing in, while the lid is off, I routinely add 4-6°F to the calculated strike water temp to actually come out pretty close at the intended sacch rest temp. If it's a little high, I simply stir another minute, or lift the lid after 10 minutes and give it a brief stir. That evens it out quickly. Make every effort not to undershoot your mash temp, it's a pain to raise it, even 2-4 degrees.

For the future I'm looking at building a (mini) HERMS set up, similar to the one my brewer friend is using. An electrically heated, small pot with a HEX coil in it. I find that the more attractive solution over RIMS as there can't be any scorching. It means better mash control, easier step mashing, but also more equipment. There may still be an issue with the shallow grain bed. Maybe lie a couple plastic wrapped bricks at the far end? :D
 
Fair enough regarding the design!

I hadn't decided if I wanted to glue or not, but if you haven't experienced any issues without, then I will probably just friction fit mine for the time being as well. I use a stainless spoon with a slight "point" as well, but no holes. I know the traditional mash paddles certainly have holes/slots, but does it really make that big of difference on such a small scale? Is it worth drilling some holes in it or investing in a proper paddle of some sort?

When using the cooler as strictly a lautering vessel, do you just dump the entire mash contents (would be incredibly heavy for an 11 gallon batch I'm sure) from your kettle to the cooler or do you drain the first runnings to the boil kettle and scoop the grains over for sparging? I would guess the latter as you wouldn't have to worry about HSA or anything then (not to start a debate about how significant the effects of HSA are or are not). I imagine you just direct fire and stir the hell out of the mash to do a step mash when mashing in a kettle? Have you tried doing a step mash via infusion in the cooler on a 5 gallon batch? It should be possible if dough-in is done at 1.1 qt./lb or something thick like that I would think. I am thinking about trying that for an Oktoberfest, Pilsner, or even for a ferulic acid rest with a hefe, although those would likely be decoctions rather than straight step mashes.

85%, really? I probably wouldn't mess with fly sparging either if I was getting that kind of efficiency batch sparging, although part of me would always wonder if I could break 90%! There is something about the process of fly sparging that is appealing though because that's how the 'pros' do it, you know? I would be super happy to get that kind of efficiency from batch sparging regardless, although most of the recipes I have in the pipeline are figured for 70-75%, but I am hesitant to plan on better efficiency and then undershoot.

Thank you for sharing your mill gap settings also; that is interesting as well. I ordered a custom brew bag for my cooler (probably going to do a more traditional batch sparge to start out with, but may try a full volume no sparge at some point, although a super thin mash like that should favor alpha amylase at least somewhat as I understand it which may or may not be desirable) so I am planning on crushing finer to hopefully get better extraction without having to worry about husk material getting through to my kettle. As for your finer wheat mill gap, I thought people milled wheat a little coarser usually since it doesn't have a husk and therefore wouldn't have much of a filter bed if it were ground to flour, or do you find that a finer crush is necessary since the berries/kernels are smaller to begin with to avoid leaving parts uncrushed (or do you use rice hulls or something to offset this)? I plan to do some wheat beers so this is very interesting to me as well. Since I haven't bought my own mill yet, hopefully my LHBS is willing to let me tinker with gap settings on theirs! Also, I didn't think one was supposed to mill their flaked oats/rice/corn? Am I wrong on that?

Thanks for the tip on the foil to reduce heat loss; that was one of the reasons I was hesitant to get a larger cooler for 5 gallon batches is that I didn't want to worry about losing several degrees of temp over the course of an hour or however long the mash is, but that should help alleviate that.

Do you find it that difficult to do a mashout in the cooler--even with a 5 gallon batch? I had read an interesting article by a member of the Maltose Falcons homebrew club (I believe Martin Brungaard is a member as well (sorry if I butchered the spelling!)) where it was suggested to pull an ultra thin decoction of roughly 1/3 the wort after saccharification had completed, leaving a 1 qt/lb liquor/grist ratio in the mash, and boil it, using this decoction as one's mashout infusion. It supposedly helps with efficiency and promotes some melanoidin production to go along with the traditional benefits of the mashout. I will likely give this a shot at some point.

I had planned to over-shoot my strike temp by 7° or so to preheat the tun, but thanks for the reminder!

I have a family friend that is an electrician so I'm sure some day I'll want to do do something with a HERMS coil, electric elements, pumps, temp probes, automation, etc. eventually, but for now I'll just be happy the wife let me build a new mash tun and buy a new spike kettle! :D
 
Oh, one more quick question for both of you: what kind of mash efficiencies do you typical achieve with your setups? I assume @JLeuck64's will be slightly higher since he flys, but I am really interested to know @islandlizard's since we have similar coolers, manifold designs and processes. I know I am over thinking it, but I don't like going into brewing blind to my efficiency (I know crush size, mash pH, grist contents etc. will certainly affect this too) since I know efficiency is going to affect ABV, and IBUs among other things. Thanks!

I pretty consistently see efficiency in the 70's to 80's, and from what I can tell there is not too much difference from fly sparging versus batch sparging. Maybe a few points higher with batch sparging but I lose a little time with that method. When I fly sparge it saves me 15- 20 minutes time which is more valuable than a few efficiency points.

All of my fittings are dry, no glue. I want to be able to pull everything apart to clean it out after a brew day. I don't have any problems with a friction fit falling apart as long as I am careful during mash in and I make sure to push everything together tight.

I heat strike water based on these general guidelines: I expect to see about 5-7 degrees of temperature loss just dumping water into the cooler depending on the time of year. I typically also see about 8-10 degrees of temperature loss when I add grains depending on the time of year. So I will plan on heating my strike water at least 15 degrees above my strike temp, typically I will go a little higher just to give myself a buffer plus it helps to preheat the cooler as the temps stabilize. If I am a few degrees above my strike temp I can choose to just let it drift down slowly. Lately what I've been doing is to grab an empty pitcher and drain some water from the cooler then just poor it back in. I've noticed this will help purge all the air trapped in the drain manifold and reduce the temp about 1 degree per pitcher. Once you get enough time brewing on your setup it won't take long to go from heating strike water, mashing in, drain and sparge to starting the boil. Just a few weeks ago I made a 10gal batch of Centennial Blonde and honestly had a rolling boil going only 3 hours after I turned on the burner to heat my strike water!
( ;
 
@mcar1919

It's kinda difficult to drill through thin stainless without distorting/twisting it. It can be done though, with the right touch. I don't think the holes make much difference anyway, as they will still be too small for much grain to move through. For comparison, look at one of those real 40" stainless mash paddles, the holes are at least 1/2" or 3/4".

I have used one of those large ones and they're a charm to stir with, even in my 8 gallon kettle, but very long and fairly heavy. I've used wooden stir paddles too, the solid ones used in commercial kitchens, they work fine and are a lot gentler on the stainless kettle sides and bottom.

When mashing in the kettle, I use induction, so a medium setting 1200-1800W and constant stirring works well. Then turn it off, put the lid on and cover with a thick folded over towel to insulate. A few days ago I brewed a Mild, mashing at 161F (!), which was difficult to keep steady at that temp, even with insulation wrapped around the kettle.

Sad to say, I think I discovered a shortcoming on my venerable $16 CDN thermometer... it doesn't seem to react fast, jumping up and down by 3-4 degrees increments. Very strange! Maybe one of those (overpriced) $80 Thermapens needs to be actually considered now.

After the mashout, I use a gallon cooking pot with a handle to ladle the mash into the mash tun. A bit drippy and messy, but gets the job done, The last gallon or so I just dump in straight from the kettle.

I've tried boiling water infusions in the cooler, but the open tun loses a lot of heat while stirring in the addition, sometimes it drops down lower than you started at, then you start chasing your tail. I guess it could work with some practice, risking overshooting rather than under, which is the pits.

Milling
Maybe some LHBS clerk was telling fables to justify their lousy mill setting. :D
If you want to convert and extract the goodness from wheat (or rye, triticale, buckwheat, ah, millet, now that's a challenge) it needs to be cracked, whole kernels don't mash (convert) well. Hence the narrower gap.
Milling twice maybe better than once, but is no match for a correctly adjusted gap to match the kernels to be crushed. I had a wheat beer from someone and was wondering: "where's the wheat?" As it turned out, their grist milled at the LHBS had at least half of the wheat kernels still intact, uncrushed. They had fallen straight through.

When I do a step mash, incorporating a beta-glucanase/protein rest around 121-125F for 15-20 minutes when using large percentages of (unmalted) flaked goods and/or wheat or rye malt, I usually don't need rice hulls to lauter. If it turns out too slow I stir in a few hand fulls of rice hulls and that fixes it. Stirring them in later is a bit of a pain as they don't hydrate very well, and tend to float.

Toward the end of the mash most enzymes are in the liquid phase (wort), so heating up the thin part of the mash, mostly wort and some grain, to mashout temps will denature them. Not sure if the thin stage with some grist left in it can be safely boiled (concern about pH and tannin extraction). Then dumping that back into the tun will raise the temps and if you heated up enough, total mashout has been accomplished.

Decoctions are the opposite. You take the thick part (mostly grist), and run it through the various mash rests, especially a 20-30' sacch rest to convert. Then you heat up slowly to boiling temps and boil for 10-15' to create melanoidins, the flavor. By adding that hot mix back to the tun, which has been resting/mashing at a certain temperature, it will raise its temps to the next mash temp, stage, or rest. Then do it again (double), and again (triple decoction).

Decoctions are fun and often rewarding, making it worth the effort and time if you're after the ultimate malt profile. I did double wheat decoction for a while, but the 3.5 hour mash process got old pretty fast. However, the result was noticeably beyond subtle, and perhaps second to none for those who appreciate it.

I always preheat the tun by adding strike water 7-10°F over calculated. After 5 minutes it's pretty close to where it should be. If still a little too hot it's easy to add a few cups of cold water. If too cold... <ugh>. It's all wet finger science. :D

Automation can be great, and where to use it, is very personal. I think the mash control is important, but also means more equipment to hook up and clean.

Now go brew a batch of beer with your new mash tun and let us know what you think.

P.S. Did you mean to say you're going to use a (Wilser) voile bag inside your mash tun on top of the manifold?
 
Thought I would share my manifold also. I still get good efficiency even without a center channel in the manifold. I also use it with the slots facing up, like in the picture. It is in a small 24qt. cooler, but works great.

Manifold.jpg
 
@IslandLizard

I will probably use my regular stainless spoon for now then and add a more traditional mash paddle to my list of gear to purchase at some point! I have been eyeing up a thermapen too as it seems like a solid investment also, but it is so damned expensive for a thermometer. I wish I could try one to see if it was worth it first (probably not, it is still just a thermometer, but regardless).

That is interesting that the heat loss is that significant just from opening the tun. I would have thought there was enough thermal mass there in the mash where it wouldn't have that significant of an impact, but I suppose in a rectangular cooler especially, there is an awful lot of surface area coming in contact with the cooler ambient air too. This makes me question my intention to stir the mash a few times during saccharification; perhaps I am better off leaving well enough alone!

I totally get that the grain husks need to be cracked to expose the endosperm and its starches for conversion, I guess I just thought it was a trickier subject with wheat since it has no husk and thus (combined with higher protein and beta glucan content) can make for a difficult lauter, making a relatively coarser crush helpful to avoid pulverizing the kernels; I suppose a smaller gap is necessary to avoid having whole kernels fall through though too like in the scenario you mentioned. Have you tried wet milling? It supposedly helps prevent kernels (and husks for grains that have them) from getting crushed to flour while still promoting an adequate crush. Also, I had asked in my last post but perhaps you misunderstood or didn't catch it: do you actually crush your flaked adjuncts (wheat, corn, barley, rice) and if so, is there some benefit to it? It was my understanding that the starches are pre-gelatinized during the flaking process where the kernels are pressed between hot rollers and thus doesn't benefit from being milled. Just wondering if I'm missing something.

I am aware that the suggested ultra thin decoction is certainly not a normal one. It just makes sense to me conceptually because one gets the benefits of the mashout (preserve mash profile by denaturing amylase enzymes, less viscous wort, more soluble sugars) and some of the benefit of a traditional decoction (some melanoidin production, potential uptick in efficiency). Assuming proper care has been taken to ensure an acceptable mash pH, I can't imagine pulling a thin decoction will be creating/promoting pH concerns alone, and with minimal husk material, I wouldn't think the risk of tannin extraction to be very high either--almost certainly less than the traditional thick decoction which contains tons of husk material. Thoughts? Here is the article on the subject that I mentioned if interested: https://www.maltosefalcons.com/tech/building-better-mashout-through-decoction


I do want to try a more traditional double or triple decoction--maybe hochkurz--at some point--maybe for a marzen or something later this year after I get my processes down and want to try a lager.

Aside from the costs of automation, pumps and the like being prohibitive, the cleaning, calibration and other upkeep of all that extra gear is certainly holding me back from wanting to take that plunge as well. Besides, there is something rewarding about being more "hands-on" in the processes anyway. I think kegging is going to be my next venture probably; I find bottle conditioning to be such a PITA.

I do plan to brew a batch soon to break in the new manifold and will certainly report back at that time; thanks! And yes, I do plan to use a bag in the cooler (brew bag from Rex, not a Wilser bag, although I have heard nothing but good things about those as well) to make cleanup easier, allow for finer crush for improved efficiency, easier lauter without fear of stuck sparge, clear runoff almost immediately, no need for rice hulls etc. If I don't like it or the results, my manifold should still do a sufficient job without the bag once completed. Do you use one as well or something or have experience with one you'd care to share?

Oh and speaking of the manifold, my aforementioned buddy the plumber claims he procured a 1/2" cpvc cross for me too so we'll see what happens there; I can certainly report back on that if interested as well.

Thanks again for the replies and conversation; I am certainly enjoying it! Take care.
 
@turkeyshot

Thanks for sharing! I like the design and I am glad to hear you get good efficiency and presumably flow from it despite lacking a center channel. Any idea what percentage mash efficiency you usually expect? You don't have clogging issues with the slits facing up? Interesting; they must be pretty thin that they don't get plugged up. Thanks again for sharing and I look forward to hearing back!
 
@jleuck64

That's awesome and reassuring to hear you are getting in the desired range for efficiencies as well.

It seems pretty conclusive for now that I will continue to dry fit the manifold being sure to assemble it tightly and careful when stirring.

Thanks for sharing that recipe too; it sounds delicious! I might have to try that recipe for those less adventurous beer drinkers out there; seems like a great segway to craft beers. That's a blazing fast brew day; good job! I was routinely taking double that amount of time on brew days on my old setup and decided, "enough was enough," and that it was time to upgrade some gear!
 
@turkeyshot

Thanks for sharing! I like the design and I am glad to hear you get good efficiency and presumably flow from it despite lacking a center channel. Any idea what percentage mash efficiency you usually expect? You don't have clogging issues with the slits facing up? Interesting; they must be pretty thin that they don't get plugged up. Thanks again for sharing and I look forward to hearing back!

My efficiency is around 78%, so I can't complain. If I were to mill a little finer I could probably bump it up a couple of more percent. But with where it is now, I don't ever have clogging issues at all. The slits in the manifold are about hacksaw blade thickness. I used my bandsaw to cut them because it was faster, but the blade is about the same thickness as a hacksaw.
 
Back
Top