Bilbo Brewing Build Thread

Homebrew Talk - Beer, Wine, Mead, & Cider Brewing Discussion Forum

Help Support Homebrew Talk - Beer, Wine, Mead, & Cider Brewing Discussion Forum:

This site may earn a commission from merchant affiliate links, including eBay, Amazon, and others.

bbohanon

Well-Known Member
Joined
Jul 10, 2013
Messages
823
Reaction score
254
Location
Charlotte
Figured I had some time to post some of my major project that has been dragging over the late fall/winter and continues to be a work in progress.
I am essentially doing this build as I get time and $$$ to work on it.

Water/Sink:
I did not put in a sink or a water supply to this building as location and water supply lines prevented this from being cost effective to put in. I will be using a cooler with a pond pump and a DudaDiesel plate chiller to recirculate the cold water/wort for chilling along with 5 gallon jugs of Primo RO store bought water for my brew water supply so I did without a water supply in this building. It sucks, but sacrifices had to be made.

Building:
This involved a 12x24 custom brew shed that I had the underfloor insulated to keep condensation from bowing the floor in, and a full back window put in for a window AC/Heat unit in. I build a pad out of crushed gravel for the building to sit on to keep proper drainage and reduce the bug factor..
I wired the shed with 50amp 240v service , breaker panel with about 6 circuits, outlets for lights, etc, along with the needed 240v 30amp outlet for my Kal panel.
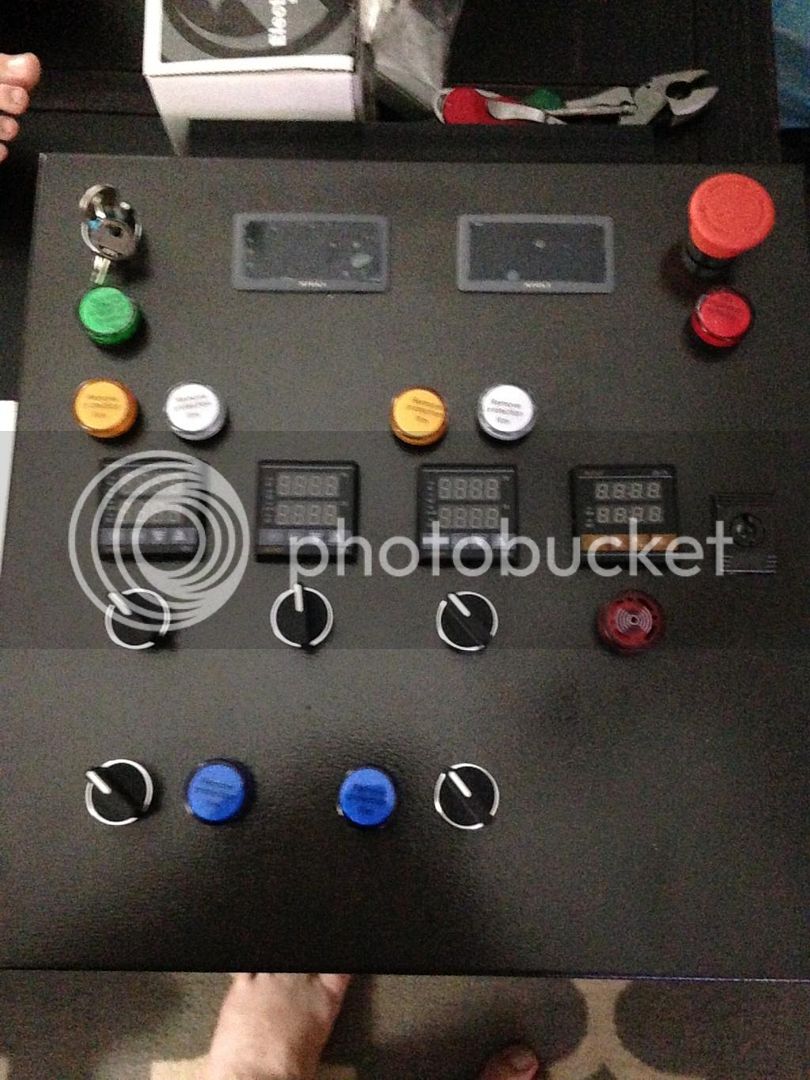
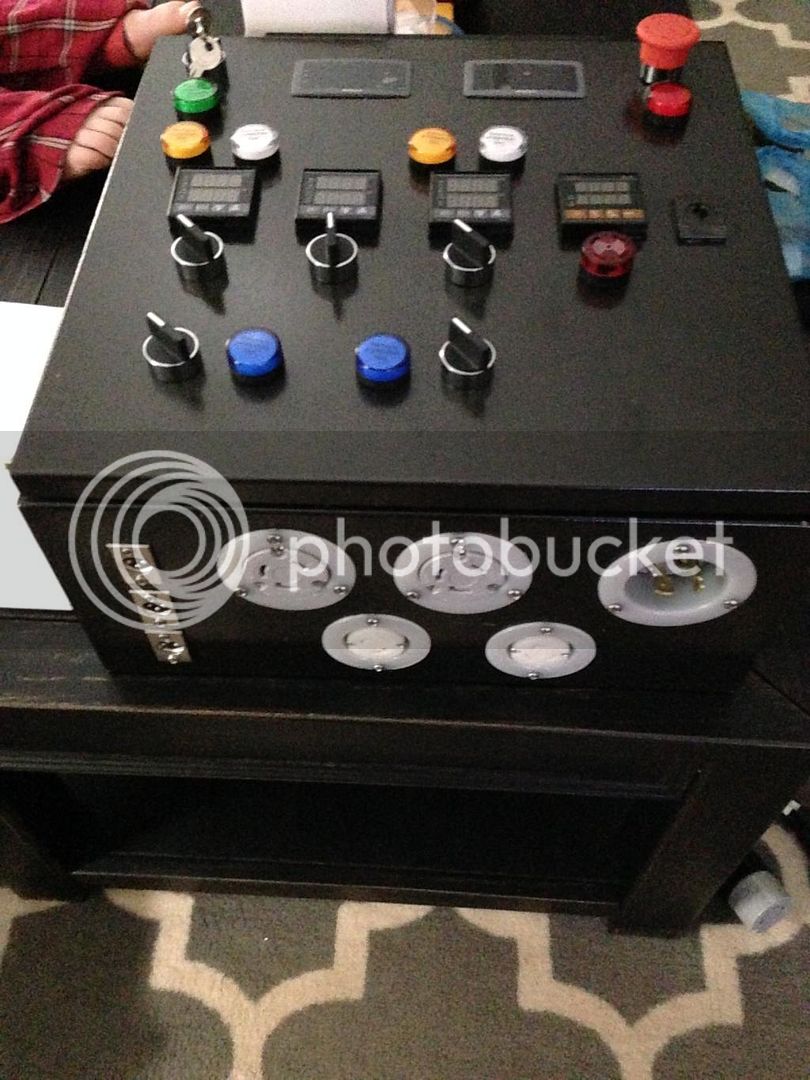
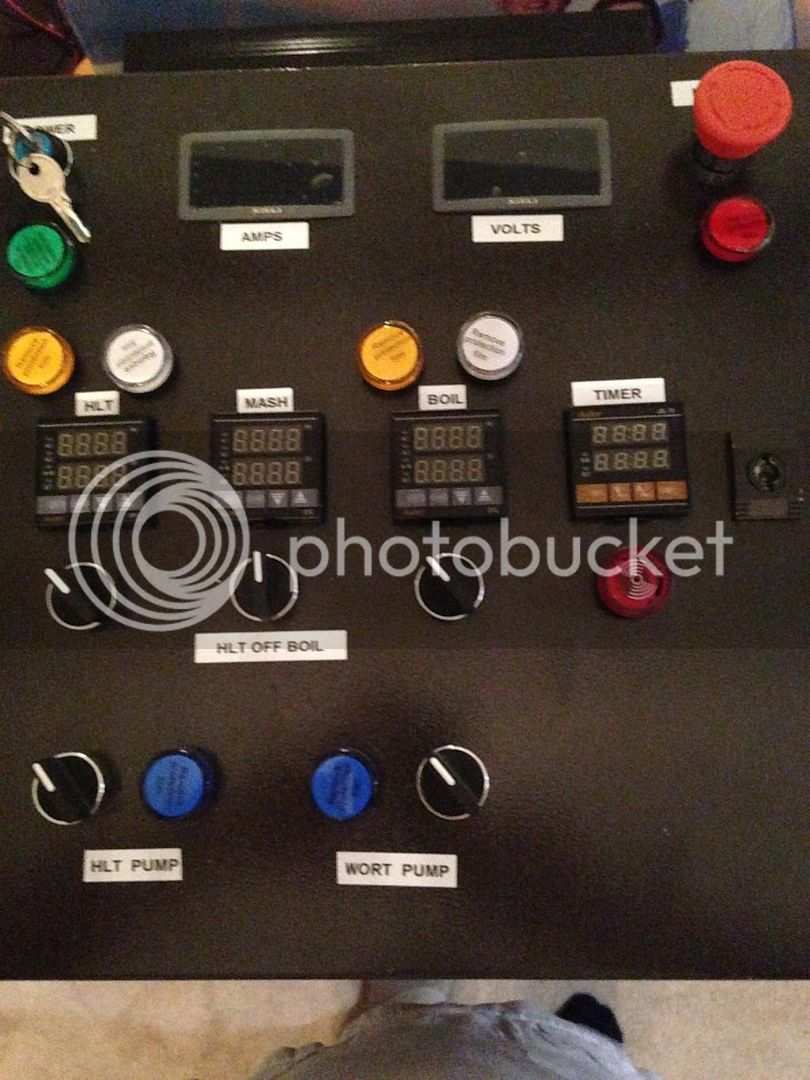
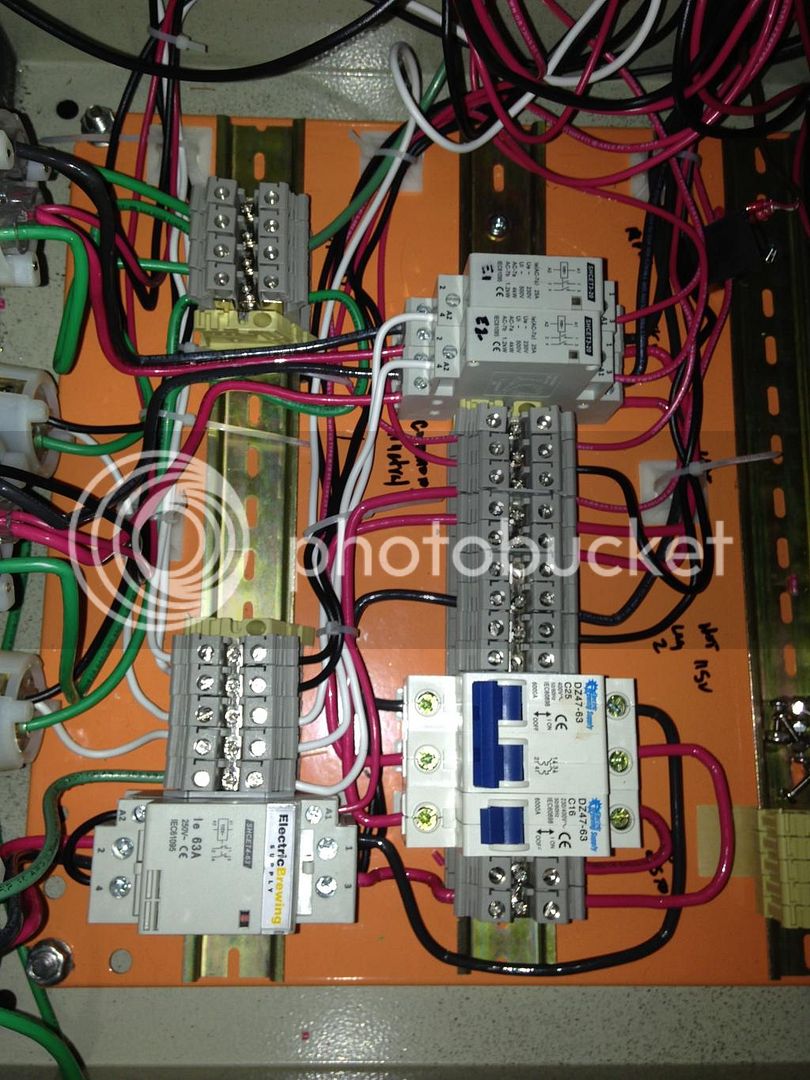

Panel:
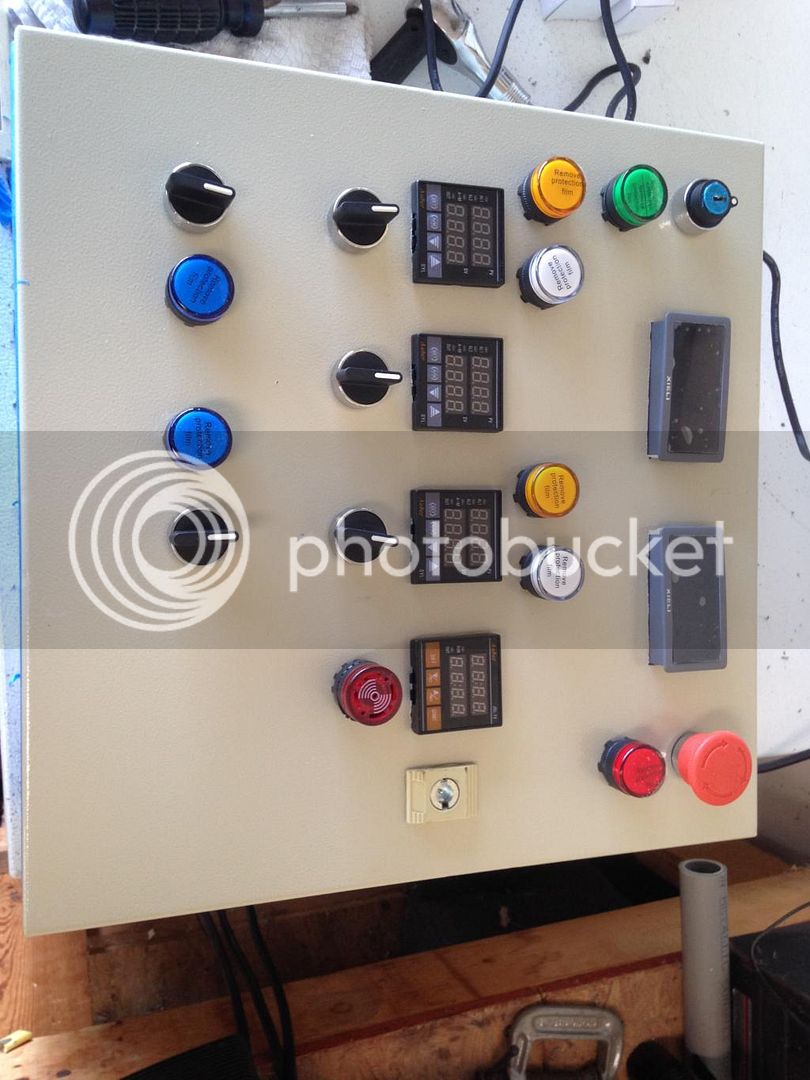
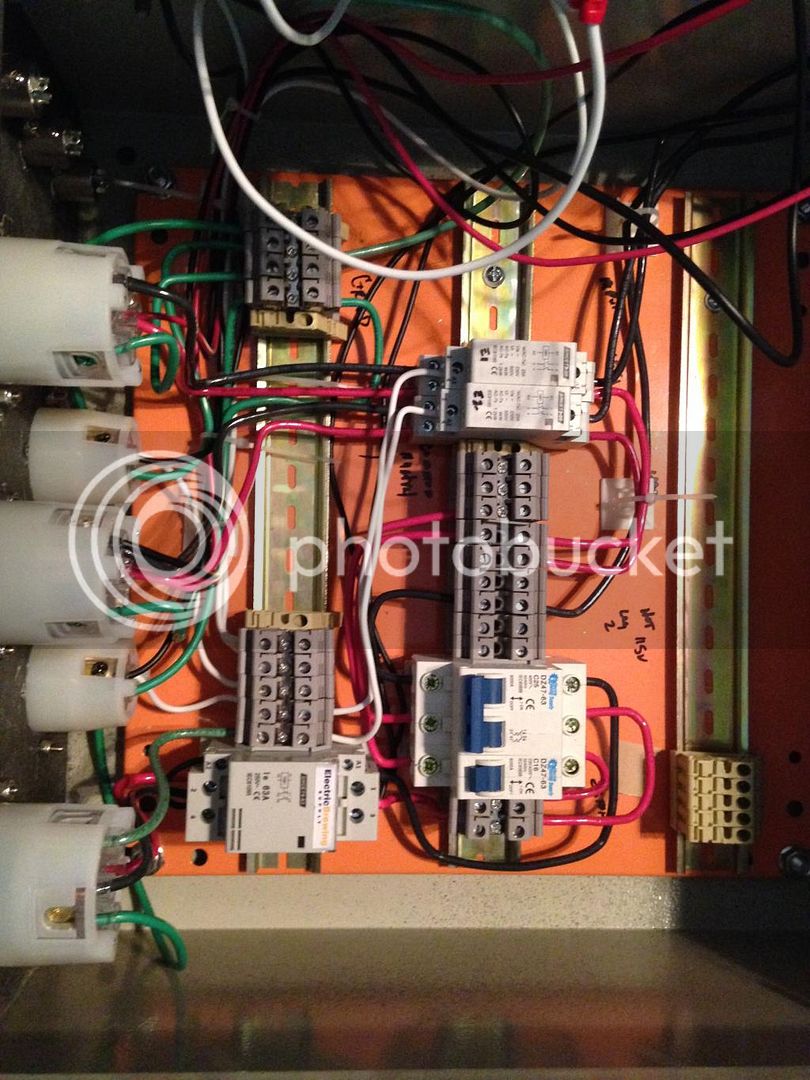
I used a ebrewsupply 2 PID - 30amp kit for this along with the panel box and heat sink combo from Auberins. The top was predrilled for the heat sink so this made life easy for this part of the panel. I used 3 Auberin PIDS with a Auberin timer. I also put in the ebrewsupply Amp and voltage meters. They look good.
I also used DIN rail contactors for ease of installation. Wiring tidyness sucks, but I am after functionality, not aesthetics with the wiring. I know I can fix it if it breaks and honestly, how many times am I really going to be opening the panel. I purchased kals temp probe kits and had one of my soldering buddies at work make them for me for some free beer. They look great. Panel powers up and so far everything looks to work. True test will come once the building is done and bench/pots are in place and plugged in.
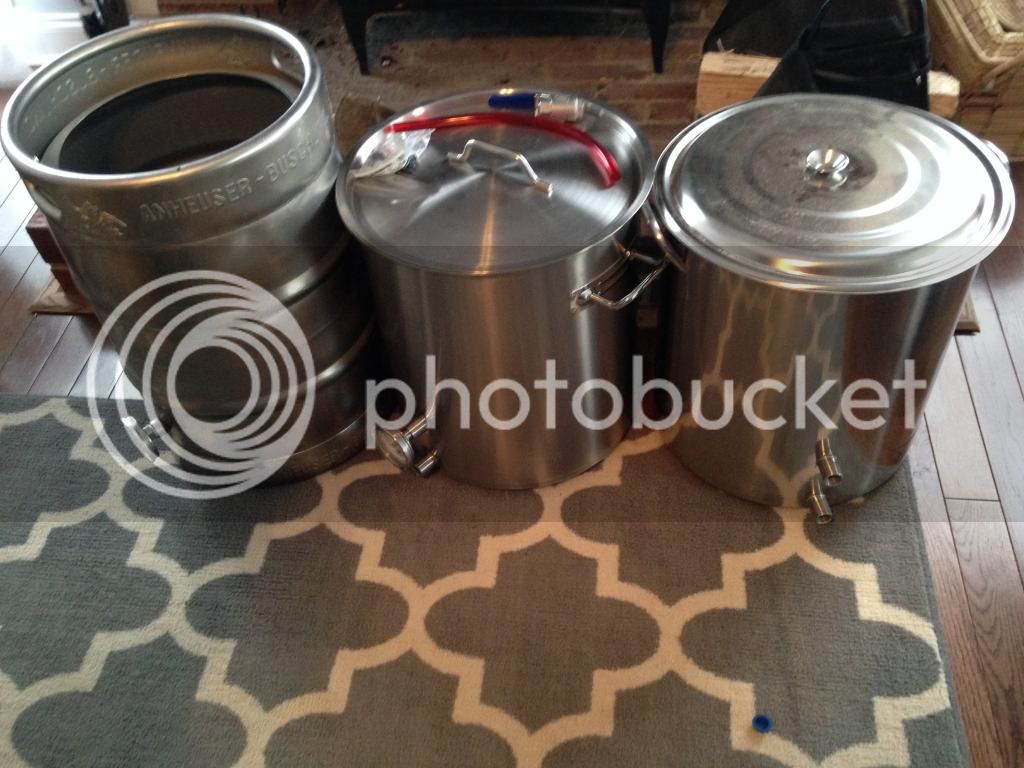
Pots:
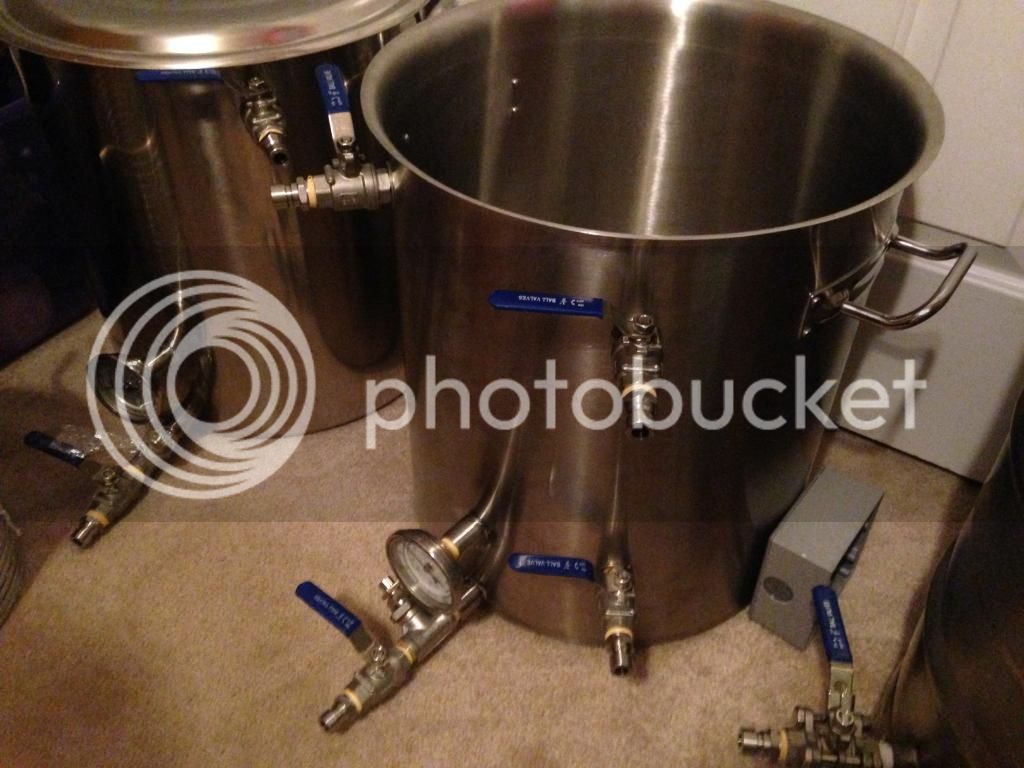
I picked up 2 of the 2-weld AIH SS brew pots($119ea) 15-gallon pots for MT and HLT and repurposed my Keggle for a brewpot.
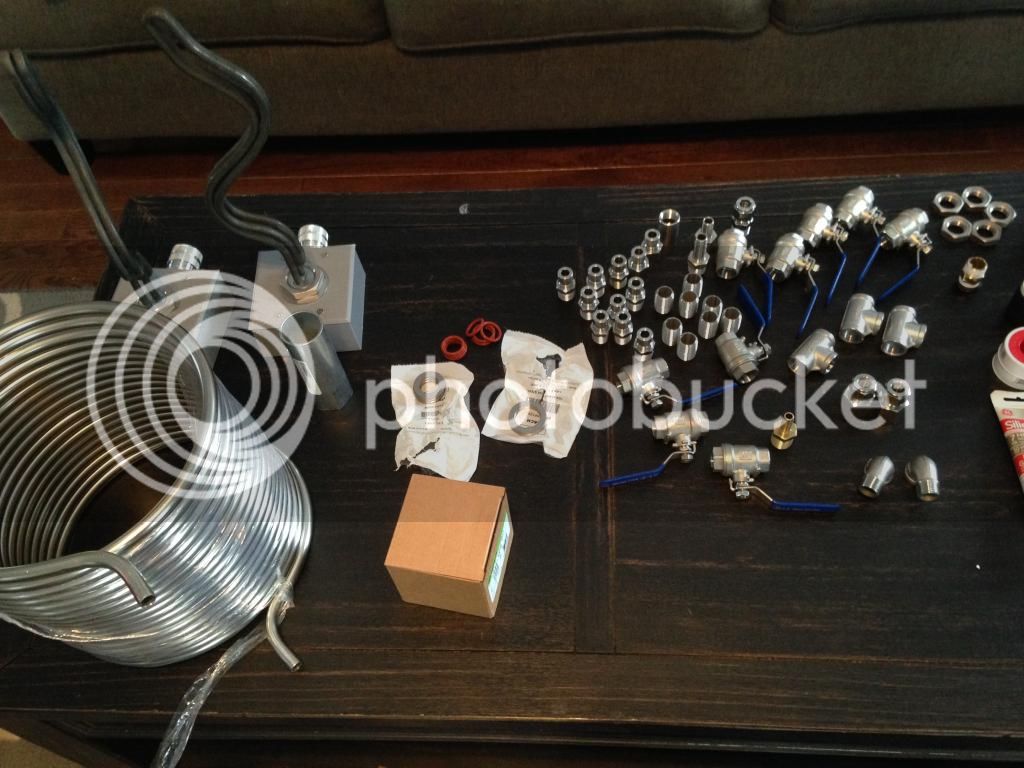
All hardware came from BFittings or Ebay. I have some extra hardware so I plan on putting them up for sale once I get everything completed.

Pumps/Hoses:
Also have 2 chugger pumps, and have built out the needed quick disconnect silicone hoses. I used the same disconnects as Kal.
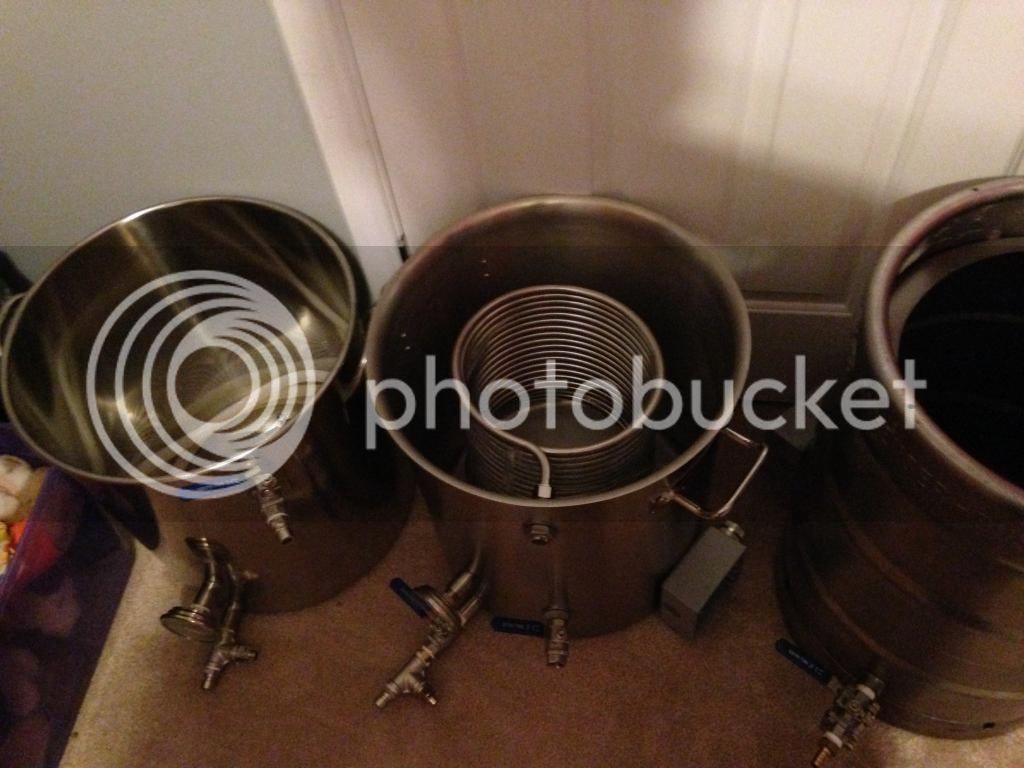
SS HERMS Coil:
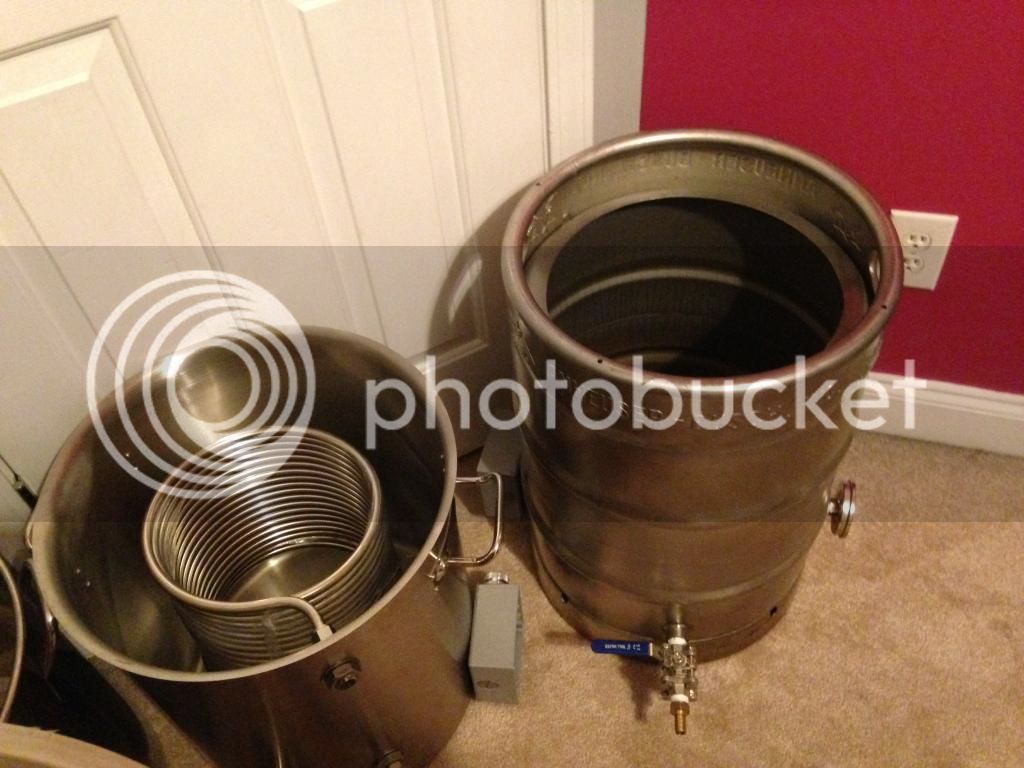
This came from stainlessfittings.com. I went with the 50ft, 10" coil. It sits a little tall in the 15 gallon HLT, but will work great!

Ventilation:
I built my own. This was essentially a bunch of 2x4s I made for the box along with some slats for the top. Used mending components to hold it all together with some screws, drilled a 6" hold in the top, and mounted the inline blower motor to the top of the box. Total cost, $40 for the box, $70 for the motor. The drywall ceiling when it goes in will have a trapdoor to allow me to service the motor should it need it. I also going to plug the motor into a variable speed controller to allow my to easily control motor speed. Tested the setup once it was mounted to the wall by burning a cardboard box and it performed well pulling all the smoke out even with the box burning at a level well below where the brew pots will be.

To-Dos:
1. Finish the drywall ceiling/mudding/sanding/painting. DONE 3/21
2. Put the flooring in(using cheap snap together laminate for the flooring). DONE 3/29
3. Finish the front building stairs/skirting(landscaping) - TBD 4/4
4. Put a sheet of acrylic sheeting up as a backsplash. - DONE 3/16
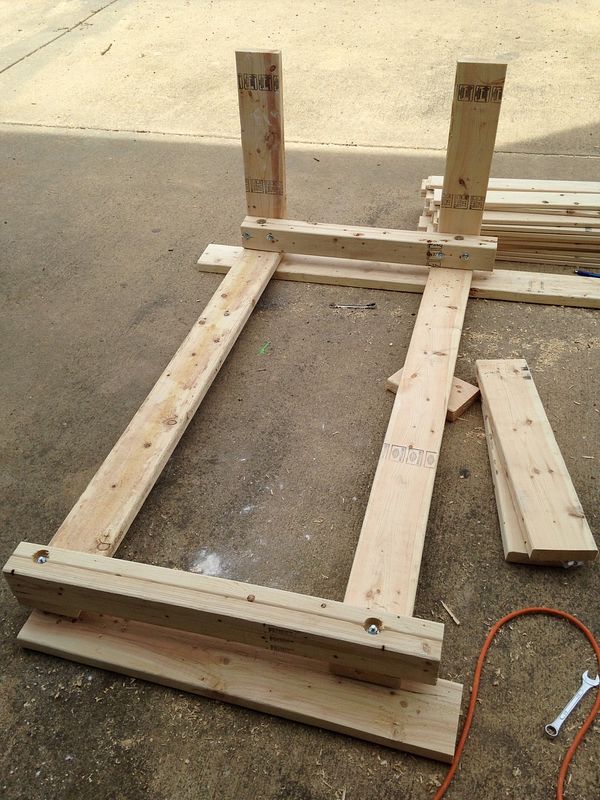
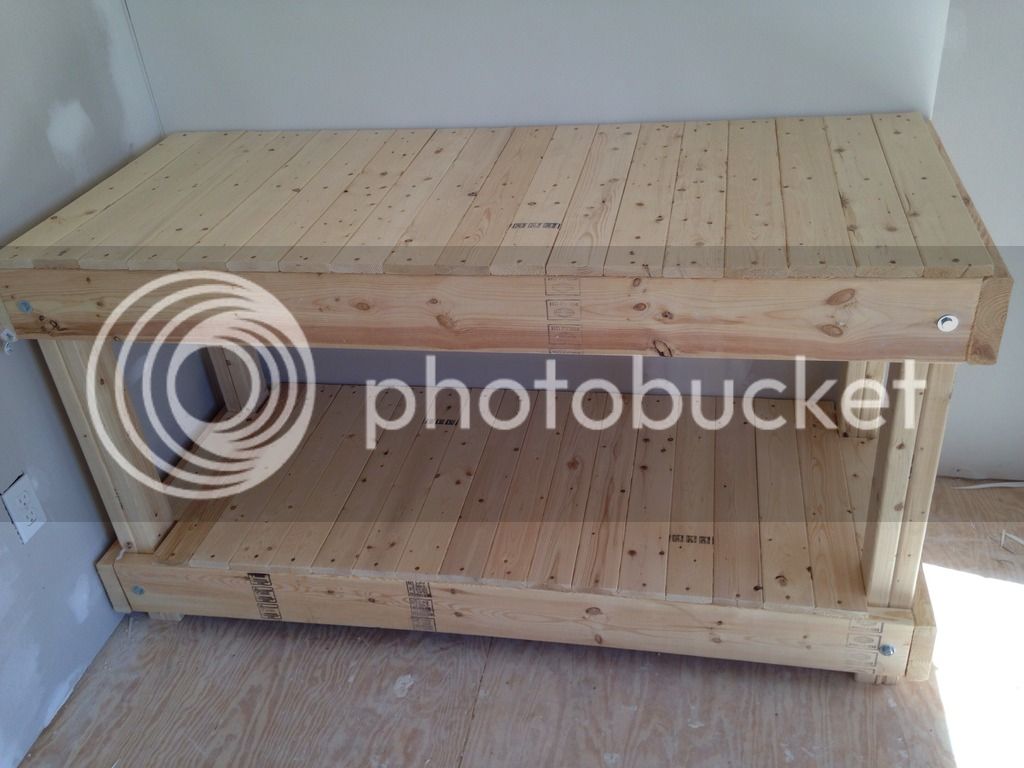
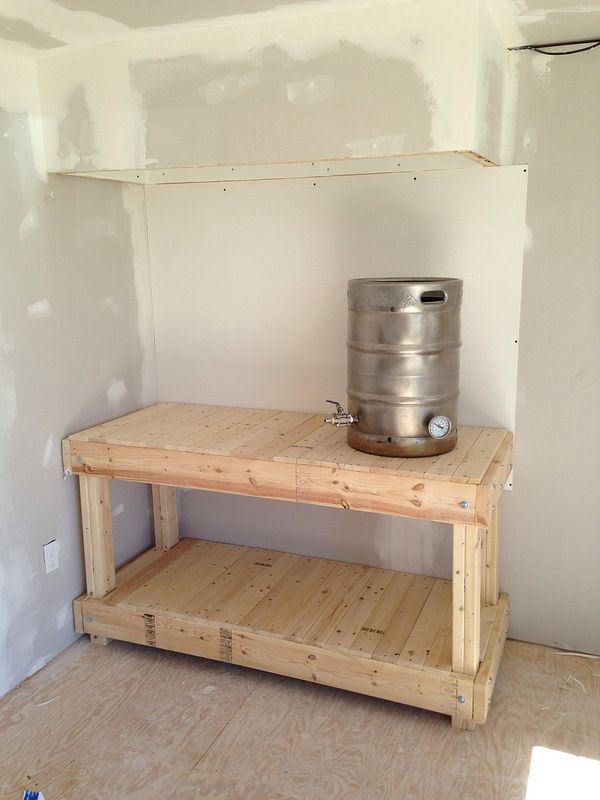
5. Build the brew bench(Kal wood build planned) - DONE 3/16
6. Finish the element wiring(power cords) TBD Week of 4/4
7. Finish the last fittings for the HLT water intake(Top)
8. Mount the pumps to brew bench. TBD 4/5
9. Mount panel and plug it all in with pots in place. TBD 4/5
10. Fill it all up with water and run auto-tune process TBD 4/5
11. Dial it all in and do a test run with just water to bring everything up to temp and simulate a brew day. TBD 4/5
12. Brew!

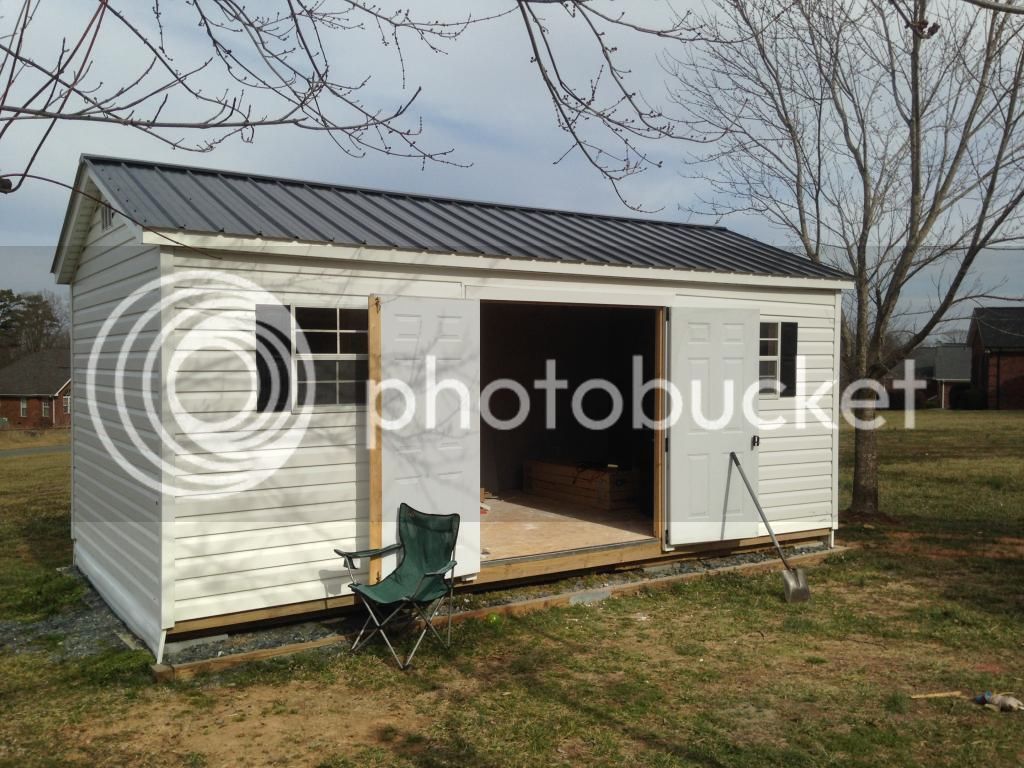
Outside of building:
0EA9DB6B-D29B-4087-96ED-341975A63CB0_zpsxigg4dle.jpg~original


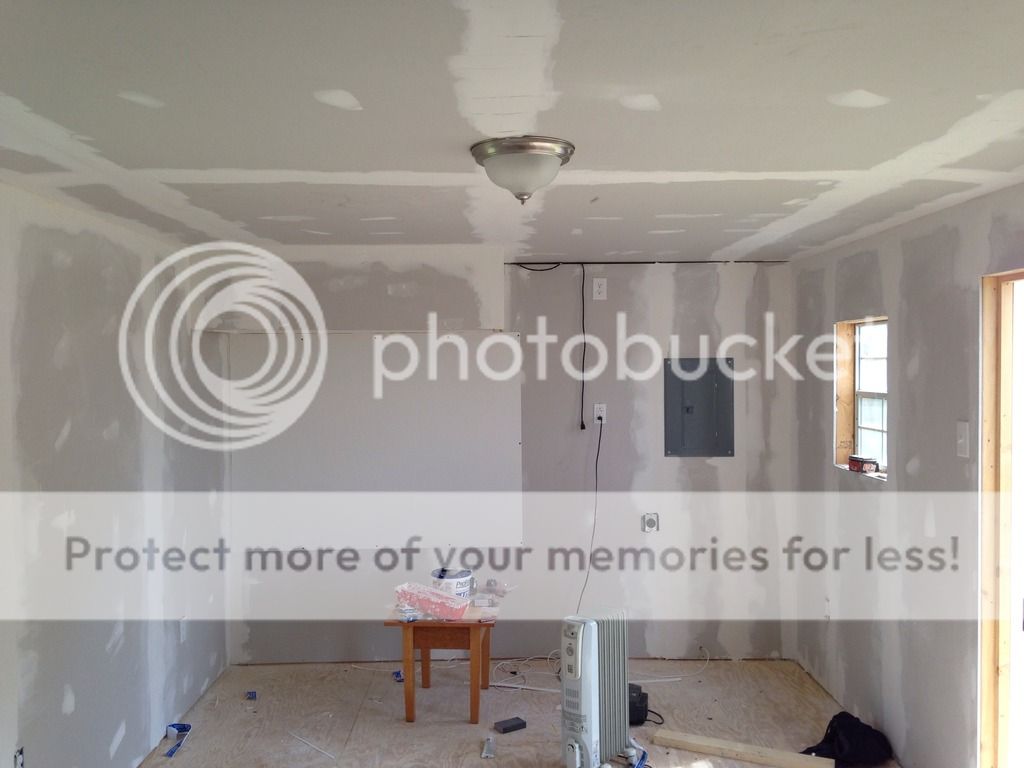
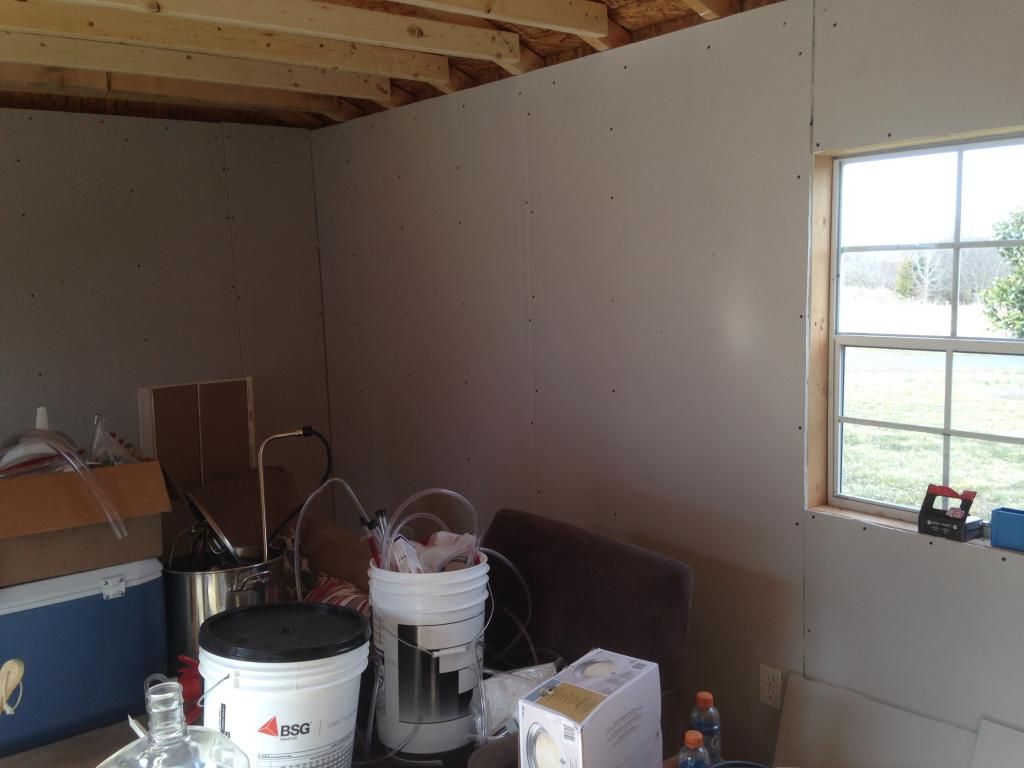
Drywall work in progress:
56BA9144-906F-4990-985B-EDDD1F66D6E2_zps9uz4v1wp.jpg~original


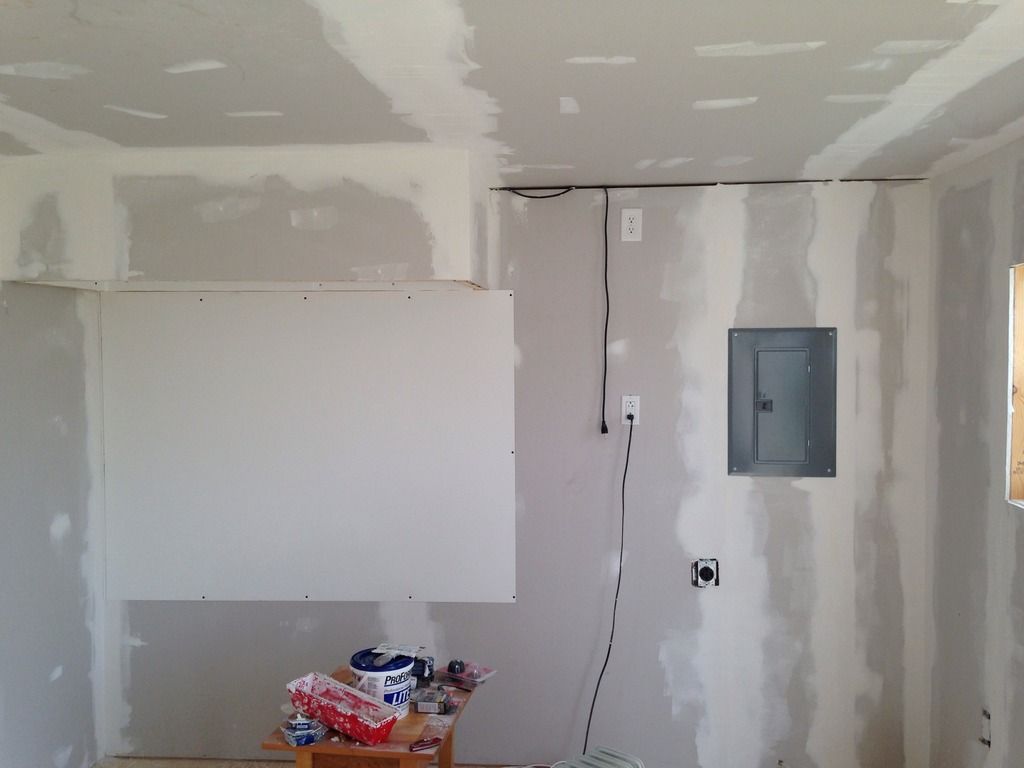
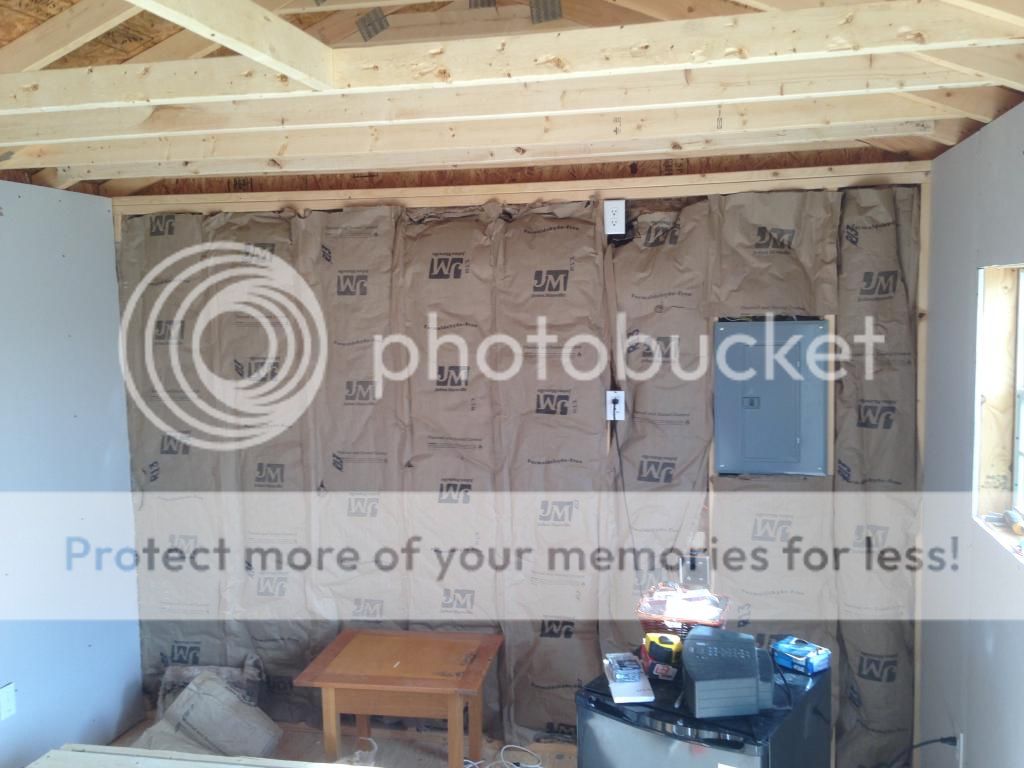
Wall where brew bench is going pre-vent hood install/drywall:
CB0120D5-6668-4F69-B82F-9C26A02424A0_zpsd8hrv1ou.jpg~original


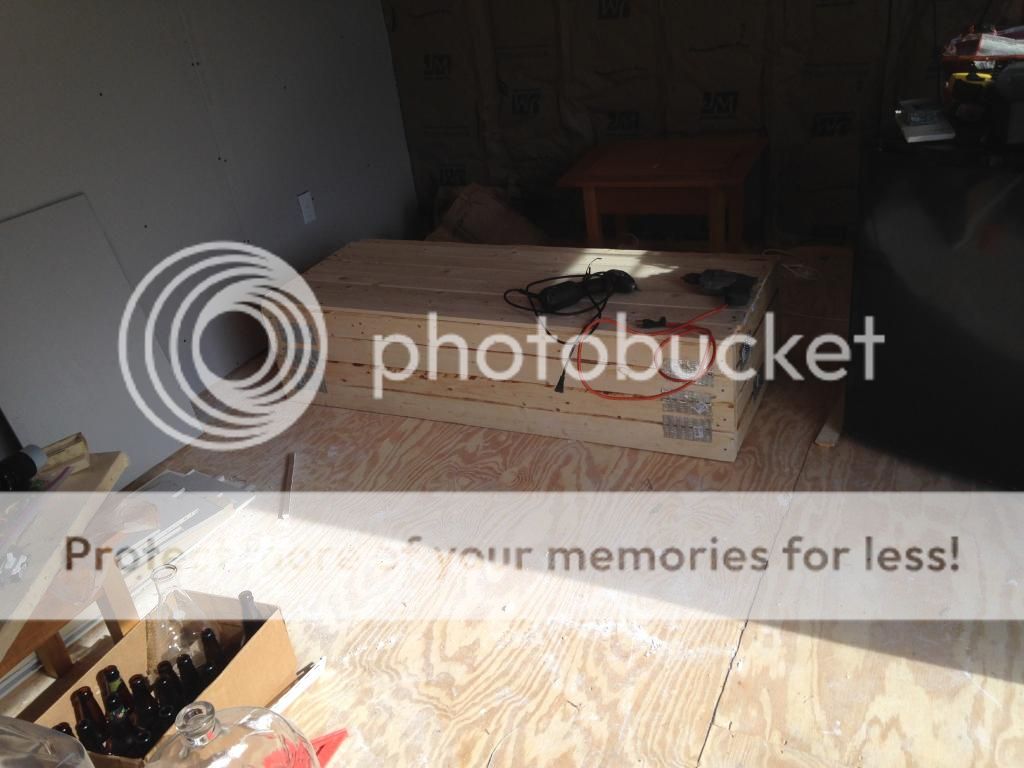
Vent hood built and sitting on floor:
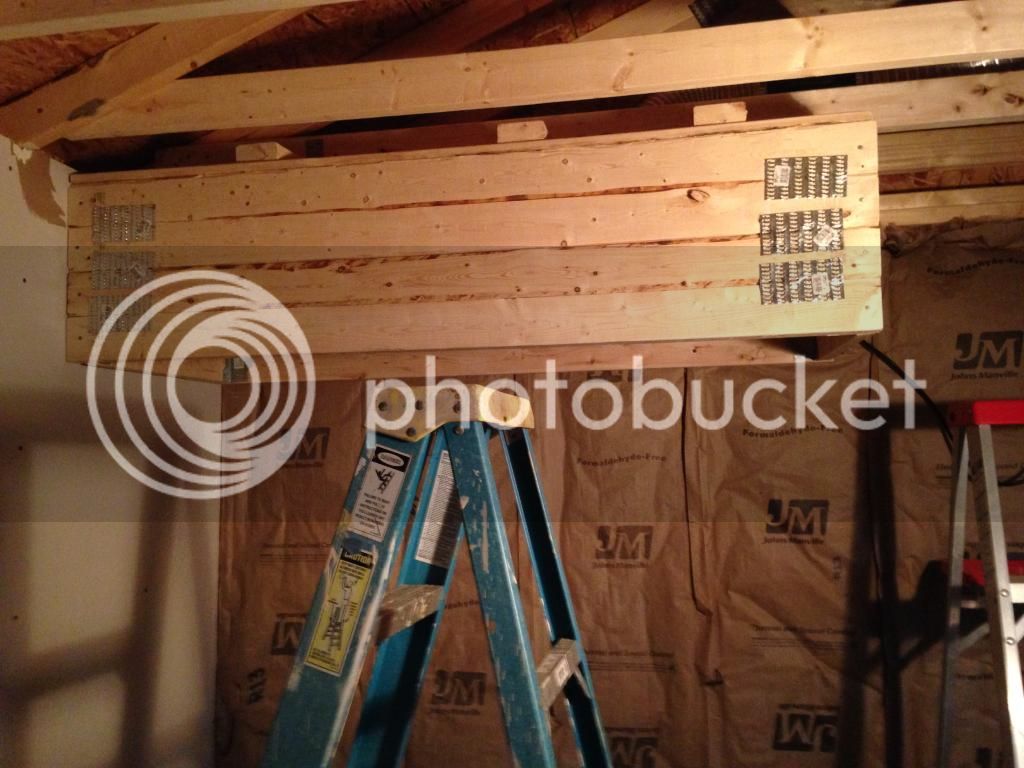
037CF80C-F088-4B43-A136-EAE0805C9BFC_zps1xzkcszp.jpg~original


Vent hood mounted:
0244941C-0034-41C0-8B89-27D3B9010925_zpssytltkri.jpg~original


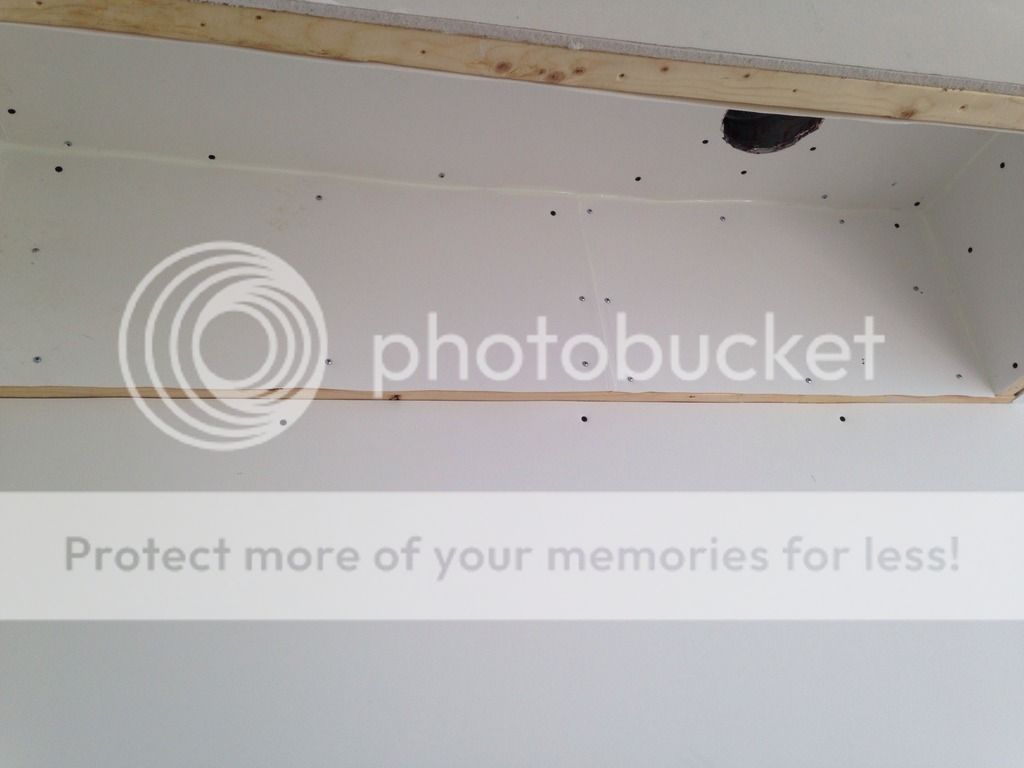
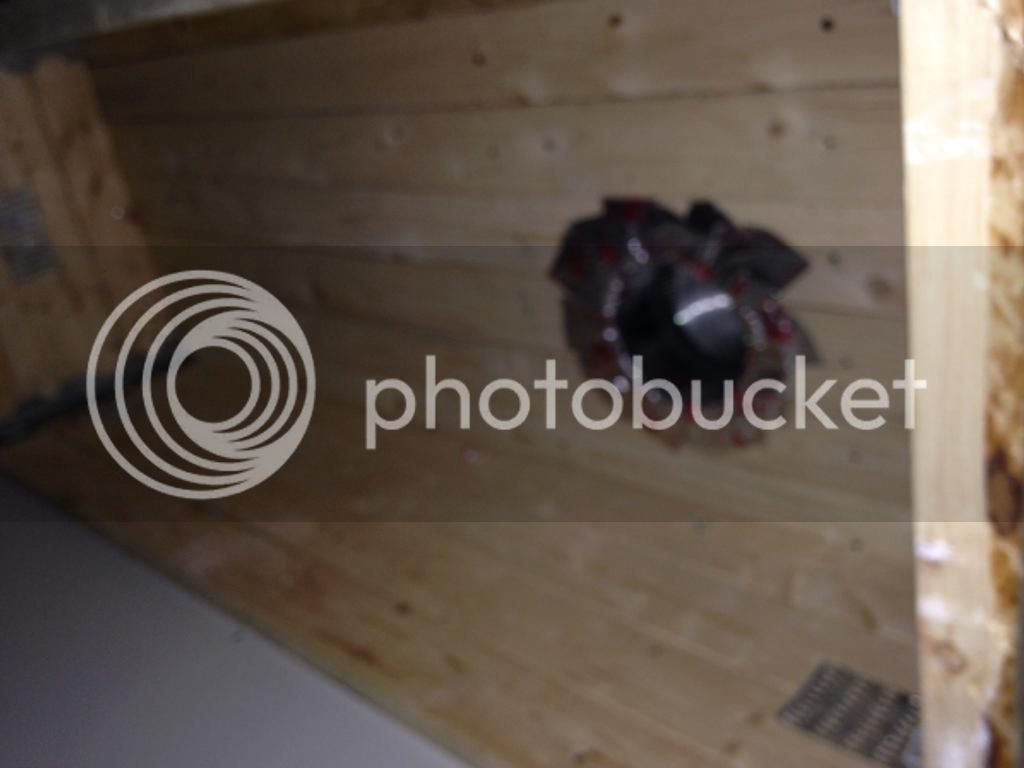
Crappy pic of the underside of the hood where the vent hole is(I will be lining the inside of this box with white acrylic):
45DDD19D-3EB5-4BDA-AD01-62138F828CA4_zps8byutqpa.jpg~original


Pic of the motor on the top of vent hood:
0247CF2D-EC57-4D63-A325-A41ED3F9B874_zpslc4qmm0h.jpg~original


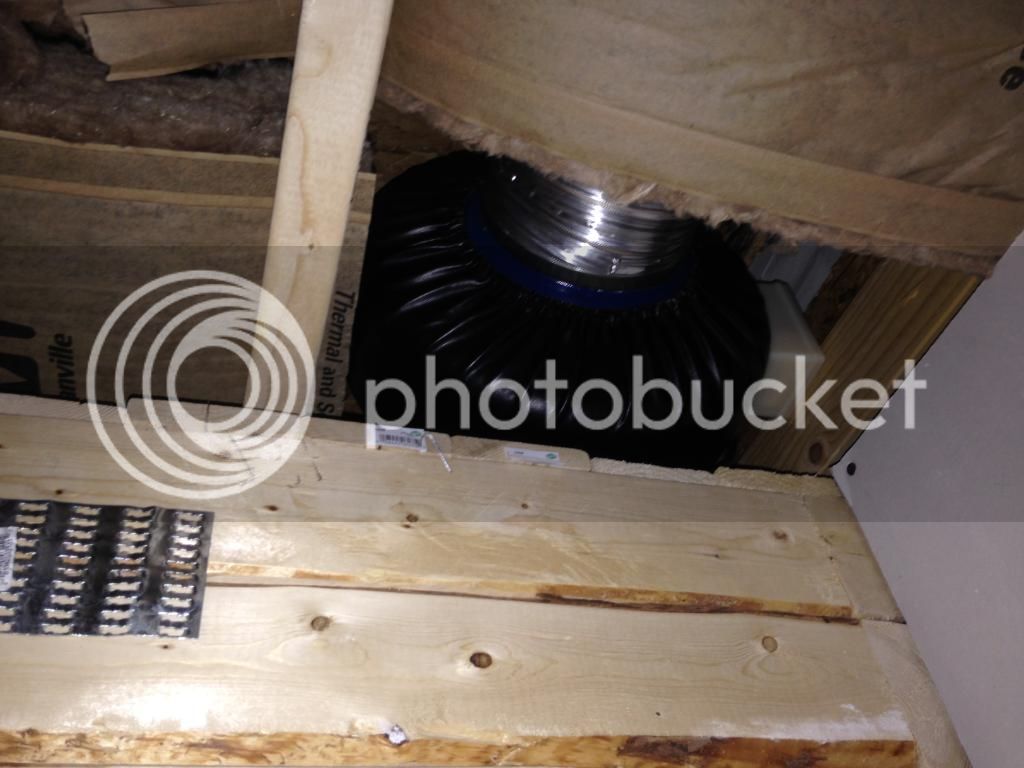
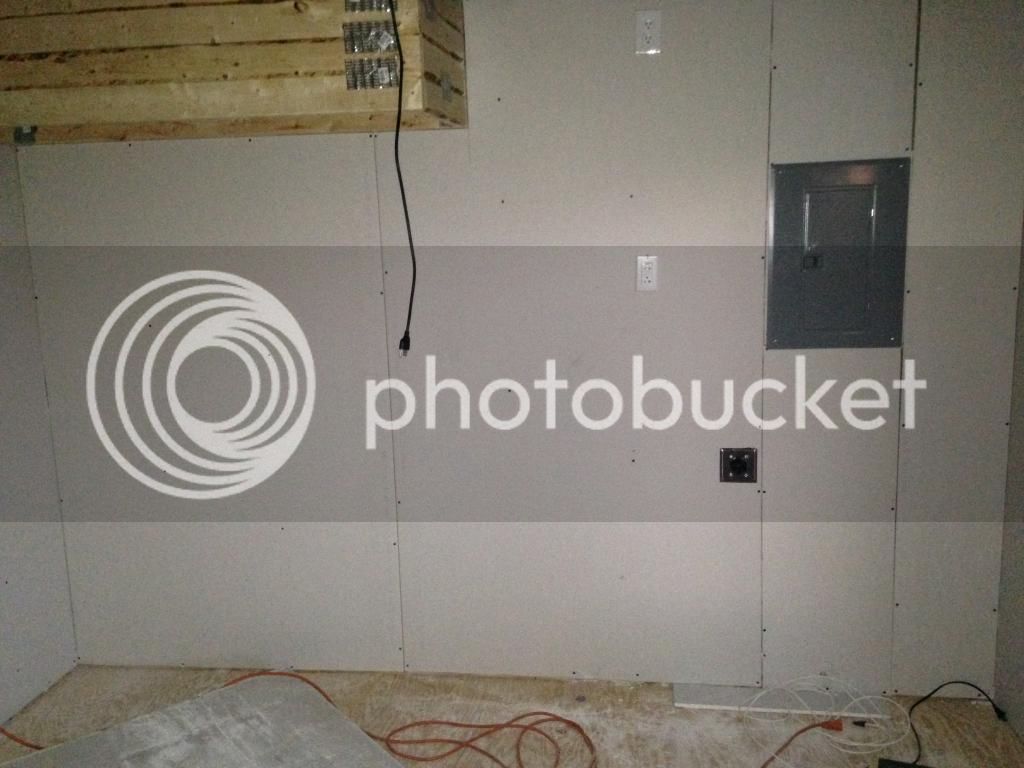
Photo of brew wall with vent hood mounted and wall drywalled. Outside of vent hood will eventually also be drywalled to look like part of the original structure:
6D66BEA8-B099-4292-A56D-983CD3D8B57D_zpsnisdfumm.jpg~original


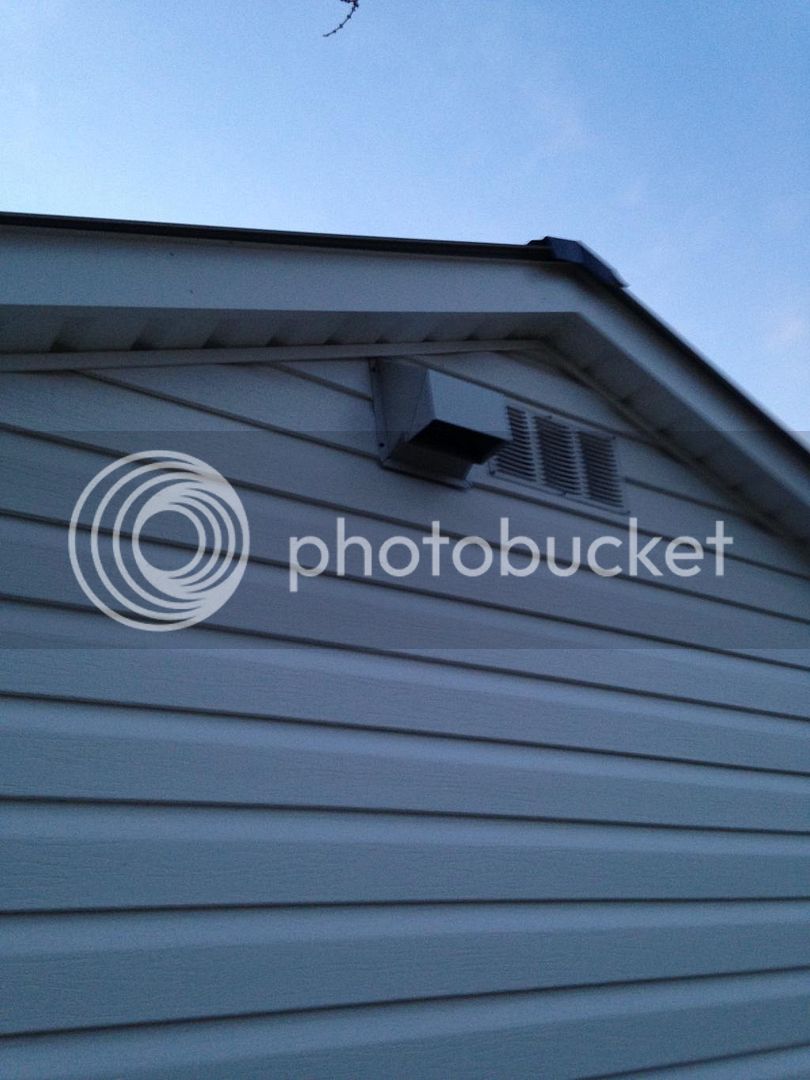
Outside of building showing the duct exhaust I installed(I used a HD exhaust..No plastic here!):
76A62C6E-8099-4704-81F5-22FFFC0FEF7C_zpswkb78s99.jpg~original


Brew Panel Pics in planning stages and post build:
0B7B9A54-2F5E-48DB-ACBA-A4974C0A35E4_zps0zwgf9uv.jpg~original


975D1910-A7E0-482A-8207-1679CB741A7D_zps5bfbugqf.jpg~original


81EC5133-E9F6-4AEF-8B9B-D5F75BFE4B32_zpsya1j4pwd.jpg~original


C1554789-FC35-4370-922E-148003B9D1C6_zpswg9qfoqz.jpg~original


Pics of wiring in various stages of build:
889A8069-2910-4633-922F-31A91EFD4006_zpssqn4nnjr.jpg~original


3A649DED-9BD9-4566-9D76-DC8B661949F2_zps1l2cm10l.jpg~original


Virgin Pots:
4FEB0B4A-F5BC-4716-A337-C3A515538FF2_zpslrgom6ou.jpg~original


Fitting Candy:
0EE7B871-EF44-45F6-BE51-983A361D2131_zps9zmosxty.jpg~original


Pots build-out:
0A5A7B26-DCFF-4ACC-814A-BEA2FB23F79F_zpsbbud8ihc.jpg~original


D9C73DBA-F783-4487-B005-062CB17B8CA1_zpsqooqjalb.jpg~original


51F142C4-AC4C-4AD3-B60F-C04A90A52E97_zpsiasjfh5b.jpg~original


Lessons learned so far:

- Buy your SS grooved nuts from BFittings or from Bobby. DO NOT BUY THESE ON EBAY! The ones I got were total crap and would not seat fully down on the NPT nipples. They were also about 1/8" thicker than the ones you get from BFittings or from Bobby.

- Buy Greenlee punchouts. I bought the QMax punches from Amazon and a month and half later, they have not shown up. Working through getting a refund and ended up buying Greenlees to keep my project moving. I will be selling these here once this build is wrapped up.

- Use the yellow thread tape and wrap up your fittings properly. This is critical to getting a no leak weldless seal the first time!! Kal mentions this and its very important you wrap the right direction and wrap enough times to get the proper seal. I put my nuts on the inside of the pot. Kal has his on the outside. its 6 one way half a dozen the other to be honest. Just get them to not leak and you are all set.

- Buy the SS HERMS coil pre-fabbed...seriously. You will save not only your time, but lots of frustration buy just buying this pre-made from Stainlessfittings.com. Very happy with mine and the cost is in line with buying the SS and forming myself.

- Glad I planned to do this over a long period of time. I knew this would be a long project going in, and knowing this has kept my patience and wallet in check.

- I LOVE LOVE LOVE the AIH SS 15 gallon 2 weld pots. for $119 each, I cannot stress enough how great of a deal these pots are. The lids are crappy, but the pots are top notch.

- EBrewsupply has been rock solid in all my build. I have had to ping them more than once and they have stepped up and replied timely and even tossed in a few freebies that I did not ask for. TOP NOTCH outfit. I even bought my DIY Element Kits and one of my chuggers through them. Cannot recommend them highly enough for those wanting a solid kit to do your build.

- For those who are scared of doing this wiring-wise, or DIY-wise, don't be. If I can do this, anyone can. Just plan your build right, don't rush it and take your time. These types of builds take time and money. Most of us dont have much of either of these so plan, plan, plan.

Ballpark cost(rough approx of what I remember paying for each of these):

- 12x24 building with insulated floor and extra full rear window(vinyl siding) - $6k
- Building build-out, wiring, drywall, etc - $800
- Lowe's Select Tavern Oak Flooring - 10 boxes @ 21.50 box = $215
- Lowe's Paint - Leftover paint from living room renovation - Free
- Pumps(1 center inlet SS, 1 inline Poly) - $260
- Pots, fittings, HERMS coil and element kits - $700(I already had the keggle on hand)
- Panel kit, enclosure, wiring - $700
- Vent Hood(inc motor and ducting/exhaust) - $200
- AC/Heat window unit - $400
- Brew Bench(wood, bolts, finish) - $80

I will post more as this build progresses, but wanted to at least get my own e-brew shed build started here for others to see/comment on.
 
It was prefab and I picked mine up from the dealer in Albemarle, NC.
http://www.buncebuildings.com/

They were able to get the floor insulated and add the full rear window for the window AC/Heat Unit for a very reasonable cost to the base building price. I was also wanting to get it with vinyl siding to match the house...I am not a big fan of the wooden shed look.
Again, total price for mine delivered with tax was right at $6k. I also got them to knock $500 off the whole deal it by paying for it all up front with cash. :)
 
So the sink problem has been bothering me for a while as mentioned before, it was just not cost effective to plumb this building with water/septic due to location, cost of the runs, etc.

I *think* I have come up with a viable plan B as I do have access to an outdoor faucet relatively close by the building.
Thinking about using this for cleanup so I am not having to put pots on the ground while cleaning up the gear post-brewday. I could actually drain the sink water into a tub for use around the house for plant water as well to reduce waste on the water side.

http://www.ebay.com/itm/GSS501-Port...316?pt=LH_DefaultDomain_0&hash=item1c4a3832e4

This sink would be hooked up and used for cleanup only and would be located about 5-10 feet from the building, not used for brew water sourcing or for chilling. I still think using a cooler with a pond pump/ice water/plate chiller with pumps recircing the ice water and wort slowly will suffice for chilling and my tap water is not ideal for brew water sourcing.

Thoughts?
Bill
 
Impressive. You have got to have water even if you put a sink in and hook it to a garden hose each time you brew. If you don't have a deep frostline, it wouldn't take much to hand dig a water trench and lay poly water line. That would help a lot even if you have to hook it to your hose bib each brew day.

I would love to do that, and I am a builder, so the structure would be easy for me, but local zoning and CC&R's won't allow it. I would have to move.

Next question- What does your wife think of all this? That could be a major obstacle for many guys. No wife? That might simplify the brewing part of your life, at least.

This is why I am thinking the outdoor sink option may be the best option for me on this...Not having a sink to cleanup, rinse gear, etc. is going to be tough. For $250, I can have this sink available to use and its portable so it can be hooked up on brewday right by the shed and shuffled into the garage when not in use.

As far as my wife, we have been married for over 17 years now and she knows I am totally nuts at this point..lol..She is also thankful that I will not be brewing in the house any longer as she does not drink, nor like the smell of wort boiling. I also make 3x more than she does income-wise so she cuts me alot of slack with these projects.

I think her biggest concern at this point is that I am going to move into the building. :ban:
 
More progress:

Drywalled with backsplash up and hood lined. I used 2 sheet of Polywall($19 a sheet at HDepot) which was easy to cut and work with.
image_zpsyrhy6i8p.jpg


Inside look of the vent hood lined with polywall and caulked. I still need to add the vinyl L channels on the lip of the hood.
image_zpsl2usvut5.jpg


Expanded view of the brew wall - The Vent hood came out nice and looks like a true part of the building. I still need to build an access panel to service the motor which is in the ceiling, its on the to-do punch list.
image_zpsqc8pbuxo.jpg


Starting the Kal Brew Bench build:
image_zps5sor8byw.jpg


Brew bench finished:
image_zpskimwfvm6.jpg


Brew bench finished and in the building under the hood. Lines up perfectly with the backsplash:
image_zpsktsw21nd.jpg


Brew bench with the tallest pot/keg I am using to show clearance to the hood..It worked out great and should work perfectly for pulling out the steam/fumes:
image_zpstie2gdj6.jpg


Next weekend, final sanding of the ceiling and application of a coat of Kilz for the paint to go on. Then the floor will go in. Almost there!
:mug:
 
Haven't seen anything on this build in a couple weeks, post when you get time...
 
I do have updates I need to get posted..I did get the paint done and the floor just got finalized this past weekend minus the baseboard I will be putting in later.

My daughter stained the brew bench a gunstock color and I will be mounting the control panel, pumps and getting ready for the autotuning process hopefully this coming weekend pending some work for my day-to-day paying job I have to do on Saturday.
I have pics that I will post later as well.
Good news, its still moving along at a decent pace.
More to come with pics hopefully tonight!
Bill
 
More progress pics from the last 2-3 weeks:

Painting done - I used leftover paint from the living room renovation. The Ventilation Hood turned out looking better than I expected. It really does look like part of the building. I still need to add some crown molding where the fan power cord is coming out of the ceiling as well as cutting the fan trapdoor.

Picture of the room post paint and the first few runs of flooring in before we lost daylight on Sunday.
7F767E42-8277-441B-BE79-630735A2189C_zps1vf8avmj.jpg~original


Another shot with the flooring partially in place. I used the Lowes Select Tavern Oak flooring for this room. At $1.29 a SF, it looks great!
A7B0BF99-6793-4878-A043-D6264E2445C3_zpsanvju4l9.jpg~original


Better pic of the flooring:
DF925B41-2047-4291-BD38-A12108B11A18_zpsxnqlnocx.jpg~original


Full room shot post-flooring completion and starting to move brew equipment into shed(this was the "I see the light at the end of the tunnel!" moment with this project for me):
C14ABF79-B749-4F1E-B1DF-11B91DA6E507_zpskheoboc6.jpg~original


Picture of the brew bench in the garage as my daughter stained it with a stain she picked out..Minwax Gunstock. Turned out great and has my kids touch to it.
422414E2-991F-4BC5-805C-EA02FF721431_zpswenmkmlo.jpg~original


I need to update my $$$ totals with the flooring cost, but all that is left to do now is to mount the panel, pumps, connect it all up to the pots and fill everything with the proper amount of water and start the auto tuning process and then simulate a brew day with the water to see how things go. I am sure I will need to dial in a few things with the dry run. Barring a major disaster with some work(day job) I need to do on Sat morning, I expect to do the dry run this weekend(I hope).

I am also getting a plastic laundry room tub sink to put by the building when brewing to supply water for cleanout/rinsing. I will be using distilled bottled water for brews as my water is not ideal for brewing(but works for cleanup!) Total cost - $129 for the sink and fittings to connect it to the garden hose.

I should be able to put in the A/C unit in the next 2 weeks as well before the weather turns too hot and at some point I will add some baseboards to the building but I am very happy its as close to done as it is.
More to come as I finalize this deal and I will try to be better about updating this post.
:mug:
 
Got the panel mounted and the last of the pump and chiller fittings put together.
I am hoping to get some water into the pots and start running the autotune process tomorrow on the HLT and BK.
Will take more pics and upload them as soon as possible, but I am getting very close to finishing this all up. One last item is my volt meter is reading all zeros, but the amp meter is pulling properly..I think I need to rewire the volt meter and it will be all set. Everything else from what I can see is working as intended.
More to come and I will try to get some followup pics tomorrow night.
:rockin:
 
Man! Need a brew buddy LOL? Looks great, try tying the inputs for the volt meter into the the hot terminals on each side (unless you already have)
 
So I did a run with just water today to double check leaks, and dial in the panel.
This post is a bit long winded but I wanted to be as detailed as possible for others..

I figured out during my trial water run that I was short one quick disconnect hose(ordered what I need to make one/two more), and the top 2 outlets(the water in and the top outlet of the HERMS coil) on the HLT have very minor leaks. I am going to take them apart and reinstall them this week to get the leaks squared away.
Everything worked as expected once I got the PIDS all figured out temp wise.
Word to the wise on dialing in your PID setups...FOLLOW KALS PID SETUP NOTES! This will keep you from having trouble getting all the funky settings on the PIDS all lined up as the PIDS ship in celsius mode and are set to the K thermocouple setting by default which will throw you for a loop if you dont know what the deal is..
Link is here for this info..Trust me it helps:
http://www.theelectricbrewery.com/control-panel-setup

I also got the volt and amp meters all fixed. Everything on the panel is working great(elements firing, pumps working, alarms alarming) and once I get the 2 minor leaks and the new quick disconnect hose put together, I am in business and will be ready for the first batch to be made.

Some friendly tips for others going down this road:
- Make sure you keep a bucket with about a gallon of StarSan in it and a few damp and dry towels close by. One mistake with forgetting to close a valve or having the hose to the brew kettle pop out and you have a mess on your hands. The bucket will help you have a place to put the hoses in during hose switchover/transfer so liquids don't end up all over the floor.

- Again, Make sure you visit Kals Control Panel setup link above for the PIDS when starting things up if you are using the Auber PIDs. Otherwise you will be scratching your head with their manual as its not very big dumb animal friendly.

- Make sure you remember which is the amp and which is the volt meter when wiring these up if using them. My problem ended up being that I had the amp meter hooked as the volt meter and the volt meter hooked up as the amp meter. Switching 2 wires from one meter to the other and vice-versa solved the problem.

- Instead of using the SS compression ferrules, I used the Delrin Sleeve Compression Ferrules that Bargain Fittings sells for .25 a piece.They are non-permanent and if you have a leak in the HERMS valves that you discover during testing the recirculation(like I did) through the HERMS, a quick removal of the HERMS to address the leaks does not mean a replacement SS Ferrule has to be ordered.

- Have fun with something like this. This has been A L O T of work and time for me personally and I still need to do some rack/gear organization along with getting the fermentation freezer into the building so it will continue to be a work in progress. It has been VERY rewarding to set this up and looking back I am glad I did this all myself rather than buying the panel pre-built. I know this brewery inside and out which makes me feel better if something breaks down the line.

I am not sure if Kal still hangs out here, but I want to personally thank him and all the other HBT folks who have posted their e-builds here as I visited probably close to all of them to get inspiration and guidance for my own build. Without you all and Kal's site, I would have never accomplished this build.

I will also post updates of the first brew day which should be next weekend if nothing else comes up family-wise.

With all of that said, here are some pictures of my test water run today and some photos during getting everything mounted and in place...

Panel and pots before plugging everything in and mounting the panel:
99502E3D-5B92-4151-A715-855DE897918D_zpswl2m6fwi.jpg~original


Hoses hooked up heating up the test water(before I fixed the amp and volt meter and got the PID settings all corrected):
484DE4F1-C8A1-4815-B0CE-A9B3F2C51F87_zpsno8auccn.jpg~original


Panel all setup and PIDS dialed in setting-wise along with amp/volt meters fixed(nothing running in this pic so t he amp draw was minimal):
BEAE5CB7-46A4-4665-8FF8-CDB1E8BB74D7_zpssk6cmerv.jpg~original


Pots/keg:
40A476FF-56C5-4CA6-8887-D3AEE8C52305_zps7mg0hfyx.jpg~original


Pumps mounted with DudaDiesel Chiller waiting to be mounted up - Will be putting splash guards over the pumps next weekend:
6C3503D6-820A-47E8-8B26-0DDC054BAE37_zpsvuxmbrdx.jpg~original
 
Looking good.
I'm curious why you went with two different Chugger pumps? I will be purchasing my second pump here in the next month or two and have the 3/4" center inlet pump you have on the right. Thanks.

-
Craig
 
Looking good.
I'm curious why you went with two different Chugger pumps? I will be purchasing my second pump here in the next month or two and have the 3/4" center inlet pump you have on the right. Thanks.

-
Craig

To be honest, the pump situation kind of "happened"...I ordered a poly inline chugger as my first pump and I got sent an inline steelhead. I ordered another poly inline chugger and I got sent a center inlet steelhead.
I chalked it up as lucky me and rolled with it. They both work great!
:mug:
 
Looks like all is good now! Balance in the brew world has been restored.. cheers!
 
First brew day on the new system was today.
Here are my notes:
- Brewed Kals electric pale ale with some slight adjustments to grain bill as I aimed to collect 5 and 5 on the nose for the fermenters..Kal aims to hit 6 and 6 on his original recipe.

The GOOD:
- It took more time to brew on this system, but it was much more automated and relaxed...

- Everything went as planned until the end(I will get to that debacle). The system performed flawlessly. I sparged quicker than Kal does on his system(I think I sparged for 30-40 mins tops) but I hit my numbers no problem as I crush finer than most do so I get a little more punch out of my grains.

- Wort was much clearer than any wort I have collected on any of my AG batches prior to using this sytem..it was unbelievable how clean the wort looked coming from the MT.

- I am so glad I put in the DIY ventilation hood and lined it with the acrylic. I did get some condensation on the inside of the hood but the vent hood pulled out most of it and no drippage occured. I also ran the vent hood for about 30 mins after the boil to knock out any lingering condensation and moisture.

The BAD (which had nothing to do with the system itself):

- Learned the hard way that you absolutely cannot use a plate chiller without filtering hops. The new Duda chiller plugged up tight as a tick about 5 mins into the chill and caused a major mess. it got the wort down to 174 before it plugged. I ended up just filling the fermenters with hot wort and they are sitting in the brew shed "no chill"-ing. I certainly hope the batch turns out ok as I really did not have any other choice after the plate chiller plugged.

- With the plate chiller debacle, I am going to go to using a Hop Spider. I really want to use the plate chiller, but man its quick to plug up with hops..

- I need to get that laundry sink setup for cleanup. Cleaning pots on a driveway sucked.

Overall it was great to use the new system and everything performed as expected...I get a hop spider in to keep those damn hops from plugging up the plate chiller, and I think everything will go as planned next time. If that PC clogs again, I will be looking to go to a CFC as I am not a fan of "no-chill"ing.

Some pics of the day:

Heating the strike water:
43C281D2-B834-4CEE-8DF2-4B3A8E59CF28_zps6u6f0mg5.jpg~original


Strike water almost there:
6B0246EB-F4A6-4AEE-B77C-E91B40DEC282_zpscaikjnwc.jpg~original


MT with the needed mash-in water recircing (with additional water I added back to the HLT to recover HERMS) to get both sides up to 149Deg before doughing-in (This took 15mins to get everything on both sides to 149Deg):
30BCA5AF-EF24-4BE3-8532-66823045D415_zps9u6ss1ky.jpg~original


Doughed-in, Recircing and wort is already clearing:
6946EA86-4AFF-4CA0-A182-4CFCB23339BE_zpshwxgfx1r.jpg~original


Recircing the wort through the HERMS:
789F3946-9463-427F-A279-7D31E9F70D05_zpsi7iurjll.jpg~original


After hitting 168 for Mash-Out, Sparge started and wort starting to fill the BK(again, the wort clarity was unbelievable..you can see the pickup tube in this picture and there is 5 gallons in the BK at this point). I sparged for about 30-40 mins tops..I still hit my numbers.
8F2A4A42-9F05-4DED-A1B0-1FCDB13EBF3C_zpsihtb7lbv.jpg~original


Sparging with all connections going:
7AD6CF00-155B-42D0-947E-4C89FC62C894_zpst5lwqfb4.jpg~original


Great shot of the brew shed during the sparge. I added some lights to the vent hood which helped big time(the wiring is a bit messy on the lights but hey, it will work).
3AACF709-53CE-448D-AF0D-D0FC14C7E34F_zpsqehcgjup.jpg~original


The boil..I kept the boil PID at 212 to keep the a boilover from occuring. It worked well and a good solid boil was achieved:
616B8676-94DC-4DF7-97DA-C5072C0E2059_zpsvepxdsr2.jpg~original


I get that plate chiller figured out, and this rig is all set!
 
Nice build!

Hop spider is a must with plate chillers, I like the SS mesh kind that hang off the side. Also a tangential pick up on the BK is helpful even if you don't whirlpool. Mine's just one of bobby's elbow fittings turned sideways.
 
I have the same chiller as you and experienced the same problem on my maiden brew with it... I now just use a hop bag and have no issues any more... No problems with hop aroma or flavor at all. Also just remembering this, when it plugged I was doing a Zombie Dust Clone, so yeah... all those hops... yeah...

In regards to your sparge time... I do the same and still hit my numbers and in most cases 2-6 points above my numbers. I don't have any need for a 90 minute mash especially when you factor in all the time it is stepping up to 168*F on the mash out.


Rock on man! Your build is aweseome!

Thanks much! I wondered about that 90 min mash as it takes 20-30 to step the system up the mash out temp..I think I will set the timer for 60 and then step it up to 168 for that last "30 min" of the 90 min mash total time for the next batch.

I was really worried about that sparge time, but hitting the numbers made me worry less. Win/Win that it takes a shorter amount of time to get done. lol

Any ideas on the best way to make sure I got all those hops out of that plate chiller? I finally got it to unplug, but I still think it has quite a few hops gunked up in there. I was thinking about hooking it up to the pumps and filling the BK up with some Oxy Free and hot water and just backflushing/recircing the hell out of the chiller with 170Deg OxyFree water along with a clean hot water rinse..Thoughts?
 
So the way that I unplugged mine was to hook up hot through the "Wort Out" side and send it through the "wort in" side... Every minute I would switch them out back and forth...

How do you know when they are all out? You don't really, but what I did was take a dish plate that is white and run the water out onto that... I could easily pick up and see any hop debris that came out. When it looked like there was only a few particles left in there, I flushed with Star-san and hot water for 10 minutes recirculating and then called it good.

The other and possibly more effective thing would be to bake the chiller at 400-420*F in your oven for 45-60 minutes. It will turn any debris inside the chiller into ash and you can then wait for it to cool down again and flush it with water and santizer.
 
Baking or boiling are the only ways to know for sure. I do about 250 for a few hours in the oven. The other way is to use caustic soda (NaOH), it's nasty stuff but very effective, a once a year kind of thing.
 
EdWorts Hefe Batch was brewed this past Sat on the system. I bought a new keggle SS hop spider I broke in today. It worked like a CHAMP and no more plugged plate chiller nor hop trub! Very happy with that purchase.

Update on the plate chiller. I ended up having to bake that puppy for half a day at 425 to get all the hops in there to turn to ash. Was a messy ordeal and one I really do not want to repeat.
Needless to say, it is back in working order and with the hop spider, it did not plug up this time around.

I used a cooler full of ice to recirc the cold water but could only knock the 10 gallons down to 119Deg F before I ran out of ice. I tossed the rest of it into fermentors and put it into the fermentation freezer overnight to knock it to pitching temps.

Both fermenters were at 60Deg Sunday morning which is when I pitched the yeast. Its now fermenting like a madman and I had to put in blowoff tubes on both buckets this morning. WLP300 is a freaking beast on a hefe and it smells wonderful.

Bottom line, the new system is still performing as expected and with the addition of the hop spider, the chiller is working well. I just need to stock up a bit more on ice to finish chilling to pitching temps with the plate chiller.

Pics of the brewday with my brewbuddy and new hop spider:

System recircing the Hefe batch:
F7524634-8F5D-4A4F-B9C2-86280EAE75CB_zpsmo6br8xs.jpg~original


Spent grains(and no stuck sparge..I did not use rice hulls but it slowed down big time due to the amount of wheat used in this recipe..May toss in some rice hulls for the next batch as I was getting nervous it was going to plug at any moment during the sparge)
CD8E2299-28DB-48F2-86E5-06300770A7EA_zpsj64fhow5.jpg~original


Wort slowly(very slowly) filling up the BK (which is finally nice and clean of all beerstone). Also pictured is the new SS hop spider which is awesome!
5FDE5115-94DB-4F52-9B0E-4EE25434B7DA_zpshsiwaekx.jpg~original


Right at the end of the boil:
3B6F1C7B-6691-4A0A-A8B0-AE2484D390A6_zpskgednj20.jpg~original


My Brew Buddy waiting on any spilled wort to hit the floor for sampling:
7DA91F25-FA75-4D7D-ABED-1C3B2AAB0390_zpspkw8lqnh.jpg~original


Next up is BMunchers OctoberFAST Ale. Kicked the last keg of that 3 weeks ago and need to whip up another batch.
Thankfully the beer pipeline is getting back into good order. Been waning due to all the beer shed work which is now complete.
:mug:
 
Very nice what a joy it must be to have a permanent brew spot, setup and tear down of my 25gal EBIAB gets to be a chore.
 
Happy Halloween from the Bilbo Brew Shed. A picture update on the outside of the brewshed as we put flagstone and a fire pit in where it was just grass before. I also lined the front with RailRoad ties to clean it up.
This area has become the weekend hangout spot for friends and family!

Makes trekking between the garage, house and brewshed a much cleaner and less muddy experience!
:mug:

Added some Fall decor, lights for Halloween and a picnic table to enjoy food and beer.
E67DB0F7-9EA9-4512-B005-7D1CE5882D90_zpsv9dkrfot.jpg~original


With the firepit(which needs to be cleaned out along with the leaves and flagstone needing a good blow-off with the leaf blower) in the frame:
E1AA0616-E701-43B3-B6F0-9ED6D13CE1B3_zpsqdyycnkh.jpg~original
 
Well over a year later with this setup and still extremely happy with it.
This system is what I am targeting a build-out of to power (will be scaled out to accommodate the much larger heating requirements) the 1.5/2BBL Nano brewpub the wife and I are now looking to start in a nearby town where I live.

The only thing I have had to do for maintenance on this setup is tighten the electrical connections on everything inside the box about twice a year to keep everything snug and I did do a complete breakdown and cleanup of the pots and fittings, etc. as they can get gunky after a while so its good to clean these up from time to time.

Love the setup, the end results and highly recommend this project to anyone planning or building their e-brewery!
:mug:
 
Sad day..wife is putting the house on the market to sell the house and buy a bit more land (15-17 acres) with a smaller modular for us to retire in with the kids departing the nest so the shed/house is going on the market.

I have brewed ALOT of beer in this shed/system and its been a great setup. Again, I cannot highly recommend doing this if you are serious about brewing indoors.

On a less sad note, the agreement I have w/her is to allow me to get a bigger building with the new property that I will be putting together for the new "Brew Shed" which WILL include plumbing and an RO system so I will be posting that build here soon once the house sells and the land/home situation get closer to done.

Onward and upward.
:fro:

I know how proud you are to have put together this awesome shed, but how exciting it must be to take all that you have learned and make something even better. I also have a dedicated area and I love it, but I know that if I had to do it all over again, it would be exciting to improve based on what I've learned. Best of luck with your move. :mug:
 
Late to the updates...So I managed to talk the wife OUT of moving so we are still at our previous location (thankfully as work has been killing me time-wise lately) so I am still in the same building brewing on the system in this thread which to me is NOT a bad thing.

I DID however recently (like this past week) finalized some upgrades..

I did get tired of the 15 gallon pots and got some friends in NJ to donate a new 20 gallon megapot (for a bigger brew kettle) and purchased another 25 gallon pot for a new MT so I can now make the much bigger beers (and barleywines) thankfully which is something I have wanted to do, but did not have the MT capacity to do it until now. I also put a new shiny SS element in the megapot BK which replaced the old Camco I had that was not SS.

Was sad pulling the old gear out as I know how much beer has been brewed on these pots and elements but seeing those huge pots made it better. I have pics I will post later.

All in all, this system has been absolutely great, all the original components are still being used today with exception to the new bigger pots and a heating element outlet that I had to replace.
It has made more beer than I can remember and has brewed 2 official award winning beers (and probably more if I would get off my lazy arse and enter more contests than I used to).

I am also getting closer to the Nano dream and will probably replicate this same setup in my first 3BBL system (with dual elements and it wont be a single phase electrical setup of course) as I think this system is much easier to deal with than a direct fire one is.

I still say to those looking to do this, if you have the time and funds, dont wait. Do it. You will not regret it if you are into homebrewing for the long haul (I am 5+ years in now and still going strong).
 
Back
Top