How to attach ground to kettle?

Homebrew Talk - Beer, Wine, Mead, & Cider Brewing Discussion Forum

Help Support Homebrew Talk - Beer, Wine, Mead, & Cider Brewing Discussion Forum:

This site may earn a commission from merchant affiliate links, including eBay, Amazon, and others.

sablesurfer

Supporting Member
HBT Supporter
Joined
Jul 21, 2013
Messages
1,317
Reaction score
305
Ok,
So only tonight have I learned that you cannot just solder your ground lead onto the side of your kettle like I had been planning to do. (Well, you can't do it with the electronics soldering kit I have.)

Not sure how I am going to proceed now.

What I am thinking at the moment....
- Remove the elements from both pots (you know, the ones that have already been water tested and past.)
- Teach myself how to silver solder
- Silver solder the crimp on wire bit to both pots
- Reinstall the elements (and rewater test them)
- Wire up the elements, run the ground wire into the crimp connector.
- Regular solder to attach wire to the crimp connecter

Is there any other way to do this? Any way that keeps me on schedule for brewing this weekend? I was supposed to have both kettles wired up tonight to do a water heat test tomorrow.
 
Drill a hole through the top of the pot, extend the wire to it and bolt/nut/lock washer it up there. Or, bolt to handle.

The easiest way is with a element housing from either Brew Hardware or Still Dragon ( I have the latter on two of my kettles ). Both of them have lugss to attach your ground wire inside the enclosure.

To use these, you will need to weld or silver solder a ferrule onto your kettle. You should be able to find someone to do the welding, but if not then Bobby at Brew Hardware has a silver solder kit and ferrule to make this relatively easy. Good luck.
 
Brewhardware also has a housing for weldless installation with ground lug. Think it is about $24. Wire connections neatly covered and grounding provision, very nice. Helped a friend install his element with one.


Sent from my iPhone using Home Brew
 
Learn to silver solder. Solder a stainless hex head machine screw onto the kettle near your element mounting hole and attach your ground wire there with a crimp on ring terminal. If you make certain that any stamped markings on the bolt head have been ground off it will become easy to solder.
 
Drill a hole through the top of the pot, extend the wire to it and bolt/nut/lock washer it up there.

This is essentially what I do. I first run the ground to my element enclosure (a steel electrical box) and then run a ground line from the box up to the rim of the kettle and bolt it on.
 
As long as the enclosure is grounded and is physically connected to the pot and element (check with multimeter) no further ground connection is required.


Sent from my iPhone using Home Brew
 
Learn to silver solder. Solder a stainless hex head machine screw onto the kettle near your element mounting hole and attach your ground wire there with a crimp on ring terminal. If you make certain that any stamped markings on the bolt head have been ground off it will become easy to solder.

This is what I went with. Came home today minus ~$90 and some silver solder and flux, some practice bolts and practice washers, and some regular bolts and acorn nuts.

Four practice tries later I attempted it on my smaller 4gal pot. Got it to stick, not as pretty as my last practice, but then the pot wasn't as stable as a washer visegrip clamped to the iron rail of my trailer. Sat I will try it on my large 9gal pot.
 
Stability is important when trying to solder one light weight item onto something like a pot with a tendency to roll around.

I nailed a couple of 2x4's to my workbench to keep the pot stable and then carefully set the bolt on it. The first time the gas/flame coming out of the propane torch had enough force to knock the bolt off. Used a smaller flame the next time and had success.

Yep, surface tension seemed to be an issue with the bolt I had, although stainless bolt, was still light enough to move on top of liquid solder. Had to use visegrips (with handle on a raised strip of wood) to hold in place and put some weight on the bolt.
 
You can improve your soldering success with a process called "tinning".

All tinning means is to separately heat the mating surfaces of the individual parts , and coat them with a layer of solder. After this, you join them and heat them together with a small amount of flux and solder.

Tinning the surfaces first makes sure all the mating surfaces have solder on them ahead of time.

Clamping parts together whiles soldering is always a good practice.
 
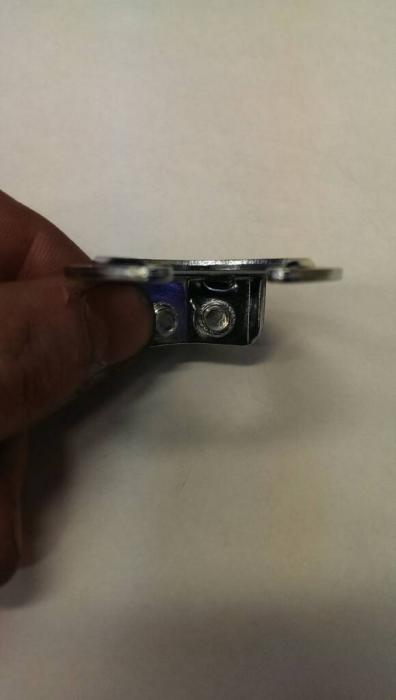
Couldn't you have used something like this... http://www.cesco.com/b2c/product/31790

Just put it on the element before the washer/o-ring going into the kettle... Unless you can't spare the threads on the element base.

I have boxes of these at work that we've never used. Not sure if we have 1" though.
 
Huh, actually I never thought those would exist. Yes, there are very few threads left after pushing through a kettle. Maybe two full turns, so it would have to be pretty thin.
 
I have two full boxes, never used one though. I took a few pics of one. Looks like it would take up at least 1 1/2 threads as is. There is a small ridge on the bottom that could probably be ground off reducing it to 1 thread... Could be a possible option for someone else.

1397746104840.jpg


1397746140835.jpg
 

Latest posts

Back
Top