Homemade S.S. cheese press

Homebrew Talk - Beer, Wine, Mead, & Cider Brewing Discussion Forum

Help Support Homebrew Talk - Beer, Wine, Mead, & Cider Brewing Discussion Forum:

This site may earn a commission from merchant affiliate links, including eBay, Amazon, and others.

tigmaster

Well-Known Member
Joined
Oct 23, 2010
Messages
144
Reaction score
19
Location
sacramento
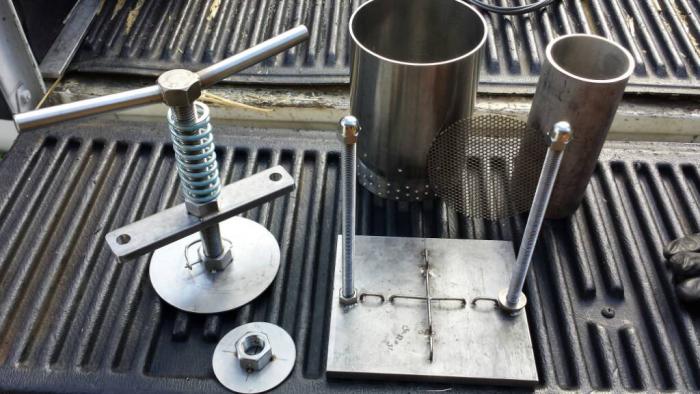
Stainless steel cheese press I made my wife. The 6" tube comes off and the 3" one will go in its place

Sent from my SCH-I545 using Home Brew mobile app

1393984857513.jpg
 
That's bad ass, Brother!
Thanks for the idea!.........My Wife's cheese making buddy's Husband, makes them out of wood, with a long lever arm, that you have to stack dumbell weights on.

That takes up much less space, ( your design!)........

Where is the whey allowed to drain out, any provisions for that?
 
Thanks everyone. I'm goin to drill holes in the sides of the mold tubes. There's a piece o's stainless in the bottem of the mold that's full of holes and it sits a half inch off the bottem for drainage. I'm also goin to get a spring to put on the all thread to figure out the pressure. Anyone know where I can find a 1" I.d. s.s. spring? Cheers

Sent from my SCH-I545 using Home Brew mobile app
 
Exploded view....any questions feel free.....There will be another nut plus washer above the spring....found the spring at work today.....I think I can make it work!

Sent from my SCH-I545 using Home Brew mobile app

1394151003873.jpg
 
I've got some figuring/trial - error to do. But I'm confident with a scale and measuring of the compressed spring we should be able to figure it out

Sent from my SCH-I545 using Home Brew mobile app
 
The bar locks down the cylinder. I'm goin to install another nut above the spring so you can engage the spring exactly when the plunger is on top of the cheese. And with a scale and measuring of the spring/counting turns we can figure the pounds of pressure were applying. Cheers

Sent from my SCH-I545 using Home Brew mobile app
 
Where did.you buy all thecomponents from? If tou take the base off and put it underneath.the scale then.tighten to predetermined poundages and make hash marks, that isa way i foumd to determi.e how much poundage you are using.
 
Bottoms up!
1/2"x8"-7"cut
6" sch 10 pipe-8" cut
5/8" rod 2 pcs-9" cut
5/8" nut 2 pcs regarding 2 pcs cap nuts flat washer 2 pcs
1/2"x8"- 1 1/2" cut
3/4" rod - 9 1/2" cut
3/4 nut - 3 pcs
3/4 flat washer 2 pcs
I found the best way to get proper pressure is to buy a little torque wrench and set it at the pounds you want and bam
 
I'm pretty sure this design is not going to work with the spring either on top of or below the horizontal bar. You could have a 500 lb spring in either position and it will not put any pressure on the cheese because the nut attached to the horizontal bar is threaded. You could have any spring in there and the press (the vertical threaded rod in the center) is going to be locked into place by the threads of the horizontal bar.

You mentioned having the spring in the top position and another nut above the spring. Here you have the same situation because the press is locked into place by the threads of the horizontal bar. Even if the nut on the horizontal bar had no threads and the press part (vertical threaded rod) slid up and down inside of it, putting tension on the spring with the top nut would actually pull the press away from the cheese!

I think a spring between the plunger and the follower would work.

The plunger is the screw on top. The follower should be loose, sitting on top of the cheese.

I've been thinking about making this modification to my press.
 
I think a spring between the plunger and the follower would work.

The plunger is the screw on top. The follower should be loose, sitting on top of the cheese.

I've been thinking about making this modification to my press.
Yeah, that would work. You would have to come up with a way to measure the spring height, which should not be too hard. Maybe a "dip stick" with marks on it welded to the follower that sticks up through a hole in the plunger. You have to figure that the cheese height is variable, so you can not simply measure down from, say, the top of the mold. You have to take into account the position of the top of the cheese if you have the spring between the follower and the plunger.
 
As I stated in my last post we use a torque wrench with no spring in there to get the pressure we need
 
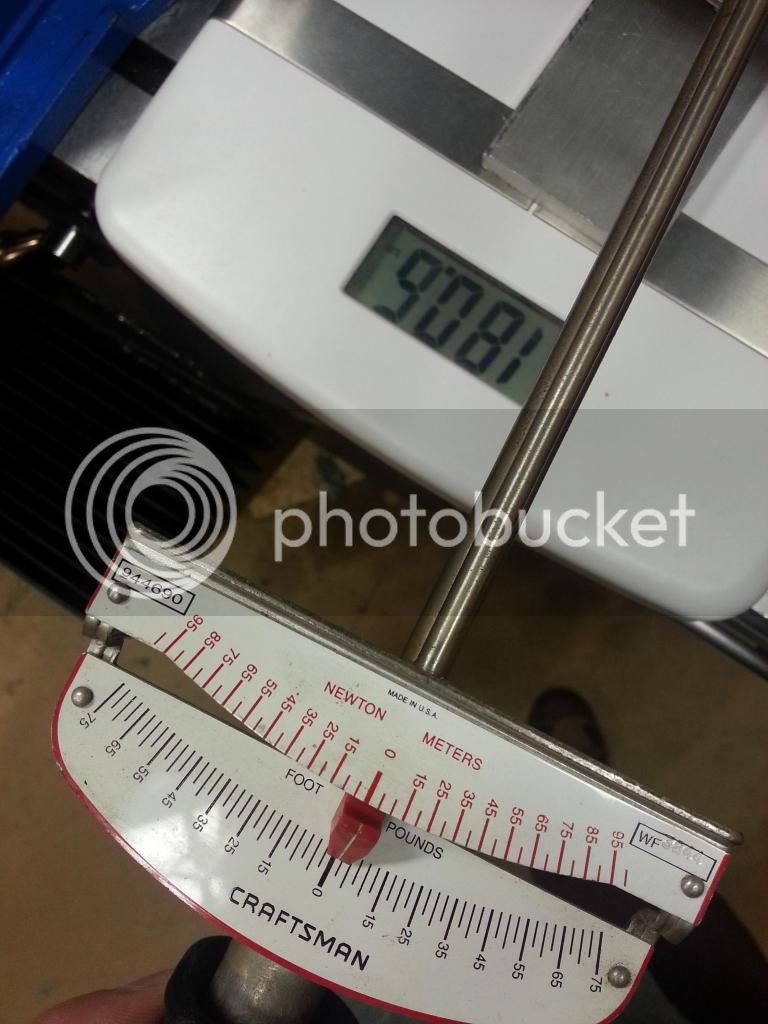
I was really curious as to whether a torque wrench would work because I didn't think foot-pounds translated to pounds of pressure. 50 foot-pounds applied with a torque wrench is a lot of force for those who have never used one. A lot. Something didn't seem quite right. So, I threw together a test setup. Sure enough, the scale registered 180 pounds before the dial on the torque wrench even moved off of zero. Maybe it was at 1 foot-pound:

20140919_182142_zpsaedde0c4.jpg


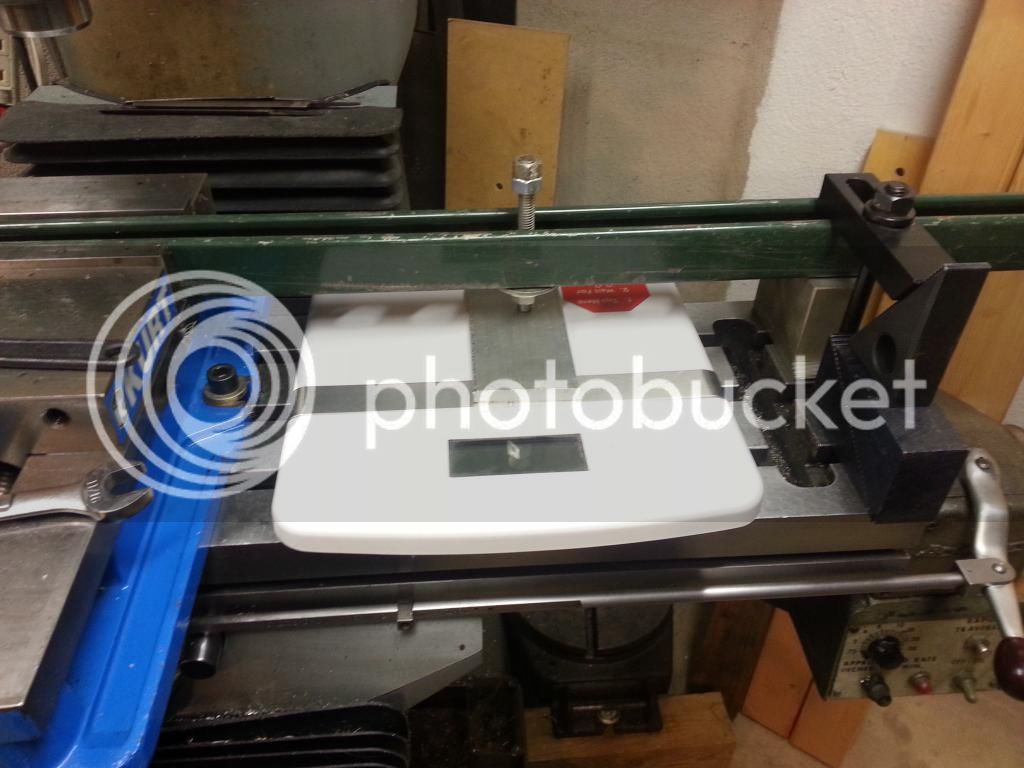
Here's an overall shot of the setup:
20140919_182207_zps8145597e.jpg


I could apply way over 50 pounds by simply turning the bolt with two fingers. The scale and the torque wrench are used frequently and are in good condition, so you can rule that out. The green bar is clamped solid with the vice on the left and with clamps on the right. The vice and the clamps are attached to a several hundred pound cast iron table. The setup is solid. The bolt threads into the green bar and presses down on the scale when tightened. The piece of aluminum between the bolt and the scale are so the bolt doesn't scratch up the top of the scale.
 
The screw thread acts to multiply the force applied in much the same way as a lever.

For a 1/2" UNC thread, with 13 TPI, and a nominal radius of 1/4", when advancing the thread by one turn, a point on the threads will move 1.57" (2*pi*radius), while the thread advances 1/13" i.e. ~1/20th of the distance the thread moves. Work = force * distance, and work in = work out, and the distance is divided by ~20. This means that the force applied to the edges of the thread is multiplied by ~20, so 1 lbf applied to the edges of thread to rotate it turns into 20 lbf applied along the threaded bar (minus some frictional losses). This pretty much lines up with what you say about applying over 50 lbf by hand on the bolt, as I'm sure you can apply a few pounds of twisting force with thumb and forefinger.

The torque required to turn the thread is the force applied parallel to the threads at the radius of the threads, i.e. the force at a radius of 1/4", so 1 ft.lbf is equal to 48 lbf applied at 1/4".

So theoretically, 1 ft.lbf torque on the thread would turn into 960 lbf applied along the axis of the threaded bar. Friction reduces this significantly.
 
dyqik- Thanks for the verification! I think I actually used a 1/2-13 bolt for the test!
 
I just got a Mad Millie cheese press as a wedding present - this press uses a spring and a threaded rod to apply the pressure like this:

CheesePress.png

As you tighten the screw, the distance between the follower plate (on top of the cheese and at the bottom of the threaded bar) and the threaded bush is increased. This compresses the spring, which applies the force to the threaded bar, and from there to the cheese. The scale rests on top of the threaded bush and is a loose fit around the threaded bar. Since the compression of the spring is proportional to the force, the scale shows the amount of force. The good thing with this design is that you don't need to calibrate it - there's no compression of the spring until the threaded bar starts pressing on the follower plate.
 
There's something I don't quite get about that design. You wouldn't happen to have any pictures of it disassembled, would you?
 
Sorry, I don't. I've only used it once, and it doesn't look that easy to disassemble.

Here's a second diagram (also poor) of how things move when you turn the handle to apply pressure on the bottom of the threaded bar.

CheesePress.png

The key point is that turning the threaded bar regulates the distance between the pusher plate/follower and the threaded bush at the bottom of the spring. Screwing the bar in increases the gap, and the spring pushes the threaded bar away from the fixed top of the press, and down onto the pusher plate with a force that is proportional to the distance between the pusher plate and the bottom of the spring. The scale allows you to measure the change in that distance, and hence the force.
 
OK, thanks. I get it now. Photos of the press make it look like the threaded bush is fixed to the yellow cheese press top. That's what was hanging me up. That's a nice design.
 
Back
Top