You are using an out of date browser. It may not display this or other websites correctly.
You should upgrade or use an alternative browser.
You should upgrade or use an alternative browser.
My Three Tier Build Project
- Thread starter TerapinChef
- Start date

Help Support Homebrew Talk - Beer, Wine, Mead, & Cider Brewing Discussion Forum:
This site may earn a commission from merchant affiliate
links, including eBay, Amazon, and others.
Lil' Sparky
Cowboys EAC
Those actually look like they're better quality than the ones I got from morebeer. One was a little dorked up and I had to order a replacement.
I needed to post a follow-up on this. I got the replacement I ordered yesterday, and they're built differently now than they used to, so I can fully recommend the ones from morebeer.
The first ones I got looked like they had one end of the nipple filled with liquid nails with a hole drilled in it. The new ones are all stainless with a nice clean hole drilled through the SS on the end. MUCH better than before, and the flame from my burner is 100% better. FWIW - two of the first ones I got worked fine, so I didn't replace those.
OP
OP
TerapinChef
Well-Known Member
Oh well. I might have gone for the stainless option. I'm just waiting for some confirmation or something from thecajunshoppe.com those damn LA people expect everyone to work on their pace, which is b a r e l y m o v i n g
I'm just excited and want my parts, no fault of their own.
I'm just excited and want my parts, no fault of their own.
OP
OP
TerapinChef
Well-Known Member
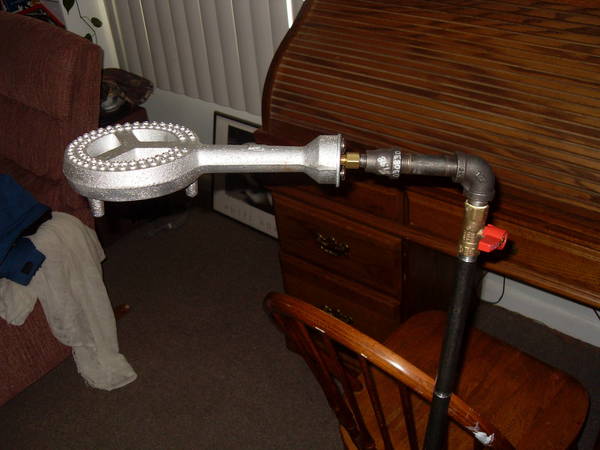
So I think it is done. I haven't finished taping up and assembling the new parts, but here she is all mocked together.
Additional Parts listing:
(2) 1/2" x 1/4" reducing coupling
(2) 1/4" x 1" nipples
(1) 1/2" x 1/4" bushing
(1) 1/8" MPT x 1/4" FPT brass coupling
(1) 1/4" brass nipple
Note:
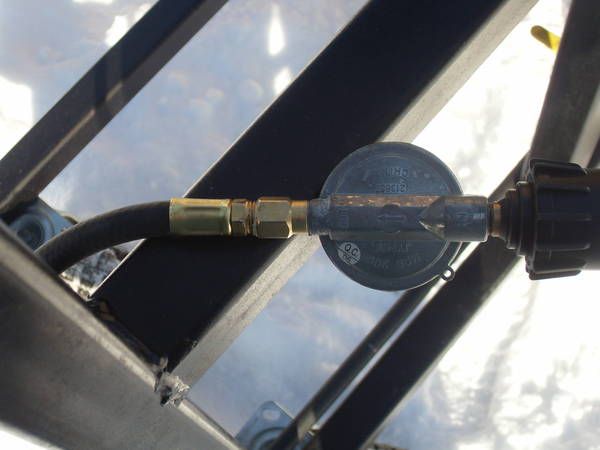
I ordered my propane hose wrong from the cajunshoppe. I told them to put 1/4" MPT fittings on both ends. It should have been 1/4" on one end and 1/8" on the other. I just had to put an extra fitting or two coming off of my regulator to get the new hose attached. Also, I recieved the female version of the propane orifice instead of the male version. Again, just a fitting or two to fix. But I think it's done, now I just need to fine tune the length of the 1/2" leads to the burners to get them centered in my platform and check for leaks and I should be good to go.


Additional Parts listing:
(2) 1/2" x 1/4" reducing coupling
(2) 1/4" x 1" nipples
(1) 1/2" x 1/4" bushing
(1) 1/8" MPT x 1/4" FPT brass coupling
(1) 1/4" brass nipple
Note:
I ordered my propane hose wrong from the cajunshoppe. I told them to put 1/4" MPT fittings on both ends. It should have been 1/4" on one end and 1/8" on the other. I just had to put an extra fitting or two coming off of my regulator to get the new hose attached. Also, I recieved the female version of the propane orifice instead of the male version. Again, just a fitting or two to fix. But I think it's done, now I just need to fine tune the length of the 1/2" leads to the burners to get them centered in my platform and check for leaks and I should be good to go.
BrewBeemer
Well-Known Member
That looks like your house central heating system don't tell me this is true?
OP
OP
TerapinChef
Well-Known Member
Yeah it's like 9 outside, so I wasn't really looking forward to walking through the yard (snow) to the shed to my stand. I may get out there to day to test fit the whole thing. As a note, I need to retap one of the burners. The threads are just off by bit, but my orifice won't thread in more than a twist or two.
OP
OP
TerapinChef
Well-Known Member
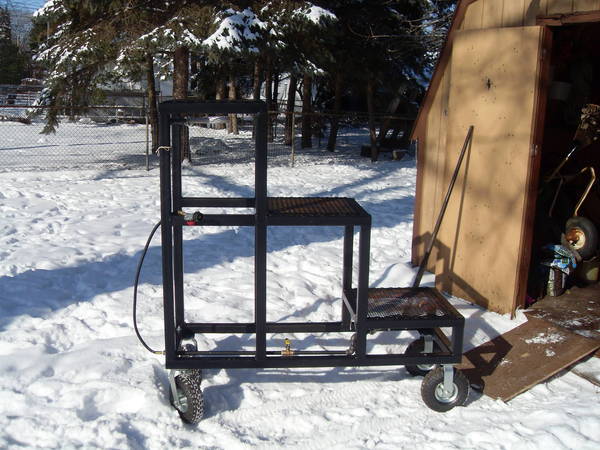
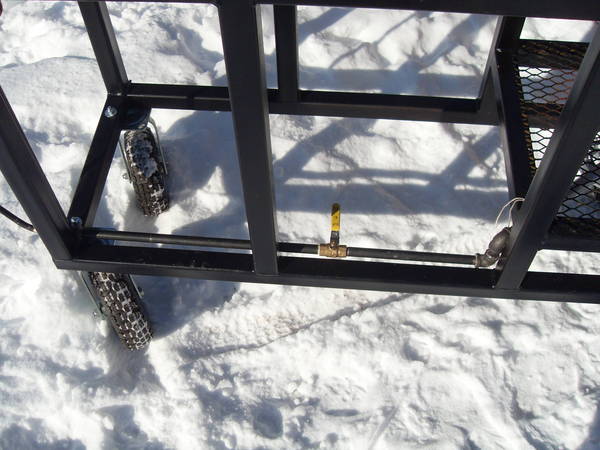
So I got my burner re-tapped and everything doped up and put together. Houston, initial burner firing is a positive. I found already that the ball valve seems to work better than the shut-off valve but I think it's just because the longer handle makes fine tuning a bit easier. The only thing left to do is shorten the burner lead on the top tier and leak test the whole thing. Here's the pics, I hope you guys appreciate the fact that I went out to take these in 9 degree weather.


OP
OP
TerapinChef
Well-Known Member

BooneDocks
Well-Known Member
I saw this thing on Detroit Craislist before you had purchased it. I never could have expected you could transform it so well. Job being very well done!!!!
- Joined
- Nov 6, 2007
- Messages
- 62,016
- Reaction score
- 6,922
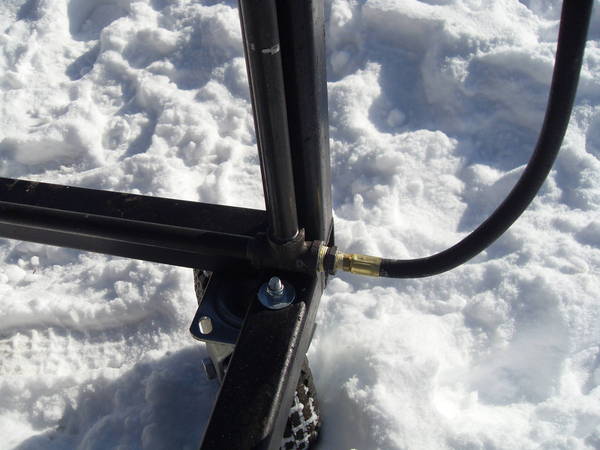
I'm assuming the zip ties holding the piping on are temproary?
Lil' Sparky
Cowboys EAC
I'm assuming the zip ties holding the piping on are temproary?
yeah, definately go get you some pipe clamps to secure the plumbing to the rig.
See my previous pics.
OP
OP
TerapinChef
Well-Known Member
Zip ties nothing, that's butchers twine!!!!
I do plan on zip tying the whole deal to the stand until it gets warm out. I don't want to mess with this thing on a cold day, and I want to make sure that this setup is going to work well before I go putting more holes in my stand. Because of the way that the plumbing runs in conjunction with the stand, there is no good off-the-shelf solution to hanging it, so I'm going to wait until I want to spend some time outside before I start messing with that. I'm going to get that top lead shortened and leak test it this week, and hopefully brew with it on Sunday or Monday. Or both")
I do plan on zip tying the whole deal to the stand until it gets warm out. I don't want to mess with this thing on a cold day, and I want to make sure that this setup is going to work well before I go putting more holes in my stand. Because of the way that the plumbing runs in conjunction with the stand, there is no good off-the-shelf solution to hanging it, so I'm going to wait until I want to spend some time outside before I start messing with that. I'm going to get that top lead shortened and leak test it this week, and hopefully brew with it on Sunday or Monday. Or both
- Joined
- Nov 6, 2007
- Messages
- 62,016
- Reaction score
- 6,922
good luck on the first brew day.
OP
OP
TerapinChef
Well-Known Member
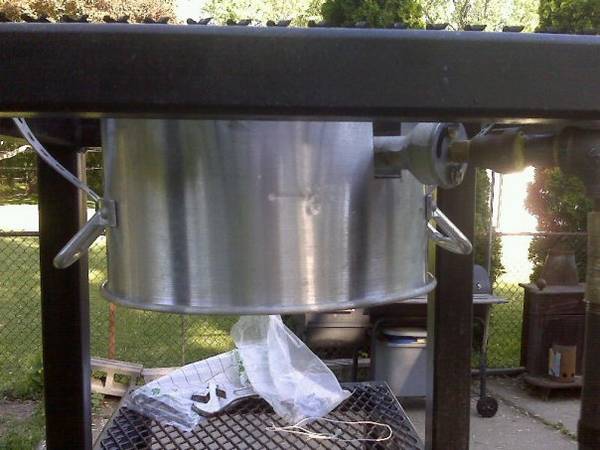
So I'm done mashing on it's two burner inaugural brewday. I'm really liking not having to lift anything. Leak check was a success, not a single leak anywhere. Not suprised, I taped and doped it up pretty good at every fitting. I really need a sightglass on my HLT though...
I'm brewing my Pure Soul Porter, by the way.
I'm brewing my Pure Soul Porter, by the way.
ScubaSteve
Well-Known Member
- Joined
- May 21, 2007
- Messages
- 3,673
- Reaction score
- 91
+1 on the sight glass. It's a really handy piece of gear.
I think if you get some beefy black zip ties, you'll be all set! Drilling, etc is a PITA and yu need to buy more hardware.
If you hide the tie-in part of the zip tie and clip off excess, it looks pretty clean. I used them on my rig inconspicuously, and they're awesome. If I ever have to do work, they cut right off.
OP
OP
TerapinChef
Well-Known Member
Yeah, I"m using the beefy black ones right now.
I'm not happy with them. I'll end up mounting them on my stand once I figure out the right clip for it. No real hardware needed besides the clip, I've got a bunch of short self tapping screws that work great. I'll be needing them to build a heat/wind shield as well...
I'm not happy with them. I'll end up mounting them on my stand once I figure out the right clip for it. No real hardware needed besides the clip, I've got a bunch of short self tapping screws that work great. I'll be needing them to build a heat/wind shield as well...
OP
OP
TerapinChef
Well-Known Member
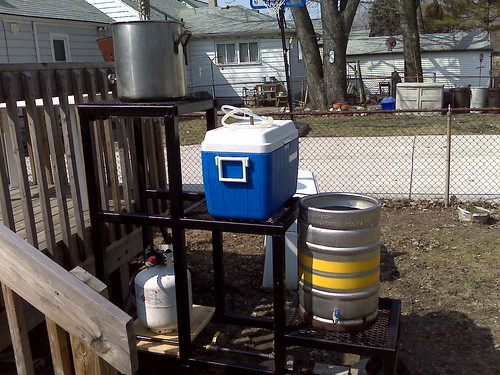
Here it is in it's latest brew day. I've built a little stand for the propane tank and clamped the gas manifold in with plastic pipe clamps (the little bit of flexibility from the plastic made things a bit easier). Next up are wind shields for the burners, brewing on a windy day seems to waste an awful lot of propane. Updates will ensue.
- Joined
- Nov 6, 2007
- Messages
- 62,016
- Reaction score
- 6,922
Looks nice and organized. Can't wait to have a rig some day some day for the sole purpose of everything being where it needs to be.
OP
OP
TerapinChef
Well-Known Member
Yeah I'm hoping that one day that will happen for me as well
BooneDocks
Well-Known Member
Chef, what is that on top of your HLT? It looks like it could be a handle, an airlock (but why on an HLT), or the neighbor's chimney.
OP
OP
TerapinChef
Well-Known Member
LOL that thing on top of my OLD HLT (!) is the top to a tiki torch. They're mounted around my deck and that one just happened to line up perfectly. Sorry for the confusion!
BooneDocks
Well-Known Member
Ah, yes. I can see the tiki torch aspects to it now. LOL.
OP
OP
TerapinChef
Well-Known Member
Here's the new addition...I fashioned some wind shields out of the old aluminum pot that came with my first turkey fryer. It was quite easy, that stuff cuts like butter! I left the handles on for the novelty, otherwise you wouldn't know it's a pot.
Here's the top (with pot handles)
Here's the bottome
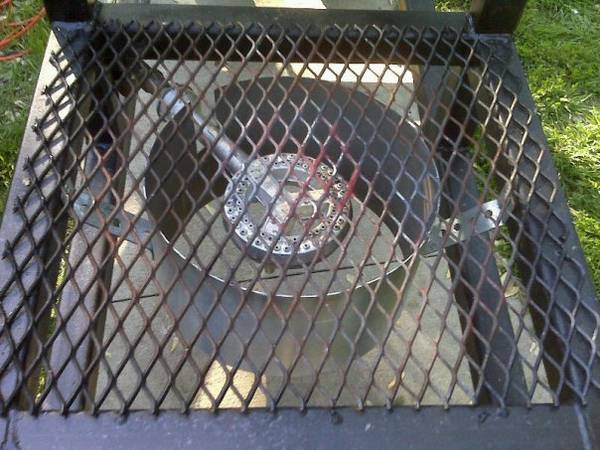
Here's the top (with pot handles)
Here's the bottome
BooneDocks
Well-Known Member
American ingenuity at its finest!
OP
OP
TerapinChef
Well-Known Member
And the best part was I didn't have to spend a dime. Had everything at the house already.
yeastbound
Active Member
Chef, this thing is absolutely top-notch. Good work.

BooneDocks
Well-Known Member
making more progess, eh, Chef?
ihatehoward
Member
Put burners on top.
OP
OP
TerapinChef
Well-Known Member
Uh...put burners on top of what?
- Joined
- Nov 6, 2007
- Messages
- 62,016
- Reaction score
- 6,922
Just on top duh!
Lil' Sparky
Cowboys EAC
on top of the other stuff, ya know!
OP
OP
TerapinChef
Well-Known Member
Burners have been put on top. And just to make sure I covered all the bases, I also put burners on the bottom, sides, and insides as well. Hope I got it all....
Lil' Sparky
Cowboys EAC
You DID mount one upside down, too, right? I found it easiest to maintain a boil by adding heat to the top of the BK!
OP
OP
TerapinChef
Well-Known Member
I knew I forgot something. Of course that would work because heat rises. Also I use sparkly fountain fireworks to help mash out.
Similar threads
- Replies
- 4
- Views
- 1K
- Replies
- 0
- Views
- 418
- Replies
- 1
- Views
- 295
