Mash Tun Problem

Homebrew Talk - Beer, Wine, Mead, & Cider Brewing Discussion Forum

Help Support Homebrew Talk - Beer, Wine, Mead, & Cider Brewing Discussion Forum:

This site may earn a commission from merchant affiliate links, including eBay, Amazon, and others.

MudTurtleBrew

New Member
Joined
Mar 5, 2012
Messages
4
Reaction score
1
Location
Westfield
So I have been brewing extract for a while and am trying to make the jump to all-grain. I wanted to save some money so I figured I would build it myself. I bought all the equipment necessary (at least I think so) to do so at home depot.

I bought:
-10 gallon rubbermaid cooler
- 3/8” threaded ball valve
- 3/8” male barb adapter
-3/8" female barb adapter
- four 5/8" SS washers (they seem a bit thin, I read they should be fender washers but I could not find any SS fender at home depot)
- 1/4" SS clamps
- brass square head plug (Watts A-737)
- ½” x 12” (or larger) braided stainless steel supply hose
- Seal from the spigot of the cooler
- 3/8" x 1-1/2" brass nipple
- 5/8" O-ring

I have it all put together, the hose is clamped in the insdie, everything is screwed in, but the v0lave is really loose and when I touch it, it wabbles. I have tried a lot of things and can't get it tight. It leaks from around the hole in the cooler. Is it a problem with the washers? the rubber seal inside the cooler? Is the nipple too long?

Any help would be great
 
Would probably be fine if you had used a 1/2" ball valve (the normal size used) instead of the small one you picked up. At least that's what I installed in the 10 gallon RubberMaid cooler i converted a while back. Easy to get leak free and didn't wiggle around at all.
 
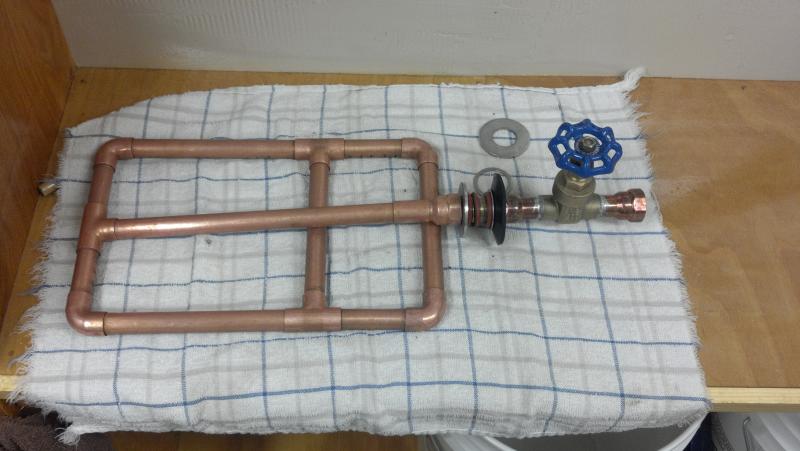
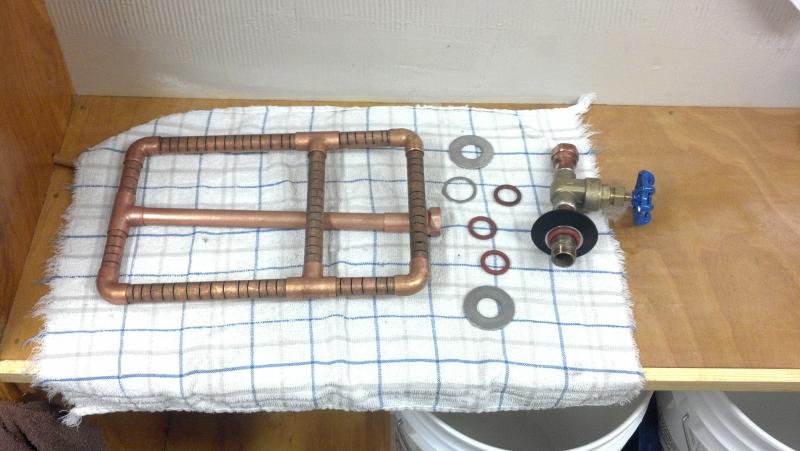
I have a Rubbermaid 10 gallon cooler and used two 1/2" copper couplers female FIPT and a close nipple with a 3/4" SS washer and two nylon o-rings on the inside on the outside is a nylon o-ring a small SS Washer and a rubber washer.
The outside is soldered and the inside is not.
The pic has some extra SS washers I have in case I need to tighten things.

2012-02-24_15-26-13_700.jpg


2012-02-24_15-25-32_637.jpg
 
The washers that I have seen in pics posted were the really thick ones, about 1/8" thick. I have seen some posts where they have had to use 4 or 5 of them to get things tightened up.

I looked at all the information and realized that I would have to search for all the right parts. I also added up all the prices, and when you have to but 2 or 4 parts in a package to get the one that you need I found the price was only a few dollars less than the kit offered by Northern Brewer, so I got that one. I added the braid from a water heater supply line. It went together very easily and works like a champ.
 
When I followed the directions on the post here on how to make a cooler mash tun, I couldn't get mine to stop leaking either. My solution was that I bought a rubber grommet from Lowe's and installed that in the hole in my 10 gallon cooler. Once that was in, I worked the plumbing through the grommet and I have ZERO leaks or drips now!
 
I had the same issue as you and had to use one or two more washers than the directions called for. After that it fit snug and didn't leak.
 
When I followed the directions on the post here on how to make a cooler mash tun, I couldn't get mine to stop leaking either. My solution was that I bought a rubber grommet from Lowe's and installed that in the hole in my 10 gallon cooler. Once that was in, I worked the plumbing through the grommet and I have ZERO leaks or drips now!

What size was the rubber grommet?
 
I used a home depot cooler, it does not leak a single drop. Oddly enough I ended up using a shark bite quick connect (because it wasn't much more and would make cleaning my ball valve easier, and easier to take off), bulkhead threaded, There was a rubber grommet on the spigot that was in the cooler, the 1/2 copper I used was slightly bigger than the hole in the rubber grommet, and I simply forced it in, made sure it was flush against the cooler wall and tightened.

The inside seal is all you have to worry about of course, the nice thing about using the spigot grommet is it had a lip that goes inside the hole and a lip that goes around outside. So the pipe was pushing the rubber on the inside lip against the edges of the hole, and the screwed on fitting on the inside was pushing the rubber against the wall. Very similar to the spigot that was in there. It has worked absolutely beautifully, and I figured it would give a better seal than just some rubber washers.
 
Every cooler mash tun seems to be different. I bought the small baby-bottle nipples and cut the widest part from the portruding nipple, used that bottom, widest part as the inner seal with a SS washer behind it and then the locknut. I also put pvc coupler between the two cooler walls so there was a rigid seal not the flex of the cooler walls. I ran the 1/2" SS nipple through the PVC coupler, a 3/4" coupler I believe. Just had to carve out the middle of the coupler to be same diameter as the rest.
 
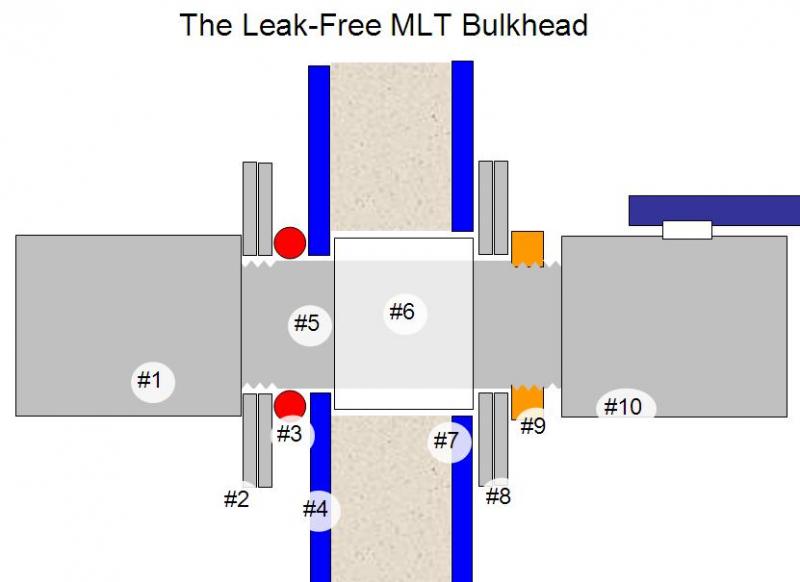
I read and reread the original post here and I don't see where he has a nut and washer on the inside of the cooler. Here is a drawing and instructions for how I did one, and it tightened up well.
>
1. 1/2" coupling, 1/2" NPT hose barb (for stainless braid designs), or 1/2" male adapter if using manifold.

2. 3/4" SS washers (meant for use with 3/4" bolts so the ID is close to the 1/2" NPT OD. Use enough washers so that the Oring's inside diameter sits on NON THREADED portion of nipple. The washer touching the oring should be slid all the way down to where the threads end and it should stop there.

3. Silicone ORING AS568A Dash Number 314 3/4" ID.

4. Inside wall of the cooler drilled to 7/8" hole.

5. Stainless pipe nipple 1/2" NPT (.84" OD actual)

6. short piece of schedule 40 3/4" PVC pipe, just long enough to reach from the inside wall to the outside wall of the cooler. Slit lengthwise with a hacksaw to stretch over 1/2" nipple.

7. Outside wall of cooler (and insulation) drilled out to 1-1/8" so PVC will fit inside.

8. 3/4" washers (meant for use with 3/4" bolts so the ID is close to the 1/2" NPT OD. Use as many washers as necessary to make up for a slightly "too long" nipple. You may have to dremel out the ID to fit over the unthreaded portion of the nipple or use a slightly larger washer. These don't have to be stainless.

9. 1/2" NPT brass Locknut. Can also get away with an electrical conduit nut for very cheap.

10. 1/2" NPT ball valve.


So why is this a superior design? First, having the inside (and only) Oring sitting on the nipple flat doesn't require any huge buildup of teflon tape to keep liquid from getting past the Oring through the threads. Second, the PVC reinforcement holds the inside wall from caving in and ruining the seal. Third, No Orings used on the outside. Any design that suggests trapping liquid inside the wall of the cooler is flawed. Do you want wort soaking into the insulation if the inner seal fails? If you ever smelled a 2 day old mash, you know the answer.
Remember, you need to use something for a nut on the inside of the cooler, and if you are using a pipe nipple, you will have tapered threads because thats what NPT is. That is why you have to use several washers, to take up the space that is left because the valve tightens up on the nipple tapered threads too soon. One solution is that you can go to a really good hardware store and buy brass nuts or preferrably stainless nuts that are NST threads which will go farther on the nipple. Make sure they are not mild steel as they might give off some strange flavors. You using smaller pipe and valves might cause some problems obtaining all the right stuff butif you are persistant you will work it out. Remember the Assyerians made beer a log time ago with out everything being "perfect". good luck

bulkhead.jpg
 
Back
Top