Side By Side Build Keezer/Fermentation

Homebrew Talk - Beer, Wine, Mead, & Cider Brewing Discussion Forum

Help Support Homebrew Talk - Beer, Wine, Mead, & Cider Brewing Discussion Forum:

This site may earn a commission from merchant affiliate links, including eBay, Amazon, and others.
I am progressing along nicely thanks to all of drkwoods hard work. One more question and I think I will have it. How did you verify there are no coils located where you drilled for your keg shelving. The cold coils are in the freezer and I believe the return is underneath but am not 100% sure and don't want to screw up when I am this close to drilling for my taps.
 
DrPhilGood said:
Can you fit a full sanke on the ferm side?

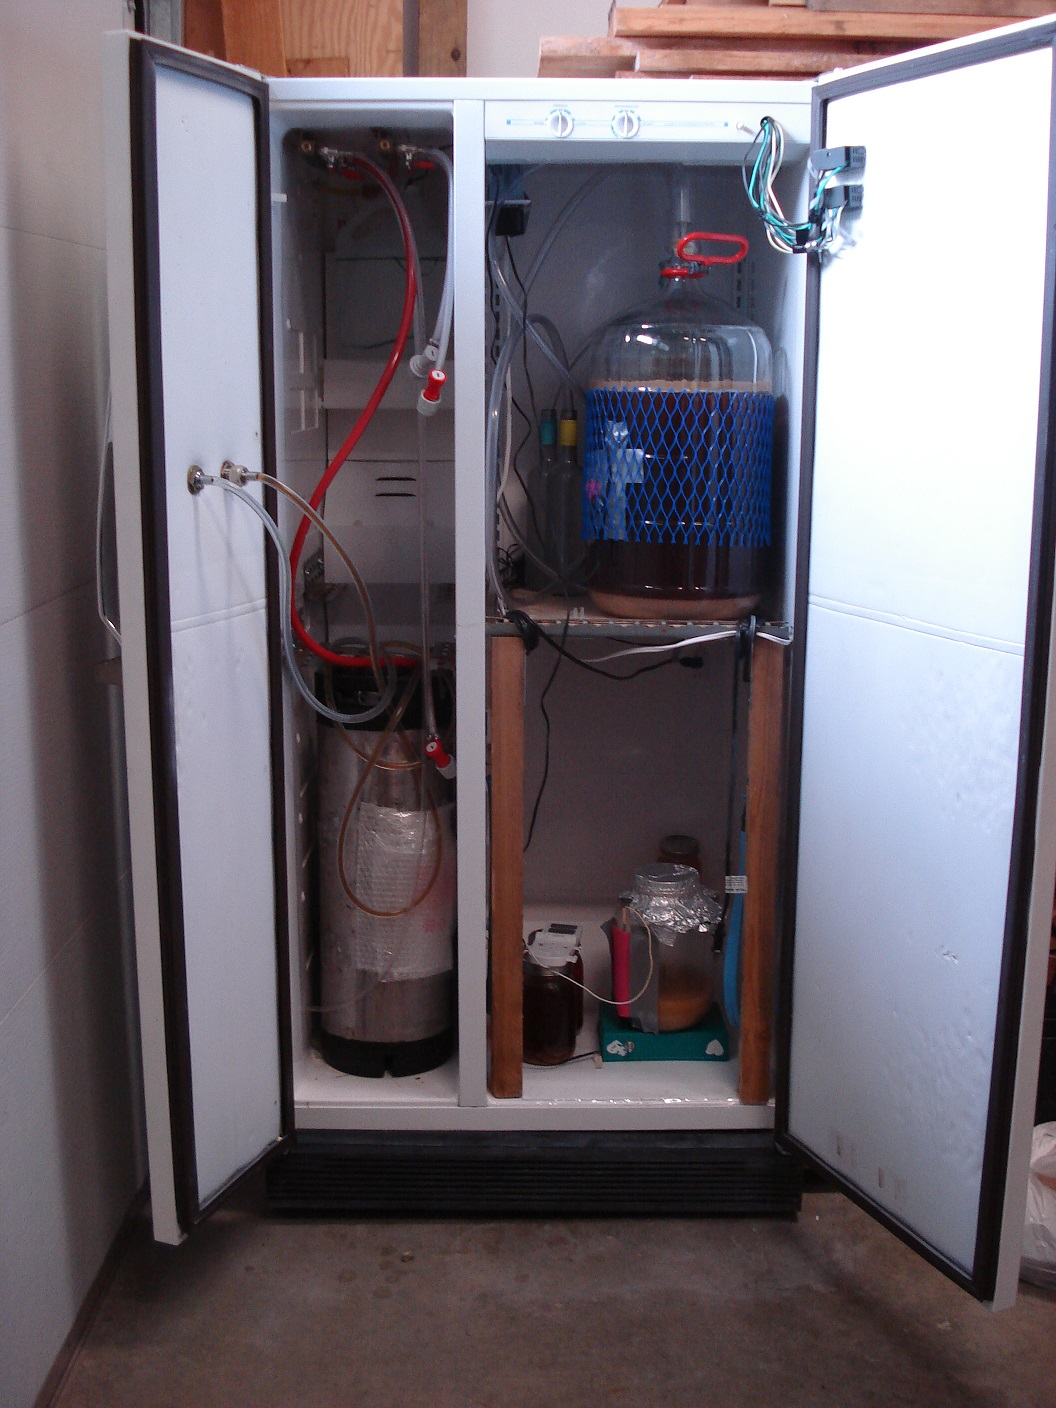
Yup. You need 16" X 24" minimums and it just fits in mine. Here is my ferm side with 4 cornies a 5 gal fermenter and a 1500ml starter.

Might wanna beef up the shelf significantly for a sanke though.

image-3410722827.jpg
 
kirkenka said:
I am progressing along nicely thanks to all of drkwoods hard work. One more question and I think I will have it. How did you verify there are no coils located where you drilled for your keg shelving. The cold coils are in the freezer and I believe the return is underneath but am not 100% sure and don't want to screw up when I am this close to drilling for my taps.

You are correct that the evaporator coil is in the freezer an the condenser outside and underneath. The only worries in the walls are the wires to the mullion and stile heaters and interior light switch wiring. back wall is anyone's guess? LOL although I did have to drill through it, I started with a tiny drill and just penetrated the metal and then slowly went bigger till I was sure nothing was in the way. Being careful each time to only drill the metal and not penetrate if possible more than an mm each time.

For Keg Shelving:
I used the existing shelving brackets and added brackets on the sides using very short sheet metal screws and trying to stay near where previous brackets pegs were assuming they wouldn't put those pegs near anything risky. I also assumed the sides and middle have no coils. I can tell you there are wires running thru the sides of the fridge. I drilled into one and popped the breakers. After that fix I grabbed my voltage detector and used it like a stud finder and found out where I cannot drill. After that I used the method above each time I had to drill.
GO SLOW. BE CAREFUL. YOU'LL BE FINE
 
I have at least roughed in my install and see some initial issues and would appreciate any suggestions.

My initial plans didn't call for a heater since my unit will be in the unfinished part of my basement, I don't have to worry about extreme temperatures. One of the relays turns on the compressor circuit and the other turns on a fan to draw air from the freezer (keg) side to the refrigerator side (fermentation).

A couple of early observations as I only finished wiring tonight.

1. I am surprised how quickly the temperature rises in the Freezer side and requires the compressor to turn on again. I currently have the setpoint at 44 with a 5 degree deadband. I am starting to think the temperature probe in a liquid is a must to eliminate this, or will actually having kegs in the freezer eventually help this. Drkwoods - Is your liquid container the red container mounted on the door? You said you got them a Lowe's but I didn't see them? Did you use a thermowell?

2. My Fermentation side temperature looks like it is equalizing toward the freezer setpoint. Very little data at this point but it is trending that way. I pluged the whol at the bottom so my only opening between the freezer is at the top where the damper once was and the fan is no located.

I am thinking about buying a small ceramic heater and using it and disabling the cooling fan for now. Long term I may need another controller to use for the freezer and utilize the dual output for the fermentation side with a heater and fan control.

Any thoughts?
 
kirkenka said:
I have at least roughed in my install and see some initial issues and would appreciate any suggestions.

My initial plans didn't call for a heater since my unit will be in the unfinished part of my basement, I don't have to worry about extreme temperatures. One of the relays turns on the compressor circuit and the other turns on a fan to draw air from the freezer (keg) side to the refrigerator side (fermentation).

A couple of early observations as I only finished wiring tonight.

1. I am surprised how quickly the temperature rises in the Freezer side and requires the compressor to turn on again. I currently have the setpoint at 44 with a 5 degree deadband. I am starting to think the temperature probe in a liquid is a must to eliminate this, or will actually having kegs in the freezer eventually help this. Drkwoods - Is your liquid container the red container mounted on the door? You said you got them a Lowe's but I didn't see them? Did you use a thermowell?

2. My Fermentation side temperature looks like it is equalizing toward the freezer setpoint. Very little data at this point but it is trending that way. I pluged the whol at the bottom so my only opening between the freezer is at the top where the damper once was and the fan is no located.

I am thinking about buying a small ceramic heater and using it and disabling the cooling fan for now. Long term I may need another controller to use for the freezer and utilize the dual output for the fermentation side with a heater and fan control.

Any thoughts?
1. Yes full kegs in there will buffer the heat swings because of thermal mass. The door things I used are called "Viewtainers"
www.viewtainer.com/. Any big box place has them on the fastener aisle. I put cheap 100 proof brandy in mine to avoid freezing solid. When I ferment I've been duct taping the probe to the outside middle of the fermenter.

2. I'm not sure how your system is responding,, but it'll be sorta inconsistent when empty / Obviously with beer in there it'll respond slower and have less swings. I think the ceramic heater is a good idea because it just ensures the ability to temperature correct in both directions. Im sure your doing this so you can walk away and have confidence that your hitting your temps and getting consistent ferments. Add the heater it's so worth it! Get a dual stage control like a LOVE for the fermentation side and then dedicate the single stage controller to the freezer. My temps are so solid it's amazing. I can keep a fermentation dead on 66f and let it rise the next week a degree of two. Its a joy to have that kind of control and your beer will make great strides in quality. By the way my bottom return is wide open and my fermentation side is at 66f right now. The freezer side is right on 34f and the fan and compressor are cycling on/off about once every 3-4 minutes. So I'm happy with that. I run a -1.5 differential temp. I think it was yurirage? Who helped me
 
Thank you so much for the help. One more question. Did you put the sensor directly in the brandy or use a thermal well
 
kirkenka said:
Thank you so much for the help. One more question. Did you put the sensor directly in the brandy or use a thermal well

Directly in the brandy. It's a stainless steel tip so I figured it would be ok
 
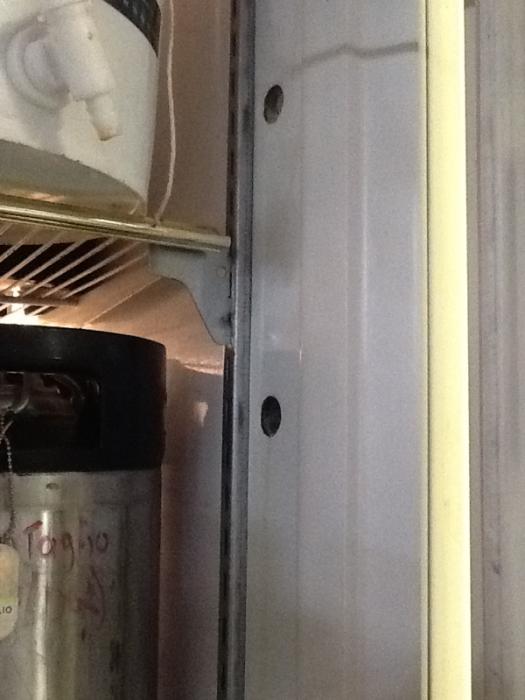
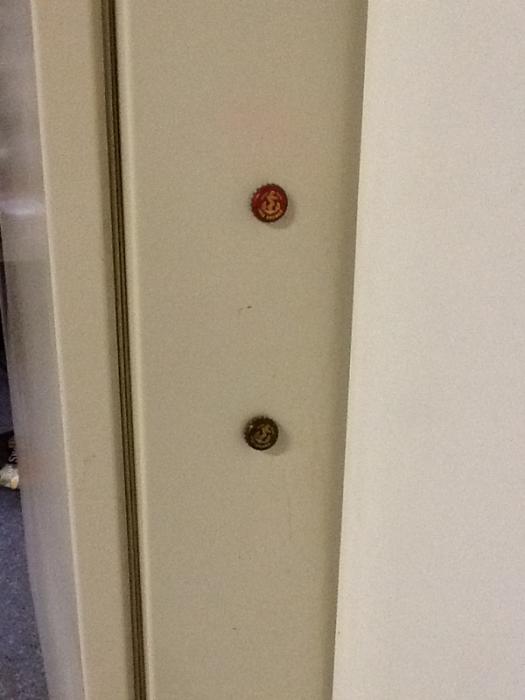
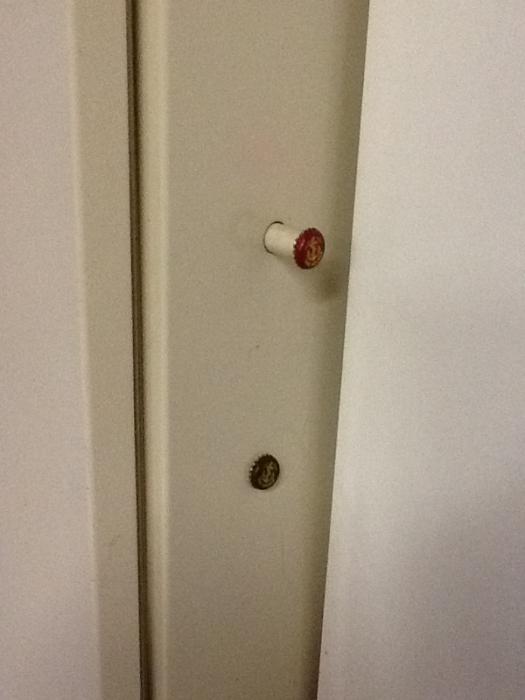
I thought I'd show the drilled holes near the front sides and close up of my beefed up shelving. This shelf can easily hold 150 pounds now without severe warping and remains adjustable with the two back wall brackets and these two up front on the sides. The drilled holes are for CO2 & beer lines to run outside the fridge to either a jockey box or my bottle filler. I've drilled access ports to the outside on the freezer side too. The holes are plugged up with 1/2" PVC pipe stuffed with insulation and topped with an Anchor brewing Cap. When installed they just looks like cap magnets on the fridge.

image-2706820260.jpg


image-3800182065.jpg


image-3444205882.jpg
 
Quick question, when you removed the shelving on the door did the gasket come off as well. If so how did you adhere it to the door when you put the sheets of stainless steel on the door?
 
Oh yea simple. The gasket fits around the plastic door shelving. It pops
Out from inside that gasket and I simply replaced it with a sheet of galvanized metal. Fit it into and under the gasket and tighten the screws
 
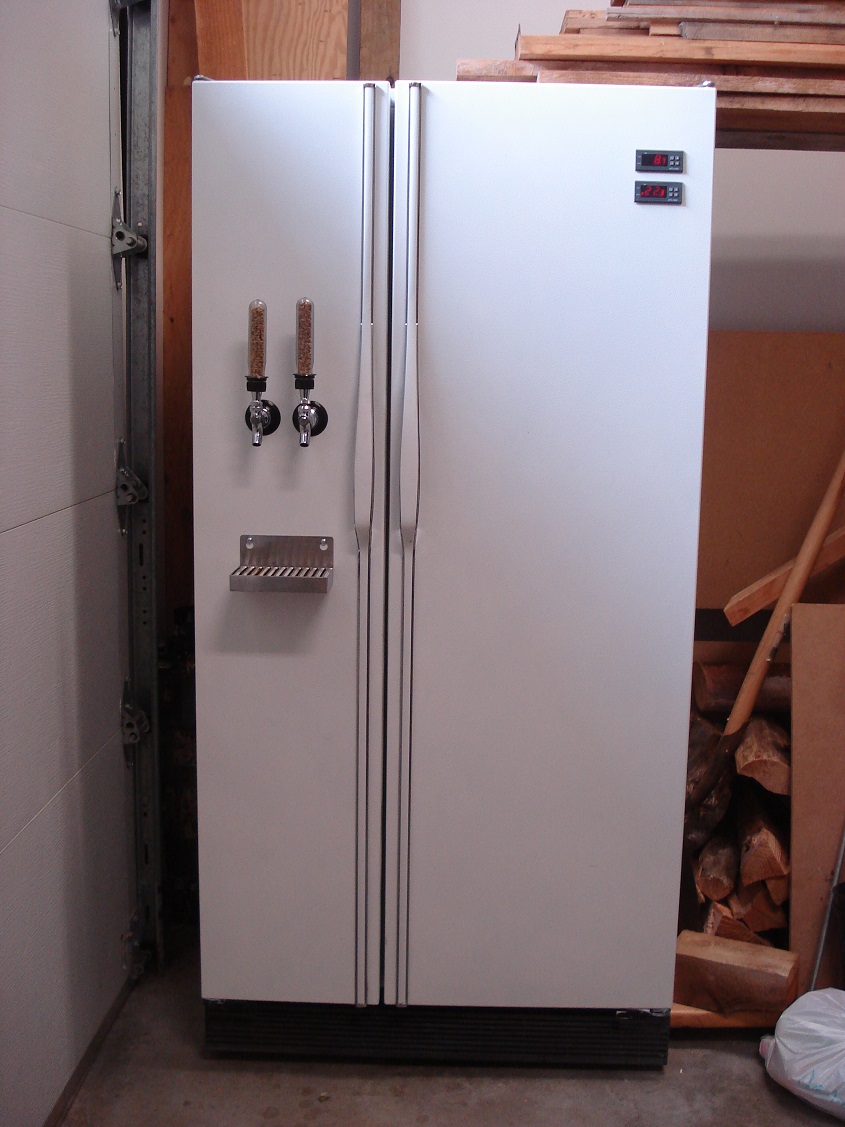
This thread is awesome. I used your info to build one of my own. My only personal touch was an always-on outlet for my stir plate. Thanks!.

003B.jpg


004B.jpg
 
Thank you for the inspiration. I've recently acquired a side by side with a slightly different intention in mind. Primary fermenting on the fridge side, lagerator on the left. Solves the whole problem of "dedicating the ferm chamber to a lager" for so long. I figure as long as the lager side is cooler than the fermenting side it should work perfectly.

I might try and use some sort of automatic baffle design. Something simple like the one for a laundry vent. Flaps open from airflow, gravity drops 'em when the fan stops.
 
So my build is so close to being finished I can taste it. Got all the cleaning of previous owner done, shelving mounted and set in place, all the wires routed. Just need the control panel parts to arrive and be wired in.

chamber01-65196.jpg


On the left we have an empty keg for show on top, full on the bottom. It'll need some thermal mass on that side once it gets up and running, it will also let me pre-chill a keg before dropping it into the keezer. If I put a different medium in for the shelf I can fit 2 kegs on it and still close the door. Shelf bracket rating: 375 lb.

On the right we've got 2x 5 gal carboys with blow off tube. And a spoon. The tube on that one wanted to kink for some reason, and I grabbed the first thing I saw that I could use to prop it up. On the bottom is a 13 gal barrel fermenter. Currently doesn't seal up tight, I'm not concerned using it as a primary. By moving the gasket I can get it air tight but don't have a grommet for an airlock at this point. Also have plenty of room on that shelf for another barrel instead of carboys. Shelf bracket rating: 250 lb.

I may let paranoia get the better of me and toss up a couple brackets opposite the current ones on the right side just to be extra safe. Even though they're at less than half the rated capacity, and that said rated capacity likely exceeds the breaking point by a good margin as well. Yes there's a bit of a tilt to the liquid in the photo, but a level on the top of the fridge indicates similar. The bundled towel (to cushion the carboys from screw heads) is also a little thicker on one side in the photo. After hoisting them into place I gave the bracket a good leaning on just to make sure it had plenty of strength left.

Very happy with the results so far. Even though it is currently functionally useless as the temp controllers haven't arrived yet. At least I've got everything ready for when they do arrive and it should become a pain free wiring job. Thanks to those who posted before me, without your inspiration I'm not sure I could have made this happen.
 

Latest posts

Back
Top