trekbiker1500
Member
forgive my ignorance, but does that cool software you're running come with the BCS?

forgive my ignorance, but does that cool software you're running come with the BCS?
If you know your way around a computer and HTML/Javascript, you can download my files and do a custom version of your own.
Info on the interface and links to the files are in my signature.
") . I am not skilled but I can learn...
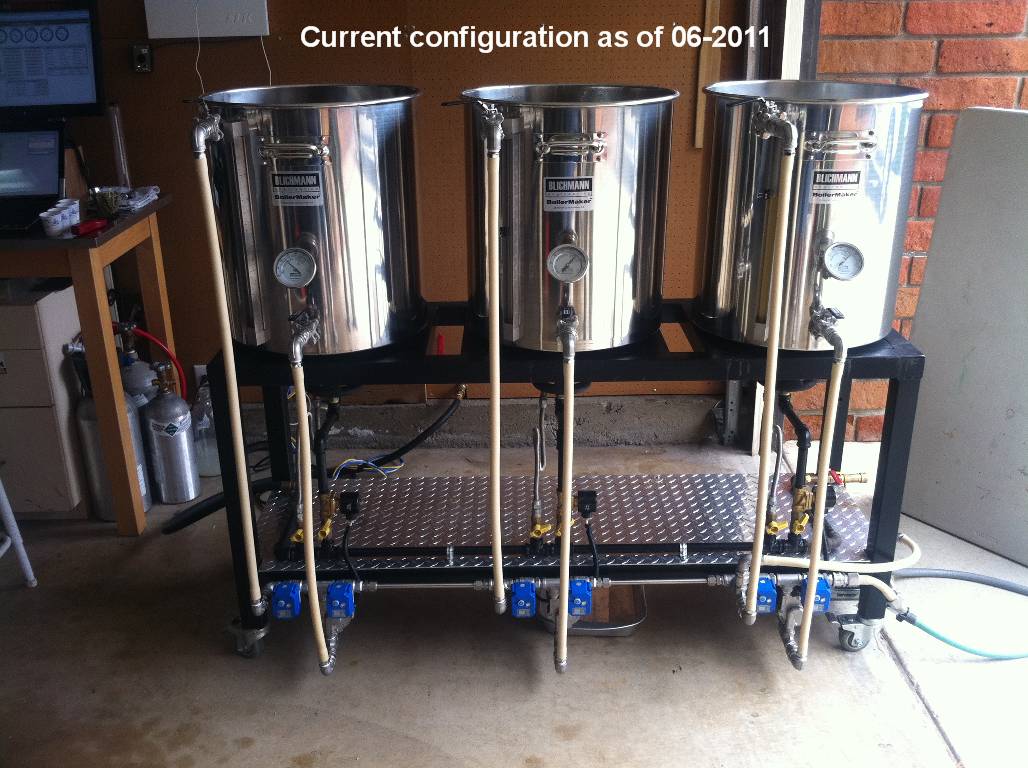
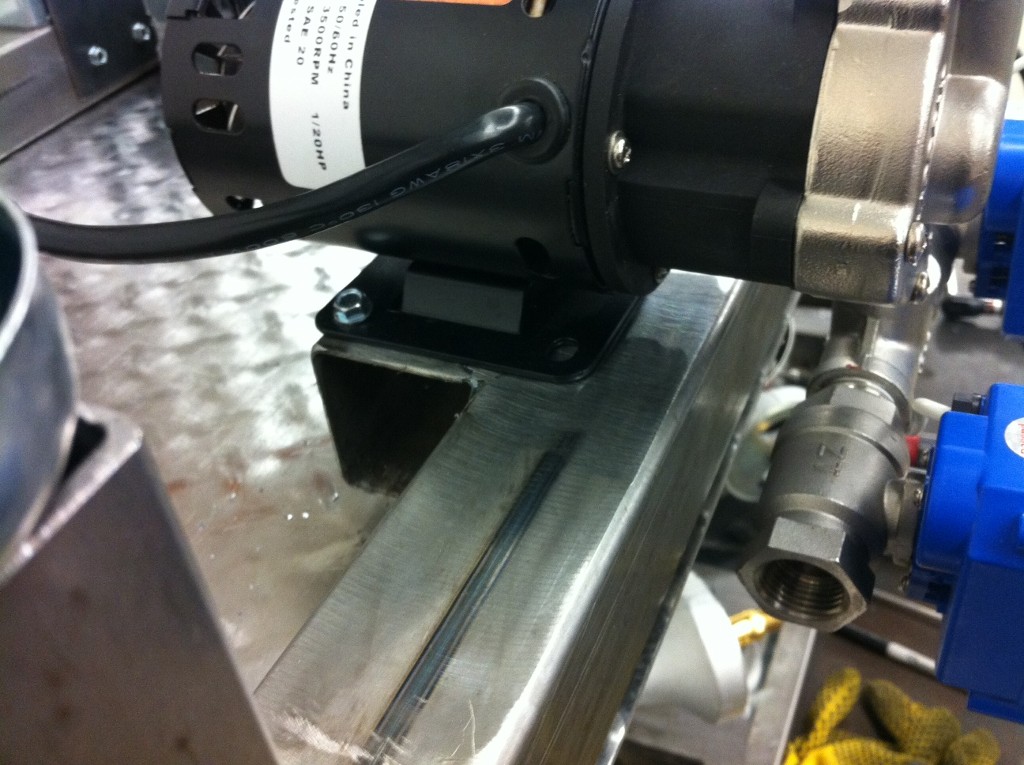
. I am not skilled but I can learn...Here's my new single tier Brutus style build. I've used the BCS-462 controller for the pumps/valves/temp probes. The BCS is mounted to the garage wall and is also used to control the temp for my serving fridges (2 kegerators) and my fermentor fridge (3rd kegerator). There are 3 CAT-5 data jacks on the back of the rig that are plugged into the BCS on the wall. One CAT-5 for the temp probes, one for the gas valves and pumps, and one for the liquid SS ball valves. Check out the next post for a liquid flow diagram.
Burners are natural gas. I ran a dedicated 3/4" gas line in my garage and have a 1/2" ID gas line with QD that the stand attaches to.
The finish on the stand is a high temp powder coating. I was running it for a while with no finish, but it starts to rust pretty quick. I've only fired it up once now that the coating is on it, but it seems like it should last pretty good. The powder coat is rated for 1200 degrees.
Yeah, I know, 3 pumps seems like overkill, but with pumps now available for $100, it really just simplified the setup when using the electronic ball valves. It also lets me setup for doing back-to-back brew sessions where I can be mashing brew #2 while I'm still finishing up brew #1 in the BK. I like to do continuous recirculation on both the HLT & MLT, so this handles that nicely as well.
Updates done since original posting:
- changed to SS QD's (Morebeer ones w/ Brewers Hardware full flow barbs).
- Swapped out pump heads for Chugger SS versions.
- Moved gas control valves from rear to front for easier access.
- Added tippy dump. This helps greatly on double brew days for fast swap to batch #2.
Current Configuration
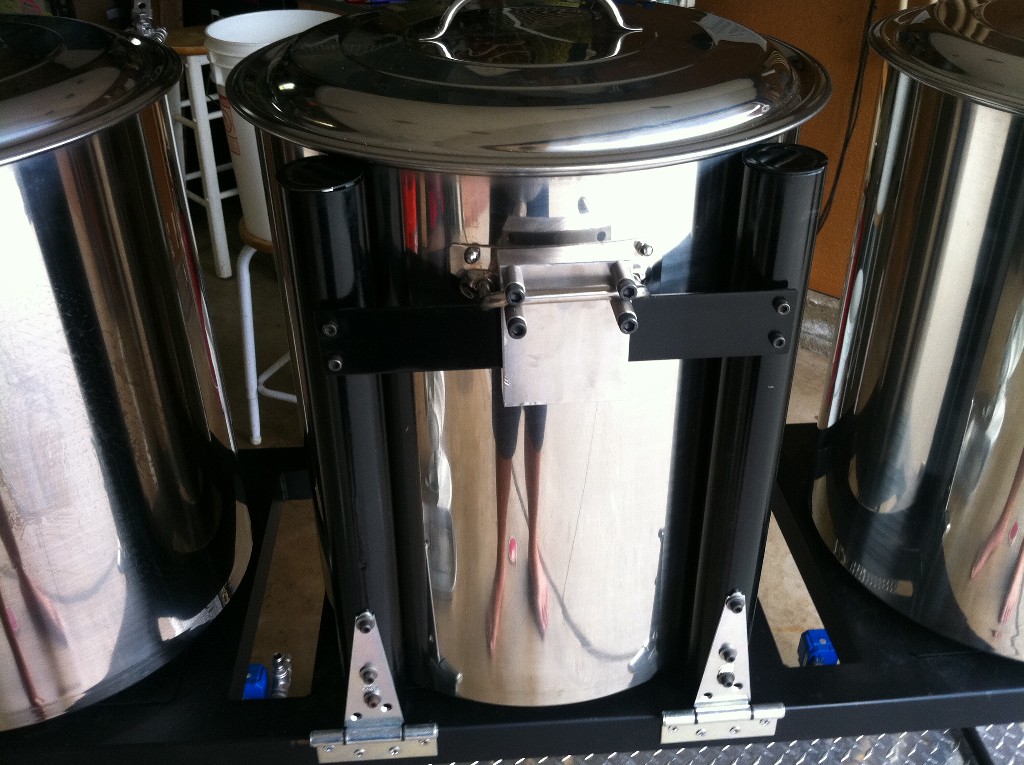
Tippy Dump view (See separate thread on Tippy dump here: https://www.homebrewtalk.com/f51/tippy-dump-blichmann-mash-tun-266852/ )
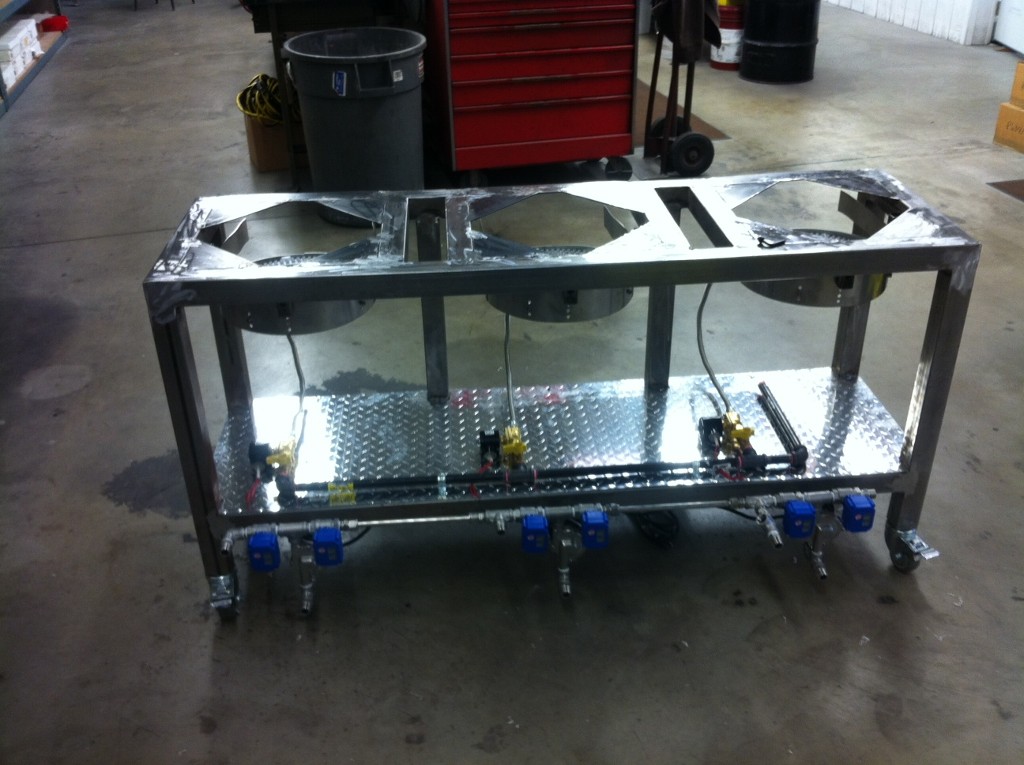
Front view - no kettles
View attachment 17786
Front view - with kettles
View attachment 17787
Therminator/Chiller view
View attachment 17788
Pump/Valve view
View attachment 17789
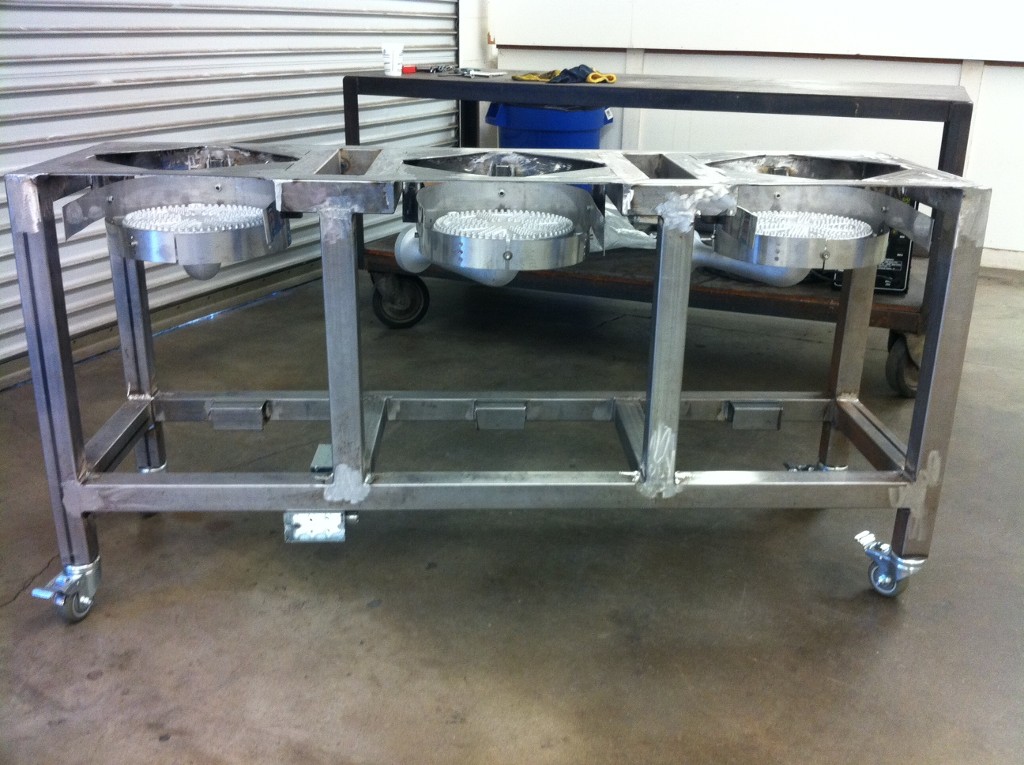
Burner View
View attachment 17790
How high is the underside of the tubing that holds up the bottom shelf above the floor ? (Ie, how much ground clearance does it have ?) Would you change that +/- if you did it over ?
Thanks
I was shooting for 8" total clearance under the tubing which is a combination of th 4" leg and just over 4" from the wheels. I ended up with 8.25" of clearance. I'd do it just the same again.
It leaves about 1.5-2" under the QD.How much room does that leave under your pumps ?
Here is a question to anybody using an electric bbq igniter.
I am using the 3 probe igniter on my rig that I am building. It is controlled via Arduino -> Shift register -> Relay -> Igniter. The problem is that when the igniter is sparking, the power surge that it creates makes the shift registers go all wonky and lose their output status. Anybody have any thoughts/suggestions/input of any kind?
Some of the BrewTroller guys went through this, not sure what the resolution ever was if there was one.

What module are you using for the hsi? I am using the honeywell s8910u modules and time from call for heat to heat is about a minute. If you what you are using is faster I would love to hear more details.
I'm not using any gas module. I have solenoid valves that control the gas flow and the igniters wired directly to an SSR. The BCS controls firing the igniters and the burner. There's a setting in the BCS where you tell it how long to fire the igniter before opening your valve and how long to continue firing it after opening the valve. For attended brewing, this works just fine. If you want to do unattended operations, then you should stay with the honeywell valves that have the flame dectectors and safety shutoffs.
Jon,
Just got through reading this whole thread, nice stand! I am preparing my brew stand build and will be using this as inspiration.
If you had to start all over, are there any changes, minor or major, that you would make? Dimensions, spacing, etc?
Thanks for sharing that.I absolutely love the 3 pump setup though. I quite often do double batch brew days and having the first batch in the BK and starting the second in the MLT is a great time saver.
You're welcome to come for a brew day some time.I'll have to make my way down to Huntington Beach some time to drop off a few beers as I'm sure I'll have a few questions myself once I dive into this build.
JonW said:If you read it all, then you saw that I have made some changes along the way from what my original build was.
- Moved gas rail from rear to front
- Changed from March heads to Chugger SS heads
- Changed from McMaster brass QD's to B3 stainless QD's
- Changed spark igniters to hot surface igniters
- Added tippy dump
I've toyed with the idea of changing my burners from the wok style jet burners to the Bayou Classic BG14 style burners. Mostly just because of how loud the jet burners are. However, after building another stand with the BG14 burners, they were a pain to get dialed in for proper air & gas flows and I think the top gussetts that I have on the rig would hinder air (combustion) flow from escaping under the kettles. With the velocity of the air and flames of the jet burners, it hasn't been an issue though.
I absolutely love the 3 pump setup though. I quite often do double batch brew days and having the first batch in the BK and starting the second in the MLT is a great time saver.
I did see all of those modifications, my question was more in regards to the stand itself, the frame. Are you completely happy with the configuration of the stands frame, other than Stainless of course.
I'm not using any gas module. I have solenoid valves that control the gas flow and the igniters wired directly to an SSR. The BCS controls firing the igniters and the burner. There's a setting in the BCS where you tell it how long to fire the igniter before opening your valve and how long to continue firing it after opening the valve. For attended brewing, this works just fine. If you want to do unattended operations, then you should stay with the honeywell valves that have the flame dectectors and safety shutoffs.
Can you provide part numbers for the glowflies and the solinoids pleeeeese?
This all depends on the style of burners you have. You just need to place them next to some jets/tips.I received my igniters and I noticed there is no reference to where the ideal place is to place them by burner. What was the distance you placed yours from the burner and is it supposed to be sticking into the flame or next to the flame of the burner.
Thank you. The steel was 3/32". Not sure what that comes out to as a gauge equivalent.Nice brew stand, and thanks for the break down of all the steel. Is that 16 gauge tubing?
It's pretty standard stuff. 1/2" SS pipe with Swagelok compression fittings. I picked the pieces up on Ebay.
Looks like SS tubing vs pipe, is that accurate?
Yes, it is 1/2" SS tubing w/ Swagelok compression fittings.
Pics are loading now... had a server issue this morning.A lot of the pictures aren't loading right now, so not sure if this was in the drawing, but what length SS tubes did you end up using? I ask because brewhardware.com has 8" SS nipples, not sure if that could work to simplify things the plumbing. I figure if it doesn't add enough length, I could compensate with longer nipples between the valves and the pumps.
Jon, I'm very inspired by your build. In fact, I'm attempting to create a similar version... Was there any logic behind using the inline pump versus the center version? From what i've read, the center pump has less issues with priming...?
Hey JonW I just picked up the steel tubing, I had the guy's there cut it, so my/your stand is taking shape. Your casters are hard core, where did you get them?
I really couldn't tell you. If I'm doing a bigger beer with 30# of grain, that is probably around 60# wet (or more). How heavy is your mash tun when it's full?Do you think the steel tubing tippy setup would work with a 1bbl system?
JonW, I have been thinking about your setup and building one like it. I will probably have many questions throughout the project that I will post. Is there any reason to use two valves per pump instead of a three way valve per pump? Thanks for the help.
D.L.

It's alive!!!! Casters are on the way and I have some grinding and painting. If you didn't share the cut list, I would still be putting this off. Thanks again man!!

Enter your email address to join:
