Soldering Stainless steel

Homebrew Talk - Beer, Wine, Mead, & Cider Brewing Discussion Forum

Help Support Homebrew Talk - Beer, Wine, Mead, & Cider Brewing Discussion Forum:

This site may earn a commission from merchant affiliate links, including eBay, Amazon, and others.
I was inspired by the posts in this thread about pulling a tapered fitting through a small hole to make a lipped hole for increased solder surface area to try something slightly different (see page 8 or so). Instead of having the sides of the lip parallel and at right angles to the wall of the keg, I wanted to make the lip tapered at the same angle as a tapered pipe thread. Then I wanted to thread it inside so I could screw in a nipple or reducing fitting, then solder it. My reasoning was the added mechanical strength from threading would improve the overall strength of the joint.

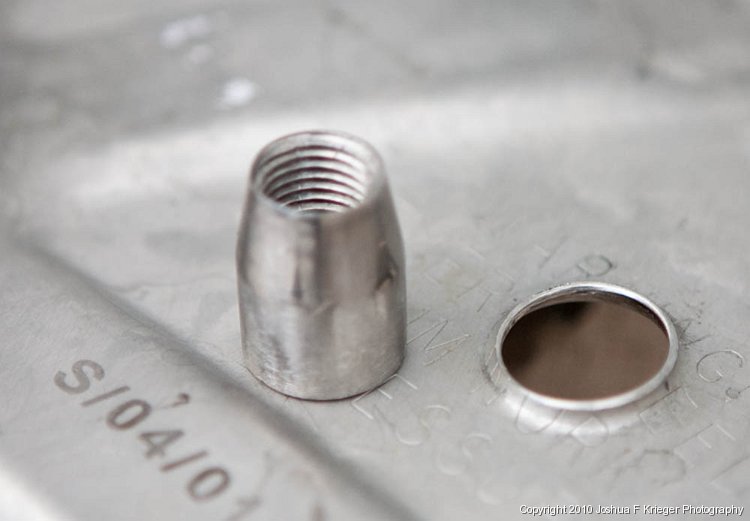
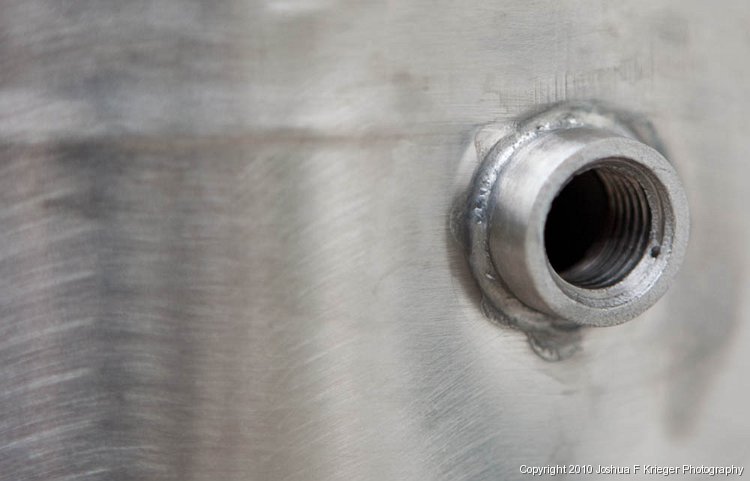
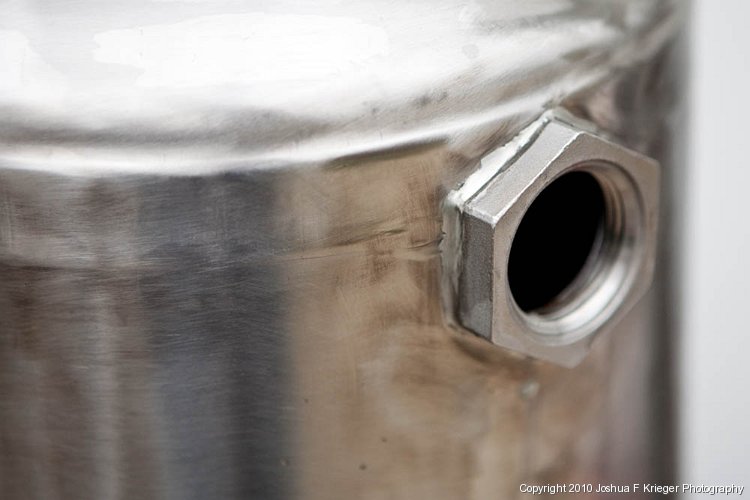
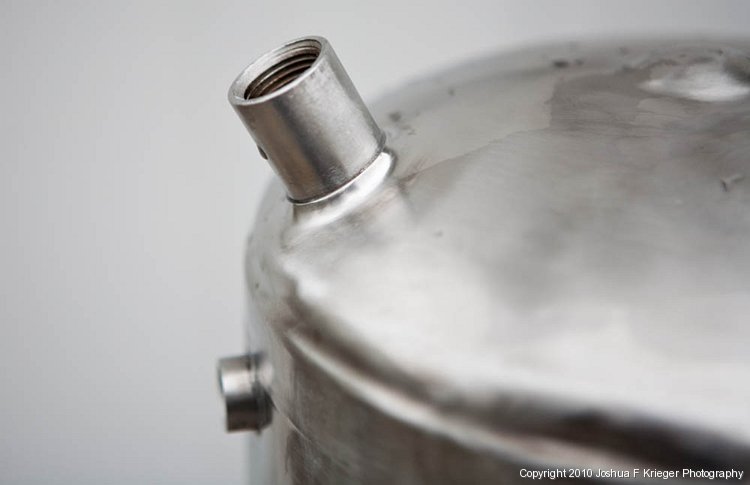
So I chucked a 3/8" nipple in my friend's lathe, and with his help we cut the threads off leaving the taper, then turned a little more taper on the first 1/8" of the "tool". I drilled a 1/2" hole in an old keg head left from keggle making and pulled the tapered tool through the hole about 3/4 of the way down its tapered section. I got a nice 1/16th inch lip that I was able to thread easily and just as easily screw the other end of the nipple into. It works great. I got about 2 full threads cut in the lip. Next will be to solder it to seal it up.

I did have to fiddle around to find the right size backup die to fit onto the back of the hole; too large a diameter and the lip didn't form, I just got a big dimple in the keg top. Too small a diameter and the tapered tool jammed before forming the lip.

I'm going to use this technique for all my small keggle holes for thermocouples and sight glasses. Either fitting nipples or 3/8" to 1/4" reducing fittings. I'll let you know how it works out, but right now I expect it will be great.
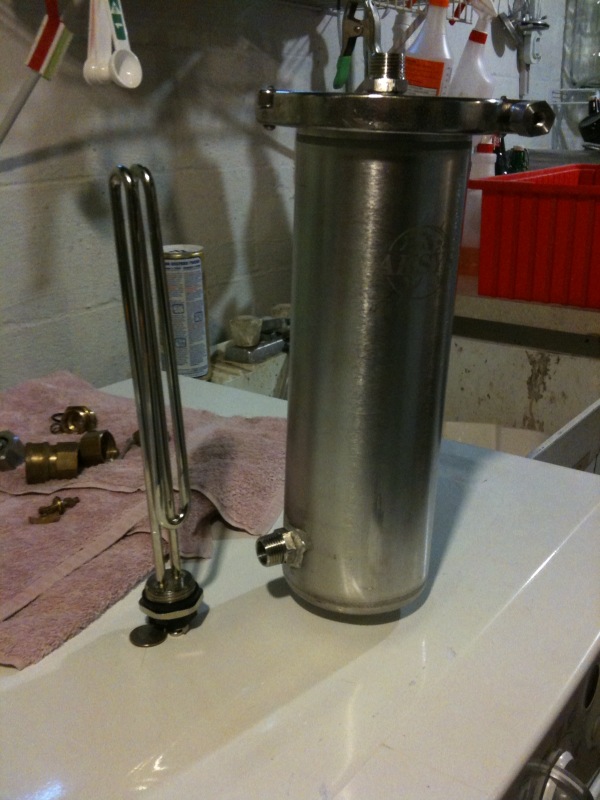
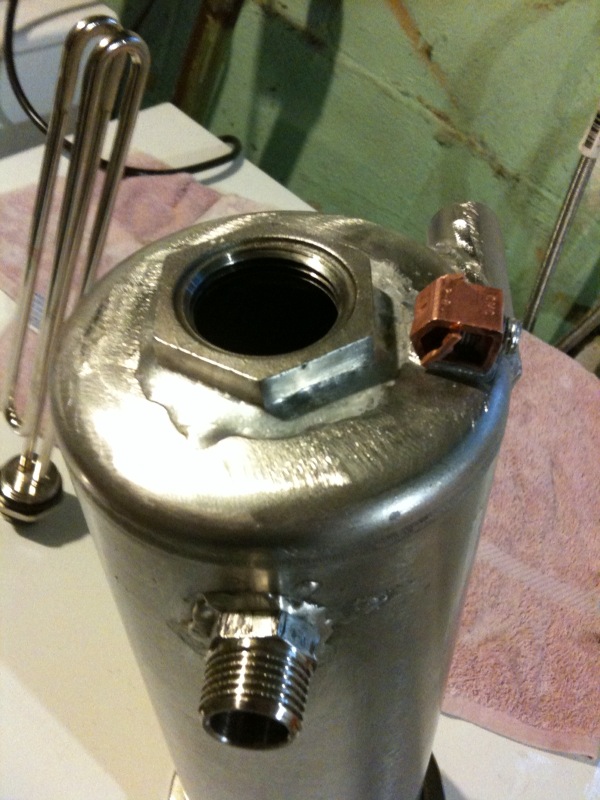
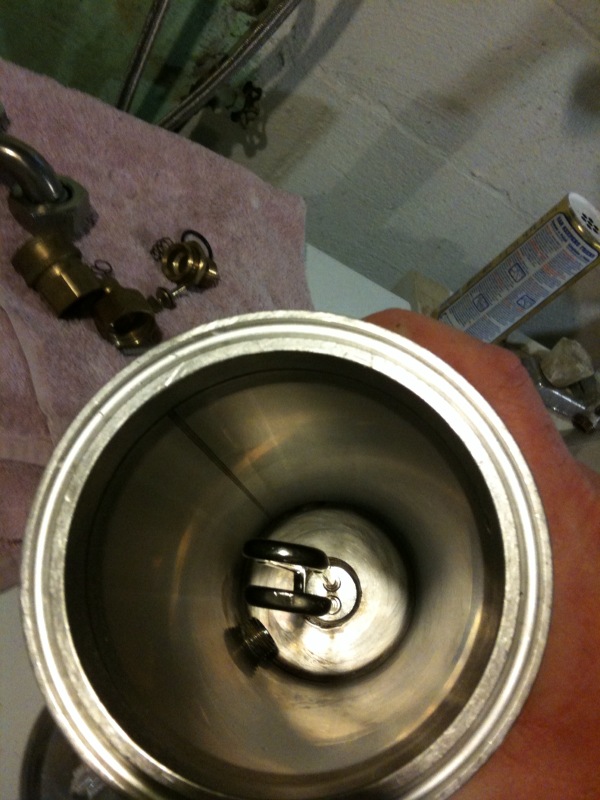
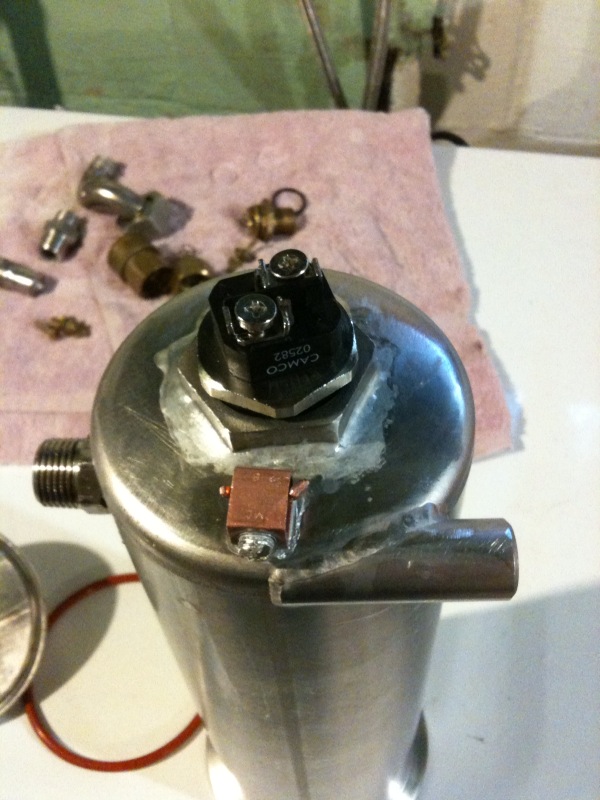
 
Ok this is starting to get even more interesting. :) Can you post some pictures of your setup? That sounds like a pretty ideal combination.
 
Here is the soldered joints on my RIMs vessel. It's all 316 SS, two 1/2" MNPT nipples, 1" nut and 3/8" FNPT fitting (was welded on when I got it). The top is 4" tri-clover. I'll put a drain in the 3/8" fitting to drain system at end of brewday.

4446848010_d4accf6ffc_o.jpg

4445836275_19c3866e77_o.jpg

4445836375_bd2d54cc97_o.jpg

4445836333_fc193c55c1_o.jpg
 
MacB,

I will as soon as I take some, load onto the computer, and figure out how to upload to this site. I broke down and upgraded my membership today so I can start posting some photos.
 
Here is mine with the jam nut on it and nipples threaded into each side. I tried to show how its threaded from each end.
Neat. That fitting is truly taper threaded from both sides. As Bobby_M stated it is a bulkhead fitting. I had searched for them before but the price is out of this world.

Can I ask? Where did you get that part and how much?

Thanks.
 
My father knows the owner of a medical equipment recycler; I gave him a list of stuff I was looking for and these were in the lot. I see my dad every few months (1 1/2 hr drive) and he is usually able to get a few things on my list. I have 10 bulkheads (nut and fitting) and Dad said they have about 50 more. I don't know what he paid, I tried to give him money but wouldn't take it. Its just whatever they have at the time. The stuff he gets is amazing quality all 316 SS machined inside and out. It's, well, medical grade. The RIMs heater I posted is an unused filter housing from a dialysis machine.
 
Pickles, can you give me an outline on how you soldered the 1" nut to your housing (hole size, any technique worth noting, etc.)?

Thanks
 
I drilled 1 1/2" with a holesaw. I tried a Harbor Freight step bit with lube and it took forever so I eventually got my BluMol holesaw kit out and drilled the hole in less than a minute. Sand and clean with alcohol first. I found it easier to tin the surface of the vessel first then set the clean, fluxed nut onto the freshly tinned surface and apply heat (propane in my case). I've found that the solder wants to bead on the SS so I applied heat and squirted with flux and the soldered flowed nicely. I tried to wipe it with a wet rag immediately after (like I would with copper) and knocked the nut right off. I found it takes much longer to cool and subsequently harden so be careful when trying to clean the fresh joint.
 
I ended up getting some fittings in my system this weekend.

A coupler turned down to act as the lead element in a keg tool for 1/4" NPT fittings, right next to a practice run through a keg lid.
0008.jpg


1/4" NPT half coupler silver soldered in place after using the keg tool.
0015.jpg


1" NPT nut silver soldered onto the BK. This was a pain in the ass to do the first time, but it worked out well in the end and is totally leak free.
0017.jpg


1/2" NPT coupler after keg tool and silver soldering in place.
0016.jpg


It was a long day of fabricating, but it ended well with both tanks cleaned and checked out as watertight. I could also do it again in half the time and twice as well now that I have practiced some.

Between the keg tool thread, and this thread on soldering, it made this possible.

Joshua
 
What type of vessel is the fitting soldered to in the bottom pic? Maybe some pics of the whole thing? I know what you mean about the 1" nut. Mine slid around on me alot.
 
I dont have a pic of the whole thing with me, but it is a cleaned up corny keg for a 2.5 gallon compact system.

The problem with the 1" nut was not sliding (thought it did that too) as much as it was getting the silver solder to bridge a 3/16" gap on the two sides. It turned out the best way to do it was to tack one side, let it solidify, and then do the other side. After that was done, I came back to the first side and re-fluxed and gently finished up. the silver solder was pretty forgiving, and if I was gentle on the heat, clean up was a breeze.
 
Looking good! I would only advise that if you're mounting an electric element, use NPS fittings, not NPT.
 
The 1" nut for the electric element is whatever they sent me from BargianFittings. I think it is NPT. All I know is that it works and seals well. The element threads in and out well.

What is the difference between NPT and NPS? If I was going to use a 1" half coupler to hold the element, what would be the best to get?
 
The locknuts I sell are NPS - National pipe straight thread. NPT is National Pipe Tapered.

The difference is NPS is a mechanical joint and NPT is a sealing joint for pressure.

The NPS will seal up fine for our applications and tape thread along with an o-ring will give a nice seal.

Soldering them to the kettle will give a very strong mechanical connection.
 
That is really good to know and thanks for the explanation. Also, thanks for all of the great fittings. They are working great and soldered in well.

Just so you are aware your website says NPT for the lock nut, which is why I assumed NPT.
 
I use 1" NPT couplers on mine and they threaded and sealed just peachy. Even though the element is NPS.

Looking good JF
 
The difference is one is tapered the other is straight. Heating elements have straight threads.
 
I tried out the element on a 1" NPT coupler and the element would not thread in properly.

Odd... I have two elements mounted with them and they run all day long with no leaks, regardless of the thread issue. It is just a standard 1" SS coupler.

When people build RIMS heaters, they are threading the heating elements into NPT reducers arent they? I know I did ;)
 
I used an NPT reducer for what amounted to a RIMS heater (used it for preheating water overnight, before I switched to NG with automaitc furnace valves). The element would not screw all the way in, didn't come close to having the gasket mate up. I just used several wraps of teflon tape to make sure it didn't leak. When I was getting the parts, I already knew the element had NPS threads, so I tried screwing it into several reducers, and there was a fair amount of variation between them, but it wouldn't thread all the way in on any of them.

Sorry for the mini-jack, just thought it might save somebody a headache to know up front.
 
After 3 days and trying various configurations with no luck, and always having a small leak. I purchased flux rated for stainless and soldered my 1" nut on the outside of the kettle and just like that it seals up perfectly. I wish I read this thread more carefully about a week ago. This honestly took me less than 5 mins.
 
For those interested in my effort to form a tapered lip on a hole, and thread it, please see the new thread (no pun intended) I started tonight in this section of the forum. It's title is "Forming threaded lipped holes in kettles. I attached some pictures too.
 
Has anyone found the Stay brite #8 and needed solder at a big box store?

Only thing I have left to get my electric Brutus 20 up and running is a ground point on my kettle, and I don't think any welding shops are open today.
 
Has anyone found the Stay brite #8 and needed solder at a big box store?

Only thing I have left to get my electric Brutus 20 up and running is a ground point on my kettle, and I don't think any welding shops are open today.

I haven't seen it at Lowes or Home Depot.

But I've seen it online at hobby stores that specialize in RC cars, boats, and airplanes. There's a chain of stores called HobbyTown USA that might have a small kit with Stay-Brite 8 and Stay Clean.

If any plumbing/HVAC stores around you are open today, they would be a good bet too.
 
Menards has liquid flux. Not the Stay Brite 8 solder though. I would use standard plumbing solder instead.
 
Not sure all I have with me is iPhone and the link doesn't support mobile. But basic lead-free plumbing solder will work just fine. The liquid flux menards carries is by Oatey and it's in a white bottle.
 
I tried this quickly today and it didn't go all that well. The flux (Harris stay-clean liquid) seemed to burn off quickly and leave me with a mess that the solder (Oatey safe flo silver solder) wanted nothing to do with. I was trying to solder a 1/2" SS coupler, close nipple, and washer together for a bulkhead.
I am assuming that I overheated it and that I need to heat everything up much more gently to avoid burning off the flux.
I practiced a bit on some 1/4" SS bolts, nuts, and washers and had much better luck, but I feel that that's not quite the same as soldering the much bigger parts which, given their price, are not cheap to practice on...
Can anyone elaborate on their technique with regard to how you apply heat when soldering?

What kind of torch are you using?

When I solder, I apply the heat gently and move the torch over the whole solder area, stopping frequently to touch the solder to the part to check if it's hot enough to melt it. once the part is hot enough to melt the solder, I do a couple more passes with the torch, then push the solder around the joint quickly and evenly. YMMV
 
What kind of torch are you using?
A handheld MAPP/propane blowtorch. I first tried with MAPP which may have contributed to the overheating.

I'd be interested in a video of someone successfully soldering SS with a blowtorch. The video with the jeweler's torch is neat, but it doesn't seem to work the same with a bigger torch.
 
I soldered 3/4" stainless steel couplings onto the sides of a few kegs with a regular propane blowtorch. (Didn't make a video, though.) I also did one coupling with OA.

Actually, this one with the oxyacetylene was the one that I did first. It was the best of the three in terms of speed and no discoloration of the surrounding metal, but I had a tiny wave created in the keg wall by the heat. In the end it worked out fine but I didn't want that happening again.... That's why I switched to the propane for the next to kegs -- thought I could control the heat better. (I'm a beginner welder. I'm sure someone else couldn't have handled it without any issues...)

And to answer your question about how to do it:

With less heat it was easier to see the stages that the flux goes through... going from gel to liquid, drying out and going cloudy, bubbling a little and then going clear again... and that's when you know the metal is hot enough. I'm not sure if that advice of "heat the metal, not the flux" worked for me. I'm pretty sure I heated the metal around the weld first, but in the end everything gets hit with the flame. You just don't want the flame to push the flux out of the joint, that's all. (Someone please correct me if I'm wrong.)

So for my first time ever handling an OA torch, I think I got lucky. I will say this: with a propane torch, the process takes a bit longer, and you get a LOT more discoloration that you have to sand off.

I didn't have any of the acidic solutions that are recommended for cleaning the flux off the weld area, so I lots of strong vinegar on an old rag. I used that wet rag to cool the metal. (Watch out for the vapors and don't burn your hand) The hot metal was cleaned really quickly. When I did the same to a cold keg there was little to no cleaning power.

I'll post some pictures if I remember...
 
Here's a coupling that I brazed on to the side of my keg. Oops. No, here it isn't. No image uploading privileges for me...

Anyway, the important part of my message is this:

I mounted the coupling on the surface of the keg instead of making the hole a little larger and setting it partly inside. I was worried that I might have to take it off and try again, which is why I opted for being on the outside. Now that it's done, I realize that it worked so well that I wish I had gone right through. FYI.

If anybody is dying for pics, I could email some out. The finished product is as professional as any TIG job.

Now with the good weather, I'm looking forward to brewing 10 gallon batches. Cheers.
 
Cutting a step into the coupling OD so it's just flush inside the keg at the 9 and 3 position then dress down the the 6 and 12 positions flush to the keg radius. Stepped would also about double the soldered surface area for strength plus no pocket for the nasties to collect.
 
I had more success this time. I tried to do it a bit more like that video with the jeweler's torch, rather than the way I'm used to soldering copper pipes (where I heat the whole joint before applying solder, so it flows fully on contact)

I first sanded, fluxed, and then tinned the washer in each case. For the female coupling, I then sanded and fluxed the fitting. I spent a little while going over everything to heat it up, keeping the torch moving the whole time. When it got to the point where the flux looked like it was about to start burning off, I went with focused heat and melted blobs of solder around the edges. Then more flux, then kept swirling the flame around until the solder flowed more and more and finally wetted the whole thing.

By that point I had WAY too much solder on everything, which was fixed with ample heat and a wet rag.

The other fitting (with the pipe nipple) was more of a hassle, since the solder loves to run down the threads.

Click images for larger versions...


I'd love to hear some tips about how to get just a small amount of solder on there in the first place. I feel like the flux burns off before I can get the whole joint up to temperature to try to get solder to flow throughout the joint all at once.
 
Back
Top