Advertise Here
Main · BrewSpace · Recipes · Brew Wiki · Groups · Clubs · Gallery · Reviews · Links · Chat · Blogs

Go Back   Home Brew Forums > Home Brewing Beer > Beginners Beer Brewing Forum
Blogs Register FAQ Mark Forums Read Unanswered Threads


Reply
 
Social Network Submit LinkBack Thread Tools Display Modes
Old 08-06-2008, 01:35 AM   #1 (permalink)
Death @ ur door..thirsty?
 
DeathBrewer's Avatar
Recipes 
 
Join Date: Apr 2007
Location: Oakland, CA
Posts: 7,736
Default Easy Partial Mash Brewing (with pics)


Due to my bad back, the limits of brewing inside a carpeted apartment, and the time constraints i have working tons of overtime at my job, i've often tried to find an easy, quick method of brewing.

extract, of course, limits the grains one can use with brewing. some of my favorite grains, including vienna, rye, flaked maize, etc. need to be mashed so i also wanted to find a way to do a partial mash without making a big mess.

the method i found works best in my situation involves a minimal amount of equipment, a short amount of time, and i can brew any type of beer i want. I use this method to do 5 gallon partial mashes and 2.5 gallon all grains several times a week.

i thought i would post this to help some of the newer people easily do partial mashes, as i know passing the extract barrier can often be difficult.

I use the following equipment for the brewing process:

2 - 5 gallon stockpots (different sizes will work, this is just what i use)
1 - Lid (to cover one of the stockpots)
1 - Floating Thermometer
1 - Stirring Rod (you can use anything from a wooden spoon to a mash paddle)
1 - 24" x 24" Hop/Grain Bag
2 - Binder Clips or other clamps

In this thread, i will explain how i made a 5 gallon batch of RyePA using pictures from the brew night. This batch took less than three hours.
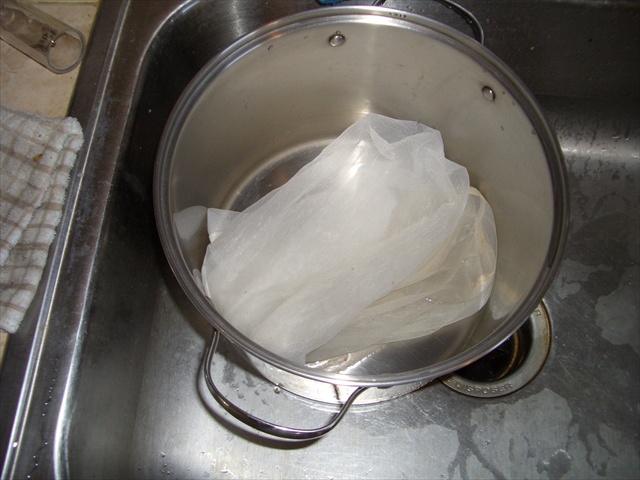
Step 1:
Place the bag inside your stockpot, use the binder clips to secure it and fill with the desired amount of strike water (i use 2 gallons of water for 5-6 lbs of grain.) Place the thermometer in the pot and heat the water to the desired strike temp. i experience a loss of about 15°F when i add my grains with this equipment, so i shoot for 170°F water.


Be sure to have some plans for dinner here my friend is grilling up some wonderful ribs and his wife took most of these pictures. Thanks guys!


I always have all my ingredients ready to go to make everything nice and smooth:

__________________
Primary: On Hiatus, will update in a couple of weeks...
Secondary:
Bottled(aging):
Kegged:


"Death is always with us." - Brewpastor

Easy Partial Mash Brewing - DIY Fermentation Cabinet - Easy Stovetop All-Grain Brewing

Quote:
Originally Posted by thataintchicken View Post
Apfelwein does not play well with others. In fact, Apfelwein runs with scissors and yells obscenities at it's classmates
DeathBrewer is online now   Reply With Quote
Old 08-06-2008, 01:36 AM   #2 (permalink)
Death @ ur door..thirsty?
 
DeathBrewer's Avatar
Recipes 
 
Join Date: Apr 2007
Location: Oakland, CA
Posts: 7,736
Default


Step 2:
Once you reach your desired temp remove the thermometer and add your grains. Stir well for several minutes and again place the thermometer inside the stockpot, checking your mash temperature. At this time you could adjust temperature if you need to, adding a little heat or perhaps even a small amount of water if necessary. As long as my mash is within 150-155°F, i cover it and leave it be.

It's also good to be comfortable during your brew days. i've had this shirt for 12 years =)


Step 3:
During the time that your are mashing, heat up an additional 2 gallons of water in the second pot to 175°F for the sparge. Move the thermometer to this pot to help determine your temp.

__________________
Primary: On Hiatus, will update in a couple of weeks...
Secondary:
Bottled(aging):
Kegged:


"Death is always with us." - Brewpastor

Easy Partial Mash Brewing - DIY Fermentation Cabinet - Easy Stovetop All-Grain Brewing

Quote:
Originally Posted by thataintchicken View Post
Apfelwein does not play well with others. In fact, Apfelwein runs with scissors and yells obscenities at it's classmates
DeathBrewer is online now   Reply With Quote
Sponsored Links
Old 08-06-2008, 01:38 AM   #3 (permalink)
Death @ ur door..thirsty?
 
DeathBrewer's Avatar
Recipes 
 
Join Date: Apr 2007
Location: Oakland, CA
Posts: 7,736
Default


Step 4:
After 30-60 minutes (or once you have conversion), pull up the bag of grains and let as much drain back into the pot as you can stand. This is a good workout with enough grain.

This picture caught me off guard. wait, what...beer?


Step 4.5 (EDIT)
Once your arm is tired, remove the bag from your mashing pot and "tea-bag" in the sparge water. Make sure it mixes well, and let it sit for 10 minutes (advice given to me in this thread. if you leave it in the sparge water longer, you will get better conversion)

After your sparge is complete, raise up the bag and let that drip again, so that you can get all the wort possible from the grains.


Step 5:
Dispose of your grains and spray all the grains out of your bag. You'll be using it again soon.


__________________
Primary: On Hiatus, will update in a couple of weeks...
Secondary:
Bottled(aging):
Kegged:


"Death is always with us." - Brewpastor

Easy Partial Mash Brewing - DIY Fermentation Cabinet - Easy Stovetop All-Grain Brewing

Quote:
Originally Posted by thataintchicken View Post
Apfelwein does not play well with others. In fact, Apfelwein runs with scissors and yells obscenities at it's classmates
DeathBrewer is online now   Reply With Quote
Old 08-06-2008, 01:39 AM   #4 (permalink)
Death @ ur door..thirsty?
 
DeathBrewer's Avatar
Recipes 
 
Join Date: Apr 2007
Location: Oakland, CA
Posts: 7,736
Default


Step 5.5 (EDIT)
Almost forgot...simply pour the wort from your original mash into the pot with the sparge water (now wort as well.) try to minimize splashing, but don't worry about it. put your heat to high to go to step 6.

Step 6:
As the water heats up, i add my extract. Some people wait until it boils, then remove from heat and add, but i find my method makes it quicker and as of yet i have had no undesirable effects. I add all my extract at the beginning of the boil.


Step 7:
Start your boil as usual! I reuse the grain bag for the hops...less to clean overall and it keeps me cleaning as i go. I'll clean the rest of the pots at this point too...i need the sink free. I use the binder clips again (be sure if you have a gas burner that you keep that nylon bag from going over the side and setting on fire.)

I use a partial boil, and adjust my hops accordingly, shooting for the middle or top of the style.


Step 8:
Cooling...i use a water bath in the apartment. i change the water out 3 times over about a half-hour period...the last time i will add ice to speed it up.


Step 9:
Sanitization...I use iodophor. i sanitize anything that could possibly touch the yeast or the wort, in this case my two 2.5 gallon carboys, my airlocks, my sampler, my funnel and i even throw the yeast packets in there.

__________________
Primary: On Hiatus, will update in a couple of weeks...
Secondary:
Bottled(aging):
Kegged:


"Death is always with us." - Brewpastor

Easy Partial Mash Brewing - DIY Fermentation Cabinet - Easy Stovetop All-Grain Brewing

Quote:
Originally Posted by thataintchicken View Post
Apfelwein does not play well with others. In fact, Apfelwein runs with scissors and yells obscenities at it's classmates
DeathBrewer is online now   Reply With Quote
Old 08-06-2008, 01:45 AM   #5 (permalink)
Death @ ur door..thirsty?
 
DeathBrewer's Avatar
Recipes 
 
Join Date: Apr 2007
Location: Oakland, CA
Posts: 7,736
Default


Step 10:
Ferment...i split this 5 gallon batch into two 3 gallon fermenters and topped off with tap water. You may not be able to use your tap water to top off...you can either boil and cool some h20 or use bottled water if you'd like. I also used two different yeasts (notty and windsor) and eventually blended them back together into one keg.


As for target gravity, i usually shoot for the middle of the style at 65% efficiency. i've experienced as low as 60%, but it's usually in the 65-70 range. as this is meant to be an enjoyable brew day, i don't take a sample until the beer is finished, poured and topped off.

EDIT: Since using the 10 minute sparge, my efficiency has been at a steady 70% efficiency for the last 4 batches.

I hope this helps inspire some people to make the jump to partial mashing from extract! all you really need is the bag in addition to some regular equipment to see how easy it is. once i started doing this, there was no turning back. i regularly make partial mash and all-grain batches nearly 3 times a week now.

let me know if you have any questions on this process or if you need any easy partial mash recipes. some of my favorites are hefeweizens, dunkelweizens and cream ales, as well as the irish rye stout in my drop down.

Take care and keep brewing!
__________________
Primary: On Hiatus, will update in a couple of weeks...
Secondary:
Bottled(aging):
Kegged:


"Death is always with us." - Brewpastor

Easy Partial Mash Brewing - DIY Fermentation Cabinet - Easy Stovetop All-Grain Brewing

Quote:
Originally Posted by thataintchicken View Post
Apfelwein does not play well with others. In fact, Apfelwein runs with scissors and yells obscenities at it's classmates
DeathBrewer is online now   Reply With Quote
Old 08-06-2008, 02:08 AM   #6 (permalink)
Stick it in the fridge
 
Bobby_M's Avatar
Recipes 
 
Join Date: Aug 2006
Location: Piscataway, NJ
Posts: 9,185
Default


Right on, good process, but cut that damn hair you hippy. You look like me when I was 16 ;-)
__________________
Bobby

Opinions are like A-holes; Everyone has one and everyone thinks the other guy's stinks.

Youtube Videos | My Website | Keg Polishing | Brewstand Build | All Grain Primer|
Buy a sightglass

Last edited by Bobby_M : 08-06-2008 at 02:17 AM.
Bobby_M is offline   Reply With Quote
Old 08-06-2008, 03:09 AM   #7 (permalink)
Registered User
Recipes 
 
Join Date: Aug 2008
Location: Memphis, TN
Posts: 176
Default


hmm i will def try this out at some point after i do 3 or 4 more extract brews... Thanks for the post!
pcolson is offline   Reply With Quote
Old 08-06-2008, 03:40 AM   #8 (permalink)
Senior Member
 
Blender's Avatar
Recipes 
 
Join Date: Jan 2006
Location: Santa Cruz, CA.
Posts: 2,520
Default


Nice write up and the pictures are great. This should be helpful to a lot of folks.

I might still have long hair if it would still grow.
__________________
Gary
Blender is offline   Reply With Quote
Old 08-06-2008, 03:49 AM   #9 (permalink)
Junior Member
Recipes 
 
Join Date: Jun 2008
Posts: 28
Default


Thank you so much, planning to do my first PM and this was really really helpful.
RMohan13 is offline   Reply With Quote
Old 08-06-2008, 04:12 AM   #10 (permalink)
Senior Member
 
Grinder12000's Avatar
Recipes 
 
Join Date: Jul 2008
Location: Columbus WI
Posts: 1,118
Default


Very good - however.

Why so slow on the cold break. Why not add the ice right off the bat. I can get from 212 to 110 in 15 minutes with ice water - then delute with 35 degree water to get to 65 degrees.

Just wondering.

Well done - where was this when I was looking into Mini Mashing my 1st time.
__________________
What I don't know I'll obsess over.

Grinders Island as of 11/30/08

Primary = AHS award winning Milk Stout, One Putt Twelve IPA
In Bottle = Cream of Three Crops(4.0%), #7 Nut Brown Ale(4.6%), Burning Down the House MILD(3.0%), Sean's West Coast Blaster(7.0%),Hazel's Nutty Brown Ale(7.3%),CCClassic Amber batch #2(4.2%)
on deck = Flat Squirrel batch #2
Grinder12000 is offline   Reply With Quote
Reply


Thread Tools
Display Modes

Posting Rules
You may not post new threads
You may not post replies
You may not post attachments
You may not edit your posts

vB code is On
Smilies are On
[IMG] code is On
HTML code is Off
Trackbacks are On
Pingbacks are On
Refbacks are On

Powered by vBulletin Version 3.6.8
Copyright ©2000 - 2008, Jelsoft Enterprises Ltd.
Content Relevant URLs by vBSEO 3.2.0
All times are GMT. The time now is 12:48 AM.