Thanks Mods, I am honored that this thread has been stickified.
Over the last year I've posted bits and pieces of this in various threads when people asked for bottling advice. I end up getting a lot of questions about my process, so since we have so many new people joining this site in a post holiday fit of brewing enthusiasm, that means really soon there are going to be a bunch of new bottlers stepping up to the plate.
First off, you may hear a lot of people recommending kegging...In fact there is a strange phenomenon on here that inevitably when someone asks a question about bottling some overzealous (and probably new) kegger will jump in with HIS answer, which is something like "Bottling sux, you should keg." Like the thought of kegging beer is so foregin to new people or established brewers that despite the fact that this section of the forum is called "Bottling and Kegging" that perhaps we who bottle are total idiots who perhaps need to be told that such a thing exists.
It's up to you what ultimately you choose to do. But don't let zealots convince you that no one bottles...actually there is probably a vast majority of brewers who still bottle for various reason (cost of setup, space requirements, or simply personal choice.)
But you will find that many experienced brewers who are keggers actually still rack some of their beer to bottles and prime and condition with sugar, or they use a beer gun (either blickman or Biermuncher's) to fill some bottles....For whatever reason, they still bottle some of their beer.
If you enter contests then bottling is a must.
I don't have the space or money to keg right now, nor do I think in the future when I move out of my loft will I keg exclusively. There is still something about cracking open a bottle of your own beer. And not many people want to take a keg on a picnic or to a game, when a six pack will do (and it's hard to stick a keg in your pocket when you are trying to sneak a beer in somewhere, not that I know anything about sneaking homebrew in.)
Bottling doesn't have to be a chore.
The trick to bottling is to make the process work for you...to make yourself as comfortable as possible doing it. It took me a few batches but I got it dialed in enough to get it done in about an hour for a 5 gallon batch....not including clean up. One of my half batches can be done in 20 minutes
You just gotta dial in your process.
Try different things until they work for you, until you've pimped it down to the bare minimum of steps...and practice practice practice...and if it doesn't work for you, then scrap it and change it again...
Eventually you will find exactly what works for you.
For example I hated the bottling wand on the end of a hose, with the bottles in beer case method, that most people use..You know, then one shown in Papazian's book where the bucket is on the counter and you sit on the floor and fill the bottles sitting in the cases....well the first time I did that, I lost track of where I was in order, and actually capped about a half dozen empty bottles...as well as spilling a sh*tload of beer because I could really see when the wand was putting the beer to the lip of the bottle....a ton would spill out....
Plus sitting for so long on the floor was bad for my back....I'm 6'7" and sitting on the floor and getting up again, is not fun.
So I kept tweaking my process until I was happy...I came up with these "tweaks."
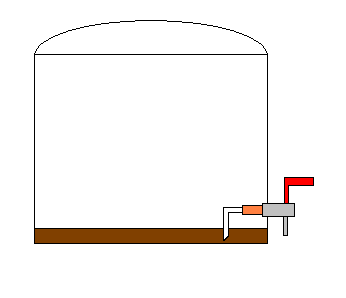
I have my bottling wand mounted right on my bucket's spigot...

So now I can sit at my dining room table and fill bottles comfortably...I prop my bucket on a pot, or fermenter bucket to bring it up to my eye level. (Actually that pot is too low, I have now moved it to the top of my boil kettle...a fermenter bucket is about the same height and works great as well.

I have a dip tube in my bucket so I get all but about 4 ounces of stuff from my bottling bucket. What that means in my case is about another 6 pack of beer- 54 bottles instead of 48.
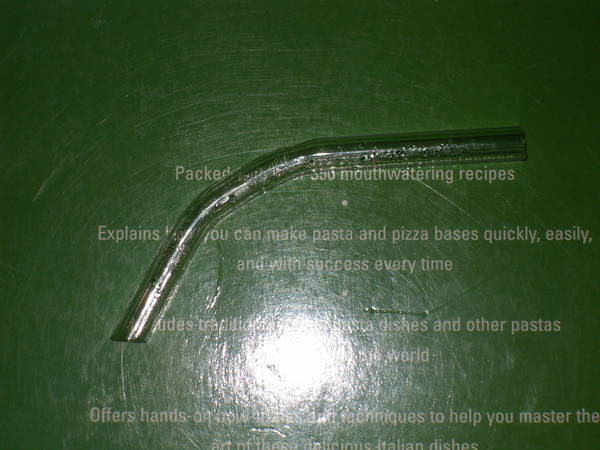
And the biggest thing about a dip tube is that there is no need to tilt to get the last few dregs of beer. It is easy to make, all you need to do is find a drilled stopper (or drill your own) that fits in the back part of your bottling bucket spigot (I got mine from my lhbs) then you need to find a tube that fits on the hole...It could be a piece of bent copper tubing, it could be the body of a ballpoint pen, it could even be a bent piece of racking cane....I made my latest one out of broken racking cane that I heated and bent over an alcohol spirit lamp, heating and cooling until I got the right bend. (One tip, bend it until the back part of the bottom of the tube touches the bottom of the bucket, leaving a tiny gap in the front for the beer to flow through.)


Here's an overview of my process
The first thing I do is set the fermenter on my dining room table, and open it (briefly) to take a gravity reading, so I can calculate the amount of priming sugar I need. (I carb to style and use beersmith to tell me how much I need.) Most of you in your first few batches will be using the stock 4.5 - 5 ounce packets that came with you ingredient kit.
Putting the fermenter in position first gives some time to let the beer settle since I just moved it. Some folks put it in position hours ahead of time, but I've never seen the need.
After I've set the bucket down, and figured out how much sugar I need, I measure it out and set it to boil. I start my priming sugar water boiling.
Then I start sanitizing my gear. I fill my bottling bucket with about 2 gallons of diluted starsan, and add my auto siphon, my bottling wand, my dip tube setup and anything else I may need into it, after first swirling around the bucket a few times to spread the sanitizer along all the sides of it. I then set the bucket on the table, and autosiphon about half of the sanitizer into another bucket. This sanitizes the inside of the autosiphon and the hose. After abut a gallon to gallon and a half of sanitizer has run through it. I open the spigot to flush that with the remained of the sanitizer as well.
Then I install the dip tube that is pictured above.
By now I usually can hear the boiling of my solution in the kitchen. I check on it, and perhaps lower the heat a bit to a gentle boil.
Then I begin to sanitize my bottles with my vinator....after the first case is sanitzed then take the priming solution off the stove to let it cool a bit, you can set it in a bit of cold water in your sink. Then I go back and sanitize my second case and final sixpack of bottles.
I can't stress how valuable the vinator is for making sanitization of bottles a simple task.

After sanitizing I count out my bottlecaps and drop them in my vinator to sanitize. I set my bottling bucket below the fermenter and pour half of the priming solution into the bottom of the bucket then I start racking the beer on top of it. When I get to 2.5 gallons I I add the remainder of the solution to the bucket.
When ready I put a pot lid on top of the bottling bucket, and gently lift it on top of a pot, or the empty primary bucket and clip on the bottling wand to the spigot. The pot lid (or plastic bucket lid) is to keep any dust or particulate matter from fallin in.
Then I get ready to bottle.
Since I'm a lefty I work right to left on my table....I put my two cases of sanitized bottles on the right hand side of the table (on the chair next to me,) I put the vinator on the table to the right of the bucket filled with my bottles caps sanitizing away. Then when I fill the bottle I place a cap loosely on it, and move it to the left side of the table...with the bottling bucket in the middle of the table there's room for a case worth of filled bottles on the table on the left side.
When I hit 24 bottles, I stand up, move the empty case to a chair on the left side of the table, then I pick up my capper and cap the first case of bottles, putting them in the case on the chair nearby...Then I grab a beer from the fridge, and sit back down and do the next case of beer....
I can get them all done and the bottling bucket and stuff soaking in oxyclean between 45 minutes and an hour....
Then the boxes go into a dark warm closet and I forget them for the next 3 weeks, trusting that they will be approaching drinkability and an adequate carbonation level by then.
If you find this thread helpful, then please hit the good ole prost button!! Thanks!
Edit, Feb 6, 09 This thread has got a huge amount of traffic, and it also has had a large amount of great tips added to it, if I could change the original name I would call it' Revvy and Friend's Tips for the Bottles, yadda yadda yadda....So thanks everyone, and keep them coming!!!!
Edit 08-25-10 I just discovered a cool article on here about bottling with krausen that is worth adding here. By our own Kai Troester;
https://www.homebrewtalk.com/f13/carbonation-kraeusen-how-9685/
Every bottle I cap is not a chore, but a success story...:rockin:
Over the last year I've posted bits and pieces of this in various threads when people asked for bottling advice. I end up getting a lot of questions about my process, so since we have so many new people joining this site in a post holiday fit of brewing enthusiasm, that means really soon there are going to be a bunch of new bottlers stepping up to the plate.
First off, you may hear a lot of people recommending kegging...In fact there is a strange phenomenon on here that inevitably when someone asks a question about bottling some overzealous (and probably new) kegger will jump in with HIS answer, which is something like "Bottling sux, you should keg." Like the thought of kegging beer is so foregin to new people or established brewers that despite the fact that this section of the forum is called "Bottling and Kegging" that perhaps we who bottle are total idiots who perhaps need to be told that such a thing exists.
It's up to you what ultimately you choose to do. But don't let zealots convince you that no one bottles...actually there is probably a vast majority of brewers who still bottle for various reason (cost of setup, space requirements, or simply personal choice.)
But you will find that many experienced brewers who are keggers actually still rack some of their beer to bottles and prime and condition with sugar, or they use a beer gun (either blickman or Biermuncher's) to fill some bottles....For whatever reason, they still bottle some of their beer.
If you enter contests then bottling is a must.
I don't have the space or money to keg right now, nor do I think in the future when I move out of my loft will I keg exclusively. There is still something about cracking open a bottle of your own beer. And not many people want to take a keg on a picnic or to a game, when a six pack will do (and it's hard to stick a keg in your pocket when you are trying to sneak a beer in somewhere, not that I know anything about sneaking homebrew in.)
Bottling doesn't have to be a chore.
The trick to bottling is to make the process work for you...to make yourself as comfortable as possible doing it. It took me a few batches but I got it dialed in enough to get it done in about an hour for a 5 gallon batch....not including clean up. One of my half batches can be done in 20 minutes
You just gotta dial in your process.
Try different things until they work for you, until you've pimped it down to the bare minimum of steps...and practice practice practice...and if it doesn't work for you, then scrap it and change it again...
Eventually you will find exactly what works for you.
For example I hated the bottling wand on the end of a hose, with the bottles in beer case method, that most people use..You know, then one shown in Papazian's book where the bucket is on the counter and you sit on the floor and fill the bottles sitting in the cases....well the first time I did that, I lost track of where I was in order, and actually capped about a half dozen empty bottles...as well as spilling a sh*tload of beer because I could really see when the wand was putting the beer to the lip of the bottle....a ton would spill out....
Plus sitting for so long on the floor was bad for my back....I'm 6'7" and sitting on the floor and getting up again, is not fun.
So I kept tweaking my process until I was happy...I came up with these "tweaks."
I have my bottling wand mounted right on my bucket's spigot...
So now I can sit at my dining room table and fill bottles comfortably...I prop my bucket on a pot, or fermenter bucket to bring it up to my eye level. (Actually that pot is too low, I have now moved it to the top of my boil kettle...a fermenter bucket is about the same height and works great as well.
I have a dip tube in my bucket so I get all but about 4 ounces of stuff from my bottling bucket. What that means in my case is about another 6 pack of beer- 54 bottles instead of 48.
And the biggest thing about a dip tube is that there is no need to tilt to get the last few dregs of beer. It is easy to make, all you need to do is find a drilled stopper (or drill your own) that fits in the back part of your bottling bucket spigot (I got mine from my lhbs) then you need to find a tube that fits on the hole...It could be a piece of bent copper tubing, it could be the body of a ballpoint pen, it could even be a bent piece of racking cane....I made my latest one out of broken racking cane that I heated and bent over an alcohol spirit lamp, heating and cooling until I got the right bend. (One tip, bend it until the back part of the bottom of the tube touches the bottom of the bucket, leaving a tiny gap in the front for the beer to flow through.)
Here's an overview of my process
The first thing I do is set the fermenter on my dining room table, and open it (briefly) to take a gravity reading, so I can calculate the amount of priming sugar I need. (I carb to style and use beersmith to tell me how much I need.) Most of you in your first few batches will be using the stock 4.5 - 5 ounce packets that came with you ingredient kit.
Putting the fermenter in position first gives some time to let the beer settle since I just moved it. Some folks put it in position hours ahead of time, but I've never seen the need.
After I've set the bucket down, and figured out how much sugar I need, I measure it out and set it to boil. I start my priming sugar water boiling.
Then I start sanitizing my gear. I fill my bottling bucket with about 2 gallons of diluted starsan, and add my auto siphon, my bottling wand, my dip tube setup and anything else I may need into it, after first swirling around the bucket a few times to spread the sanitizer along all the sides of it. I then set the bucket on the table, and autosiphon about half of the sanitizer into another bucket. This sanitizes the inside of the autosiphon and the hose. After abut a gallon to gallon and a half of sanitizer has run through it. I open the spigot to flush that with the remained of the sanitizer as well.
Then I install the dip tube that is pictured above.
By now I usually can hear the boiling of my solution in the kitchen. I check on it, and perhaps lower the heat a bit to a gentle boil.
Then I begin to sanitize my bottles with my vinator....after the first case is sanitzed then take the priming solution off the stove to let it cool a bit, you can set it in a bit of cold water in your sink. Then I go back and sanitize my second case and final sixpack of bottles.
I can't stress how valuable the vinator is for making sanitization of bottles a simple task.
After sanitizing I count out my bottlecaps and drop them in my vinator to sanitize. I set my bottling bucket below the fermenter and pour half of the priming solution into the bottom of the bucket then I start racking the beer on top of it. When I get to 2.5 gallons I I add the remainder of the solution to the bucket.
When ready I put a pot lid on top of the bottling bucket, and gently lift it on top of a pot, or the empty primary bucket and clip on the bottling wand to the spigot. The pot lid (or plastic bucket lid) is to keep any dust or particulate matter from fallin in.
Then I get ready to bottle.
Since I'm a lefty I work right to left on my table....I put my two cases of sanitized bottles on the right hand side of the table (on the chair next to me,) I put the vinator on the table to the right of the bucket filled with my bottles caps sanitizing away. Then when I fill the bottle I place a cap loosely on it, and move it to the left side of the table...with the bottling bucket in the middle of the table there's room for a case worth of filled bottles on the table on the left side.
When I hit 24 bottles, I stand up, move the empty case to a chair on the left side of the table, then I pick up my capper and cap the first case of bottles, putting them in the case on the chair nearby...Then I grab a beer from the fridge, and sit back down and do the next case of beer....
I can get them all done and the bottling bucket and stuff soaking in oxyclean between 45 minutes and an hour....
Then the boxes go into a dark warm closet and I forget them for the next 3 weeks, trusting that they will be approaching drinkability and an adequate carbonation level by then.
If you find this thread helpful, then please hit the good ole prost button!! Thanks!
Edit, Feb 6, 09 This thread has got a huge amount of traffic, and it also has had a large amount of great tips added to it, if I could change the original name I would call it' Revvy and Friend's Tips for the Bottles, yadda yadda yadda....So thanks everyone, and keep them coming!!!!
Edit 08-25-10 I just discovered a cool article on here about bottling with krausen that is worth adding here. By our own Kai Troester;
https://www.homebrewtalk.com/f13/carbonation-kraeusen-how-9685/