Chilling Options for BIAB

Homebrew Talk - Beer, Wine, Mead, & Cider Brewing Discussion Forum

Help Support Homebrew Talk - Beer, Wine, Mead, & Cider Brewing Discussion Forum:

This site may earn a commission from merchant affiliate links, including eBay, Amazon, and others.

Woodbrews

Well-Known Member
Joined
Nov 5, 2013
Messages
282
Reaction score
53
Location
Arlington
I had a successful second brew on my new eBIAB setup last night (post here), but the chilling process using my immersion chiller was agonizingly slow and used up nearly 25 gallons of tap water. It was a late night by the time I finally pitched my yeast and cleaned up.

My tap water is about 60F right now, so it's plenty cold. I even added a wort recirculation tube to my chiller to speed things up (details here).

My questions are: is there anything I can do to speed up chilling with the immersion chiller? Or does it make sense to look at either a plate chiller or a counterflow chiller? Do plate chiller or counterflow chillers use substantially less water?

In my case, using less water is important because my sink is not close enough to my brew location to drain directly; I have to fill buckets with the drain water and haul them to the sink. It's a PITA and it makes me acutely aware of how much water I'm using.

Thoughts?
 
Have you tried pumping ice water through the immersion chiller and then recycle it back into the same bucket that is being pumped into the chiller? You'll probably go through about 20lbs of ice but you won't have to keep dumping water.
 
I noticed for a 5 gallon brew day, I use about 14 gallons of water using my duda plate chiller. Albeit, if you get a larger plate chiller its obviously less water needed. I chill 5 gallons of wort in just under 9 minutes! I love it! I got the 20 plate, 12" chiller for $119. You can go one step further and use your immersion chiller as a pre-chiller for the water going into the plate chiller. Fill a bucket with alot of ice and run the water through the immersion, then the water coming out into the plate chiller.

You can also incorporate a aquarium pump in a bucket of ice cold water that feed your immersion chiller. BUT I love my plate chiller. Its amazing. I made a thermowell to place my thermometer on the Wort out side off of a 45 and a T to get the temp of my chilled wort. always 74 degrees... here is a pic of my setup:
You can see the plate chiller on the right hand side.


note im recirculating while mashing.

also you dont NEED a pump but man is it hady!
 
Have you tried pumping ice water through the immersion chiller and then recycle it back into the same bucket that is being pumped into the chiller? You'll probably go through about 20lbs of ice but you won't have to keep dumping water.
I'll have to give that a try. I have a carboy washer with a nice sump pump in it; I could pull out the pump, submerse it in ice water, and connect it to the chiller. I may have to mess around with the fittings, but it certainly could work.
 
Are you stirring the wort while it chills? I hold the immersion chiller by the top bend where the tubing connects and swirl it around and/or bob it up and down. Cut my time down significantly.
 
I noticed for a 5 gallon brew day, I use about 14 gallons of water using my duda plate chiller. Albeit, if you get a larger plate chiller its obviously less water needed. I chill 5 gallons of wort in just under 9 minutes! I love it! I got the 20 plate, 12" chiller for $119. You can go one step further and use your immersion chiller as a pre-chiller for the water going into the plate chiller. Fill a bucket with alot of ice and run the water through the immersion, then the water coming out into the plate chiller.

I like that setup. The plate chiller is certainly more compact than the IC. I also like that I could still use the IC as a pre-chiller for the water going into the plate chiller. I have a small 12v pump that I use for recirculating during mash, but I don't know if it's strong enough to push the wort through a plate chiller. Anyone use one of the 12v Sun pumps with a plate chiller?
 
I have never seen it done before But im sure if gravity works, then that little pump must work... heck you can keep the chiller below the pump and the kettle. One thing I have learned with brewing, if there is a tool out there, USE IT! hah
 
What the ID of your IC? Are the coils completely covered by the wort?
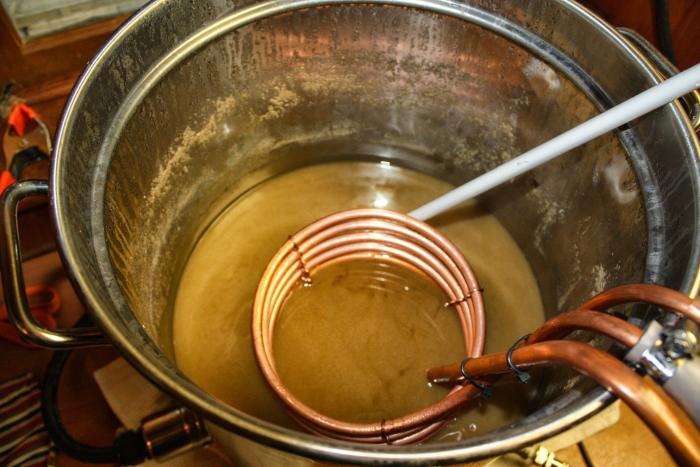
It is 3/8" copper tubing. Because the IC must sit on top of my element, the top two or three coils are above the wort. I'm reluctant to stir the IC in the pot for fear of damaging the element and temperature probe. That's why I added a wort return tube from MoreBeer and tried to use it to create a whirlpool. The result was a wimpy little current and not what I'd call a whirlpool. I added a pic -- it's apparent that at least 4 coils are above the wort.

IMG_3187.jpg
 
Get a false bottom above your element, or life the chiller up a coil or two and agitate. Alternatively, use a large spoon and stir like crazy. Aerating the wort at this point is fine, and you the more wort you can get in contact with the chiller (by moving either or both around) the better.


Edited to add... Your chilling options for BIAB are exactly the same as any other type of brewing, dunno why you're asking about BIAB specifically.
 
Edited to add... Your chilling options for BIAB are exactly the same as any other type of brewing, dunno why you're asking about BIAB specifically.

True, but I'm looking for a relatively compact solution that doesn't require a dedicated brewstand. BIAB'ers are likely to have similar constraints.
 
In my case, using less water is important because my sink is not close enough to my brew location to drain directly; I have to fill buckets with the drain water and haul them to the sink. It's a PITA and it makes me acutely aware of how much water I'm using.

Thoughts?

Is your sink so far away that you cannot run a return 3/8" vinyl hose? That hose will fit in your kettle with the chiller between brews even if it's 50'
 
I have the same setup. My probe is about 2" though, and the element is near the bottom. My coils are just above the wort line too-- but I only have a 25' copper immersion coil. With all that stated, I get mine chilled in about 10-minutes flat.

That stated, I get a workout though since I am constantly sloshing the wort to chill. I would imagine too that I am really oxygenating it and getting it ready for the yeast!! Ten-minutes, but you gotta really slosh the coils up and down.
 
Are you recirculating during the chill? I use an IC and just set my pump to recirculate during chilling. Usually takes about 15-20 minutes but is hands off. Also aerates things pretty well.
 
I had a successful second brew on my new eBIAB setup last night (post here), but the chilling process using my immersion chiller was agonizingly slow and used up nearly 25 gallons of tap water. It was a late night by the time I finally pitched my yeast and cleaned up.

My tap water is about 60F right now, so it's plenty cold. I even added a wort recirculation tube to my chiller to speed things up (details here).

My questions are: is there anything I can do to speed up chilling with the immersion chiller? Or does it make sense to look at either a plate chiller or a counterflow chiller? Do plate chiller or counterflow chillers use substantially less water?

In my case, using less water is important because my sink is not close enough to my brew location to drain directly; I have to fill buckets with the drain water and haul them to the sink. It's a PITA and it makes me acutely aware of how much water I'm using.

Thoughts?

Are you gutsy enough to try no-chill on a batch? It won't get the wort cooled as fast, not even close, but it takes no water, no immersion chiller, no plate chiller, none of that stuff. Just pour your boiling hot wort into a fermenter bucket (not a carboy, glass can't take the thermal shock and will shatter) and put the sanitized lid on. It's best to use the "S" airlocks so you don't have to worry about suck back but you can use a 3-piece airlock if you don't fill it too high. Use Starsan or vodka in the airlock to kill any bacteria that might get sucked in as the wort cools. At room temperature you can expect it to take 30 hours to chill.
 
Are you recirculating during the chill? I use an IC and just set my pump to recirculate during chilling. Usually takes about 15-20 minutes but is hands off. Also aerates things pretty well.

I tried that this time around, but the whirlpool was anemic, using a copper tube attached to my IC and angled toward the edge of the pot. Maybe I need a stronger pump than my 12v Sun pump.

Are you gutsy enough to try no-chill on a batch? It won't get the wort cooled as fast, not even close, but it takes no water, no immersion chiller, no plate chiller, none of that stuff. Just pour your boiling hot wort into a fermenter bucket (not a carboy, glass can't take the thermal shock and will shatter) and put the sanitized lid on. It's best to use the "S" airlocks so you don't have to worry about suck back but you can use a 3-piece airlock if you don't fill it too high. Use Starsan or vodka in the airlock to kill any bacteria that might get sucked in as the wort cools. At room temperature you can expect it to take 30 hours to chill.

I've read about no-chill, but have been leery of trying it. But my next batch might be the one for it. I've mistimed my brewing by underestimating how quickly we consume our 5 gallon batches (again!), so my current keg will run dry weeks before this last brew is out of the fermenter. I'm thinking of doing a quick full-volume extract recipe, like this 15-minute Cascade Pale Ale, that could be parked in a fermenter bucket for a few days while this one finishes fermenting. For no-chill, what kind of containers are appropriate?
 
If you are only going to leave the wort in the container until it is cool enough to add the yeast, the HDPE buckets are safe to over 250 degrees. If you (like the Aussies) want to make up the wort and store it for better weather for the fermentation period, then you need a different container.
 
Are you gutsy enough to try no-chill on a batch?

While the original no chill is hot packing the wort in an HDPE cube and is very sanitary, enough so that you can leave your unpitched wort for months befor adding yeast. There is also a small sum of us that successfully no chill right in the kettle, then add yeast ASAP once the wort is cool. I would suggest letting the wort cool for an hour or two to reach a nice hop stand temp of about 160, add a bunch of hops and lid the kettle overnight, in the morning bring the wort to pitching temps and add yeast...RDWHAB all good!

I use to obsess on getting the wort to pitching temps ASAP, but I have since taken the attitude to just let it happen, and guess what, the beer has not suffered at all, and has likely improved, perhaps for other reasons, but improved all the same without fretting about how quickly im chilling or worrying about evil bugs infecting my wort...hasn't happened contrary to the public fear....cheers!
 
I've become a pretty big fan of leaving the wort in the kettle, putting it in a water bath and going to bed. It's usually about 70 by the time I wake up, and a water refresh can have the temperature where I want it in like 15 minutes. Yet to have an infection issue with this system. If you're really worried, cover the seams between the lid and the pot with tinfoil while it's still hot. I don't, but I can see how it would be beneficial.
 
I've become a pretty big fan of leaving the wort in the kettle, putting it in a water bath and going to bed.

I am also a fan of doing this, but I will sometimes add 3-4 frozen 2 liter soda bottles to the water bath, sort of like passive chilling. In the morning I am usually at pitching temps, sometimes needing to temper with another frozen bottle and then pitch when at proper temps.
 
I used to use ice until I got tired of storing it and paying for it. A lot of the time I will refresh the water bath at least once. I can actually have it to pitching temps in a couple hours, I'm just frequently somewhat drunk and tired by the time I'm done brewing. It totally helps that I can count on 50ish degree tap water for all but the real summer.
 
Yes good point, I recently ditched the chest freezer in favor of a good size fridge on top refrigerator as my serving unit, so I have plenty of freezer space to help with "passive" chilling. Ice really packs a punch even compared to cold water, I forget but it is like 2-3 times pound for pound.
 
+1 for no-chill in the pot.

Batch #5 is in the fermenter now, and the last 3 were no-chill. sooooo much easier, and less mess to clean up. Knocks brew day time down significantly. It does take a few minutes the next day to xfer to a fermenter and pitch the yeast, but totally worth it.
 
+1 to the No Chill.

All I would add is to use a healthy and large starter to out compete any potential bacteria.


Sent from my iPad using Home Brelm?l ohm ,uo klo. on, 9? Pegou k Kym. N.ugvknb libbmj ff 47&&-- Jugehuh
 
While doing no chill would be the fastest way to chill....

The OP asked how to chill faster with an IC.
This is what I came up with, make it bigger!

I use a BIG immersion chiller, a stir motor, pump and ice.
I got my last lager batch of 12 gallons down to 42 in 35 minutes.

It took a lot of gallons of tap water and bucket of ice to do it though.

Pics of my setup here -
https://www.homebrewtalk.com/f51/triple-coil-immersion-chiller-pics-448915/

Kevin

That's true, he did ask how to chill faster with an immersion chiller. He also asked how to reduce the volume of water used and about alternatives to the simple immersion chiller. There are ways to improve the chilling with the immersion chiller and your way is one of them. However, you don't reduce the water used. No chill doesn't speed up the chilling, it slows it down, but it reduces the water usage in chilling to zero. It's all a set of compromises between cost, speed, and water.

The OP isn't the only one reading these threads though and others might like your alternative as their water usage may not be as important to them. Thanks for contributing to this thread.
 
+1 on a simple immersion chiller recirculating through an ice bath. I fill a cooler with about 10lbs of ice, then fill it about 1/3 with water. I have a cheap water pump in a closed circuit that recirculates the water between the chiller and the ice bath. It's the fastest and most water efficient method I have used to cool wort.
 
- Slow the flow of your cooling water down. You don't need to run the flow full blast.
- Figure out which way the water flows through your immersion chiller and stir the wort in the opposite direction.
- catch the initial cooling water in a large bucket/tub (it will be pretty warm) and use it to clean up items
- after you initially cool the wort to around 100° with tap water, switch to a recirculating bucket/pump/ice water to chill the rest of the way

I do these things and I can have my wort down to pitching temps in about 20 - 30 minutes plus I haven't used 20+ gallons of water to chill it
 
I haven't tried the no chill method yet.. but, will do so my next 2.5g batch.

That said, I save my 1/2g paper milk containers.. rinse well, fill with water and freeze. Makes a lot of ice inexpensively. Brewday, at chill time, cut the containers with a box cutter and put in a big bucket with water and ice pick the blocks for added contact area. I bought a cheap (~$12) submersible water pump at Harbor Freight and pump ice water thru the chiller.. recirculate it after the temp drops a bit.. the first few gallons going into my brew bucket as hot cleaning water. The balance of the water after the chill goes into the washing machine for tepid water clothes washing.
 
I chill similar to Brewzologist. I recirculate ice water from the sink through my IC. I use 2 frozen 1 gal jugs (old milk jugs) and 3 bags of ice. I save icemaker ice in bags (free) but you can obviously just buy it. I bought a smallest 12V bilge pump from my local marine store for about $20 and spliced it to an old recharging cord.

I fill the sink 1/3 with water, put in the BK, add the ice jugs (I cut away the plastic), add one bag of ice and hook up the pump and hoses to my IC. Start the pump and I drop to about 140F in 5 min. Since I'm impatient, I will then syphon some water out of the sink and add more ice. This process gets me down to 60F in 15 - 20 min. My IC is homemade - 30 feet of 3/8-inch copper. I could probably do better with a bigger chiller but I'm happy with this setup. The syphoning is the only inconvenient step but not too bad.
 
Back
Top