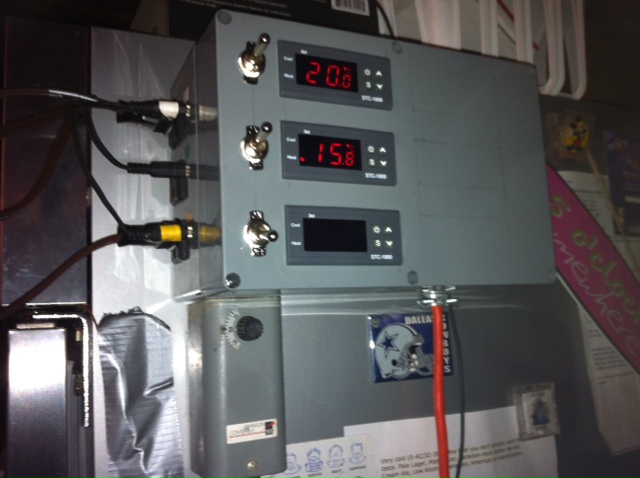
Fermentation Control panel

Homebrew Talk - Beer, Wine, Mead, & Cider Brewing Discussion Forum

Help Support Homebrew Talk - Beer, Wine, Mead, & Cider Brewing Discussion Forum:

This site may earn a commission from merchant affiliate links, including eBay, Amazon, and others.

RedRory

Member
Joined
Apr 26, 2009
Messages
22
Reaction score
0
Location
Midwest
I've been searching, but I haven't found anything about this.

Has anyone made a control panel specifically for fermentation? For example, I ferment multiple carboys in a fridge. I wrap each carboy with a fermwrap and control each one with a ranco. I'd like to create a nice looking, easy to read and use panel and ditch the ranco controllers. Ideally, I would like to have 4 controllers.

Opinions on this. I'd love to see some pictures and diagrams if anyone has done it.
 
It's a great idea. Set the fridge/freezer at a certain temp below where all of your different beers ferment and then run multiple sensors and brew belts back to a panel, control multiple batches at different temps.


Primary: Maibock, Helles (first partigyle batch)
Secondary: Mojave Red, Irish Stout
On tap: Orange Belgian IPA, Turbo IIPA
Bottled: Dwarven Gold Ale, La Fin Du Mond clone, Hefeweizen


Thats what I do - search for BCS controller, or buy a handful of the $20-$30 STC controllers - run one on the fridge and the rest on the fermenters. I find flex watt heat tape works well. Also insulate your fermenters with reflectix so you're not heating up the fridge as much.
 
This would be awesome. Means I can ferment a lager and ale at the same time in my chest freezer. Then I can lager in my keezer. Just need a bigger keezer now...


Primary: Maibock, Helles (first partigyle batch)
Secondary: Mojave Red, Irish Stout
On tap: Orange Belgian IPA, Turbo IIPA
Bottled: Dwarven Gold Ale, La Fin Du Mond clone, Hefeweizen
 
search for BCS controller, or buy a handful of the $20-$30 STC controllers - run one on the fridge and the rest on the fermenters. .

The BCS controller is pretty cool, but I don't really need that. The handful of controllers is the route I'd like to go. Looks cool, is simple and is organized. I just don't know how to wire them together. I would prefer not to have 5 wall outlet plugs coming out. I'd like to keep it clean by having only the temp probes and one electrical coming out of the panel.
 
I just built one. I'm at work right now but I think I bought the box off Amazon, I have 3 STC-1000 but can add 3 more. I only use the heat side to control my Ferm Wraps. I have a Johnson control unit just below that controls the freezer which I may switch later to an STC-1000 but as long as it's working I see no reason to change. I Tested it for about a week with 3 - 5 gal water containers and it worked great. I'm now fermenting my first beer using this method and temp is holding perfect.

Here's a picture (only one I had on my phone). Top unit is my Christmas Ale, Middle unit is just on the side of a carboy, bottom unit is off.

Fermentor control box.jpg
 
Yes! Thank you, that's it! If you ever get a chance, can you snap a picture of the inside wiring for me? Thanks again. That's exactly what I was thinking of.
 
Text to SWMBO: "Honey I'm having one more pint with the guys, be home in 20 minutes. If I'm not home by then, read this message again."

Just had a Hella good laugh. ^^^Awesome!!!:mug:

I know...:off: My bad:D
 
Just to give you another picture to look at, this is one I made (and recently sold).

j7op.jpg


You wire it just like any ordinary STC-1000, although you wire the controllers in parallel so you only have one power cable powering the whole enclosure. Th.e switches controlled fans located in the two separate fridges. I made it so the enclosure had six outlets. two for the fridges, to for the space heaters and two for the fans.
 
Sorry, I haven had a chance to do a diagram. But bemerritt is right. All I did was wire the STC-1000 the normal way. All 3 are connected to the same power supply and I put a simple toggle switch from Lowe's on the Hot side coming in before splitting off to the STC terminals. I only used the Heat side so I only need 1 plug per STC unit. Got a pack of 10 off of e-bay. Used stereo connector on the temperature probe. I wanted to be able to take it down without having to pull the probes out of the freezer. Box is held on to the side with Velcro. I would take a picture but I 'm using it right now and I don't want to take it down (lazy). I could have gotten the cheaper Heat only STC units but I want to be able to eventually update the program to the alphaomega firmware with profiles for fermenting.
If you want to know what the box is let me know or I could put a parts list together also if you want.
 
So let me get this straight... you set the fridge at let's say 55 degrees F. You wrap each fermenter with fermwrap and plug each one into separate controles to raise the Temps to the individual brews. If this is correct I need to ask... are any of you experiancing high over swings in temp of the fermenters. And if you set the fridge at lagering temp, does the fermwrap have difficulties maintaining ale Temps for the rest???
 
I just got through using mine for the first time. I had 1 probe taped to the side of a carboy insulated from the air. Carboy was filled with water as a control. Freezer probe was in a small container of water (1/2 gal) set to 60 F. I did a Christmas ale on another controller (bucket with probe in a thermowell) at 68 F. Another Honey Blonde that was also in a bucket with thermowell on the 3 controller also set to 68 F. All went great. The freezer stayed at 60 F (control water also at 60 F) and only kicked on maybe 3 times during the day. Day temp was in the mid 80 F. Both buckets stayed with in a 1/2 degree of what I had set. The fermwraps only turned on when the temps got down to 67.5 and would shut off if above 68.5. I have not yet tested doing a Lager and an ale at the same time. I got the idea from another person here on HBT who was doing this for a while. Do a search and you might get more info from him. I mostly do ales but if I do a lager I will probably plan so I'm not trying to heat an Ale that need 20+ degrees higher.
 
Just an FYI I see a lot of the older celcius stc1000's here... you can get Fahrenheit multirelay (heat and cool) ones for under $20 shipped now... I have one and just ordered a second...
 
So let me get this straight... you set the fridge at let's say 55 degrees F. You wrap each fermenter with fermwrap and plug each one into separate controls to raise the Temps to the individual brews. ??

Kind of.........I let the fridge run as normal. So its in the high 30's. I wrap each carboy with a ferm wrap. I then set my Ranco control to say, 65. Then I wrap with that silver bubble wrap insulation. The fridge and heater work with each other to really nail the temps. I can then slowly raise temps as fermentation slows and I can crash by simply slowly lowering the temp and taking the insulation off. I've never seen large temp swings.

For me, this works better than chest freezer. I can have up to 3 carboys all at drastically different temps (each one has a separate controller). Plus, I don't have the condensation or lifting involved with a chest freezer. Also, a fridge will last way longer than a chest freezer cycling on and off constantly.

I just ordered my box and PIDs..........it'll take me a month or to to get it together, but I post an update eventually.

My only issue with this whole thing would be the insulation... if you wrap it and it does over shoot a bit (which would be likely with a real active fermentation ) how is it supposed to cool quickly if it's insulated?
 
Ok, I was able to get a couple pieces together. Starting with 4 PIDs, but my box is big enough for more. I started laying it all out, and cutting my openings. It dawned on me that this is going to be a huge PIA if I ever add more to this box. I think I am going to cut openings for all future expansion.
Now what to do with the openings? For switches and LED's I will just buy more and set them in, but I'm not ready to buy more PID's. I haven't been able to find any blanks to set in.
Anyone have thoughts on some inexpensive covers? DIY would be fine.
 
My only issue with this whole thing would be the insulation... if you wrap it and it does over shoot a bit (which would be likely with a real active fermentation ) how is it supposed to cool quickly if it's insulated?

It only needs to cool quickly if your crashing. You only need to to hold at a constant temperature for fermentation. I've never seen it go over temperature. Remember, the insulation I described is not very hefty. Its really only going to help not waste heat. I only insulate the sides of the carboy. So top and bottom are exposed. If the ambient temperature is 36-39 over shooting is not going to be an issue with a fermwrap. I typically have to worry more about fermentation being too cool.

This is just my preferred method. I works great for me.
 
Ok, I was able to get a couple pieces together. Starting with 4 PIDs, but my box is big enough for more. I started laying it all out, and cutting my openings. It dawned on me that this is going to be a huge PIA if I ever add more to this box. I think I am going to cut openings for all future expansion.
Now what to do with the openings? For switches and LED's I will just buy more and set them in, but I'm not ready to buy more PID's. I haven't been able to find any blanks to set in.
Anyone have thoughts on some inexpensive covers? DIY would be fine.


Acrylic cut to the size needed and double sided tape. If you want to be fancy get something etched in it so it looks like a badge instead of a plain ole cover
 
Back
Top