(Yet Another) Jester Coffin Keezer Clone

Homebrew Talk - Beer, Wine, Mead, & Cider Brewing Discussion Forum

Help Support Homebrew Talk - Beer, Wine, Mead, & Cider Brewing Discussion Forum:

This site may earn a commission from merchant affiliate links, including eBay, Amazon, and others.

richardtmorgan

Active Member
Joined
Sep 12, 2014
Messages
27
Reaction score
9
Location
Paoli
15114325344_26fe78446a_c.jpg


I took inspiration for this from the Jester Keezer. I saw that and thought: 'I'd like one of those'.

I discovered that hundreds of people have made these and figured that I'd like to have one that would hold four kegs.

There's a list in the forums of how many kegs various freezers take, and I found this Kenmore at KMart for $162 - which I reckoned was a good price:

15549075177_199b0fd242_c.jpg


I'm going to details the build in the next few replies to this thread...
 
I decided to sit the keezer on a base of 3/4" plywood. I use the same plywood for the top (replacing the original freezer lid). There are plenty of keezers with bases built out of solid wood. Plywood is easier and perfectly strong. It's also much cheaper to buy plywood in 4' x 8' sheets - so if you get some for the top there will be plenty around for the bottom.

15548849738_7ff6ab3e0b_c.jpg


The plywood sits on 4 casters. These allow the keezer to be easily moved. I had thought about locking casters, but they would have required a removable skirt (which Jester's keezer has) which would have to have been pulled on and off every time you wanted to move the keezer. That's impractical. In fact the keezer is heavy enough that it stays put unless you deliberately put a little weight behind it to move it. Perfect.

15735832812_74c269b93b_c.jpg


The base is designed so that there is 3/4" clearance between the frame and the freezer to allow for (some) airflow. While much less that the 3" that is recommended around freezers I am not persuaded that this is an issue. Principally because the compressor is running much less of the time to keep the freezer at beer temperature rather than freezer temperature. For the same reason I didn't see any need to have an active fan-driven airflow (like Jester's keezer). There does need to be a route for air across the freezer skin though - so I put three 1" holes front and center to allow a passive airflow around the freezer. There is also a 3/4" allowance at the rear.

15114341494_b7e88952b3_c.jpg


The skirt 'floats' above the ground with about 1/8" clearance - which is plenty for the floor in my living room. It looks just fine like that. It's attached to the base, not to the rest of the frame - so getting it cut pretty accurately (especially the front dimension) is important. The joint are mitred and glued with no extra help - so they're inherently weak, but the strength comes from the whole skirt being screwed into the base using the furring strips shown.

15734285065_9b48f2eac3_c.jpg


I installed a trim piece around the top of the frame to fill in the 3/4" gap. The holds the freezer nice and snug (and looks good). It also adds a little bit of rigidity to the frame. The trim is glued and screwed.
 
15732361671_3e979e15a7_c.jpg


The keezer is framed in red oak. Red oak is plentiful and relatively inexpensive. I bought 16' of 12"x1" board from a local lumber yard and ripped it to the widths I needed. The panels are red oak faced plywood.

I was shooting for utility furniture, not an heirloom piece. It looks great and I'm very happy with it. If you were shooting for the stars, I would use better joints (I used pocket hole joints throughout) and better lumber (harder woods are always more attractive imho). There's a good example in the forums using cherry; even more impressive is a build in walnut with solid wood panels. A recent posting shows one in hickory which is also drop dead gorgeous.

15548406209_94220aec3b_c.jpg


The panels are simply rectangles of solid oak - nothing more complicated than cutting these to length.

15548838908_f3b46a393a_c.jpg


The oak is joined with pocket holes. This was my first experience using pockets holes. They are kind of magical. It's about 100x quicker than cutting mortise and tenon joints. Nevertheless I would still want a mortise and tenon (or at least a dowel joint) on a piece of high end furniture that I wanted my grandchildren to enjoy. The pocket joints are dead good at this point though and I expect will last at least twice as long as the freezer...

15734291515_a06b021a34_c.jpg


The plywood is simply glued onto the back of the frames. I cut a rabbet into the frames with a rabbeting bit on a freehand router. While putting the frame into a slot (dado) would be much stronger, my source of cheap plywood was 1/2" thick so needed to be set back with a rabbet. The glue is plenty strong enough without any extra support and this construction is very quick.

15735840222_31c16e61b1_c.jpg


A chisel makes quick work of making the round router corners square.

15114337634_85b4ce8b74_c.jpg


The dry assembled side panel. Always make sure stuff fits before committing yourself...

15735846302_4f73d066f6_c.jpg


The three frames are joined to one another with pocket screws, before gluing the panels in place. I over-glued the panels and paid the price in a little bit of glue seepage on the visible face of the panel - which is either a pain to remove or will screw up your final finish. The finished frame was screwed to the base from underneath.

15114902223_09da13430a_c.jpg


After the edge spacer strip was fitted, the whole frame was stained. I first tried Minwax's 'Jacobean' stain - I wanted something quite dark to contrast a little with the lighter oak floorboards in my living room. Jacobean was quite cold, so I bought some 'Red Oak' stain which is much redder (too red on its own). I mixed up a pint of 85% Jacobean and 15% Red Oak, which warmed up the Jacobean just enough.
 
The oak was finished with a Minwax stain and then Danish oil. It proved very important to try stain colours on scrap. Several iterations were required before the 85% Jacobean 15% Red Oak mix proved to be the colour that I liked. It doesn't hurt to try out the whole finish (stain and oil) on scrap to check that you like it.

The Oak was finished to 220 grit sandpaper. Oak is quite coarse so I think this is really far enough. There are one or two saw marks left on parts of the wood (in fairly discrete places - you have to look hard) which is a reminder that you have to make sure that you do the work properly at 60 or 80 grit before stepping up to 120 and 220.

I used glue and sawdust on the mitres on the top trim to make the imperfection in the join disappear. This is a good technique - if the mitre's not perfect (needs to be close) rub a little glue (all the glue is white woodglue) in the gap and then sand hard with 120 grit on a block over the top to fill the gap with sawdust. I wasn't careful enough with finish sanding after that had dried and there was a little glue remnant to the side of the mitre left in the surface of the wood. It looked terrible when the stain went on, so the area had to be re-sanded and then re-stained.

Minwax stain is super easy to use (I used the regular old fashioned oil based stuff - which I recommend). I applied it with a rag fairly heavily, let it sit for 10 minutes and then wiped it dry with a clean rag. Absolutely no blotchiness, super easy to apply. I'd heard that pre-stain is not necessary for oak and I can confirm that it is not and would be a waste of time and money.

I would have put clear danish oil (Watco) over the top, except that I had bought dark walnut stained danish oil (hoping that would be enough and I could have avoided the stain coat altogether - it was no where near an acceptable stain on its own) so I used that. The first coat is to seep into the wood, so you get the wood wet with a cloth full of danish oil and keep it wet for half and hour. Then you rub hard to remove any excess that is still on the surface. Because you have pushed oil right into the pores of the wood (which are very open for oak) you need to come back after a couple of hours and rub everything dry again. Leave two or three days for this coat to go off, and then rub it gently with fine grade steel wool, and apply a super thin coat - leave for ten minutes and then rub out hard with a cloth. Here's the trick with an oil finish - it looks good now, but if you keep going it will look great. Every two days (every day if you have good drying conditions) repeat with a new super thin coat of danish oil (which is really an oil / poly / thinner mix). After something like five or six coats, the wood takes on a beautiful sheen which is exactly as beautiful as it looks when the oil is wet on the surface. It's worth persevering - it takes only a few minutes to apply each new coat.
 
I made the decision to replace the freezer lid, rather than bolt a new lid to it. I'm glad I did. Hence 3/4" ply for the top was necessary for rigidity.

15732369511_2e902c011b_c.jpg


I painted the underneath of the lid (and the 2x3 framing which was later screwed and glued to it) with a spray can of inexpensive primer, and then with some oil based paint I had lying around. Perhaps unnecessary, especially since it is all then covered in insulation - but the inside of the freezer will get some condensation and this is protection for the plywood to stop it absorbing any moisture (which would be fatal).

15549459780_508b5f0aca_c.jpg


The apron is attached to the lid with pocket screws before the inside frame is screwed on. The round hole is for a pipe to be attached to bring air up from the bottom of the freezer into the coffin and the oblong hole is for the beer lines (and returning the cold air).

15114900173_d41094ca34_c.jpg


The lid was fitted with 1" insulation attached with Loctite spray glue (I love spray glue). Where the lid meets the freezer I stuck on weatherstripping - which I bought in a self-adhesive roll from Home Depot. The lid is heavy, but when propped open as shown it's quite near its balance point. The props shown are very thin pieces of mahogany scrap (any spare hardwood would do) and are plenty strong enough - they don't bow at all in use.

15732372341_01172bef8a_c.jpg


Because the props are thin, they stack away on top of the edge trim very tidily.

15549459220_4c93d10450_c.jpg


On top of the lid, the trim is mitred and glued on. The glue is strengthened by screws from underneath but this is really excessive. The lid is lifted by the apron, and there is a lot of surface area connecting trim and lid.

The dimensions of the trim are such that the inside is exactly 36 and 3/16" wide and the outside hangs just a little bit over the frame. The inside dimension is so that there is a limit to how much cutting of my 12" square tiles is necessary.

I attached Hardie board on top of the plywood. I am sure that this is quite unnecessary for the stability of the tiles (the area is very small) but it helps bring the finished tile level up very close the the height of the trim.

The drip tray needs to be dropped just a little into the plywood to achieve the right final height, and so I routed out a rectangle from the plywood to drop the drip tray into. The drip tray was a little over $20 from Amazon - although the price seems to fluctuate.

15734300505_41aee6f785_c.jpg


The tiles are 12" square Travertine tiles from Home Depot. It was a little under $30 for a 10 pack. Travertine is a natural stone - so I like it a great deal more than ceramic / porcelain. It's endlessly fascinating to look at. The front pieces are 12" x 10" and the pieces at the back sides are 12" deep - so I kept the number of cuts down. I covered it in stone sealer before installing it. I borrowed a wet saw to cut the stone with - which was wonderfully easy to use. The remaining four tiles became the top of a coffee table which matches the keezer.

15548845698_06f0ba5f4d_c.jpg


In place and grouted. I used some blue masking tape to shield the wood when grouting. It was very effective - but I could have been a little more careful with it. Nevertheless the finished result looks pretty good as long as you don't study it too closely.
 
Last edited by a moderator:
15549101877_f1b9d1509c_c.jpg


The coffin structure is two pieces of oak for the sides joined by 4 pieces of plywood. A further piece of plywood is added to the front to hold the oak board that the taps go through. The two plywood pieces at the back will support the rear cover; the plywood at the front bottom supports the front ply that will be tiled. Some people have made these by creating a plywood box and cladding it with the finish wood. No real reason to add to the thickness of the side of the coffin like that. I like the little angle that the Jester keezer has from a few inches up rather than entirely straight coffin sides - I think it makes it just a little less heavy looking.

15710586476_15e1506492_c.jpg


Here's the box built out with plywood at the front and top and trimmed with oak at the top and the oak tap board at the front. There's a little gap under the plywood at the front to allow the tile to recess behind it. That's pure laziness so I didn't have to make an additional cut to the stone.

15710574986_73af2001d7_c.jpg


The coffin does need cooling. Since the air is coldest at the bottom of the freezer it make sense to bring the air up from there. I do that by recessing a plastic pipe fitting into the lid, and attaching a piece of flexible hosing to it that reaches the bottom of the freezer. I just looked around Home Depot for whatever they had - I think it was in the swimming pool section.

15548844308_8b32d3cd1c_c.jpg


Some people have a box with a fan at the bottom of the pipe. I decided to put my fan in the coffin and pull the air up it. I built a little fitting for the fan to hold it snug in place over the top of the pipe. It's a 12v computer fan rated for reasonably low noise.

15548837498_d5b61a617b_c.jpg


Here are the electrical / electronic connections. Some notes here since there are quite a few questions in the forums and I didn't find a whole pile of answers (they're probably there - I just didn't come across them).

1) The temperature controller is an STC1000. These are about $17 from Amazon. If you get a version of this that only cools (which is all you need) you can get one for about $12. That's a whole lot cheaper than a Johnson temperature controller.

2) The power comes into a standard wall mount box (a couple of dollars from Home Depot) using a power tools replacement power cord rated for 15A (I think about $12). The left hand side is a duplex outlet (currently 68 cents at Home Depot) which is wired straight to the power cord. The right side is switched by the STC1000. I originally thought I would remove the tab between the two outlets of a single duplex unit - but couldn't figure it out, and there was enough space for a two gang box so I just went that way. The face plates etc... are also very inexpensive. You have to shop a little careful - the basic versions of all these electric bits are much cheaper than some of the fancier ones.

The switching works like this - the neutrals of the left and right outlets are connected together - only the live is switched. [All grounds are also connected together inside the box]. The live leaves the left outlet and goes to the switched cool circuit on the STC1000. It is then brought back from there to the live connector of the right outlet.

The STC1000 also needs power - so the live from the outlet is also sent to the live power in of the STC (it's split with the red wire connector) and the neutral connection is joined from the STC unit to an available neutral connection on the outlets. The wire is 12 gauge hook up wire - but short lengths from inside any 15A rated cable would be fine.

This is very easy but it is electrics - so if in doubt look up wiring an outlet and a switch on Google.

3) This allows the freezer just to plug into the switched side with no other adjustment to the freezer whatsoever.

4) The left hand side has the 12v transformer plugged into it. This goes to a dimmer switch ($3 or so from Amazon) which I removed from its original housing in order to fit through the rear panel. I soldered the transformer wires to the inputs of the dimmer switch and a little hook up wire from the same place to go onto a switch for the fan (you just need the red and black wires on the fan). I reutilised the original connectors at the far side of the dimmer switch (on the right hand side of the photo) to join to the wire going to the led lights so that the electronics can be removed easily from the coffin.

15548851958_bc3a2be23d_c.jpg


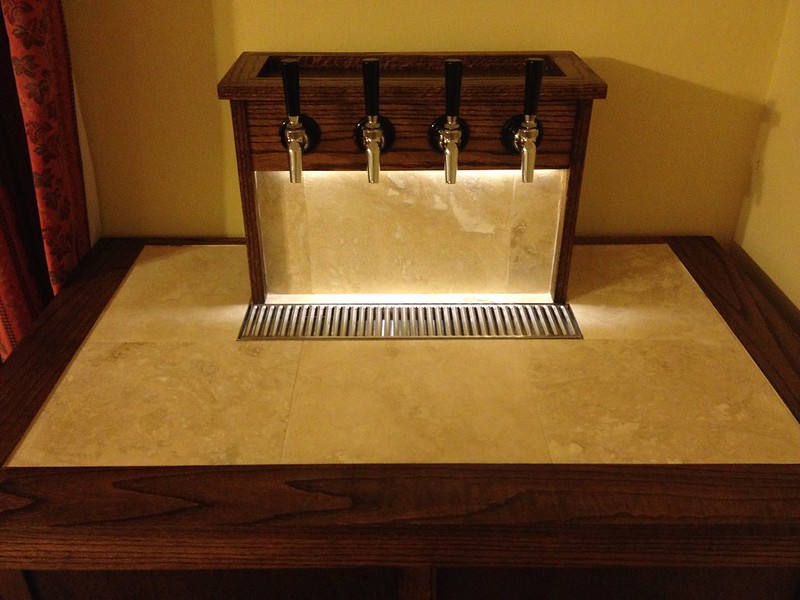
I used some of the insulation that I bought for the lid to pad out the inside of the coffin. As you can see there are plenty of gaps - but I figured some insulation would be better than none and didn't get too obsessive about it... I used little pieces of plywood to hold the nuts on the back of the beer shanks - I didn't fancy getting a spanner right up the tap board. Taps and connectors all came from BeverageFactory.com - which I found fairly reasonable; Kegs came from Adventures in Homebrewing which were much cheaper than anyone else for new Corny kegs with rubber tops and bottoms. I had been planning on used cornies - but these were sufficiently close to the used prices to be prepared to splash out. Generally most places are much of a muchness on pricing and I'm sure they change all the time in any event.

The rear cover for the coffin is plywood lined with some insulation - it's missing here so that you can see inside.

15114329384_15254dcb94_c.jpg


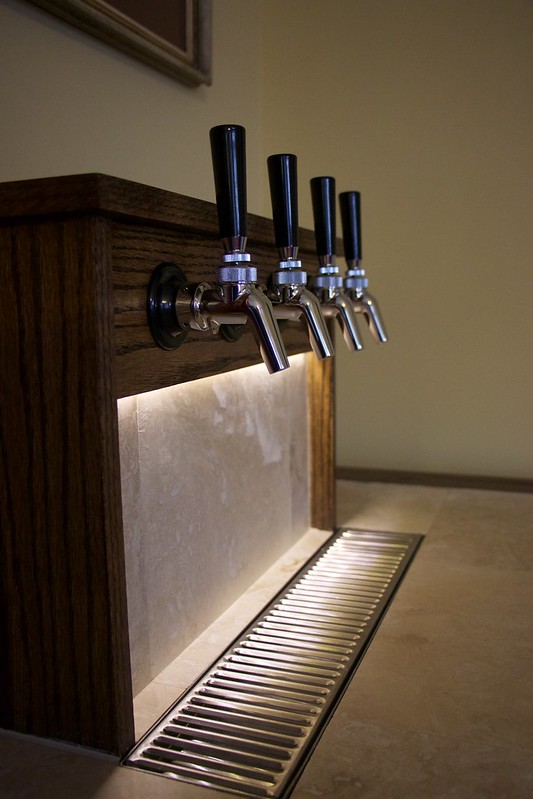
The taps are Perlick 630SS and the shanks are all stainless too. This seems a fairly standard choice and people seem to reckon that stainless is worth the little extra. The led lighting was $8 for a 5 metre strip from Amazon - which is great; I want to put it under my kitchen cabinets now! (I've got >4 metres left!).

The coffin lighting looks so good on the Jester keezer picture and just as good in real life - I'd definitely recommend going for this as part of the design of the coffin.
 
Last edited by a moderator:
I want this in a nice .PDF like I followed for my Kal clone. This is exactly what I want to do for my next keezer.

... Now to sell the wife on the idea.....

Thanks for the detailed posts!!!
 
Looks awesome! Question was there a specific reason you did not keep the original top for this build?
 
It didn't seem useful to just bolt a new top onto the old one - and not that it matters, but the freezer could be returned to original condition with no holes in it...
 
15114325344_26fe78446a_c.jpg


I took inspiration for this from the Jester Keezer. I saw that and thought: 'I'd like one of those'.

I discovered that hundreds of people have made these and figured that I'd like to have one that would hold four kegs.

There's a list in the forums of how many kegs various freezers take, and I found this Kenmore at KMart for $162 - which I reckoned was a good price:

15549075177_199b0fd242_c.jpg


I'm going to details the build in the next few replies to this thread...
Not sure if it’s me but the photos aren’t showing up. Thanks for your guide!
 

Latest posts

Back
Top