• Please visit and share your knowledge at our sister communities:
  • If you have not, please join our official Homebrewing Facebook Group!

    Homebrewing Facebook Group

Upside Down Keggles?

Homebrew Talk

Help Support Homebrew Talk:

This site may earn a commission from merchant affiliate links, including eBay, Amazon, and others.
"dry fitting" using wood and cinder blocks. Trying to get a rough idea on heights, etc.

WP_20141118_14_32_10_Pro.jpg


Planning on a cart similar to JohnW's (https://www.homebrewtalk.com/f253/single-tier-3-pump-bcs-462-automated-rig-204705/) and the Coloradoan one (https://www.homebrewtalk.com/f253/coloradoan-single-tier-build-345773/). Only I'll just be using 2 pumps to start with and no built in plumbing... having the cart put together in stainless so will likely have the mounts for a third pump put in place just in case and only use two to start with.

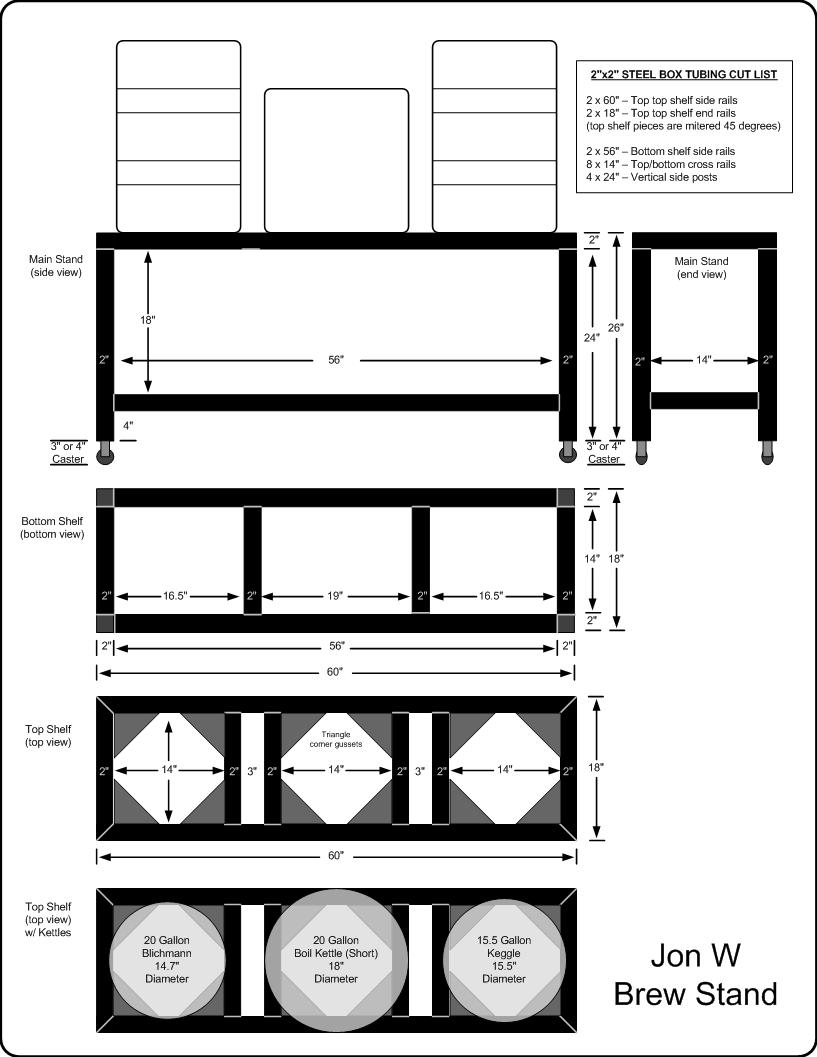
I'll be using JohnW's cart dimensions for the most part:

Brutus-10-JW-V6.jpg


But I believe I'll have the front top cross beam lower than the rear one and some type of either angled reduction on the arms coming from the back to meet the front bar or just a straight L. This will allow for the bottom drain to be brought to the front without hitting the front cross beam. IE: here's what I'm running into with the wood setup:

WP_20141118_14_20_54_Pro.jpg
 
Also, here's the brew bench design I'm thinking of. Pumps on the bottom bench, keggles up top. I dropped the front cross beam 5" down so that the bottom drains can come out the front.

Any thoughts?

brewbench.jpg
 
And here's an assembled bottom drain with the quick release for the tubing attached. Right now the temperature probe will be placed at the end here, but I may end up moving that down to the pump area to keep wiring cleaner... This would require another pump I think.

WP_20141119_13_53_53_Pro.jpg
 
Also, here's the brew bench design I'm thinking of. Pumps on the bottom bench, keggles up top. I dropped the front cross beam 5" down so that the bottom drains can come out the front.

Any thoughts?

brewbench.jpg


If you bump the keggle, it could fall at an angle between your supports. I would add guides that keep the base of the keggle from shifting enough for that to happen or keep part of the original top rail on each side with a slot for the drain valve to fit through. Then you could put some pieces of plate to create a larger surface for the keggles to sit on.
 
If you bump the keggle, it could fall at an angle between your supports. I would add guides that keep the base of the keggle from shifting enough for that to happen or keep part of the original top rail on each side with a slot for the drain valve to fit through. Then you could put some pieces of plate to create a larger surface for the keggles to sit on.

Aha, great point... Trying to picture a few options, is there another build thread that fixed this?

Maybe bring the sides in 2-3" so that there's enough space for the valve to pass through but the front can still rest on it?
 
Alright here's another version. There's a slot on the right for a whole home water filter (https://www.homebrewtalk.com/f256/water-filter-setup-29145/). On the left is where I mounted my CFC. Thinking that will face outwards. Only real negative is my source of water & electric is over near the control panel on the right, so will need to run a hose over to the CFC during cooling.

Maybe run plate across the top and cutout the areas that the keggles's valves will sit?

brewbenchv2.jpg


Thanks,
Ryan
 
Something that I realized after I cut off the plug on my chugger was that the cord wasn't long enough to reach my panel . I ended up make a short extension with a locking plug on one end and a regular 5-15r on the pump end.
 
Something that I realized after I cut off the plug on my chugger was that the cord wasn't long enough to reach my panel . I ended up make a short extension with a locking plug on one end and a regular 5-15r on the pump end.

Can you post a picture? I wasn't happy with my solution for the same problem.
 
Ordered parts for the Control Panel today. All told I'm around $850 in on the CP with probes. Got a 462 instead of a 460 as well.
 
Ordered parts for the Control Panel today. All told I'm around $850 in on the CP with probes. Got a 462 instead of a 460 as well.


This is exactly why I've been putting it off....This project is turning out to be a lot more than I planned.


Which guide for the panel, if any, are you following?
 
This is exactly why I've been putting it off....This project is turning out to be a lot more than I planned.


Which guide for the panel, if any, are you following?

Yeah between the kegs, keg parts, pumps, control panel, and the brew bench I'll be putting together next it'll get up to around 2500$.

Will be following ebrewsupply's wiring diagram. And will have a similar setup as his control panel for the physical placement.

Bought my enclosure from tier1automation. Pretty decent prices.
 
Ordered my breakers and SSRs over the weekend. Need to order some full couplings and go weld stuff together this weekend.

Also need the receptacles for pumps and elements. Any brand recommendations?

Thanks,
Ryan
 
Hey Ryane,

Do you have any suggestions for a locking receptacle for the pumps? I'm looking at this one but it says 2 pole, will it work?

http://www.ebay.com/itm/Leviton-232...-3W-Flanged-Outlet-Locking-Recep/290761953210

Thanks,
Ryan

2P means that is has 2 conductors (H-H or H-N = the same thing) and a ground, so yes it will work for a chugger or march pump. In fact this is what I use myself.

You can always over-spec your connectors/etc and have no worry about using it. Nearly all of my high amp inputs are now 3P 480V connectors since I could source them cheaper and more easily.
 
Awesome. Thanks!

Got a couple of goodies in:

WP_20141126_16_30_27_Pro.jpg


WP_20141126_15_51_45_Pro.jpg


Case is bloody huge.

2P means that is has 2 conductors (H-H or H-N = the same thing) and a ground, so yes it will work for a chugger or march pump. In fact this is what I use myself.

You can always over-spec your connectors/etc and have no worry about using it. Nearly all of my high amp inputs are now 3P 480V connectors since I could source them cheaper and more easily.
 
3x the price. :)

I know this is like 2 weeks too late, but why doesn't anybody make lids out of the keg cutout? I wish I had a good pic handy, but I kept the piece of the keg bottom that got cut out, wrapped some of Bobby's polyvinyl edging around it, taped the **** out of it with reflectix tape (which is holding up in the moisture so far) and then put a 6 inch handle on the top, the same style that the Kal panels use. With polyvinyl edging also around the keg opening, it's enough extra material to make up for what I lost with the angle grinder.
 
I know this is like 2 weeks too late, but why doesn't anybody make lids out of the keg cutout? I wish I had a good pic handy, but I kept the piece of the keg bottom that got cut out, wrapped some of Bobby's polyvinyl edging around it, taped the **** out of it with reflectix tape (which is holding up in the moisture so far) and then put a 6 inch handle on the top, the same style that the Kal panels use. With polyvinyl edging also around the keg opening, it's enough extra material to make up for what I lost with the angle grinder.

Yeah I still have my cutouts too. Couple reasons I went the lid path...

1. These lids are cheap... For $20 including shipping I'm done with the lid deal.
2. I ended up taking more of the edges off the top after I cut it as it wasn't a perfect circle. So the cutout is a bit small now.
 
Yeah I still have my cutouts too. Couple reasons I went the lid path...

1. These lids are cheap... For $20 including shipping I'm done with the lid deal.
2. I ended up taking more of the edges off the top after I cut it as it wasn't a perfect circle. So the cutout is a bit small now.

Perfectly logical, that is a good price too :rockin:
 
Nice. Yeah figuring I'll use wood to build some type of base for each of them... or build a table so that there's a hole in the bottom large enough for the piping to escape.


I will be using 4 rigid casters with the wheels removed, flip them over, reattaching them to the bottom skirt of the keg through drilled holes and using the "top" of the casters as legs. That way there is plenty of room for the drain fittings and I can move the MLT around as I need to.
 
Back
Top