• Please visit and share your knowledge at our sister communities:
  • If you have not, please join our official Homebrewing Facebook Group!

    Homebrewing Facebook Group

The birth of Zeus. (Non typical brewstand build.)

Homebrew Talk

Help Support Homebrew Talk:

This site may earn a commission from merchant affiliate links, including eBay, Amazon, and others.
It's looking awesome!
Thanks !

Where is the water heaters flue going to discharge?
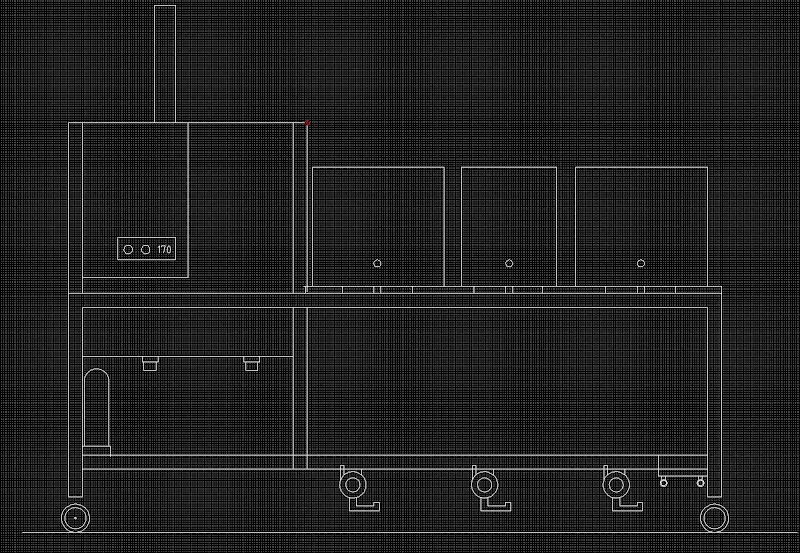
Probably just straight up as per the drawing. The flue pipe and an elbow come with it in a kit. Both are stainless steel. I might put on a big ole exhaust stack for effect...

I'm not sure how you could get low pressure hot through a water heater as that's 1 of the reasons we have them the only way I personally can think of doing it is
The heater MUST be run on pressurized water. I believe there is a pressure sensor inside it and it will shut down on low pressure. The pressure is needed to keep the water from turning to steam inside the heat exchanger. It exits the hot water heater at 140F with the stock thermostat and 180F (IIRC) with the accessory thermostat, but parts of the heat exchanger might be hotter than that.

Getting the smallest copper cylinder possible and having a small header tank and an immersion heater in the tank and using your heater for your tap....but it wouldn't be worth it for the price of the heater and it wouldn't be portable unless you had the cylinder set up on another frame with casters connected with flexible /push fit john guest fittings, snap on snap off for storage,

Hope you can come up with a way though!

All I need to do is have 2 water pressure regulators, one on the hot water line/valve going into the manifold and the other on the cold water line/valve going into the manifold.

The only thing i don't know about is the temp rating of the regulators. I doubt that its standard practice to have a water pressure regulator on a hot water line.

The other thing i could do is put a safety relief valve set at 5 PSI on the manifold and just allow it to blow off if the pressure is exceeded.

The only thing I need either of these for is because I want hot and cold water valves going directly into the manifold so that vessels can be filled, things can be flushed, etc. Neither the pump head nor the silicone hoses are designed for high pressure, thus the need for something to protect them. As long as one runs the manifold valves properly, neither of these components would see high pressure, but on brew day, when you have a 1000 things on your mind, I can't rely on myself to remember that. Thus the need for protection in the form of a relief valve or upstream pressure regulators.
 
The only part I see that might be a problem is only four casters. With the added length and the potential weights you are going to put on it I would probably add two more to the center. Just to make sure you don't end up flexing the middle or over stressing it. Stainless should hold up but i wouldn't risk it.
 
The only part I see that might be a problem is only four casters. With the added length and the potential weights you are going to put on it I would probably add two more to the center. Just to make sure you don't end up flexing the middle or over stressing it. Stainless should hold up but i wouldn't risk it.

The weight is distributed along the length of the long members. I put about 150 pounds of force on the center of one of them today when it was supported on each end by a sawhorse. It was fine.

I wouldn't want casters in the center because if the surface its sitting on isn't perfectly flat, it will rock. Nothing worse than stirring a kettle and have the stand rock while doing it.

If there is a flex issue, I'll put a stress rods diagonally on the back from the top of the legs to the center of the lower shelf and another from the top of the back center upright to the front lower shelf. That would strengthen everything while leaving the lower shelf mostly open for easy access.
 
True rocking would be a nightmare. Another alternative option would be legs. using long nuts and some bolts welded to the bottom you could adjust them up and leave then there unless you felt a need to lower them. Would also make for a backup leveling or stabilizing system if needed. Just throwing random thoughts at you. I seem to be a magnet for Murphys law where if it can go wrong it will lol!
 
I'll test the strength out by filling all the vessels when I get it built. Stay tuned.
 
Blow off valves are an option but you'd end up flooding the place or getting burnt wet feet every time you turn your Tap on to the manifold,

You can buy pressure reducing valves for hot water I've had to fit them on showers before but I don't know how low you can go, instead of silicone hoses could you use speed fit? As this wouldn't require reducing and the manifold should hold,

Where are you discharging the carbon monoxide?
 
Where are you discharging the carbon monoxide?
If my burners are adjusted properly, my stand shouldn't produce any carbon MONoxide.

I'll be running the stand in my garage, so the burners and heater will dump the carbon DIoxide into the garage. I'll mount a carbon monoxide detector on the stand and open a door and window to provide fresh air into the space and keep it safe.

The water heater burns a lot less gas than a burner does.
 
brewman ! said:
If my burners are adjusted properly, my stand shouldn't produce any carbon MONoxide.

I'll be running the stand in my garage, so the burners and heater will dump the carbon DIoxide into the garage. I'll mount a carbon monoxide detector on the stand and open a door and window to provide fresh air into the space and keep it safe.

The water heater burns a lot less gas than a burner does.

The burners don't seem a problem as we have gas hobs, it was more the heater as in the uk we have alot of safety regs on boilers/water heaters, but definitely get an alarm in the uk we have 2 types a patch of paper that changes colour which is useless as it gets older it changes anyway, or we have a digital one which sounds an alarm but aslong as its sites next to a window it shouldn't be a problem just watch out for headaches haha
 
I got the burner mounts cut.

DSC_0076.JPG
 
It's refreshing to see a build where there is actually progress being made, on an almost daily basis. Good for you. If you start slacking I'll start taunting you ;) For reals, can't wait to see it finished.
 
It's refreshing to see a build where there is actually progress being made, on an almost daily basis. Good for you. If you start slacking I'll start taunting you ;) For reals, can't wait to see it finished.
Its taking up room in my garage and I need the space for other projects. I have no choice but to get it done !

I only have time to brew in winter. If I don't get this thing done before Christmas, I'm going to miss another brewing season.

Believe me, I have other projects that haven't had any progress on them for a while.

I'll be working on it on and off today and this weekend.
 
I'd consider giving you five whole dollars to build me one too. Unless of course you drive a hard bargain, I could up it to $10. Looking Great, man. :D
 
FYI, I've been informed that using one of the structural members of the stand as a conduit for natural gas (or propane) supply to the burners is highly illegal and frowned upon. I thought it might be, but I checked to make sure.

I am going to be piping natural gas to my burners as much in compliance with local codes as possible.

Even though the stand is being operated in a garage, its still considered an indoor natural gas appliance. With a little extra planning and work, it should be fully compliant.

I don't need it to be compliant as I won't be getting my stand inspected. But those regulations were created for a reason and I'm going to abide by them as much as possible.
 
ParamedicGuy said:
I'd consider giving you five whole dollars to build me one too. Unless of course you drive a hard bargain, I could up it to $10. Looking Great, man. :D

That's ridiculous.. Brewman, I'd like to double his offer.
 
I went shopping today to gas componentry to hook the burners up to the gas valves.

I was told its illegal to use a rubber hose on a indoor gas system. It has to be hard plumbed with a "non porous" line, meaning threaded pipe, an appliance hookup "line" or copper, and only a certified gas fitter is allowed to flare copper for nat gas use.

So... I went shopping for "appliance hookup line" can found this, for $24.

DSC_0085.JPG


Too bad its 1/2 x 1/2. But wait ! It uses some sort of coupler to make the connection. It turns out the ends on that hose are 3/8" flare. What size is the valve on my burners ? 3/8" flare !

DSC_0089.JPG


DSC_0095.JPG


So then I set about laying out the route of the line, with the burners upside down, like it will be from the underneath.

DSC_0097.JPG


I'm not sure how I feel about the gas line being under the burner next to it. I want the burner valve at the front of the stand so that the flame can be easily adjusted.

I want the gas control valves at the back of the stand because I don't want gas lines running up in front cluttering up access to under the stand. If I can avoid having the gas line running down the front of the stand, when the brewing hoses are disconnected from the manifold, the entire front of the stand will be open.

I don't want the gas line to be much lower than it is in the picture because I need all the height I can get in order to store my brewing kettles, which are 18 inches high with the lids on upside down.

I need to sleep on this. Lots to think about here.

How hot is it UNDER a burner with a pot on top ?

I also found a 6 foot hose for my faucet. I'll explain that another time.

Tomorrow will be a big day for Zeus, if my wife isn't ill.
 
brewman ! said:
How hot is it UNDER a burner with a pot on top ?

Well, I'm not ashamed to admit that I run a KAB4 bayou burner on top of a Formica bench, and it gets just hot to the touch after the burners been running for 2 hours. You could probably fabricate some kind of a heat shield.
 
How much space is there between the Formica top and the underside of the burner ?

Warm to the touch would be fine.

I guess if your counter top is fine, my gas lines should be fine too as they will have more air flow around them than your counter top did.
 
brewman ! said:
How much space is there between the Formica top and the underside of the burner ?

Warm to the touch would be fine.

I guess if your counter top is fine, my gas lines should be fine too as they will have more air flow around them than your counter top did.

8" max between the counter a roaring banjo burner element.
 
Grill design, shown with the 11 and 20.5 gallon kettles sitting on top.

Grill%2520drawing.jpeg


The up and down bars are 3/16" x 1" stainless welded on side.

The cross wise bars are 1/8" x 1" stainless laid flat.

The grills are held in place on the stand by 4 or 6 1/4" bolts.

I'm a bit worried about the bars warping with heat from the burner, but so what if they do a bit ?

I thought about making these out of mild steel, but then they would be a rust mess.

I'll have about an 1.25" between the top of my burner and the underside of the pot. That is about the same spacing as on the gas stove we have in our house.

I'm hoping that running the grill bars longwise will allow good air flow around the underside of the pot. The flame won't go outside of the bars at +/- 6", but there isn't a lot I can do about that.

I've tried to minimize the amount of grill bar that gets heated directly by the flame to minimize the amount of heat not going onto the pot and the amount of heat coming back to the frame.

The pots never touch the 2x2 frame, so the frame is not conducting heat away from the pots. I dislike designs that put the pots directly on the frame because usually the frame is cold relative to the flame and pot and the frame is usually impeding the air/flame flow.

I'm not sure I like this design.
 
I like this design better.

Grill%2520drawing2.jpeg


4 pieces of 1x1 tubing cantilevered off of the frame or a cross member of it.

They only catch the 11 gallon pot by a couple inches, but one could bolt tabs to the grill bars to keep the pot centred.

None of the grill bars are in contact with the flame.

The heat coming back to the frame via the grill bars would be minimal.

A 20 gallon pot weighs about 15 x 8.333 + 30 pounds for "stuff" = 150 pounds. Each bar would be holding ~40 pounds at most. It would put the frame members under some torque, in the order of 15-20 foot pounds but it should be OK with that.

The grill could hang the burners on a height adjustable mount.

The only problem is that I need to go out and buy a piece of 1x1 tubing (probably 20 feet) to build this grill. The entire stand will need roughly 10 pieces x 7-8" = 6-7 feet.

However, I could use the left over tubing for the grain mill assembly.
 
At this point I have to say that figuring out what to build takes longer than actually building it. At least for me, on this stand, anyway.
 
You may want to shield those somehow.
Agreed.

If I build the grill with the cantilevered 1x1 tubing, I need to run a 2x2 across the stand on either side of the center pot. I could run the appliance line inside them, to hide them and to shield them.

I don't know how warm those frame pieces would be though. I might be better to run the appliance lines under them and put a piece of stainless sheet on each side. That would be pretty good shielding and the lines would be secured.

When I was picking out my appliance lines, another brand was covered with a nice yellow plastic wrapper. I passed them up due to heat issues with the plastic and they were more expensive.
 
Updated drawings.

Changed kettle spacing, added mounts for hot water heater, added the new grill structure.

Brewstand%2520drawing6-top.jpeg


Brewstand%2520drawing6-side.jpeg


Brewstand%2520drawing6-grill%2520detail.jpeg
 
It may too much to ask, but can you add the manifold and plumbing you are planning on using? I may be convinced to hard plumb my stand, although I'd like to see an example of some good hard plumbing.
 
Sure thing. I'll post it up when I plumb it, which is hopefully later this week.

Basically, I'm using a custom T on top of each pump with 3 valves on the non pump ends. 2 go to the manifold on either side and the other goes up to the return (sparge arm, etc) on the vessel.

I'm putting a union between each pump head on the manifold, so that the manifold breaks down for easy cleaning. Remove 4 screws on the pump heads and crack a few unions and the whole manifold is broken down, ready for washdown in the sink.

However, I'm hoping that by flushing with water and BPW after brewing and a flush again before brewing that I don't need to break it down to wash it very often. But I feel a lot better about having a manifold knowing that I can break it down to wash it if I need to. I don't think I could bring myself to go with a "hard" plumbed manifold.
 

Latest posts

Back
Top