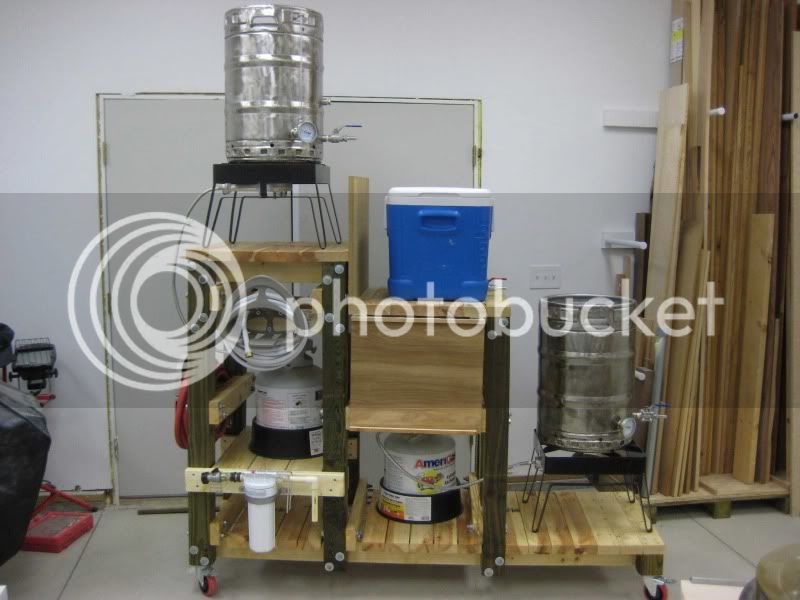
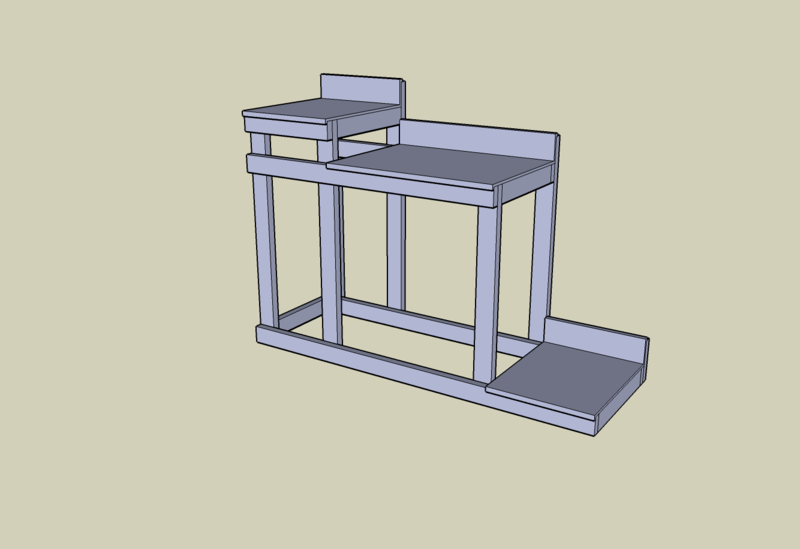
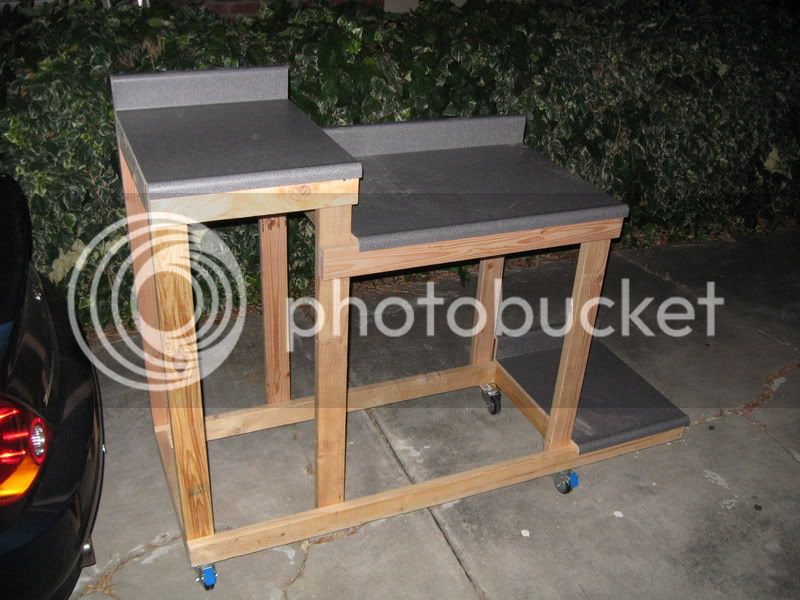
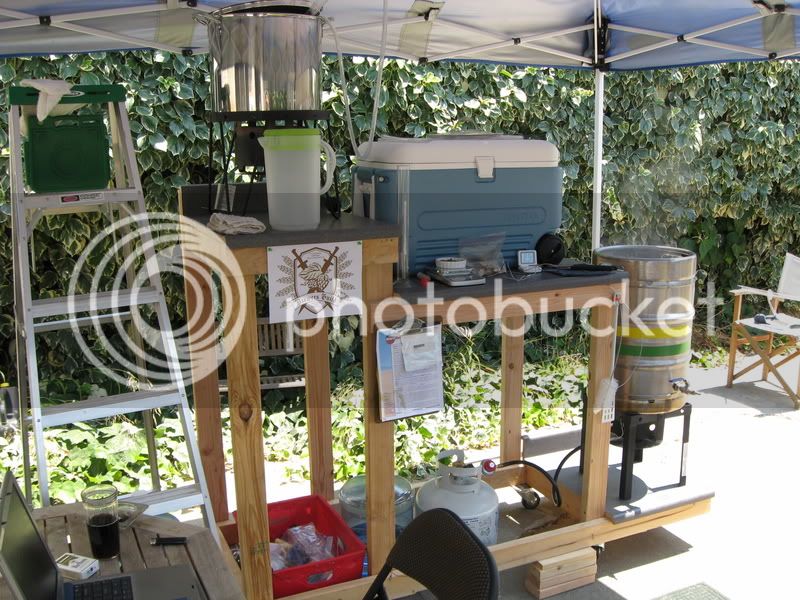
• Please visit and share your knowledge at our sister communities:
  • If you have not, please join our official Homebrewing Facebook Group!

    Homebrewing Facebook Group

Show Me Your Wood Brew Sculpture/Rig

Homebrew Talk

Help Support Homebrew Talk:

This site may earn a commission from merchant affiliate links, including eBay, Amazon, and others.
IamCanadian said:
I really like this idea. How is the balance on it when the kettle is full water.

I put the shelf low enough to not cause balance issues but tall enough to drain into fermenter. I brew small batches so never more than 5 gallons in kettle. One could add a drop down support leg to shelf. The cart is heavy and balances nicely.
 
Sorry I'm a bit late to this thread. I built a brewstand two weeks ago out of 2x4s and some laminate countertop.

I made the plans with Google's sketchup:

BrewStand07.png


and here it is, in action:

IMG_0659.jpg

IMG_0664.jpg

IMG_0666.jpg


Since then I've already built a shelf in the high part to hold the propane tank, and I intend to fully enclose it with some nice cabinetry. Cheers~

Do you have the dimensions for this build?
 
Do you have the dimensions for this build?

You can get pretty close by eyeballing it. Standard keg height is right around 24 inches, and that burner appears to be about half that. That gives about a 3 foot height difference from the BK tier to the MLT tier. Based on my own build, it looks like the same rough dimensions in a slightly different configuration. IOW 2'x2' BK, 3'x2' MLT and 2'x2' HLT. Only difference for me is that I skipped the (what appears to be) 8" rise to the HLT since a BoilerMaker spigot will drain even with the top of my MLT when sitting on a 12" high burner. First picture in my build thread (in my signature) has a graph paper drawing with dimensions. Just extend the 2x4s on the HLT tier another 8" and split the decks, and you should have pretty much exactly that design.
 
Do you have the dimensions for this build?

It really should be custom for your own equipment.

Height of your lower burner plus the height of your BK = height of your middle tier.

Height of your middle tier plus the height of your MLT minus the height of your HLT burner and minus the height of your spigot on your HLT = height of your top tier.

You might want to add a couple of inches to the top tier so that your HLT spigot is a couple of inches higher than the top of your MLT.

This is exactly what I did when I built my stand. Worked GREAT!
 
I like the tip design on your top tier. Do you have a pick up tube or do you just have a screen?
 
Hlt just has the tubing going into mash tun. Mash tun has the braided tubing. Have to slow down draining to maintain siphon because drain is not completely on the bottom. I found the tipping really helps.
 
I emailed Thompson's to see what the official response would be. For whatever it's worth, here's the email conversation:

Me:
I'm planning to build a wooden workbench. There will be a propane burner with 24" stainless steel legs sitting on top of the bench. The flame is directed up. There could be some wooden structure beside the burner also. The wood should not have direct contact with the flame, but be exposed to heat that radiates on the sides and bottom. I would like to seal the bench with Thompson's Water Seal, but I wanted to check about the flammability of the product once it's dry and whether the heat would cause any fumes. Thanks.

Thompson's:
Our products can only withstand up to 120 degrees F. It sounds as though you surface may get hotter than 120 degrees F. If this is the case do not use our products. Once our products have fully cured (20-30 days after application) they are no longer toxic nor are they a flame risk.

Me:
Thank you. That's very helpful. One clarification. If it is non-toxic and not a flame risk after 20-30 days, what would the result be of exposure to 120+ degree temperatures?

Thompson's:
The product will turn black, peel, crack, and basically fail when exposed to temps higher than 120 degrees F.

Very interesting. I wonder how a polyurethane spray would hold up under the heat. My rig has had no issues with the spray so far.
 
Very interesting. I wonder how a polyurethane spray would hold up under the heat. My rig has had no issues with the spray so far.

just look up the MSDS sheet for any of your products used. i just looked up rustoleum polyurethane spray since its mosty what you would find in any store. this might just be before application but one thing that looks like a general consensus amoung a polyurethane coating is...

CONDITIONS TO AVOID: Avoid temperatures above 120 ° F. Avoid all possible sources of ignition.

HAZARDOUS DECOMPOSITION: By open flame, carbon monoxide and carbon dioxide. When heated to decomposition, it emits
acrid smoke and irritating fumes.
 
Temperature cautions usually mean while applying so you don't have blowtorch in your hand. As far as durability under high temps I would use exhaust manifold paint, rated to withstand temps much higher than BBQ paint. They will all produce odors at high temps, at least for awhile.
 
There is lots of great information in this thread! Thanks all for the ideas.

Here is my new gravity stand based on what others have done on this forum. Thanks for the helpful tips.

image-1859117843.jpg
 
BFD Brewhaus v2.0 - Single level platform for three Blichmann floor LP burners and two March 815 pumps (HLT kettle and third burner future)...gas manifold, NG conversion and HLT/MLT temperature control automation are future upgrades...

Updated BFD Brewhaus v2.1 - Added third burner and 15g HLT and automated burner control for the mash tun and HLT. Takes the adrenalin infused rage out of holding a mash temp and mashing out...
BFD Brewhaus was designed to keep any flammable material outside and below the burner shield perimeter. I used 1" angle iron back to back to make a "T" platform to mount the burners. The wooden frame was given a light spray of polyurethane clear coat to inhibit water infiltration. After I built it and fired up the burners, I found that the burner shields do get pretty hot, but the wooden frame surfaces and the steel angle below the burners were barely warm to the touch. I think I could have gotten by with wood to support the burners.

DSC_6781cls.jpg


DSC_6753.jpg


DSC_6763.jpg


DSC_6796rcl.jpg
 
Updated BFD Brewhaus v2.1 - Added third burner and 15g HLT and automated burner control for the mash tun and HLT. Takes the adrenalin infused rage out of holding a mash temp and mashing out...
BFD Brewhaus was designed to keep any flammable material outside and below the burner shield perimeter. I used 1" angle iron back to back to make a "T" platform to mount the burners. The wooden frame was given a light spray of polyurethane clear coat to inhibit water infiltration. After I built it and fired up the burners, I found that the burner shields do get pretty hot, but the wooden frame surfaces and the steel angle below the burners were barely warm to the touch. I think I could have gotten by with wood to support the burners.

Very nice........DROOOOOOLLLL!
 
Still need to add some sort of drip pan under burners to catch stuff that falls down and possible boil over. Also need to figure out how to attach the chiller?
 
Update on progress of my brew stand. Pomp tool box is reconfigured and ready to go. Added se heat shielding to protect the wood around the burners. Added a clear plastic covering to the tops to protect the wood and give a smooth work surface.

woo that is sexy! :mug:
 
Oh, and since I added the new BoilerMaker HLT, figured I'd post a couple pics...


tell me, what is the metal skin around your burners made of? I have some heat bleed that I intend to contain but my old man and I couldn't decide what material might be best for this.
 
tell me, what is the metal skin around your burners made of? I have some heat bleed that I intend to contain but my old man and I couldn't decide what material might be best for this.


Zoom in on it about 3 times.........Looks thin and easily trimmed and formed to me......


I would guess roof flashing.:mug:
 
Zoom in on it about 3 times.........Looks thin and easily trimmed and formed to me......


I would guess roof flashing.:mug:

Exactly. Galvanized roof flashing. It was a 24 inch x 10 foot roll. I cut 2 2'x2' squares for under the burners. I then trimmed up some sections to make wind screens for the KAB6s.
 
ccostel said:
Update on progress of my brew stand. Pomp tool box is reconfigured and ready to go. Added se heat shielding to protect the wood around the burners. Added a clear plastic covering to the tops to protect the wood and give a smooth work surface.

Wow... That's a gorgeous rig man.
 
image-1343092375.jpg

This is what I just finished. Brewed a 10 gallon batch last Wednsday. Worked pretty well. Needs a little tweaking. Much better than my old method. I like pumps
 

Latest posts

Back
Top