New Kegerator DIY Build !

Homebrew Talk - Beer, Wine, Mead, & Cider Brewing Discussion Forum

Help Support Homebrew Talk - Beer, Wine, Mead, & Cider Brewing Discussion Forum:

This site may earn a commission from merchant affiliate links, including eBay, Amazon, and others.

Clubbinaz

Supporting Member
HBT Supporter
Joined
Nov 17, 2010
Messages
19
Reaction score
0
Location
Phoenix
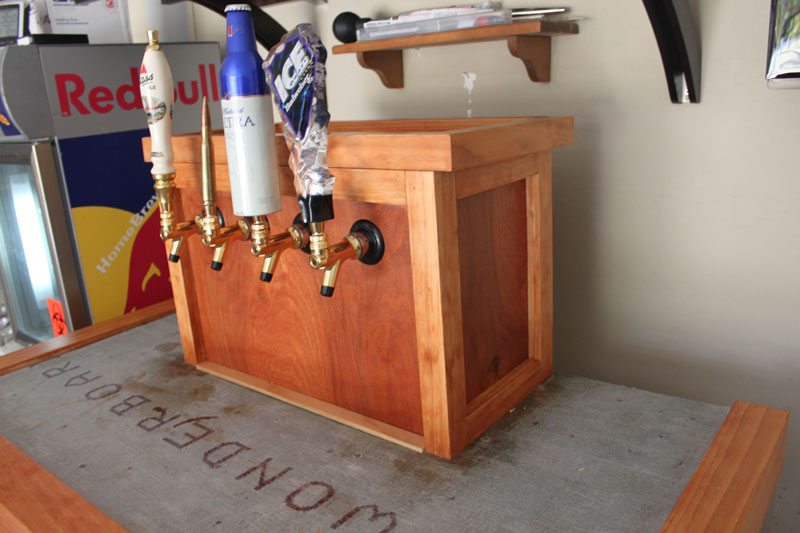
Easy to Build and doesn't look that bad either.
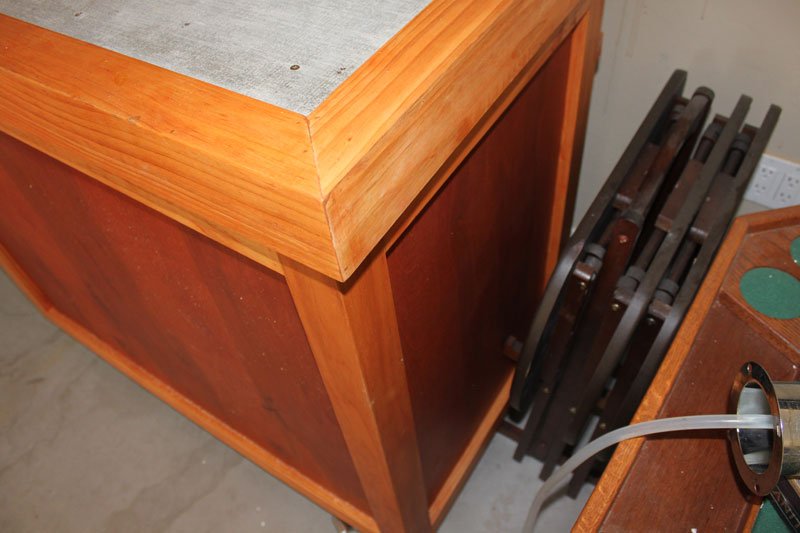
The body is structural sitting on top of a 2 x 4 base with casters for easy movement. The chestfreezer just slides in the back and the lid opens as it should. I haven't decided what I want to do with the top yet, Im waiting for my drip tray so I can install it , but I'm probably going to tile the top.

Chest Freezer - $75 bucks on Craigslist
Home Depot Pine Select 1x3 x 3 8foot sticks = $22.68
Home Depot Pine Select 1x4 x 2 6foot sticks = $14.44
Home Depot Birch Sheet 4x8 = $35.00
Home Depot Standard 2x4 8foot = $2.76
Casters 3" Rubber Wheel Total Lock = Ebay $24.00
1 Box 3" Wood Screws = $7.95
1 Bottle Titebond Wood Glue = $2.97
19" Drip Tray = 36.00 Amazon
Cousin to bring Miter and Table Saw over for a day = $HOMEBREW
2 Cans Stain - Gunstock and Clear = $15.00
1 Can Pre-Stain = $9.99

I already owned the gas system, taps and hoses so I reconditioned them for this project.

Total Cost of Purchased Parts = $245.79
Total Cost of Already owned parts = 300 bucks including Co2 tank.

Total Build "from scratch" price : 545.79
Having 4 taps of homebrew all the time: Priceless

IMG_5031.jpg


IMG_5032.jpg


IMG_5033.jpg


IMG_5034.jpg
 
Lookin' good! Now you just need to lay your tile and replace the Mich Ultra and Natty Ice tap handles.
 
Ha, I took those from an old box just so I would have something on there for the pictures. I actually just purchased 4 of these chalk board tap handles from Tapboards.com. Coolest idea I've seen in a while and they will look nice up there!!
 
You could easily insulate the coffin box, just cut a big whole into the chest freezer and insulate the insides of the coffin box and your done. But, I don't see the need to do that extra labor and it would definetely do a lot more damage to the chest freezer and would make replacing the chest freezer much more difficult. I build the outside to out last the chest freezer that is why I made it possible to simply slide out the old and slide in a new chest freezer when the time is right. I use velcrow to attach the chest freezer lid to the box top which opens with the lid of the chest freezer, because the chest freezer lid weighs very litte, it works very well. But again, for my design, insulating the top of the box really isn't needed. Tap clearances? Box is 21" long with 4 inches inbetween each tap and they site approximately 3 " out from the lid of the top box.
 
Nice Job! I'm getting ready to build one of these over the next couple of weeks and have been reviewing several keezer build threads. I have a couple of questions: Is there a gap between the outer skin of the freezer and the inside of the cabinet? I have read that most of the newer freezers lose their compressor heat through the outer skin of the units, with the exception of the Sunbeams that have a cooling coil on the back. Are you using fans to keep the unit cooled down to prevent constant cycling? How is the wonderboard attached to the actual top itself? Sorry if these are stupid questions, but if have seen these things built numerous different ways and everyone seems to have a different theory on how to prevent the freezer from overheating. I am nearing completion on my basement build and have all of the material needed to build the cabinet and top + coffin. I found a 7.1 cu.ft. freezer at Costco for $168, which I may go pick up this weekend. I'm doing mine with T&G knotty pine, cedar log trims, and a tumbled travertine top to match my bar area of the basement. Wish me luck. Anyways....great job on yours and I look forward to hearing back on my questions. :mug:
 
Nice Job! I'm getting ready to build one of these over the next couple of weeks and have been reviewing several keezer build threads. I have a couple of questions: Is there a gap between the outer skin of the freezer and the inside of the cabinet? I have read that most of the newer freezers lose their compressor heat through the outer skin of the units, with the exception of the Sunbeams that have a cooling coil on the back. Are you using fans to keep the unit cooled down to prevent constant cycling? How is the wonderboard attached to the actual top itself? Sorry if these are stupid questions, but if have seen these things built numerous different ways and everyone seems to have a different theory on how to prevent the freezer from overheating. I am nearing completion on my basement build and have all of the material needed to build the cabinet and top + coffin. I found a 7.1 cu.ft. freezer at Costco for $168, which I may go pick up this weekend. I'm doing mine with T&G knotty pine, cedar log trims, and a tumbled travertine top to match my bar area of the basement. Wish me luck. Anyways....great job on yours and I look forward to hearing back on my questions. :mug:

Is there a gap between the outer skin of the freezer and the inside of the cabinet?

Yes, there is definetely space, infact, there is a good inch or so on either side including the front. This is and was not designed for cooling purposes. My Westinghouse chest freezer has its compressor housing and motor in the back which is completely open on this build. In Fact, because I lifted the chest freezer off the ground when I installed casters, there is actually more air flow preventing "overheating" than if it were just sitting in the corner.

Are you using fans to keep the unit cooled down to prevent constant cycling?

Nope, actually which my thermostat installed, the chest freezer itself only runs for maybe 10 minutes at a time. Doesn't really run that often so I don't think there will be a problem.

How is the wonderboard attached to the actual top itself?

On top of the "top" of the chest freezer, I have a scrap piece of 1/2" sheet wood. To this I used some wood glue and a finish nailer and attached the edging to that piece of wood to create the top. From there I cut the wonderboard and layed it over the sheet wood, then screwed all of it together. Now I have a "semi-liquid proof surface to tile over. The wonderboard just makes a great vapor lock and easy waterproof surface for countertop. To be honest, the only reason I used the wonderboard, was because my drip tray is 7/8" high and to be flush, I needed to fill a quarter inch or so from my top so I used a piece of 1/4" wonderboard so now my tile and drip tray will be flush with the wood edging.

Just a suggestion, as I have noticed, the top of the chest freezer gets very heavy. It's a very light item that gets much much heavier. Keep that in mind when you are choosing your tile. The only reason why mine wasn't finished for this picture is because I took back the granite tile I was going to use because it made the top way to heavy to be functional.
 
I appreciate all of the responses. Congratulations...it looks awesome. I can't wait to stop bottling and start kegging! Yes, I am a little concerned about the weight on the top as well. I may use red cedar plywood with red cedar log trim for the top to cut down on weigth. It would match more closely to my redwood slab bar top and it would be a hell of a lot lighter. I think that with a 2 step epoxy finish, it would hold up great. Check out my basement build and look at my bar + bar base and you'll get an idea of the look I'm going for. Unfortunately, built the bar before I started brewing, so I did not incorporate tap handles. I plan on building this matching coffin keezer and putting it where the fridge in the pictures is located. Thanks again for your help and I'll keep you posted once the project begins. :mug:

Is there a gap between the outer skin of the freezer and the inside of the cabinet?

Yes, there is definetely space, infact, there is a good inch or so on either side including the front. This is and was not designed for cooling purposes. My Westinghouse chest freezer has its compressor housing and motor in the back which is completely open on this build. In Fact, because I lifted the chest freezer off the ground when I installed casters, there is actually more air flow preventing "overheating" than if it were just sitting in the corner.

Are you using fans to keep the unit cooled down to prevent constant cycling?

Nope, actually which my thermostat installed, the chest freezer itself only runs for maybe 10 minutes at a time. Doesn't really run that often so I don't think there will be a problem.

How is the wonderboard attached to the actual top itself?

On top of the "top" of the chest freezer, I have a scrap piece of 1/2" sheet wood. To this I used some wood glue and a finish nailer and attached the edging to that piece of wood to create the top. From there I cut the wonderboard and layed it over the sheet wood, then screwed all of it together. Now I have a "semi-liquid proof surface to tile over. The wonderboard just makes a great vapor lock and easy waterproof surface for countertop. To be honest, the only reason I used the wonderboard, was because my drip tray is 7/8" high and to be flush, I needed to fill a quarter inch or so from my top so I used a piece of 1/4" wonderboard so now my tile and drip tray will be flush with the wood edging.

Just a suggestion, as I have noticed, the top of the chest freezer gets very heavy. It's a very light item that gets much much heavier. Keep that in mind when you are choosing your tile. The only reason why mine wasn't finished for this picture is because I took back the granite tile I was going to use because it made the top way to heavy to be functional.
 
Nice looking setup! :mug:

BTW, the top on mine weighs a friggen ton, but it works just fine. I have a prop cut to the right length to hold it open when needed. The hinges are holding up no problem.
 
That's good to hear that it's holding up. The hinges on the chest freezers are way overrated then because the lid probably only weights 8-10 lbs total and now they are supporting at least 60 lbs.
 
Thats where my .50 Caliber IPA goes !! :)

Nice...

I have six empty .50 cal (BMG) shells on hand that I'll probably be turning into tap handles... Getting ready to order up a couple of complete, dummy, rounds. Also found an online store that has 20mm rounds... I have a 20mm shell (complete, a dud) that I'll probably try converting as well... Although that one might not work out so well, since it is rather heavy. I'll try posting a picture of it, when I can locate it...

Thought it was a 25mm, turns out it's a 20mm round... :D
 
My future tap handles... Well, two of them at least (have five more of the .50 cal shells on hand)...

highres_11829934.jpeg


The one on the left is the 20mm round (a dud)... I've had it for many, many years...
 
I really dig the flush mounted drip tray.. I need one, but the $70 price tag is holding me back.

-=Jason=-
 
Do a search for "drip tray" here. I have this one. SS. works great. 19" long, 4" deep, 1" tall $15

I suppose I could get that to work, I was looking into the flush mounted ones that have a flange that sits on top of the tile work.

but for $15 I might have to see if I can make it work. I should have thought about that before I laid my tile :(
http://www.barproducts.com/media/drippan.htm

-=Jason=-
 
Back
Top