Monster Mill 2-roller gap adjustment instructions

Homebrew Talk - Beer, Wine, Mead, & Cider Brewing Discussion Forum

Help Support Homebrew Talk - Beer, Wine, Mead, & Cider Brewing Discussion Forum:

This site may earn a commission from merchant affiliate links, including eBay, Amazon, and others.

blizz81

Well-Known Member
Joined
Feb 4, 2008
Messages
957
Reaction score
326
Location
Omaha, NE
I've had a barley crusher for 10 years and have always measured the gap (and adjusted accordingly) by sticking a feeler gauge in the gap from above and tightening the adjustable roller.

Got a Monster Mill 2-roller and in the instructions, they say on their 2-roller mills, "the gap should be measured at the bottom of the rollers". "At the bottom" and "from the bottom" are two different phrases to me, and I would think there'd only be one effective gap to measure regardless of where you are measuring it from. Any thoughts?

https://www.monsterbrewinghardware.com/store/pc/catalog/MM-2-3-20Instructions.pdf
 
....Got a Monster Mill 2-roller and in the instructions, they say on their 2-roller mills, "the gap should be measured at the bottom of the rollers". "At the bottom" and "from the bottom" are two different phrases to me, and I would think there'd only be one effective gap to measure regardless of where you are measuring it from. Any thoughts?

https://www.monsterbrewinghardware.com/store/pc/catalog/MM-2-3-20Instructions.pdf

Perhaps they could provide a better description by changing the word "at" to "from". Just measure from the bottom since the adjusting roller adjusts vertically. If the roller adjusted horizontally (which it does not), then the gap theoretically could be measured either from the top or from the bottom of the rollers.

Lastly, be sure to setup multiple gaps and mark them by the adjusting knobs/bolts such as something like .35, .40, and .45. That way it will be a lot easier to change the gap size later when you want to.
 
One thing I have read somewhere on their site is that you want to set the gap as the slave roller moves toward the driven roller from underneath. On both sides.
That way the outward pressure during milling pushes the (eccentric) roller bearing into the (locked) set screws, so the gap won't change.
I wonder if that's what they're referring to in those instructions.

Notes:
  1. You want to tighten the set screws a tad more than thumb-tight, so use some pliers, but gently, just an extra nudge, like a 1/100 of a turn. I put some thick grease on the steel set screws that go into the aluminum frame to reduce wear on the aluminum threads with repeated gap re-adjustments.
  2. Especially if you hand hold the drill, before you fill the hopper and start the drill, make 100% sure the slave roller spins freely, by jogging it from underneath. If it's locked up for whatever reason the whole mill setup may flip over when you start the drill if it has enough torque. This may cause damage and injury...
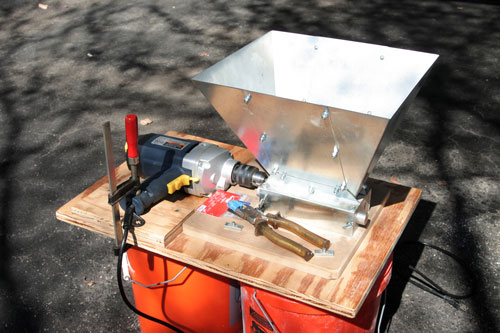
You may want to build a base for your mill that integrates your drill. Hands-free dr milling. This is what I built:

Mounted-Monster-Mill-MM2_500.jpg
 
Last edited:
Posted about this a long time back. Here's the response I received from Fred about adjustment: "If you make sure that the adjustable roller is coming up from UNDERNEATH the drive roller on both ends when you set the gap, then the thumbscrews should hold. There is TWO positions of the adjustable roller where you can set the same gap, one with the roller coming down from above, and one with it coming up from underneath. If you notice the thumbscrews are OFFSET from the centerline of the knob. they are below the knob centerline. If you imagine the grain pressing against the knob trying to turn it while you are milling, you can see that the thumbscrew will either get pressed against or pulled away from the knob when milling depending on how you set the gap. We have found that the gap should hold with the thumbscrews are finger tight if the gap is set such that the roller is coming up from underneath the drive roller when setting the gap. To state it another way, the gap should get smaller when you turn the knob on the drive shaft side of the mill clockwise."

And here is the thread (most helpful info is on page 2 of the thread): https://www.homebrewtalk.com/forum/threads/adjusting-monster-mill-2-0.375038/


Rev.
 
Thanks Rev! I had searched for threads prior to posting but didn’t come across that one.

I got the Pro, and I did adjust it last night as the clockwise tightening on that was closing the gap. The gap seems to measure the same from below as it does from above. I never paid attention to the travel on my BC adjustment roller to see if it swings upwards similarly, nor did I ever heed tightening the adjustment screws down when it was tightening w/clockwise turns vs. over-rolling back away.
 
Back
Top