• Please visit and share your knowledge at our sister communities:
  • If you have not, please join our official Homebrewing Facebook Group!

    Homebrewing Facebook Group

Looking for welding advice.

Homebrew Talk

Help Support Homebrew Talk:

This site may earn a commission from merchant affiliate links, including eBay, Amazon, and others.

Ohio-Ed

Supporting Member
HBT Supporter
Joined
Nov 18, 2008
Messages
2,058
Reaction score
25
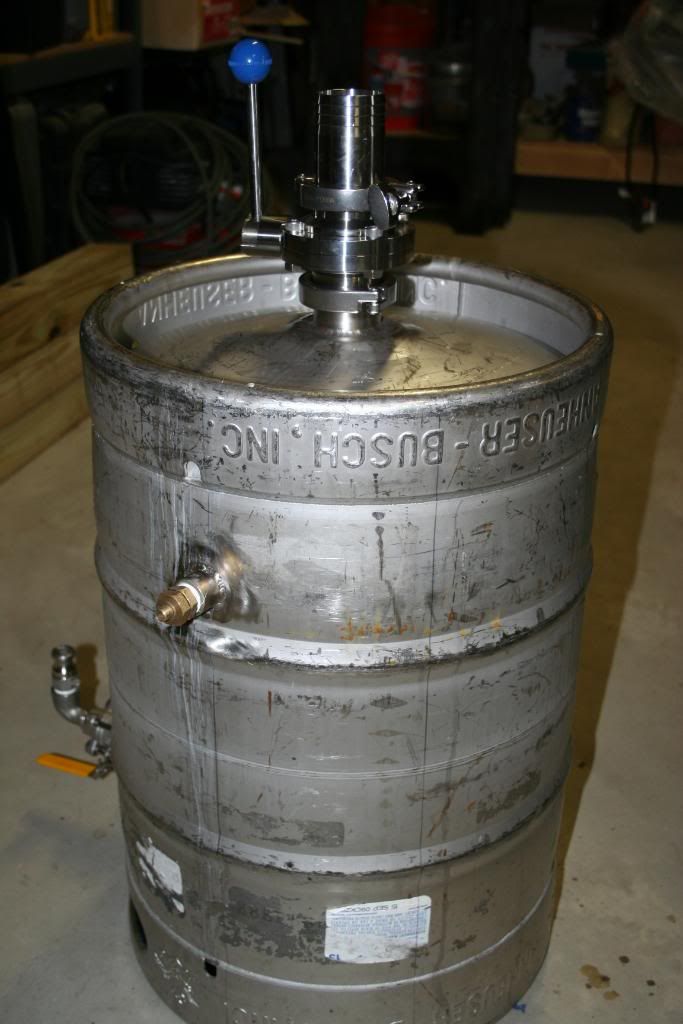
I tig welded a 2" triclamp ferrule on the bottom of my MT for a waste valve.
I wasn't confident that I could put a hole in the keg tight enough for a good fit up and I wasn't sure how to clamp the ferrule flush with the keg bottom. On top of that, I was concerned about burning away the edges of the ferrule or the keg opening.

They way I ended up welded it was to drill a 1.5" hole, center the 2" ferrule over the hole and weld it in place. I then used an angle grinder to remove the rest of the keg material... Pictures of the results are below.

I want to put a similar valve on the bottom of my BK. I'm also thinking about triclamp fittings for mounting heating elements in my HLT & BK. So, how can I fit up & clamp additional ferrules?

Thanks,
Ed

Outside of weld:
IMG_3639.jpg


Inside of weld:
IMG_3627.jpg


Inside of ferrule where keg was ground away:
IMG_3641.jpg


Another shot of inside of ferrule where keg was ground away:
IMG_3644.jpg


Valve in place:
IMG_3650.jpg
 
First of all, nice looking welds.

Secondly, that isn't a bad way of doing it unless you want 100% precision. If you had a plasma cutter, it'd be the most accurate way of cutting the 2" hole, other than that you're looking at your method being your best bet.

I'd stick with something that works!
 
For electric element this what I had Swagman build for myself

Its 1 1/2 Ferrell with a 1inch SS not nut which is straight threads.

Its built so the box and element can be removed with removable of one 11/2 clamp.


MVC-341S.jpg


MVC-343S.jpg


Hope this helps

Woodie
 
For electric element this what I had Swagman build for myself

Its 1 1/2 Ferrell with a 1inch SS not nut which is straight threads.

Its built so the box and element can be removed with removable of one 11/2 clamp.


Hope this helps

Woodie

Woodie,

Thanks for the reply, that is basically what I am building.
My question has to do with welding the ferrule which will clamp the heating element assembly to the keg.
Have you installed yours?

Thanks,
Ed
 
First of all, nice looking welds.

Secondly, that isn't a bad way of doing it unless you want 100% precision. If you had a plasma cutter, it'd be the most accurate way of cutting the 2" hole, other than that you're looking at your method being your best bet.

I'd stick with something that works!

Brum,

I have a lot to learn yet but thanks for the compliment...

The way I welded it, there is a bit of material from the keg that overlaps the ferrule beyond the weld. No question this would not be food grade sanitary.
This will work for now, but I'm looking for advice on the best way to fit this up and make it as sanitary as possible.

Thanks,
Ed
 
First of all, nice looking welds.

Secondly, that isn't a bad way of doing it unless you want 100% precision. If you had a plasma cutter, it'd be the most accurate way of cutting the 2" hole, other than that you're looking at your method being your best bet.

I'd stick with something that works!

I disagree that a plasma is the most accurate. You could get a bettet fit by cutting the hole with a hole saw. I use hole saws to cut all of the holes in my kettles, then use a small grinding stone, slowly, to open the hole up to the perfect size.
I weld my kettles at about 72 amps and I use 3/32 wire. I tend to walk the cup (not free hand) around the ports. you can use solar-flux on the inside to make in almost sanitary. But the best way IS to purge the vessel with argon for a 100% sanitary weld.

Mike,

Thanks for the input.
I did use a hole saw to cut the initial 1.5" hole. I was concerned a 2" hole saw may be too loose. I should have done a test, and I will when I get a chance.

I welded this one free hand, I have no experience walking the cup... again something I should practice. I used a 1/16" tungsten and a very large gas lens. I would probably need a smaller lens to walk the cup on this weld, what size do you use?

I used 1/16" wire. That is all I have other than some .035 (I think) mig wire.

My welder was set on about 125amps, but I was pretty far from full petal.

I did back purge the weld with about 15cf of argon.

Thanks,
Ed
 
Woodie,

Thanks for the reply, that is basically what I am building.
My question has to do with welding the ferrule which will clamp the heating element assembly to the keg.
Have you installed yours?

Thanks,
Ed

ED

When it comes to hole into the keg I use good quality hole saws. The 1 1/2 ferrule is 1.500 OS so I used a 1 1/2 hole saw used a clamp to hold in position cap the ferrule and back flowed. Couple of tacks and than its off to races.

Woodie
 
Ed, everything you are doing is fine. The only thing I would do different is tack the ferrule over the hole in three or four places, then I would grind off the overlapping keg material flush with the inside of the ferrule with a flapper wheel.
Then I would make a fusion weld from the exterior to join the two, of course with a purge.
You can fuse the two all the way through to the back side of the joint from the outside if you get your puddle hot enough.
Fusion joining the fitting with good results takes some practice. Don't weld too hot or your going to blow a hole in the joint and have to dab some filler to close it up before continuing.
You can freehand the weld, just watch the weld puddle carefully. When the puddle starts swirling, and dancing your at that point where your getting complete fusion between the two pieces, but also where if you move too slowly the puddle can fall away and leave you with a hole in the joint.
I suggest you start off a little on the cold side, 50 to 60 amps is a good start, check for fusion(an inspection mirror would help a lot) and if you didn't get proper fusion, go around it a little hotter again.
Gradually increase the heat until the pieces fuse properly. You can try going over the joint as many times as you need to until you get it right

And by the way Ed, your welds are looking really good.

dmfa,

Thanks, I really appreciate your input.
I'm thinking... if I weld the outside of the ferrule, I need to grind the inside back to where the two pieces are fused? I'm thinking of going down from a 1/16" tungsten to a .040"? And I will definitely reduce the heat. My experience with fusion welding to this point has been with a thinner piece melted into a thicker piece... These are both similar thicknesses so I was not confident in my ability to fusion weld.

Thanks for the props on the welds... I have much yet to learn, but your guys input is a huge help.

Ed
 
dmfa,

Thanks, I really appreciate your input.
I'm thinking... if I weld the outside of the ferrule, I need to grind the inside back to where the two pieces are fused? Yeah , grind the excess keg material sticking out past the ferrule until it's flush with the inside diameter
I'm thinking of going down from a 1/16" tungsten to a .040"? No need to use that small of a Tungsten. 1/16 is just fine. I use a 3/32 for stuff that thin.And I will definitely reduce the heat. My experience with fusion welding to this point has been with a thinner piece melted into a thicker piece... When welding materials of dissimilar thickness you want to concentrate your heat towards the thicker of the two pieces. Point your Tungsten ever so slightly towards the thicker part.
You want to watch the puddle closely when doing this because it's very subtle.
These are both similar thicknesses so I was not confident in my ability to fusion weld. You seem to catch on to welding pretty quickly. I belive you'll get it.

Like I said earlier practice on something else if you have the material. But if you don't, start off on the lower range of your amperage, weld a little and check for fusion, if the pieces didn't fuse all the way through to the back side go around it again a little hotter the next time.
A little tip... brush your welds after each pass


Thanks for the props on the welds... I have much yet to learn, but your guys input is a huge help.

Ed
.
 

Latest posts

Back
Top