Weezy
Well-Known Member
This is something I had been mulling around for a long time. It was a side project, as I have too many other big and time consuming projects to talk about...but I never liked immersion elements. More cleaning, worry of scorching, etc. Anyway, when I picked up a used Avantco IC1800, I was excited because it has temperature settings for every 10 degrees through the typical brewing range; 140, 150, 160, 170. The first thing I did was put a pot of 2 gallons of water on the thing, set it to 140F and wait. I came back in 45 minutes and it was 173F by my thermometer. Scrap that idea!
That one was a crappy, cheap, used one off Craigslist. $40. They must have used it for deep frying because it was coated with grease. It died. But that was a blessing. I tore it apart.

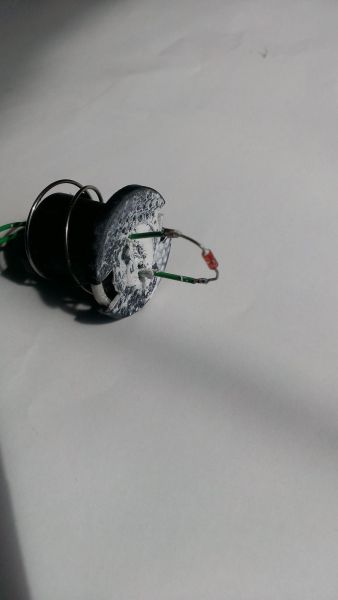
The blob of white stuff is thermal grease that transfers heat from the underside of the glass lid to the thermistor (not a very effective setup). The thermistorthat is nestled on the top of the black post at center:
The center part is the sensing section. It's essentially a fancy resistor that varies resistance based on its temperature. Putting a meter on this shows it at about 275K ohms at room temp.
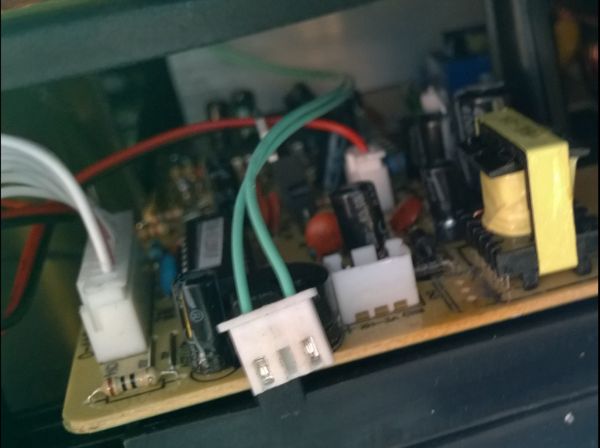
Here's where it attaches to the board:
When I saw it was a nice simple, removal plug, the wheels started spinning. I immediately started looking for ruggedized thermistors with the approximate resistance range. I enlisted the help of a few EE friends with supplier contacts. We came up with nothing.
Then another light bulb went off. Why not just use the existing probe with added wire and a home brewed thermowell?

I ordered some nonconductive thermal grease from Omega, and a 1/2" NPT threaded thermowell from Brewhardware.
I had an unused, cheap PT1000 thermistor that I cut to use the wire. I could have easily just used hobby wire but this is a sheathed two-wire set at the appropriate gage. win-win.
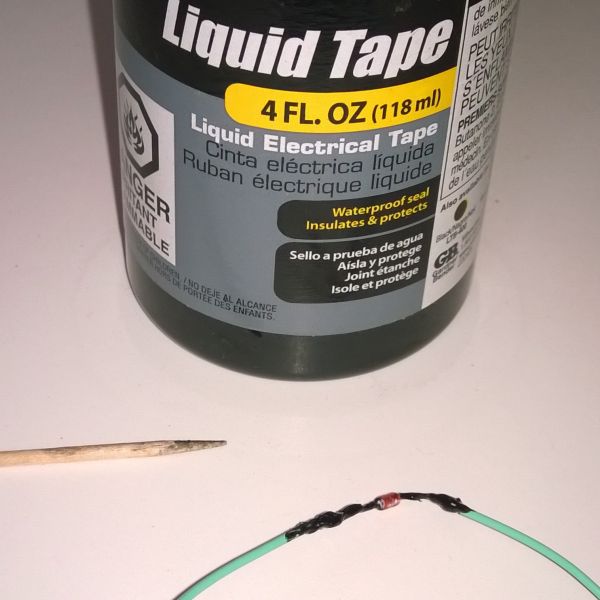
Only the sensing section needs to be exposed. The surrounding, bare wire, if shorted would likely fry the board (this is why it would have been nice to find an off the shelf ruggedized thermistor replacement) So I coated the bare wire with liquid electrical tape:
I cut the probe wires closer to the board mount, being sure to leave enough wire to solder to the spliced in extra wire. For the board side, I drilled a hole through the bottom of the cooker (the IC1800 has a flat plate on the bottom that simply unscrews).
For the probe side and the installation in the thermowell, I about 1/3 filled the well with the grease, inserted the probe as far as it would go, then siliconed the outside end to fix it and waterproof it.
IT'S ALIVE!!!

FIRST TEST?
First of all, I didn't release the factory installed smoke. It ran. I put a 12 quart pot on it with 1 gallon of water. I set it 160F, mash-in temp, and let it go. I got 2F/minute and it did not get to 160F. Let me start at the end, then I'll give the details. The temperature settings on the machine do not match the actual temps that the water will be heated to. But this isn't a big issue because the temperature settings now nicely coincide with consistent water temps, thanks to immersing the probe.
setting vs. water temp
160F = 130F
170F = 140F
180F = 150F
190F = 160F
200F = 170F
Now the details. The water must be recirculated or at least quite frequently stirred. Without recirculation, the cooker will overshoot the above listed temp by 4-5 degrees, then shut off and the temp will fall back for the listed temp, before kicking back on. When I had it set at 170F, it would cycle from 144-145 to 139-140. So I started stirring and it stayed at 140-141. Although, this yoyo effect may be dampened with grain and more water (more thermal mass) and a insulation wrap.
$230 is better than $1,000 for a 2600W Dipo with a factory external probe.
I have not brewed with this yet. I need to get the probe mounted to a pot. I plan to build two of these (likely 3500 watters), and use the Brutus 20 method. Mash Tun heated to 160F for mash in, then turned down for 150F mash. Sparge Pot on the second cooker heated to 170F. After a short mash, start cross recirculation with both set to heat to 170F.
That one was a crappy, cheap, used one off Craigslist. $40. They must have used it for deep frying because it was coated with grease. It died. But that was a blessing. I tore it apart.
The blob of white stuff is thermal grease that transfers heat from the underside of the glass lid to the thermistor (not a very effective setup). The thermistorthat is nestled on the top of the black post at center:
The center part is the sensing section. It's essentially a fancy resistor that varies resistance based on its temperature. Putting a meter on this shows it at about 275K ohms at room temp.
Here's where it attaches to the board:
When I saw it was a nice simple, removal plug, the wheels started spinning. I immediately started looking for ruggedized thermistors with the approximate resistance range. I enlisted the help of a few EE friends with supplier contacts. We came up with nothing.
Then another light bulb went off. Why not just use the existing probe with added wire and a home brewed thermowell?
I ordered some nonconductive thermal grease from Omega, and a 1/2" NPT threaded thermowell from Brewhardware.
I had an unused, cheap PT1000 thermistor that I cut to use the wire. I could have easily just used hobby wire but this is a sheathed two-wire set at the appropriate gage. win-win.
Only the sensing section needs to be exposed. The surrounding, bare wire, if shorted would likely fry the board (this is why it would have been nice to find an off the shelf ruggedized thermistor replacement) So I coated the bare wire with liquid electrical tape:
I cut the probe wires closer to the board mount, being sure to leave enough wire to solder to the spliced in extra wire. For the board side, I drilled a hole through the bottom of the cooker (the IC1800 has a flat plate on the bottom that simply unscrews).
For the probe side and the installation in the thermowell, I about 1/3 filled the well with the grease, inserted the probe as far as it would go, then siliconed the outside end to fix it and waterproof it.
IT'S ALIVE!!!
FIRST TEST?
First of all, I didn't release the factory installed smoke. It ran. I put a 12 quart pot on it with 1 gallon of water. I set it 160F, mash-in temp, and let it go. I got 2F/minute and it did not get to 160F. Let me start at the end, then I'll give the details. The temperature settings on the machine do not match the actual temps that the water will be heated to. But this isn't a big issue because the temperature settings now nicely coincide with consistent water temps, thanks to immersing the probe.
setting vs. water temp
160F = 130F
170F = 140F
180F = 150F
190F = 160F
200F = 170F
Now the details. The water must be recirculated or at least quite frequently stirred. Without recirculation, the cooker will overshoot the above listed temp by 4-5 degrees, then shut off and the temp will fall back for the listed temp, before kicking back on. When I had it set at 170F, it would cycle from 144-145 to 139-140. So I started stirring and it stayed at 140-141. Although, this yoyo effect may be dampened with grain and more water (more thermal mass) and a insulation wrap.
$230 is better than $1,000 for a 2600W Dipo with a factory external probe.
I have not brewed with this yet. I need to get the probe mounted to a pot. I plan to build two of these (likely 3500 watters), and use the Brutus 20 method. Mash Tun heated to 160F for mash in, then turned down for 150F mash. Sparge Pot on the second cooker heated to 170F. After a short mash, start cross recirculation with both set to heat to 170F.
")