• Please visit and share your knowledge at our sister communities:
  • If you have not, please join our official Homebrewing Facebook Group!

    Homebrewing Facebook Group

Immersion chiller advice....

Homebrew Talk

Help Support Homebrew Talk:

This site may earn a commission from merchant affiliate links, including eBay, Amazon, and others.

Ize

...
Joined
Mar 11, 2006
Messages
2,238
Reaction score
44
Location
Central Illinois
Meet my get-toe immersion chiller....


3414-Chillerresize01.jpg


I got this sorry POS when I bought my original kit 9 yrs ago and like all of my gear it's been sitting ever since. (Never been used) Now I want it up and running since I'm so close.... To me it needs a re-wrap and something to tighten down the coils... (copper wire?) I know a corny would be ideal to re-wrap it, but since I'm not kegging at this point, not an option... Also looking at outfitting it with some Hi-Temp vinyl tubing with standard garden hose connectors...

Any and all input highly appreciated as always....


Ize
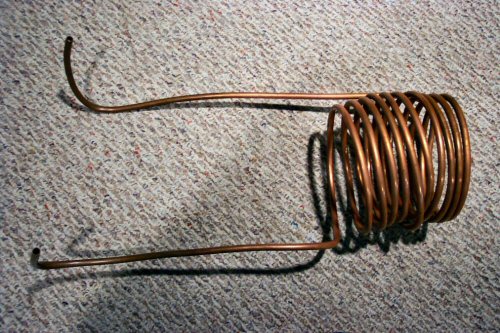
 
Re-wrapping it will probably cause you nothing but trouble - you'll end up with the same surface area, which is really what matters.

Garden hose connections are convenient, but if you're using 3/8" tubing, they're a bit large. Look into some barbed fittings about the same inside diameter as your copper tubing and sweat them with some solder and flux. Or you can just smash some PVC or vinyl hose onto the ends and call it good.
 
Yuri_Rage said:
Re-wrapping it will probably cause you nothing but trouble - you'll end up with the same surface area, which is really what matters.

Garden hose connections are convenient, but if you're using 3/8" tubing, they're a bit large. Look into some barbed fittings about the same inside diameter as your copper tubing and sweat them with some solder and flux. Or you can just smash some PVC or vinyl hose onto the ends and call it good.

To be honest it was the vinyl smash I was thinking of... Clamp em' down, make sure they're snug and run with it... It was a freebie when I bought my gear so I wasn't that worried about it.

Wouldn't it be more efficient with tighter coils tho? (just having a helluva time wrapping my brain around this one... I keep looking at it, especially after a few beers and keep overthinking it I think...)

Ize
 
Ize said:
Wouldn't it be more efficient with tighter coils tho?
Actually, it probably wouldn't, unless you can manage to get more of the tubing into the hot wort. The purpose of the coils is to get the longest amount of tubing into the wort that you can. The longer the tube (so to speak!) the better the cooling action.

FYI, my "fancy" counterflow chiller uses nothing but slip-fit and clamped hose connections on either end, and it works just fine.
 
Yuri_Rage said:
Actually, it probably wouldn't, unless you can manage to get more of the tubing into the hot wort. The purpose of the coils is to get the longest amount of tubing into the wort that you can. The longer the tube (so to speak!) the better the cooling action.

FYI, my "fancy" counterflow chiller uses nothing but slip-fit and clamped hose connections on either end, and it works just fine.


AH! Ok, the more IN the wort, the more efficient the chiller.... NOT the compactness of the coils... (couldn't get the whole "Block of Cold Area" out of my head) Total sense.... :rockin:

Ize
 
Another thing to consider is that you want the wort to be able to flow around the coils of the chiller freely so more of the hot wort comes in contact with it. If the coils are tightened against each other vertically, you would lessen the good flowaroundocity factor you already have.
 
Chairman Cheyco said:
Another thing to consider is that you want the wort to be able to flow around the coils of the chiller freely so more of the hot wort comes in contact with it. If the coils are tightened against each other vertically, you would lessen the good flowaroundocity factor you already have.


As loose as this thing is (think slinky) I should be in good shape then... Do you think hi-temp tubing would be the best bet for this? It won't be coming into contact with hort wort (maybe just the kettle) but warm water on the outflow....


Ize
 
If you ever decide to get another chiller, that old one will make a nice pre-chiller.

I use one and it makes a difference. I drop it in a cooler with a bag of ice and water and run the out to my bigger chiller.
 
You can get some compression fittings and size that fitting up to garden-hose size. Very simple and all you gotta do is buy or make 10ft of garden hose for your outflow.

I have the above x2 with 10ft of tubing in my pre-chiller and 30ft in the wort. Pre-chiller really makes a difference in the summer months.
 
Cheyco's got it right - it's really the total surface area of the coil that's important. More surface area of copper touching the wort will lead to better heat transfer. If the copper's touching the copper, well, that's not helping cool the wort, now is it?
 
Chairman Cheyco said:
Another thing to consider is that you want the wort to be able to flow around the coils of the chiller freely so more of the hot wort comes in contact with it. If the coils are tightened against each other vertically, you would lessen the good flowaroundocity factor you already have.

I heartily agree here, I stretched out my immersion cooler a bit and it works much better. That, combined with gentle stirring of the wort, and I can get a batch cooled to pitching temp in 10 minutes instead of 25.
 
the_bird said:
Cheyco's got it right - it's really the total surface area of the coil that's important. More surface area of copper touching the wort will lead to better heat transfer. If the copper's touching the copper, well, that's not helping cool the wort, now is it?

aka the more ghetto it is the better!


And if the chiller has never been used make sure to soak it in a bucket of water with an acidic ph for about an hour. Starsan water works well for this. This removes a lot of the coating and stuff from the tube that otherwise would go into your beer. The cooler should look shiny before you use it in the wort. The water you soak in it will smell metallic and have a wierd green color after the hour soak. Lastly rinse the chiller with water before placing it in the wort.
 
I heartily agree here, I stretched out my immersion chiller and it works amazing, but then I went with a mythbusters approach and added salt to the ICE water mix around my prechiller andwhata diference..... 3-5min in the summer in MS
 
Ize - go to Menard's - in the plumbing section they have a 10 foot utility hose that has a female garden hose fitting on one end for like $5 - cut it in half, slip it on and hose clamp it - mine works like a charm!

Skol!
 
Thanks guys. I agree w/ Ed Wort, it'll make a damn fine pre-chiller when I get to that point. (knowing my anal-retentive ways that won't take too long)

I never really thought about the "flowaroundocity" (as Cheyco so eloquently put it) but it makes total sense. More cooler contact in more areas throughout the wort will make for a faster cooling time. Hence a more spread out chiller IN a boil would cool faster.

And thanks chillHayze for the heads up on a pre-cleaning. I was just gonna boil the sucker ahead of time. Less of a chance of some copper nonsense getting into my brew.


And SBN, I had been eyeballing some laundry lines at Farm and Fleet, but the utility hose at Menards will work even better. Thanks for the heads up.

(they're gonna think it's a still i'm working on when I haul this sucker in to make sure I have the fit right.... Hell Yeah! Corn Squeezin's!!! :p )

Thanks guys. :rockin:

Ize
 

Latest posts

Back
Top