• Please visit and share your knowledge at our sister communities:
  • If you have not, please join our official Homebrewing Facebook Group!

    Homebrewing Facebook Group

HOWTO - Make a BrewPi Fermentation Controller For Cheap

Homebrew Talk

Help Support Homebrew Talk:

This site may earn a commission from merchant affiliate links, including eBay, Amazon, and others.
Status
Not open for further replies.
Congratulations!

With I2C firmware, if you are not using a rotary encoder (pressing the knob turns the backlight back on normally) you can short pin D7 to GND and it will disable the backlight timer (after a reset). If you are using the shield, you can jumper PSH and GND on the encoder pins.

With RevC firmware, there's a backlight jumper on the board above the trimmer to do the same thing. You jump it to PB for the encoder, or ON for no timeout.

Great shorten pin D7 to GND worked fine for me. Thanks again!
 
So, after building my BrewPiRemix, and completing my RIMS controller, I did my first brew since December.

It's fermenting now (actually on the ramp-up to finish it out), but I'm seeing unexpected behavior from the BrewPi. When BrewPi says that it should be "Idling" it has the cooler outlet energized. This doesn't seem right to me. FWIW, I have the heater relay COM fed from the NC side of the cooling relay to prevent both from running simultaneously. I've attached the plot from the chamber and my chamber device settings.
Any thoughts?

BREWPI RAMP UP Annotation 2019-08-20 105410.jpg BREWPI SETTINGS Annotation 2019-08-20 105714.jpg
 
We just went through this a week ago: you need to set both Heating and Cooling actors to INVERTED.
And make sure you don't have the GPIO for Heating swapped with the GPIO for Cooling...

Cheers!

Well, crap. And, here I was thinking that I was up on all the new posts ...
 
It's okay man ... we need easy ones once in a while. :)

There's LED's on the relay board which are VERY helpful in figuring this out.
 
It's okay man ... we need easy ones once in a while. :)

There's LED's on the relay board which are VERY helpful in figuring this out.

It's all in an enclosure, but I put in indicator lights wired directly to the switched outlets. Unfortunately, it's downstairs and headless, and the PC is upstairs.

Was Post #7768 back in April that last discussion of this?
 
We just went through this a week ago: you need to set both Heating and Cooling actors to INVERTED.
And make sure you don't have the GPIO for Heating swapped with the GPIO for Cooling...

It appears that, despite my carefully conceived color coding scheme, that I managed to transpose the leads for cooling and heating when I soldered up the stripboard shield. All(?) errors have been corrected and everything is running as I expected now.

Beer may have been involved ...

Thanks for the help!
 
Last edited:
It appears that, despite my carefully conceived color coding scheme, that I managed to transpose the leads for cooling and heating when I soldered up the stripboard shield. All(?) errors have been corrected and everything is running as I expected now.

Beer may have been involved ...

Thanks for the help!

lol - but good to see you're up and running.
Wrt history it appears the threadlette I referenced was elsewhere, so my apologies on that.
In my defense "BrewPi" and its descendent threads are all over the place now and its hard to keep track what got written where ;)

Cheers!
 
Hi Dotball. Glad the install went well for you. That's the intent of course, but its a big world with lots of variables.

day_trippr is exactly right, of course. I'd like to elaborate while I wait for my coffee to brew:

I think 95% of this is technique and research rather than software. The first place to go for the proper fermentation temps is the yeast supplier. If you look at White Labs' page for WLP001 California Ale Yeast, you'll see that proper temps for this particular yeast are 68°F - 73°F. If you skip over to Wyeast's most popular yeast in the same category, you'll see that the 1056 American Ale yeast prefers temps in the 60°F - 70°F range. So, where you might choose 70°F for a middle-range setting for the WLP001, it would be at the top end of what's okay for the 1056.

<snip>

Long story short: Select a Beer Constant temp that your yeast supplier recommends, and then you be the judge of when the beer is done in order to cold crash or whatever else you will do. Someone else's curve might not be the right one for your recipe, your equipment, your process and your yeast. Using temp control to keep what the yeast supplier recommends will be a large improvement in your process and your beer. The last 0.1% you might get from automating that last part is likely not something to which I'll be devoting a lot of time. Who knows though? I love a challenge.

So now I have my coffee in hand and I thought about this while pouring a cup. There are two issues here I believe:
  1. Let's say you have one fermenter that's really taken off and the second has not yet. The first will be generating its own heat, that can be 3-5 degrees maybe if it really gets going. The second one will be very close to the chamber temp until it starts going well. If you lower the chamber temp based on an average, you will also be chilling down the one that's not fermenting as well yet, further slowing it down. The strength of a temp controller like this is the ability to keep a fermenting liquid +-0.1°F or so. If you average between two fermenters you're removing that advantage and honestly making it worse. My recommendation for that scenario would be:
    • Get a larger fermenter and do it in one vessel; or
    • Use a second fermentation chamber and control both correctly; or
    • Use chamber constant and at least know that the chamber is being well controlled. That's an "average" of sorts, and will at least not penalize the second fermenter based on the activity of the first. A fan in the chamber will really help here.
  2. Program Space - the Arduino Uno is severely limited and the last change I made necessitated me going through alk the code and finding a way to remove 27 characters of string storage (27 letters that were in messages) so I could get it to run without crashing. Adding new functionality in the controler itself is unlikely without switching to a new platform.
Yikes, that's a lot of typing. It was an interesting set of questions though which present some challenges that are likely not well/optimally solved by computers. I enjoyed "talking" it out.

Thank you LBussy for the detailed explanation it all makes sense but some of the math is more than I really want to do just to brew beer. :) I do not enter comps and don't necessarily brew to style so for me missing SG by 0.001 probably won't be an issue and I am not sure I would notice with my taste buds.

Thank you also to Day_trippr, guess I'm just wanting something out of the ordinary. :)

Should also say all parts have arrived and I spent quite a long time playing around with it last night and think I have a reasonable grasp on the concept and how to achieve some of the requirements.

I had a devil of a time removing devices once I had assigned them to a slot and ended up flashing the board with
sudo echo -ne 'E\n' > /dev/ttyACM0
which meant I had to start from square one again.

What is the trick to remove a device please?

Thanks again
Cheers,
 
Thank you LBussy for the detailed explanation it all makes sense but some of the math is more than I really want to do just to brew beer. :) I do not enter comps and don't necessarily brew to style so for me missing SG by 0.001 probably won't be an issue and I am not sure I would notice with my taste buds.
I'm not suggesting that's the important part for homebrewers. I'm suggesting that such a scenario creates bottle bombs. That's something I think we can all agree is bad. :)

What is the trick to remove a device please?
Set the devices function to none, apply, and refresh.

https://brewpi-userdocs-rmx.readthedocs.io/en/latest/devices/index.html#uninstalling-a-device
 
Need help with a second esp8266 controller. I have a working controller and tested the build with that esp8266 and everything worked perfectly.

When it boots it runs through the test software that checks the sensors and turns on cooling/heating relays and such and completes with Done with tests.

I cannot connect to the board in anyway to flash the board at all, have tried a usb connector to a computer, tried to connect to its wifi but the captive portal does not appear.

To be honest I am not sure where I left off with the board last time I attempted to get it going as I had a 6 month break between working on it. I obviously loaded some software in it though since it runs through a brewing test.

For Device Address it says 27, my working one has the IP I gave it during setup.

I am sure I am missing something obvious here, any help is greatly appreciated. Until then I will keep looking through this and other posts on the subject.

Thanks,
Jeff
 
Thanks for pointing me in the right direction. Will post over there and start searching those for assistance.

Jeff
 
I had a hard time getting this to work. But worked through it.

RaspberryPints and BrewPi Remix

The process is

1. Install rpints via the rtlindne repository and choose your flavor

Code:
curl -L https://raw.githubusercontent.com/rtlindne/RaspberryPints/master/util/installRaspberryPints | sudo bash

2. Rename index.php to something else, like rpints.php. If you don't do this the brewpi installer will replace the index.php with a shortcut to the brewpi index.php

3. Install brewpi-rmx

Code:
curl -L install.brewpiremix.com | sudo bash

4. Enter a custom directory

During the brewpi install you will be asked to enter a custom directory. I only have one chamber, so I just used 'brewpi'

5. Rename php file index.php

This is optional. if you want to use IP or rpints.local instead of IP/rpints.php or rpints.local/rpints.php to access your taplist.

6. Now you can access RaspberryPints at rpints.local and brewpi at rpints.local/brewpi
 
Last edited:
As soon as there’s an heir apparent in the whole RPints mess, I’ll work with them to make it a little more user friendly.
 
I will tell you that running the install.sh script again (like adding a new chanber) will again overwrite your index.php so keep that in mind.
 
LBussy, I have been reading through this extensive thread as I am about to pursue a control system build for my fermentors. Before jumping in on such a quest of knowledge and potential pain I wanted to ask some hopefully simple questions that would assist me in a "Go!, No Go!" overall decision.

I believe from what I read and that this thread is currently active as of today that the "BrewPi Remix" project is still active and in modern development. I have reviewed the brewpiremix.com site and reviewed the hardware components needed to create a multi-chambered system. I thank you for your clarity and work toward outlining a system for people like me to start from.

As for my project, I am hoping to create a control system that would include the following goals using your system as a base.
- multiple fermenter control - currently 2 unitanks
- cooling and heating - currently only cooling needed
- cooling source - glycol chiller
- touchscreen interface for setting of temperatures and real time review of operation
- I will create an enclosure for wall mount in my fermentation area for the screen and all the given components, including the control screen, rasberry pi, mulitple Arduino unos and LCD's, connectors, USB hub, power distribution, and heat dissipation.

My current equipment includes 2 half barrel SSbrewtech unitanks with FTSS systems, a SSBretech glycol chiller.

I would like to migrate to a centralized control system from the independent SSBrewtech PID based FTSS controllers, using your outline as a base. Since your system is configured to use "chambers" using 120v outlets to cycle cold or heat, I may have to replace my existing 12v submersible pumps with 120v pumps unless you have an explanation on how I can use my existing 12v system. I like the use of multiple small pumps instead of building a full manifold system as it does not require me to have a constant running glycol pump and actuated solenoids. This may change in the future, but I don't always have beer fermenting and independent systems seem simpler.

I have some familiarity with rasberry pi, temp controllers and the like but not quite to this extent. I look forward to learning and sharing my experience with anyone that would like to do a similar build.

I believe that I have a good list of parts outlined from https://www.brewpiremix.com/brewpi-hardware/ but any further advise would be wonderful.

Thank you, and others, again very much for all your hard work to date on this concept and I hope that I can add to this project with my own take on it for people moving toward glycol based cooling systems.
 
Last edited:
I believe from what I read and that this thread is currently active as of today that the "BrewPi Remix" project is still active and in modern development.
I don't know about "modern development" but I'm doing my best. :)
My current equipment includes 2 half barrel SSbrewtech unitanks with FTSS systems, a SSBretech glycol chiller.
To be fair, right now you may find the min on/off times too long. I'd be happy to give you a version of the firmware with those zeroed, or with a "ninja switch" to allow you to bypass those minimums. I don't have a glycol setup here so if you'd be a guinea pig, I can help you get going. I'd want you to experiment with water in the fermenter first of course. I've wanted to support this but had no way to test.
I would like to migrate to a centralized control system from the independent SSBrewtech PID based FTSS controllers, using your outline as a base. Since your system is configured to use "chambers" using 120v outlets to cycle cold or heat, I may have to replace my existing 12v submersible pumps with 120v pumps unless you have an explanation on how I can use my existing 12v system.
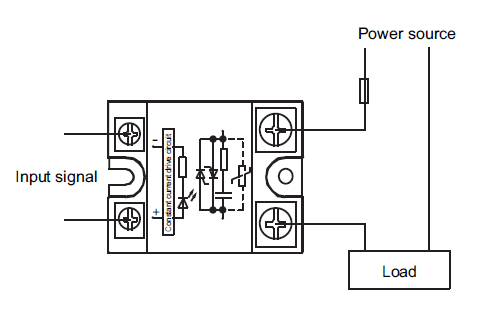
You can use the relays with 12V, or use an SSR setup like this one. They don't look like this, but you'd wire it similarly:
SSR70A_Circuit.gif

Of course if you have a heater, you'll want to stick with the relays and do a similar thing using only COM and NO terminals.
I have some familiarity with rasberry pi, temp controllers and the like but not quite to this extent. I look forward to learning and sharing my experience with anyone that would like to do a similar build.
This is one of those things that makes more sense when you jump in. I'd encourage you to set it up on your workbench (without the pumps of course) and just play with it.
I believe that I have a good list of parts outlined from https://www.brewpiremix.com/brewpi-hardware/ but any further advise would be wonderful.
Aside from replacing the relay with the SSR (and you could use the relay for that matter), I think that's a pretty good start. You won't need the heat lamp as I think that the system has a mat? And the fan is likewise no use to you.
 
LBussy, thank you very much for your quick reply to my inquiry.

On your first point I am not sure what the minimums are for on off, but you are probably right if they are fairly short. To keep within my current 1 degree F of hysteresis my system currently will run for approximately 4-5 minutes glycol on when temp is within range and does not cause an over/under shoot.

The SSR link you provided doesn't work, is this close?: https://www.amazon.com/SainSmart-Ch...eywords=sainsmart-2+ssr&qid=1568849394&sr=8-1


As for heat, yes its a 12v DC pad... I never use them but its a feature that I would like to have optionally.

I am happy to be a guinea pig on this as I have the equipment, time and finances to make it all happen quickly.

Another question I had depending on the go no go answer was how to setup the arduino LCD, is it possible to use something like this: https://www.amazon.com/SunFounder-S...9Y2xpY2tSZWRpcmVjdCZkb05vdExvZ0NsaWNrPXRydWU=

that LCD sheild seems like with just a few jumpers it works... but I don't know if that is true as I have never worked with arduino's and LCD displays at all, nor if your software scripts would interface with this LCD correctly.


This is exciting if I can work with you to gather the proper hardware purchase list, I will happily get it all and have it bench tested quickly. Then setup H20 tests on one of my currently empty fermenters. I have a fermenting Oktoberfest lagering in my other tank for the next month. But I will only need the one tank for testing.

Thank you again.
 
Here are the fermenters and glycol system I am looking to control. The idea is to mount a touch display above the current glycol chiller on the left.
 

Attachments

  • Keystone Brewing Fermenters.jpg
    Keystone Brewing Fermenters.jpg
    2.4 MB
Status
Not open for further replies.
Back
Top