Are there anyone on here who has tried to run a multi chamber solution with bluetooth or wifi?
Yes.
https://www.homebrewtalk.com/showthread.php?t=508151

Are there anyone on here who has tried to run a multi chamber solution with bluetooth or wifi?
I have been building and rebuilding so much I don't have a current backup - pretty sure I could whip it out again in the amount of time it takes me to re-image. Doing backups would be much smarter but why work smarter when you can just work harder?Guess who has been working on designing BrewPi shields for the past two weeks, corrupted his Raspberry Pi SD card working on another project and found out that his backup was from two iterations ago of his BrewPi multi-chamber bluetooth build, so now does not have any working BrewPi builds? Yep, this guy. Backups people, backups. They are easy to make. Why don't I make them more often?
")


$~ is /home/pi under raspbian what you need to change should be under /home/brewpi though. and don't forget that everything for the web side either needs to go under /var/www/html or you need to change apache so that the old hierarchy still works.

sudo avrdude -p m2560 -c wiring -P /dev/ttyACM0 -b 115200 -F -D -U flash:w:/home/pi/brewpi_mega2560.hex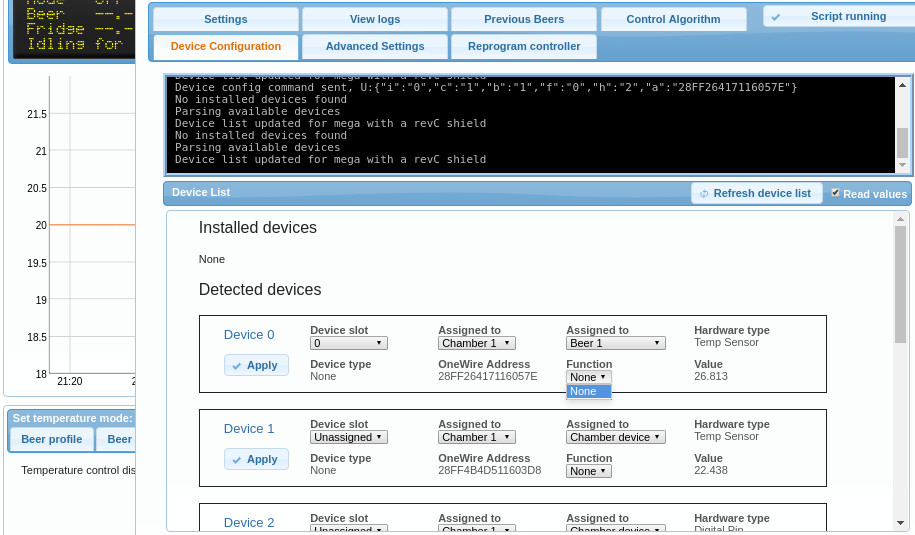

Hey guys
I have been messing all day with this all day using the Arduino mega 2560
I know uno is a easy way to do this, but i have the mega and can be a little bit stubborn.
I wired it up like this image
Then i found a mega2560 hex buried in this thead and flashed it with this command:
Code:sudo avrdude -p m2560 -c wiring -P /dev/ttyACM0 -b 115200 -F -D -U flash:w:/home/pi/brewpi_mega2560.hex
I could setup brewpi and actually read the temperature from the sensors, but there is no way for me to actually add them since the only function I have is "none"
Anyone have any idea what I can try? I tried playing with some conf files (and then some) but am completely stuck.
Found BrewPi v.2.4, running commit 00000000, running on an Arduino Mega with a revC shield on port /dev/ttyACM0Have you tried hitting the button under the advanced settings at the very bottom of the page that resets the defaults to the factory core? Sometimes that works for me if I'm having trouble during configuration.
Feb 07 2017 00:27:41   Resetting controller to factory defaults
 Feb 07 2017 00:27:43   Controller debug message: INFO MESSAGE 15: EEPROM initialized
 Feb 07 2017 00:28:26   Installed devices received: []
 Feb 07 2017 00:28:28   Available devices received: [{"a": "28FF26417116057E", "c": 1, "b": 0, "d": 0, "f": 0, "i": -1, "h": 2, "j": 0.0, "p": 58, "t": 0, "v": 26.5}, {"a": "28FF4B4D511603D8", "c": 1, "b": 0, "d": 0, "f": 0, "i": -1, "h": 2, "j": 0.0, "p": 58, "t": 0, "v": 22.125}, {"c": 1, "b": 0, "d": 0, "f": 0, "i": -1, "h": 1, "p": 2, "t": 0, "x": 1}, {"c": 1, "b": 0, "d": 0, "f": 0, "i": -1, "h": 1, "p": 5, "t": 0, "x": 1}, {"c": 1, "b": 0, "d": 0, "f": 0, "i": -1, "h": 1, "p": 6, "t": 0, "x": 1}, {"c": 1, "b": 0, "d": 0, "f": 0, "i": -1, "h": 1, "p": 59, "t": 0, "x": 1}, {"c": 1, "b": 0, "d": 0, "f": 0, "i": -1, "h": 1, "p": 4, "t": 0, "x": 1}]
 Feb 07 2017 00:28:47   Device updated to: {"i":0,"t":0,"c":0,"b":0,"f":0,"h":0,"d":0,"p":0}
 Feb 07 2017 00:28:52   Installed devices received: []
Feb 07 2017 00:28:54 Available devices received: [{"a": "28FF26417116057E", "c": 1, "b": 0, "d": 0, "f": 0, "i": -1, "h": 2, "j": 0.0, "p": 58, "t": 0, "v": 26.5}, {"a": "28FF4B4D511603D8", "c": 1, "b": 0, "d": 0, "f": 0, "i": -1, "h": 2, "j": 0.0, "p": 58, "t": 0, "v": 22.125}, {"c": 1, "b": 0, "d": 0, "f": 0, "i": -1, "h": 1, "p": 2, "t": 0, "x": 1}, {"c": 1, "b": 0, "d": 0, "f": 0, "i": -1, "h": 1, "p": 5, "t": 0, "x": 1}, {"c": 1, "b": 0, "d": 0, "f": 0, "i": -1, "h": 1, "p": 6, "t": 0, "x": 1}, {"c": 1, "b": 0, "d": 0, "f": 0, "i": -1, "h": 1, "p": 59, "t": 0, "x": 1}, {"c": 1, "b": 0, "d": 0, "f": 0, "i": -1, "h": 1, "p": 4, "t": 0, "x": 1}]Hey guys
I have been messing all day with this all day using the Arduino mega 2560
......
Anyone have any idea what I can try? I tried playing with some conf files (and then some) but am completely stuck.
This it the output I get from the updater:
Code:Found BrewPi v.2.4, running commit 00000000, running on an Arduino Mega with a revC shield on port /dev/ttyACM0
Full output can be seen here: http://pastebin.com/raw/f5SAvwb1
Yeah - the Arduino Mega2560 won't work. Code wasn't compiled for it and likely won't be. You need an UNO with the ATMega258, I believe it is.

IIRC, RevC shields assume that you're using OneWire relays. It sounds like this firmware was compiled against the RevC shield (and therefore won't support wired relays like in your diagram)[...].
That is incorrect, the Elco Rev C shield only supported standard relays.
Cheers!
Hey guys, just got my BrewPi up and running this weekend. Thanks for all of the great information on this thread it was a fairly simple process. I just placed my first fermentor in my chamber last night. It had been fermenting in my finished basement. It has already been fermenting for a week in an ambient temperature of 67 degrees. I was a bit shocked when the temperature sensor in a thermowell told me the beer was at 61.5 degrees when I first hooked it all up. I knew there would be a difference between ambient and actual temp but it definitely made me realize that this brewPi will help me step up my game.
Any ways I want to create a temp profile similar to what the guys from brulosophy have been doing. Remember I am already 7 days into my fermentation so I plan on ramping up the temperature right away.
This is his method.
1. Chill wort to target fermentation temp (66°-68°F/19˚-20˚C)), place in temp controlled environment, attach insulated temp probe to side of fermentor, and pitch yeast starter.
2. After 2-5 days (OG dependent) of active fermentation, remove*probe from side of fermentor so it measures ambient then bump regulator to 75°F/24˚C* (the Black Box*makes this easy).
3. After 2-5 more days, once FG is stable and the sample is free of off-flavors, cold crash the beer to 30-32°F/0˚C.
This is the schedule I made, remember I am already 1 week into fermentation. He states he just sets the fermentation chamber to 75. We are measuring the beer so I figured maybe it would be roughly 2 days to get to the same point.
Do you think this looks somewhat right?
This it the output I get from the updater:
Code:Found BrewPi v.2.4, running commit 00000000, running on an Arduino Mega with a revC shield on port /dev/ttyACM0
Full output can be seen here: http://pastebin.com/raw/f5SAvwb1
The most recent version is 2.10 that may be why it doesn't work. perhaps someone had gotten one working at one time but it's most likely deprecated. get a cheap uno clone and you'll be back on track.
Got a real uno - plug and play


![Craft A Brew - Safale BE-256 Yeast - Fermentis - Belgian Ale Dry Yeast - For Belgian & Strong Ales - Ingredients for Home Brewing - Beer Making Supplies - [3 Pack]](https://m.media-amazon.com/images/I/51bcKEwQmWL._SL500_.jpg)


