• Please visit and share your knowledge at our sister communities:
  • If you have not, please join our official Homebrewing Facebook Group!

    Homebrewing Facebook Group

HOWTO - Make a BrewPi Fermentation Controller For Cheap

Homebrew Talk

Help Support Homebrew Talk:

This site may earn a commission from merchant affiliate links, including eBay, Amazon, and others.
Status
Not open for further replies.
Awesome! I'm assuming that speed won't be an issue. Will probably attempt this on my next build. Would it be worth trying to create a shield that encompasses all the stuff from the cadibrewer shield as well as an interface and buck for pi?

Do I need the voltage divider or can I use resistors to drop voltage or can i follow this guide:

https://mycontraption.com/raspberry-pi-and-arduino-serial-communication/
 
Hello. Have built 2 BrewPis both with Arduino. I'm going to help a brew buddy build one in the next few weeks. I know Arduino is no longer supported officially but based on reading the last 10 pages on this thread it sounds like Arduino Uno will work assuming I use the legacy branch. Are the instructions on page 1 of this thread up to date and will work if we go arduino route? Thanks so much!
 
Hello. Have built 2 BrewPis both with Arduino. I'm going to help a brew buddy build one in the next few weeks. I know Arduino is no longer supported officially but based on reading the last 10 pages on this thread it sounds like Arduino Uno will work assuming I use the legacy branch. Are the instructions on page 1 of this thread up to date and will work if we go arduino route? Thanks so much!

I would go to the DIY brewpi wikia diybrewpi.wikia.com and follow the instructions there. They are the most current and are based on the legacy branch of the software.

Post any questions here and you'll get plenty of help from the smart guys.
 
Thanks! I wouldn't have been able to build the other 2 without this group for sure.
 
Hi guys.

After having reinstalled my Raspberry Pi, I am using BrewPi legacy with the BrewPi legacy_script. As far as I understand, this is the newest software that is supported on the Arduino platform.

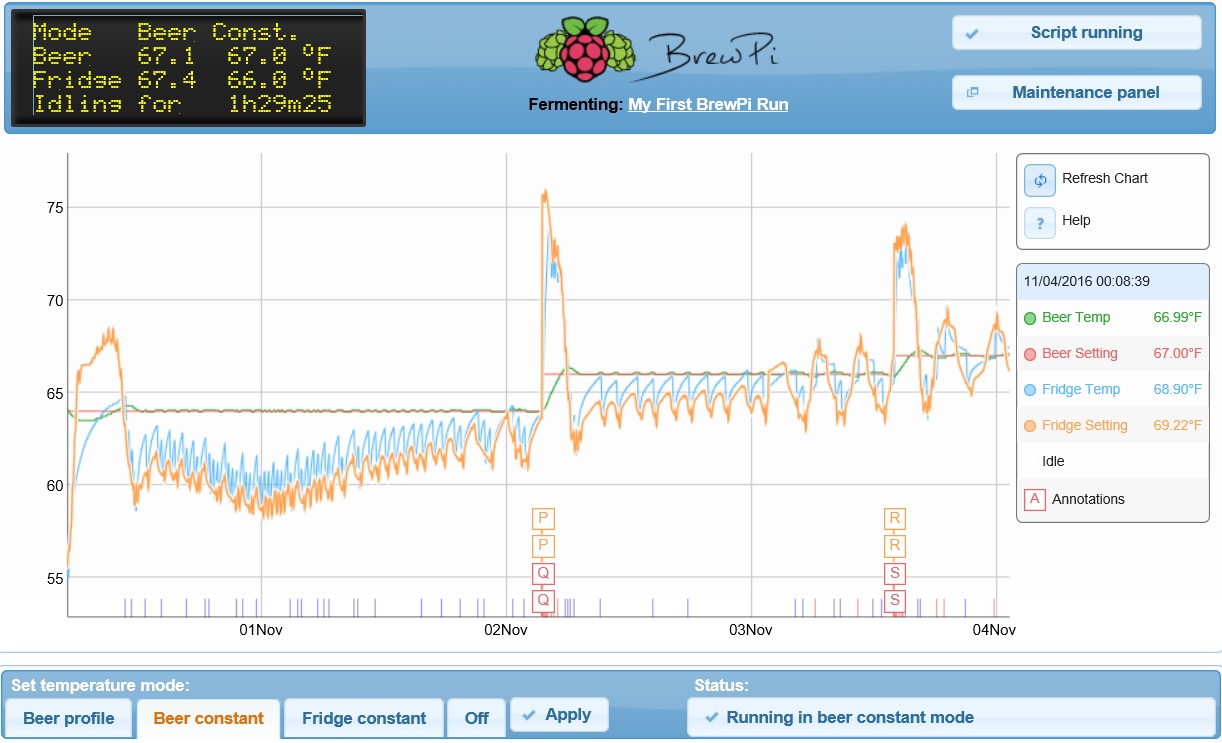
I actually made my setup in the early summer and made two beers during the summer before reinstalling the Raspberry Pi. As far as I remember, there were options to set "minimum on time" and "minimum off time" in the web interface, but now these are nowhere to be found. Am I wrong?

I would really like to lower the minimum off time from its current setting, which appear to be 3 minutes. I am using a conical/FTS setup with cold water and the temperature drops far below the set point in 3 minutes.

EDIT:
I may have found the answer myself - I merely updated the installation to use the "master" branch for the web interface. Is that OK or will it cause me problems?

EDIT 2:
Did not work. Get this in the log:

Nov 03 2016 22:34:44 Controller debug message: INFO MESSAGE 12: Received new setting: minCoolTime = 1
Nov 03 2016 22:34:44 Controller debug message: WARNING 0: Could not process setting

So apparently the Arduino does not understand the setting.
 
Last edited:
Thanks for the great guide. Control is much improved over what I had been using (stc-1000)
FKd9XmO.jpg
 
[...]Would it be worth trying to create a shield that encompasses all the stuff from the cadibrewer shield as well as an interface and buck for pi?

Cadibrewer's shield supports serial communication already and has a resistor divider to level-shift the TX output down.
The feature is there to support Bluetooth/Serial and Wifi/Serial bridges.

Bandwidth is not an issue as the dialog between host and Arduino is terse...

Cheers!
 
I think the deal is you need PWM for control of mash/boil so a "modified" PWM (let's just call it that for the sake of argument) makes the control algorithm/software easier to manage. There's only one set of calculations regardless of what is being controlled.

I agree, calling it PWM for temp control of a device with a compressor cycle is a stretch to put it mildly, but I think we can agree he's found a way to use the same loop for both applications.


^This. I imagine he would prefer to operate a single control algorithm to handle all functions. sounds kinda like he wants to mitigate support tickets down to a handful of potential troubleshooting methods. I don't really see how it's any different, functionally, than the old system. other than it can be used for brewing functions as well.
 
Hey guys,

I hit a snag while installing BrewPi. I'm not using a Raspberry Pi, I've installed Debian Wheezy on a PC and everything is running fine.

I got up to this point:

Run sudo ~/home/pi/brewpi-tools/install.sh this may take some time depending on what version of RPI you have and how fast your internet connection is.
It will ask you if the time is correct hit Y.
It will ask you what directory to install into, press enter to accept the default /home/brewpi
It will ask you where you want the web files installed(by default /var/www, it wiill say the folder is not empty do you wish to still use it, select Y for Yes. IMPORTANT NOTE: If you are using a version newer than Wheezy(7.9) such as Jessie(8.0) then you need to ensure this path is /var/www/html or else brewpi wont install the files to the right location.


Except I received this error:

"Creating and configuring user accounts...
Enter new UNIX password: retype new UNIX password: password updated successfully
usermod: user 'pi' does not exist"

I'm stuck, I'm new to Linux and I'm not sure what action to take. I feel like the Debian Wheezy install needs its own section in the WIKI page.

Any help would be greatly appreciated.


It's important if you want to forgo an potential errors going forward that anytime you use a pc that you set it up from the beginning with the default user pi. once you get that part down you will have very few issues with the setup process. I setup my virtual machines this way when I was testing out different tweaks early on.
 
Is there a way to eleminate the USB cable and go pin to pin for the raspi/arduino interface?

Yes, you can do that, just need to change the config.cfg to point to the serial device.
I did this once using an Alamode just to prove it worked...
So .... Pi + Alamode + Shield = nice form factor for a complete setup?

It's a bit more expensive, but the OCD (CDO) person hiding inside me likes the neatness. :)

The only incompatibility with the current shield (in the LCD thread) is the ICSP header. I guess that could be left off?

If you wanted to get crazy, we could even run two chambers from that setup with Fuscus.
 
still haven't been able to get fuscus running... womp womp... I built a small circuit on a separate breadboard with the appropriate pins and spacing and put everything I needed on there so i wouldn't have a ton of wires. can post picture if interested.
 
So, I got the Arduino flashed (via usb) and the raspi up and running and it's all hooked up but i'm at the point where when i go into device manager it gives me the dreaded

"Error while receiving device configuration: SyntaxError: JSON Parse error: Unexpected identifier "Couldn"


in the config.cfg file I added "port = /dev/ttyAMA0"

stumped. again.
 
still haven't been able to get fuscus running... womp womp... I built a small circuit on a separate breadboard with the appropriate pins and spacing and put everything I needed on there so i wouldn't have a ton of wires. can post picture if interested.

I've had Fuscus running at home for the past few months - I'll log into the device & post my configuration here later tonight.
 
So, I got the Arduino flashed (via usb) and the raspi up and running and it's all hooked up but i'm at the point where when i go into device manager it gives me the dreaded


"Error while receiving device configuration: SyntaxError: JSON Parse error: Unexpected identifier "Couldn"


in the config.cfg file I added "port = /dev/ttyAMA0"


stumped. again.


You sure you don't have a ch340 USB chip? you might have to use ttyUSB0
 
sainsmart uno r3 uses the 16u2. I'm trying to access serial via pins 1 and 2 of the uno vs. usb...
 
sainsmart uno r3 uses the 16u2. I'm trying to access serial via pins 1 and 2 of the uno vs. usb...

I do the same. Sorry just jumping in here with out context but did you step down the arduino tx 5v to 3.3v before going to pi's rx?

(I apologize in advance if this doesn't apply to you)
 
Perhaps not enough, couldn't find the right resistor combo so put a 4.7K in place... now doing my math again it looks like I may need another 10K... getting a little in the weeds here.
 
Are you using a pi3? because that port would be for the uart that is now attached to the onboard bluetooth. maybe try ttys0 or ttyserial0
 
I am using a pi3, did an ls /dev/ttys* and didn't get anything so didn't think that existed. I'll try those
 
I may have found the answer myself - I merely updated the installation to use the "master" branch for the web interface. Is that OK or will it cause me problems?
Legacy is the branch that will talk to the Arduino. I am not sure on that particular setting, but I do know the Master branch is not compatible.
 
I am using a pi3, did an ls /dev/ttys* and didn't get anything so didn't think that existed. I'll try those


Found this info online, don't know if it'll help you though

Code:
Step 3 - Device Tree settings as below:

Add device tree to /boot/config.txt to disable the Raspberry Pi 3 bluetooth.

sudo nano /boot/config.txt
Add at the end of the file

*if you want to change the blutooth to miniuart port(bad)

dtoverlay=pi3-miniuart-bt
*if you want to disable the blutooth(good)

dtoverlay=pi3-disable-bt
Exit the editor saving your changes.

Step 4 - reboot the pi

sudo reboot
step 5 -

a)to disable the Serial Console edit the file using

sudo nano /boot/cmdline.txt
remove the word phase "console=serial0,115200" or "console=ttyAMA0,115200"

Exit and save your changes

b)to Enable the Serial Console edit the file using

sudo nano /boot/cmdline.txt
Change the file to the following:

dwc_otg.lpm_enable=0 console=tty1 console=serial0(or ttyAMA0),115200 root=/dev/mmcblk0p2 rootfstype=ext4 elevator=deadline fsck.repair=yes rootwait
Exit and save your changes

Step 6 - reboot the pi

sudo reboot
 
I actually made my setup in the early summer and made two beers during the summer before reinstalling the Raspberry Pi. As far as I remember, there were options to set "minimum on time" and "minimum off time" in the web interface, but now these are nowhere to be found. Am I wrong?

...

I may have found the answer myself - I merely updated the installation to use the "master" branch for the web interface. Is that OK or will it cause me problems?

EDIT 2:
Did not work. Get this in the log:

Nov 03 2016 22:34:44 Controller debug message: INFO MESSAGE 12: Received new setting: minCoolTime = 1
Nov 03 2016 22:34:44 Controller debug message: WARNING 0: Could not process setting

So apparently the Arduino does not understand the setting.

Yeah, you pretty much hit the nail on the head. There's three parts to BrewPi:

brewpi-firmware - The firmware on your Arduino/other device - There are a lot of differences, and the master branch won't work on an Arduino. Everything was pretty much rewritten between legacy and master, but works in mostly the same way. There were substantial changes to the "behind the scenes" variables used in the PID algorithm, however, as well as the conversion of everything to use PWM.

brewpi-script - The part that communicates between firmware & web interface - The legacy and master branch are functionally identical. They added an error message to prevent you from using the master branch with legacy devices, but if you disable that it works fine. A full list of all of the differences is here.

brewpi-www - The web interface - The only real difference I've found is that the "master" web interface expects/sends the "master" behind the scenes variables (and therefore is only compatible with the "master" firmware when attempting to edit these variables). If all you're looking to do is set a beer profile, look at graphs, etc. then the master & legacy branches of brewpi-www are identical.


tl;dr - You happened to try to use the one feature in the "master" branch of brewpi-www that is incompatible with the "legacy" firmware.
 
Bypassed the idea of a direct serial connection and now i'm getting this error:


Nov 04 2016 20:49:03 Opening serial port
Nov 04 2016 20:49:03 Notification: Script started for beer 'My First BrewPi Run'
Nov 04 2016 20:49:13 Checking software version on controller...
Traceback (most recent call last):
File "/home/brewpi/brewpi.py", line 348, in
hwVersion = brewpiVersion.getVersionFromSerial(ser)
File "/home/brewpi/brewpiVersion.py", line 32, in getVersionFromSerial
ser.timeout = 1
File "/usr/local/lib/python2.7/dist-packages/serial/serialutil.py", line 352, in timeout
self._reconfigure_port()
File "/usr/local/lib/python2.7/dist-packages/serial/serialposix.py", line 315, in _reconfigure_port
raise SerialException("Could not configure port: {}".format(msg))
serial.serialutil.SerialException: Could not configure port: (5, 'Input/output error')
Nov 04 2016 20:50:03 Opening serial port
Nov 04 2016 20:50:03 Notification: Script started for beer 'My First BrewPi Run'
Nov 04 2016 20:50:13 Checking software version on controller...
Traceback (most recent call last):
File "/home/brewpi/brewpi.py", line 348, in
hwVersion = brewpiVersion.getVersionFromSerial(ser)
File "/home/brewpi/brewpiVersion.py", line 32, in getVersionFromSerial
ser.timeout = 1
File "/usr/local/lib/python2.7/dist-packages/serial/serialutil.py", line 352, in timeout
self._reconfigure_port()
File "/usr/local/lib/python2.7/dist-packages/serial/serialposix.py", line 315, in _reconfigure_port
raise SerialException("Could not configure port: {}".format(msg))
serial.serialutil.SerialException: Could not configure port: (5, 'Input/output error')
Nov 04 2016 20:51:04 Opening serial port
Nov 04 2016 20:51:14 Errors while opening serial port:
Could not find compatible serial devices
""


going to try a full software re-install... otherwise everything was working swimmingly.
 
however. after it hangs for a while it'll run for about 10 minutes or so (based on screen counter on LCD and stop watch) then it'll just hang for a while, then it'll pick back up... wtf?
 
Sorry to come back to this but I just started working on it.

I repeated the udevadm info -a -n /dev/ttyACM0 | less > info.log and changed it to /ttyACM1 with the log output to info1.log. That's how I found the second Arduino.

My question is, it should be on a different ACM* for each arduino right? When I i follow the rest of your directions i leave the * as a *, and I dont have to put the 0 or 1?

Also, I would change the code you have as brewpi1 and brewpi2 to my folder names, chamber1 and chamber2.

Thanks again!

lol

Ok, I'll offer this: if referring to http://docs.brewpi.com/advanced-setups/multiple-arduinos-single-rpi.html, there's a better mechanism to exploit than using kernel ids.

That is, use the Arduino serial numbers instead, which has the major advantage that the symlink value never, ever changes, no matter how many/how few Arduinos are connected.

It's pretty much the same procedure to find the serial number for each Arduino, then you edit the same arduino.rules file, but the key parameter is different.

eg:

Code:
$ udevadm info -a -n /dev/ttyACM0 | less > info.log

$ sudo nano info.log
.
.
.
	KERNEL=="ttyACM0"
	ATTRS{manufacturer}=="Arduino (www.arduino.cc)"
	ATTRS{serial}=="9543231383735150F0D1"
.
.
.

Record the serial number, then repeat for each Arduino.

Then, create the rules file:

Code:
$ sudo nano /etc/udev/rules.d/99-arduino.rules

SUBSYSTEM=="tty", KERNEL=="ttyACM*" , ATTRS{serial}=="9543231383735150F0D1", SYMLINK+="brewpi1", GROUP="brewpi"
SUBSYSTEM=="tty", KERNEL=="ttyACM*" , ATTRS{serial}=="9425672387582557E2F0", SYMLINK+="brewpi2", GROUP="brewpi"

Cheers!
 
Sorry to come back to this but I just started working on it.

I repeated the udevadm info -a -n /dev/ttyACM0 | less > info.log and changed it to /ttyACM1 with the log output to info1.log. That's how I found the second Arduino.

My question is, it should be on a different ACM* for each arduino right? When I i follow the rest of your directions i leave the * as a *, and I dont have to put the 0 or 1?

Also, I would change the code you have as brewpi1 and brewpi2 to my folder names, chamber1 and chamber2.

Thanks again!

First, one should never be reluctant to ask for assistance here. It's what we do :)

Yes, you leave the asterisk regardless of how many Arduinos you have in play.

Here's the 99-arduino.rules file from my primary system when I had four Arduinos connected via USB:

Code:
SUBSYSTEM=="tty", KERNEL=="ttyACM*", ATTRS{serial}=="85336303532351F0A031", SYMLINK+="brewpi1", GROUP="brewpi"
SUBSYSTEM=="tty", KERNEL=="ttyACM*", ATTRS{serial}=="754373038303510BF870", SYMLINK+="brewpi2", GROUP="brewpi"
SUBSYSTEM=="tty", KERNEL=="ttyACM*", ATTRS{serial}=="5543131323835130B160", SYMLINK+="brewpi3", GROUP="brewpi"
SUBSYSTEM=="tty", KERNEL=="ttyACM*", ATTRS{serial}=="55431313238351104021", SYMLINK+="brewpi4", GROUP="brewpi"

Cheers!
 
Yeah, you pretty much hit the nail on the head. There's three parts to BrewPi:

brewpi-firmware - The firmware on your Arduino/other device - There are a lot of differences, and the master branch won't work on an Arduino. Everything was pretty much rewritten between legacy and master, but works in mostly the same way. There were substantial changes to the "behind the scenes" variables used in the PID algorithm, however, as well as the conversion of everything to use PWM.

brewpi-script - The part that communicates between firmware & web interface - The legacy and master branch are functionally identical. They added an error message to prevent you from using the master branch with legacy devices, but if you disable that it works fine. A full list of all of the differences is here.

brewpi-www - The web interface - The only real difference I've found is that the "master" web interface expects/sends the "master" behind the scenes variables (and therefore is only compatible with the "master" firmware when attempting to edit these variables). If all you're looking to do is set a beer profile, look at graphs, etc. then the master & legacy branches of brewpi-www are identical.


tl;dr - You happened to try to use the one feature in the "master" branch of brewpi-www that is incompatible with the "legacy" firmware.

Thank you for the detailed info :) I might update to use the newer version of brewpi-script.

With regards to brewpi-firmware, I downloaded the 0.2.10 source code and set the relevant parameters to zero (cooler minimum on time, cooler minimum off time, time to wait between heating and cooling), then compiled and uploaded to the Arduino through the BrewPi UI. So far, it seems to have solved my problem, and my temperature control has become much more precise.

I suggest that other BrewPi legacy/Arduino + FTSS users, using BrewPi in fridge constant mode, do the same in order to avoid large temperature fluctuations due to the BrewPi cooling for a minimum of 3 minutes no matter the temperature of the fridge (the fridge being the beer). The parameters were probably set by Elco to protect the compressor of a fridge or freezer from rapidly switching on and off, but when using the BrewPi to control a cheap replaceable pump, these settings are unnecessary.

I don't know why I didn't notice the problem when fermenting in the summer. Perhaps because my room was about 77f or more all the time. Now my room is 71.6f or less. Now, especially during secondary fermentation when the exothermic reaction does not generate much heat, there the problem is evident. As less heat is generated in the fermenter, the cooling is less active, and the water in the reservoir becomes colder and colder (because the reservoir is inside a keezer set to 35.6f). For instance, if my set point is 68f and the BrewPi is set to cool at 68.9f (through the settings in the UI), the temperature ends up at 66.56f after 3 minutes. At the end of secondary fermentation, when the water in the reservoir is as cold as it is going to be, it would probably end up lower than 66.56f. Glad I got this problem solved.
 
Status
Not open for further replies.

Latest posts

Back
Top