How can I convert this Chest Freezer into a Temp. Controlled Fermentation Chamber?

Homebrew Talk - Beer, Wine, Mead, & Cider Brewing Discussion Forum

Help Support Homebrew Talk - Beer, Wine, Mead, & Cider Brewing Discussion Forum:

This site may earn a commission from merchant affiliate links, including eBay, Amazon, and others.
Takes a little wiring with a temp controller, but thats it. The temp controller is wired so the freezer plugs into the controller, and the controller plugs in to the wall. Temp sensor for controller is put inside freezer, preferably the fermentor for better accuracy.
Controller in your freezer isnt used, unless you want temps colder than the freezer can do.

Popular STC1000 is about 20 bucks from various sources.

https://www.homebrewtalk.com/f39/temperature-controller-newbie-369532/
 
I have that freezer and it works great. Buy a Ranco digital temp controler. Put your carboy or whatever you use in it. Tape the controler probe to the side of your carboy. set the controler to the ferm temp for the type of yeast your using. Thats it. the freezer also works great as a frige to store your leftover thanksgiving donner
 
The "plug-and-play" options available from Johnson Controls and Ranco range from $50-$100 depending on the source. I second meadmazer's suggestion of the STC1000. I purchased a similar model directly from China except mine reads in Fahrenheit (Total price after shipping was $14.66). Both require a bit of wiring, but are worth the savings.

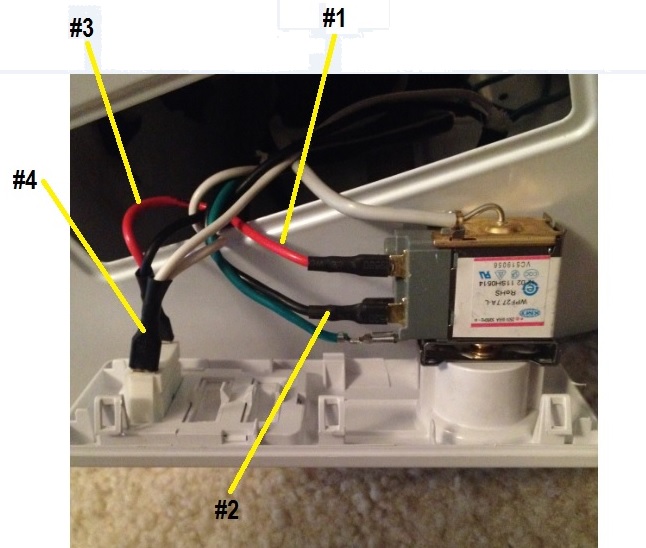
I replaced the existing temperature controller in the front of my unit with my new temperature controller like this:

ZkYD6IK.jpg


(The numbers correspond to the numbers on terminals of the new controller)

Not intricate, very easy to do, which was your goal.

Good Luck!

On the STC-1000 the terminals are numbered as such....

1/2 - Power Supply 110VAC
3/4 - Sensor
5/6 - Heating
7/8 - Cooling


I would love to put my STC-1000 in place of the stock controller. Are the numbers on your controller different, maybe your 3/4 is the STC-1000's 7/8? Did you use the factory temp probe or the one that came with your controller?
 
I would love to put my STC-1000 in place of the stock controller. Are the numbers on your controller different, maybe your 3/4 is the STC-1000's 7/8? Did you use the factory temp probe or the one that came with your controller?

The terminals are labeled differently on my unit. Using the numbers in my picture as a reference, 3&4 would connect to your power supply terminals, 1&2 would connect to your cooling terminals.

I did replace the freezers stock sensor with the new one that came with the controller. I chose to insert it into the existing probe housing.
 
Back
Top