A suggestion for your tap handles, if you want to make your own and have room for labels on them; Do you think staggering the wide part of each handle could work. On the first handle it would be at the base, and at the next it would be near the top. Then alternate down the line. Nice build, im envious
You are using an out of date browser. It may not display this or other websites correctly.
You should upgrade or use an alternative browser.
You should upgrade or use an alternative browser.
Found the 'Magic' in 'Magic Chef' - keezer progress, questions
- Thread starter MadDwarf
- Start date

Help Support Homebrew Talk:
This site may earn a commission from merchant affiliate
links, including eBay, Amazon, and others.
OP
OP
MadDwarf
Well-Known Member
Sure, there are lots of ways to make the spacing work - I just mentioned it in case Robby already had some tap handles that he intended to use. I ended up carving some small tap handles without a spot for labels, and just put current beer info up on a blackboard.
Some pics of my tap handles so far: https://www.homebrewtalk.com/f35/new-tap-handle-s-139690/
Some pics of my tap handles so far: https://www.homebrewtalk.com/f35/new-tap-handle-s-139690/
Skarekrough
Well-Known Member
I picked up this same model freezer last week. I didn't think it would hold six like that. Obviously i was wrong!!!!!
robbyg
Well-Known Member
Thanks for the info, MadDwarf. I hadn't yet thought out the tap handle situation, so that's definitely food for thought. Nothing I have will be have so gorgeous as those you've carved... incredible work!
I just purchased a Love Temperature Controller (and a thermistor probe) online today. It'll be mounted on the front of the collar.
Yep, that is the bigger magic chef. I have the smaller one. What temp controller are you plannig to install on it?
I just purchased a Love Temperature Controller (and a thermistor probe) online today. It'll be mounted on the front of the collar.
Last edited by a moderator:
Indyking
Well-Known Member
Thanks for the info, MadDwarf. I hadn't yet thought out the tap handle situation, so that's definitely food for thought. Nothing I have will be have so gorgeous as those you've carved... incredible work!
I just purchased a Love Temperature Controller (and a thermistor probe) online today. It'll be mounted on the front of the collar.
Cool, that's the same temp controller I'm buying for my magic chef. Do you already have a good understanding of how to install it? I think I understood the wiring diagrams posted in another thread here pretty well, but I don't know is:
1- Should I install the controller direct to the compressor totally bypassing the thermostat, therefore disconnecting the freezers thermostat, or
2- Should I use the thermostat to power the controller and dont mess with power feeding the thermostat, or
3- Should I use the controller to power the thermostat and don't mess with the connections between the thermostat and the compressor.
The temperature controllers that comes wired uses method 3 and someone else in another thread suggested method 2 is the way to go. Anybody can help me?
Thanks...
Last edited by a moderator:
1- Should I install the controller direct to the compressor totally bypassing the thermostat, therefore disconnecting the freezers thermostat, or
2- Should I use the thermostat to power the controller and dont mess with power feeding the thermostat, or
3- Should I use the controller to power the thermostat and don't mess with the connections between the thermostat and the compressor.
My 2¢ worth: In method 2 the thermostat can be used as a power switch when you need to work on the wiring or turn off the keezer for any reason.

$53.24
1pc Hose Barb/MFL 1.5" Tri Clamp to Ball Lock Post Liquid Gas Homebrew Kegging Fermentation Parts Brewer Hardware SUS304(Liquid Hose Barb)
Guangshui Weilu You Trading Co., Ltd


$58.16
HUIZHUGS Brewing Equipment Keg Ball Lock Faucet 30cm Reinforced Silicone Hose Secondary Fermentation Homebrew Kegging Brewing Equipment
xiangshuizhenzhanglingfengshop


$719.00
$799.00
EdgeStar KC2000TWIN Full Size Dual Tap Kegerator & Draft Beer Dispenser - Black
Amazon.com


$176.97
1pc Commercial Keg Manifold 2" Tri Clamp,Ball Lock Tapping Head,Pressure Gauge/Adjustable PRV for Kegging,Fermentation Control
hanhanbaihuoxiaoshoudian


$39.22 ($39.22 / Count)
Brewer's Best Home Brew Beer Ingredient Kit - 5 Gallon (Mexican Cerveza)
Amazon.com


$20.94
$29.99
The Brew Your Own Big Book of Clone Recipes: Featuring 300 Homebrew Recipes from Your Favorite Breweries
Amazon.com


$22.00 ($623.23 / Ounce)
AMZLMPKNTW Ball Lock Sample Faucet 30cm Reinforced Silicone Hose Secondary Fermentation Homebrew Kegging joyful
无为中南商贸有限公司


![Craft A Brew - Safale BE-256 Yeast - Fermentis - Belgian Ale Dry Yeast - For Belgian & Strong Ales - Ingredients for Home Brewing - Beer Making Supplies - [3 Pack]](https://m.media-amazon.com/images/I/51bcKEwQmWL._SL500_.jpg)


$53.24
1pc Hose Barb/MFL 1.5" Tri Clamp to Ball Lock Post Liquid Gas Homebrew Kegging Fermentation Parts Brewer Hardware SUS304(Liquid MFL)
yunchengshiyanhuqucuichendianzishangwuyouxiangongsi


$27.29 ($13.64 / Count)
$41.99 ($21.00 / Count)
2 Pack 1 Gallon Large Fermentation Jars with 3 Airlocks and 2 SCREW Lids(100% Airtight Heavy Duty Lid w Silicone) - Wide Mouth Glass Jars w Scale Mark - Pickle Jars for Sauerkraut, Sourdough Starter
Qianfenie Direct


$10.99 ($31.16 / Ounce)
Hornindal Kveik Yeast for Homebrewing - Mead, Cider, Wine, Beer - 10g Packet - Saccharomyces Cerevisiae - Sold by Shadowhive.com
Shadowhive


$7.79 ($7.79 / Count)
Craft A Brew - LalBrew Voss™ - Kveik Ale Yeast - For Craft Lagers - Ingredients for Home Brewing - Beer Making Supplies - (1 Pack)
Craft a Brew


You can open up the side and get to the thermostat if you really want. I just left mine set to the coldest setting and wired the Love controller to the power cable. (Yes, I cut the end)

Indyking
Well-Known Member
You can open up the side and get to the thermostat if you really want. I just left mine set to the coldest setting and wired the Love controller to the power cable. (Yes, I cut the end)
So, I think you did option number 3 from my previous post, that is, use the wall socket in your house to power the controller and connect the switch on from the controller to the thermostat. Most wired controller out there (Johnson, Ranco, etc) use this set up to override the thermostat.
I knew options 2 and 3 would work, but wondering if I could totally ignore the thermostat connecting the controller direct to the compressor (option 1), after all, the love controller is nothing but a more sophisticated thermostat, isn't it?
Indyking
Well-Known Member
My 2¢ worth: In method 2 the thermostat can be used as a power switch when you need to work on the wiring or turn off the keezer for any reason.
I agree and that's the kind of set up (option 2) I'm inclined to do in mine; however, this set up will prevent the freezer to work at temperatures below what the thermostat can reach, not that I'm going to ever use such low temps for a kegerator, but that is something to keep in mind.
I didn't connect mine to the thermostat. I left the thermostat wired and attached the power from the Love to the power cable for the freezer. It's the easiest way to connect, unless you want to wire a female edison plug (extension cord) to the controller and just plug in your freezer.
B
B
Indyking
Well-Known Member
I didn't connect mine to the thermostat. I left the thermostat wired and attached the power from the Love to the power cable for the freezer. It's the easiest way to connect, unless you want to wire a female edison plug (extension cord) to the controller and just plug in your freezer.
B
OK, I think we are talking about the same thing, just different interpretations. This is what I think you did:
1-Removed the freezer's power cable from the wall socket and opened the power cable head to expose the wires.
2-Connected the striped exposed wires from the head of the freezer’s power cable to the love controller "switch on" (the "switch on" is controlled by your temperature settings).
3- Connected the love controller power cable to the wall socket and turned on the system!
If you did that, you are totally connecting your controller to the thermostat through the "switch on" which overrides it! Remember, the freezer's power cable powers the thermostat first!
robbyg
Well-Known Member
My plan is to do the following:
1. Cut the female end off an extension cord and use it to provide power from the wall outlet to the Love controller.
2. Install a standard wall outlet in the back of the collar of my freezer.
3. Use the controller to provide switched power to the outlet (I may leave one as always-on... haven't yet decided).
4. Plug the freezer's power cord into the switched outlet in the collar.
It's a little roundabout, I realize, but it means I don't have to mess with any of the freezer's original wiring. If I ever remove the collar, the freezer would be completely back to normal.
EarthBound
Well-Known Member
My plan is to do the following:
1. Cut the female end off an extension cord and use it to provide power from the wall outlet to the Love controller.
2. Install a standard wall outlet in the back of the collar of my freezer.
3. Use the controller to provide switched power to the outlet (I may leave one as always-on... haven't yet decided).
4. Plug the freezer's power cord into the switched outlet in the collar.
It's a little roundabout, I realize, but it means I don't have to mess with any of the freezer's original wiring. If I ever remove the collar, the freezer would be completely back to normal.
I don't see anything wrong with that. It's a good idea. In fact, now that I think about it, I'm going to do the same thing. I would leave one of them as always-on, and plug the freezer into that one and the fan into the other.
Indyking
Well-Known Member
My plan is to do the following:
1. Cut the female end off an extension cord and use it to provide power from the wall outlet to the Love controller.
2. Install a standard wall outlet in the back of the collar of my freezer.
3. Use the controller to provide switched power to the outlet (I may leave one as always-on... haven't yet decided).
4. Plug the freezer's power cord into the switched outlet in the collar.
It's a little roundabout, I realize, but it means I don't have to mess with any of the freezer's original wiring. If I ever remove the collar, the freezer would be completely back to normal.
I don't see anything wrong with that. It's a good idea. In fact, now that I think about it, I'm going to do the same thing. I would leave one of them as always-on, and plug the freezer into that one and the fan into the other.
Robbyg, that's fine, but IMHO, you would be better off with one of those wired ranco or johnson controls because you wouldn't need to do any wiring at all with them, just plug the freezer to the controller and the controller to the wall socket. Those run a little more expensive than the love controller though.
To me, the big advantage of the love controller, besides a slightly lower price, is that it has a nice and small front interface that can be fitted to the collar given a neat and professional look to the kegerator. I don't really see a reason why one would ever want to remove the collar since it makes the freezer bigger inside and the love controller would allow it to work at freezing temperatures too, just like it had always been. If you ever want to sell your finished kegerator, it is much easier to get a better deal in a kegerator compared to just a chest freezer. In fact, the craigslist is full of used chest freezers being offered 60-80% lower than their brand new counterparts in the store.
jackers252
Well-Known Member
I picked up this same model freezer last week. I didn't think it would hold six like that. Obviously i was wrong!!!!!
Where did you find one? I can't find them anywhere.
if you already have the Love, you could just cut an extension cord in half and use the male half to power the Love and the Female half as the controlled outlet.
B
B
I don't have the wiring diagram in front of me, but I got a really clean installation doing this --
I got a nice weight black 3 prong cord from home depot. One end of the cord from the wall to the freezer, the other end from the freezer to the plug, and the middle chunk from the controller to the back of the freezer. I ran the middle chunk of the cord from the front (love controller) out the back. Then connected up all the wires using male/female spade connectors. Using a 3 conductor cord gives you the right # of wires for each segment.
The end that went into the wall was the longest, the middle chunk just right to go from controller to back and a small segment hanging off the back for the freezer to plugin. I also put the spade connectors on in such a way that I couldn't hook it up wrong.
Swcoxe
Active Member
Can you get this freezer in black?
I haven't seen the Magic Chef in black. But one of the other companies that's selling the freezer under a different name may have it.
B
B
Indyking
Well-Known Member
I don't have the wiring diagram in front of me, but I got a really clean installation doing this --
I got a nice weight black 3 prong cord from home depot. One end of the cord from the wall to the freezer, the other end from the freezer to the plug, and the middle chunk from the controller to the back of the freezer. I ran the middle chunk of the cord from the front (love controller) out the back. Then connected up all the wires using male/female spade connectors. Using a 3 conductor cord gives you the right # of wires for each segment.
The end that went into the wall was the longest, the middle chunk just right to go from controller to back and a small segment hanging off the back for the freezer to plugin. I also put the spade connectors on in such a way that I couldn't hook it up wrong.
That sounds like agood idea. Would you be more specific or perhaps provide a diagram? I got confused by what you meant by end of cord and plug or wall, not sure if by end of cord you meant the original freezer cord or the new 3-prong cord and not sure if wall and plug are both referring to the wall outlet.
A pretty rudimentary diagram of the cord.
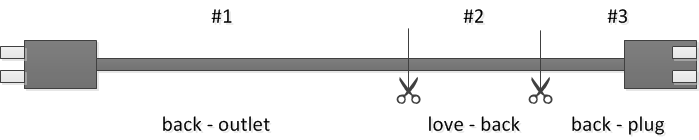
I didn't modify the original cord or wiring in any way -- I just plug the freezer into this just like my previous Ranco controller.
All three of these segments meet at the "back" of the keezer. #1 goes from the wall outlet to the back, #2 go from the love controller to the back (mine was routed inside the keezer) and #3 just dangles down to the original plug.
For my purposes #3 was a little two foot stub, #2 was just long enough to go from front to back after hooking up the controller and #1 was the rest of it (~8' in my case).
I'll see if I can find my wiring diagram -- it's on paper somewhere...
Indyking
Well-Known Member
A pretty rudimentary diagram of the cord.
I didn't modify the original cord or wiring in any way -- I just plug the freezer into this just like my previous Ranco controller.
All three of these segments meet at the "back" of the keezer. #1 goes from the wall outlet to the back, #2 go from the love controller to the back (mine was routed inside the keezer) and #3 just dangles down to the original plug.
For my purposes #3 was a little two foot stub, #2 was just long enough to go from front to back after hooking up the controller and #1 was the rest of it (~8' in my case).
I'll see if I can find my wiring diagram -- it's on paper somewhere...
That is actually very helpful, thank you very much. If you can find the wiring diagram, please post it too!
jackers252
Well-Known Member
A pretty rudimentary diagram of the cord.
I didn't modify the original cord or wiring in any way -- I just plug the freezer into this just like my previous Ranco controller.
All three of these segments meet at the "back" of the keezer. #1 goes from the wall outlet to the back, #2 go from the love controller to the back (mine was routed inside the keezer) and #3 just dangles down to the original plug.
For my purposes #3 was a little two foot stub, #2 was just long enough to go from front to back after hooking up the controller and #1 was the rest of it (~8' in my case).
I'll see if I can find my wiring diagram -- it's on paper somewhere...
Thanks! I hate to ask this but do you happen to have any pics of your wiring?
Disclaimer -- you should know what you're doing .. blah blah.
Haven't found my chicken scratchings yet, but this was the resource I used along with the wiring diagram that came with it. This site has a great description I'll reproduce here:
http://blog.flaminio.net/blogs/index.php/beer/gadgets/love-ts-13010-temperature-switch-new-wir-2008
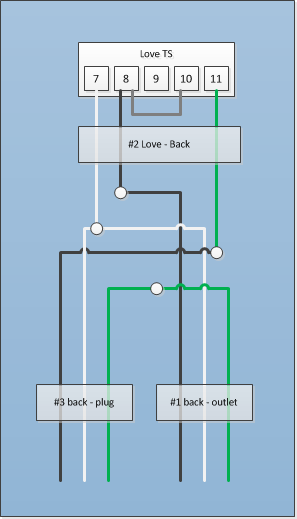
Notice that in either case (new or old controller) there are 3 wires leaving the love controller, 3 wires "to device" and 3 wires from "power plug". I carefully drew everything out and planned out the spade connectors. I left the wires from the love controller alone and put
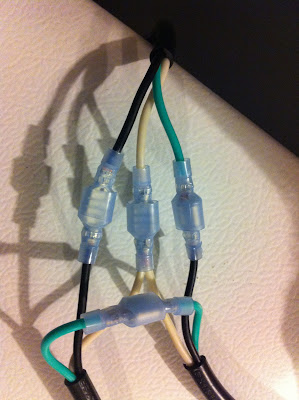
My actual wiring (basically looks like above in reality)
Haven't found my chicken scratchings yet, but this was the resource I used along with the wiring diagram that came with it. This site has a great description I'll reproduce here:
In text, take the black wire from the wall plug to #8, run a short jumper from #8 to #10. Then, connect the black wire from the device plug to #11.
Then run a length of wire from #7 to the white wire from the wall plug, and splice that into the white wire from the device plug.
Then splice the green ground wire between the wall/device plugs together.
This configuration is the typical setup of device is unpowered when switched off. If, for some reason, you wanted to be on when the switch is off (and not used the menu option) you could connect the jumper to #9 instead of #10.
http://blog.flaminio.net/blogs/index.php/beer/gadgets/love-ts-13010-temperature-switch-new-wir-2008
Notice that in either case (new or old controller) there are 3 wires leaving the love controller, 3 wires "to device" and 3 wires from "power plug". I carefully drew everything out and planned out the spade connectors. I left the wires from the love controller alone and put
My actual wiring (basically looks like above in reality)
jackers252
Well-Known Member
That is EXACTLY what I'm Looking for! Thanks bolts.
Indyking
Well-Known Member
That is EXACTLY what I'm Looking for! Thanks bolts.
I second that! THANKS BOLTS! This is very helpful. Those insulated spade connectors are great but I have not been able to find them. Do you happen to know the model and where you got them?
I second that! THANKS BOLTS! This is very helpful. Those insulated spade connectors are great but I have not been able to find them. Do you happen to know the model and where you got them?
Glad this is helpful. The spade connectors and the cord were from home depot.
Looks good, except the green to black connection. Any electrician who sees that (without the schematic) will ^&(* bricks. Take a piece of black electrical tape and put a band around the green wire, close to the spade. Then it will make sense!
Indyking, any hardware store will have them. Just ask for "spade lugs" (But I buy them in boxes of 100 from HD.)
B
Indyking, any hardware store will have them. Just ask for "spade lugs" (But I buy them in boxes of 100 from HD.)
B
Indyking
Well-Known Member
Looks good, except the green to black connection. Any electrician who sees that (without the schematic) will ^&(* bricks. Take a piece of black electrical tape and put a band around the green wire, close to the spade. Then it will make sense!
Indyking, any hardware store will have them. Just ask for "spade lugs" (But I buy them in boxes of 100 from HD.)
B
Glad this is helpful. The spade connectors and the cord were from home depot.
Thanks guys. I actually have one more question. Instead of using the short jumper from #8 to #10, is it OK to just to connect the wire that is comming from the Love output #10 to the spade connector between cord #1 from the outlet and cord # 2 coming from output # 8 in the Love controller? It seems it would make no difference and make that wiring a bit simpler.
Sure, you could. But then you'd need to run one more wire. The jumper is the simplest way to do it.
B
B
Similar threads
- Replies
- 1
- Views
- 2K
- Replies
- 0
- Views
- 770
