• Please visit and share your knowledge at our sister communities:
  • If you have not, please join our official Homebrewing Facebook Group!

    Homebrewing Facebook Group

EZBoil DSPR320 experience

Homebrew Talk

Help Support Homebrew Talk:

This site may earn a commission from merchant affiliate links, including eBay, Amazon, and others.
It's easy to understand once you have done it. Pretty much you have a boil and a mash program. Within those you have steps.

Easy 3 step mash program - For my mash I use an initial step
Step 1 which is a target temp with 0:00 for the time. I don't want to hold that time just get there. It hits it alarm goes off. (Say 159 or something)

Immediately moves on to Step 2 - Step 2 is my mash temp with a timer. It will let the mash temp free fall till it hits my target then start the timer. (After adding grain temp will fall. Say I am mashing at 152)

Step 3 - is set to be "STOP". So when the timer runs out on 2 it goes to step 3 which is to shut down. You could program lots of things like a mash out (I do sometimes) or a maintain temp indefinite or something.

So after setting that up choose your mash program and hit RUN. Not hard after you do it a few times. Just remember pushing the dial in the middle - Short push vs Long push. Hold it down(long push) to get into program setup stuff. It all becomes 2nd nature after a few runs.

And you WILL screw it up first time like we did but the beer will still be drinkable. It always is. Just do something easy. :yes:

I have both alarms hooked up to external alarm buzzers but usually don't program them separately. I have my pumps on separate manual switches. You can put them on Relays and have the 320 control those but eh. It's not hard for me to turn my pumps off and on.
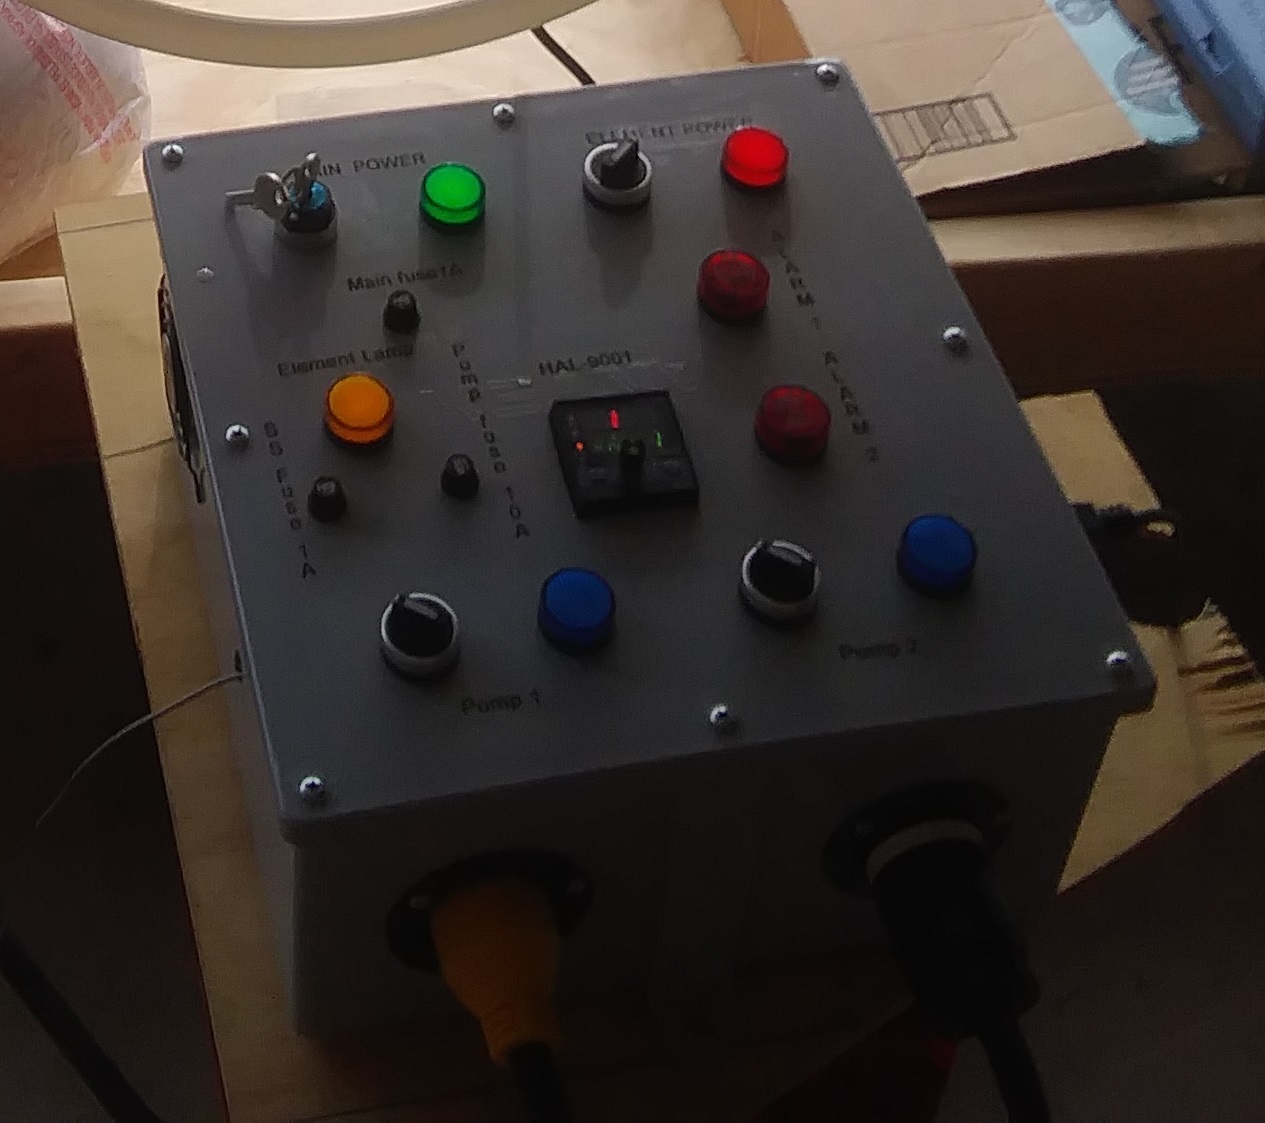
controller.jpg
 
Last edited:
I have been running some practice runs with just water and I keep over shooting my temps. The element shuts off but the temp keep rising a few degrees. I have tried using the overshoot setting, I have it set up to about 10 degrees already. I think its my false bottom retaining the heat honestly, I guess I could just guess and set my temp a couple of degrees below what I shooting for, say 156 for 158.

Also, how to I clear out my setting for a program a run other than going to system and resetting?

Hmm I over shoot 1-2 degrees every once in a while but not normally. And even then it comes back quickly. It's good about feathering the element as it nears the target and seems to self tune well. Yeah I just reset the program then edit the steps. But I'm not running multi step mashes or complicated stuff.
 
Last edited:
I have been running some practice runs with just water and I keep over shooting my temps. The element shuts off but the temp keep rising a few degrees. I have tried using the overshoot setting, I have it set up to about 10 degrees already. I think its my false bottom retaining the heat honestly, I guess I could just guess and set my temp a couple of degrees below what I shooting for, say 156 for 158.

Also, how to I clear out my setting for a program a run other than going to system and resetting?
Where is your temp probe located? Many problems with poor response of temp controllers are due to the temp probe being placed too far from where the heating actually occurs. This causes a time lag between when temp targets are exceeded and when the controller finds out about it, in which case the controller can't do anything to avoid the overshoot.

Brew on :mug:
The temp probe is located in T fitting coming from the ball valve.
 
Where is your temp probe located? Many problems with poor response of temp controllers are due to the temp probe being placed too far from where the heating actually occurs. This causes a time lag between when temp targets are exceeded and when the controller finds out about it, in which case the controller can't do anything to avoid the overshoot.

Brew on :mug:

In theory, well-tuned PID constants (or perhaps an autotune) would take care of it. In this case, increasing the I term would work. But that's being pedantic. I agree though, simple solution is to move the sensor to where the wort enters the MT. It should never overshoot then (unless you had a flow obstruction).

I just installed one of these DSPR320's in my panel :) I was planning on using it for boil, but I'll probably move it over to the MT if I ever get a HERMs coil installed. I'll probably just replace the BK PID position with the simpler easyboil PID they have.
 
the temps inside the t will only bee accurate when there is actualy recirculation going on... if you get a probe thats long enough to actually reach through the tee into the kettle you will get much more accurate readings.
 
the temps inside the t will only bee accurate when there is actualy recirculation going on... if you get a probe thats long enough to actually reach through the tee into the kettle you will get much more accurate readings.

Oh, not a concern for me. The whole point of my planned system is to recirculate. If I wasn't going to recirculate, I'd just insulate and leave it be.

I don't want a probe extending into the kettle. That would be a rip hazard for a bag and could interfere with a mesh basket.
 
I just built an EZ-Boil eBIAB panel using the DSPR320 and really love all that can be done with it. The panel controls the heater element as well as two aux circuits. The aux circuits are controlled by 3-way selector switches with positions Auto, Off and On. When switched to On, these Aux circuits can be operated manually. When switched to Auto, they are controlled via the AL1 and AL2 dry contacts switching the outlets via 120V coil SPDT relays. I have it set up with Aux1 controlling my recirculation pump and AL2 controlling a solenoid valve that controls water flow to my plate chiller.

The wort is always pumped through the chiller. Whenever a program calls for a temperature ramp down, the chiller loop automatically switches on, leading to rapid drops in temperature. Unfortunately, programming of the AL1 and AL2 relays is a bit tricky, so I decided to add a third 120V coil SPDT relay to allow AL2 to activate both relays. In this manner, whenever the selector switches for both are in auto mode, the ramping down automatically activates both the chiller loop and the recirculation pump. Since the recirculation pump always needs to be active during chilling, this greatly simplifies relay programming. I just set AL2 to Cooling mode for both mash and boil programs. Then, whenever a temp ramp down is called for, cooling is automated. Works perfectly!

I have my programs set up so that I can program in a delayed start to a start temp. Since I typically sparge, I have this set to sparge temp (170F), then when I start my brew day, I just pump over needed sparge water into an Igloo cooler. I then have the mash program ramp the temp down to strike temp and begin the first mash rest temp (sometimes this is set to do a protein rest, sometimes just a single mash rest). The second mash rest temp is initiated after 20 minutes and completes after 40 minutes, raises the temp to mash out (170) for 15 minutes and then goes into a hold. This allows me to do a sparge if needed. After the hold, a Start button press allows it to continue on to the boil program, where it raises the temp to 208 at full power followed by a switch to about 50-80% (depending on volume) for a medium boil for 60 minutes. At 10 minutes before the end of the boil, the recirculation pump is activated to sanitize the chiller, and whirlpool tube. At "flame out," the chiller circuit is activated and continues this until I stop the program. I've done one brew day on it, and it's worked really well!

Although the relay programming takes a bit of thinking, it does work pretty well and provides much more automation than I was anticipating. It's perfect for even more complex single vessel brewing operations.
 
Apologies if I’m reviving an old thread here, but this seems to be the most popular thread on the DSPR320. I’ve had mine for around 18 months now. Worked pretty flawlessly and I have been really happy. At some point in the last couple of months though I found the temp readings would float around for a bit and then ultimately massively overshoot what the controller was reading. Like 500c overshoot. Obviously this isn’t possible and some sort of failure. I purchased a new PT100 and it did the same thing. I had a couple spare PT100’s, so I wired one directly to the controller, essentially bypassing the xlr connector I have in the box, and it worked for a while, but now it’s doing the same thing. Three PT100’s failing seems unlikely and I’m starting to accept the 320 has died on me. Anyone seen this?
 
Yeah, that doesn't sound right. How are you wiring in your PT100's to the DSPR320? Are you using the kind that have spade lugs and directly wiring, or are you using the XLR or mini-XLR versions? If either of the latter, it is possible that there might be some extra resistance due to connections within the XLR connector (e.g. if it got wet and rusted or got some beer crud in there). As I understand it, resistance increases with increasing temperature with an RTD probe, so my bet would be there is some extra resistance getting into the signal.
 
I’ve got spade connectors onto the controller, wired and then soldered onto an XLR and then a cable to an M12 connector which is attached to the thermowell. Fair point perhaps before I throw it in the bin I need to go back and make absolutely certain all the solders and connections are clean and neat.
 
If you have a multimeter, I'd suggest checking the resistance on each of the wires between the probe and the terminals connecting to the DSPR.
 

Latest posts

Back
Top