
FooFighter
Active Member
After getting tired cold-bath cooling my 5gal kettle in the kitchen sink (it barely fits), I decided it was time to invest a few bucks in a chiller.
I also plan to switch to all-grain & get a larger kettle, so I want something that is future-proof at least to that stage.
Immersion seemed to fit my needs/budget.
My LHBS has a 20' immersion coil for ~$100 CAD taxes-in.
That would have done the trick, but I thought it would be fun to build my own and for the same price I could build a 50' one with two coils for better performance.
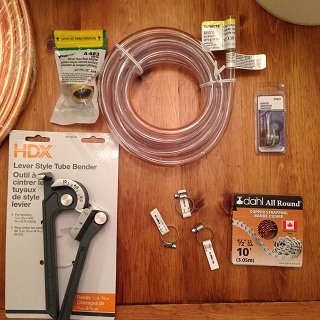
Here's my parts and approximate costs:
3/8" OD x 50' coil of soft-copper tubing... $50
3/8" ID x 10' Vinyl tubing....................... $6
Qty 3 SS hose clamps............................ $3
Hose end for tubing .............................. $6
Hose adapter for Faucet......................... $7
Copper strap....................................... $10
Tube Bender....................................... $11
Total with taxes was $108 CAD
Here's the parts:

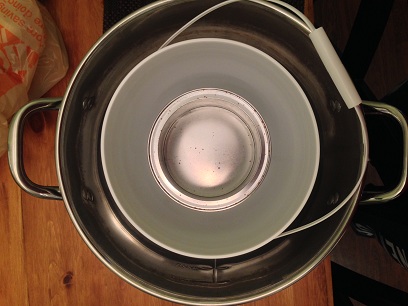
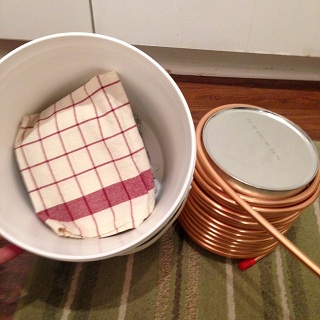
I used a coffee tin, and a 2gal fermenting bucket to form the coils.
You can see why I chose these items; they fit perfectly in my kettle.

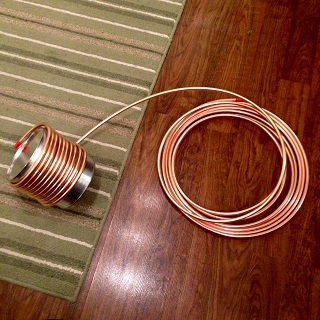
Getting the coil started on the can is the worst part... I sat on a chair with the can between my legs and the spool on the floor.
It helps if you straighten out 6' or so of tubing to work at a time with or else the spool gets in your way.
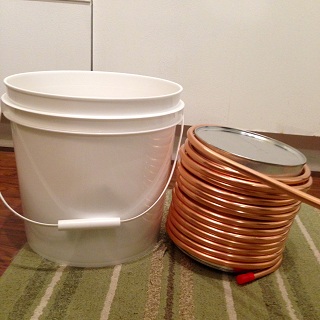
I decided to make my 2 coils using roughly equal length of tubing and planned to leave about 2' extra at each end to make connections.
The inner coil would be ~21" per each coil so would do 13 coils, and the outer coil would be ~27" per coil so I should end up with 10.
Since the coffee tin was shorter than the bucket, I put in a pyrex dish and some towels to raise it up to the edge of the bucket.
That way what will eventually become the bottom of my chiller will be mostly flat.
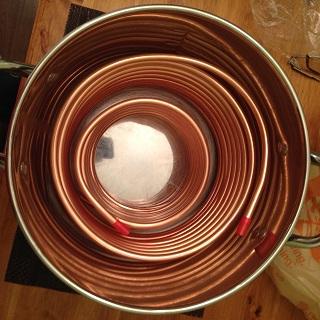
I started wrapping around the bucket and quickly realized an oversight: the bucket is tapered, and has a lip that would make the coil hard to remove.
I didn't have anything else on hand to use as a form, so I used it anyways. I had to 'loosen' the coils a bit at the end to get it off. No harm done.
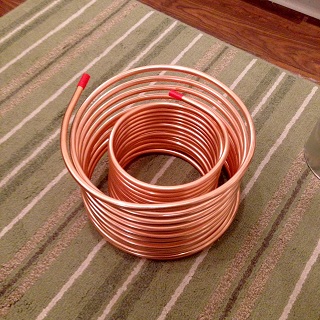
I unraveled the extra at the ends of the tubing and made my connection bends using the tubing bender.
The bending tool was well worth the $11. Seems easy to kink at 90deg angles. Made the vertical pieces extra tall to accommodate larger kettles in the future.
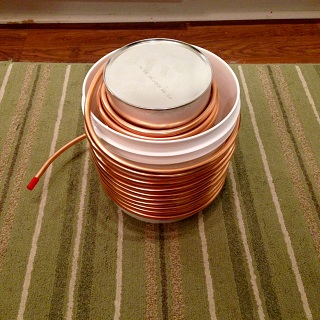
I used the straps on the top to space the inner/outer coils evenly and add some rigidity.
I did the same on the second-from-the-bottom coil (wanted the bottom coil bare to avoid scratching the kettle).
Popped on the tube and clamps, and we're good to go!

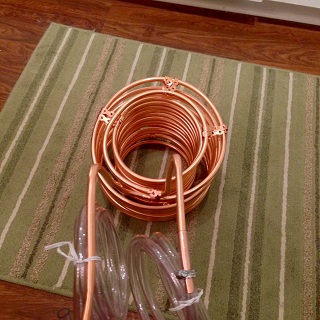

One connection piece is too long, so I'll go borrow a pipe cutter tonight and trim/deburr it.
My faucet fitting turned out to be the wrong size, so I'll return it tonight and post back when I test the chilling performance!

I also plan to switch to all-grain & get a larger kettle, so I want something that is future-proof at least to that stage.
Immersion seemed to fit my needs/budget.
My LHBS has a 20' immersion coil for ~$100 CAD taxes-in.
That would have done the trick, but I thought it would be fun to build my own and for the same price I could build a 50' one with two coils for better performance.
Here's my parts and approximate costs:
3/8" OD x 50' coil of soft-copper tubing... $50
3/8" ID x 10' Vinyl tubing....................... $6
Qty 3 SS hose clamps............................ $3
Hose end for tubing .............................. $6
Hose adapter for Faucet......................... $7
Copper strap....................................... $10
Tube Bender....................................... $11
Total with taxes was $108 CAD
Here's the parts:
I used a coffee tin, and a 2gal fermenting bucket to form the coils.
You can see why I chose these items; they fit perfectly in my kettle.
Getting the coil started on the can is the worst part... I sat on a chair with the can between my legs and the spool on the floor.
It helps if you straighten out 6' or so of tubing to work at a time with or else the spool gets in your way.
I decided to make my 2 coils using roughly equal length of tubing and planned to leave about 2' extra at each end to make connections.
The inner coil would be ~21" per each coil so would do 13 coils, and the outer coil would be ~27" per coil so I should end up with 10.
Since the coffee tin was shorter than the bucket, I put in a pyrex dish and some towels to raise it up to the edge of the bucket.
That way what will eventually become the bottom of my chiller will be mostly flat.
I started wrapping around the bucket and quickly realized an oversight: the bucket is tapered, and has a lip that would make the coil hard to remove.
I didn't have anything else on hand to use as a form, so I used it anyways. I had to 'loosen' the coils a bit at the end to get it off. No harm done.
I unraveled the extra at the ends of the tubing and made my connection bends using the tubing bender.
The bending tool was well worth the $11. Seems easy to kink at 90deg angles. Made the vertical pieces extra tall to accommodate larger kettles in the future.
I used the straps on the top to space the inner/outer coils evenly and add some rigidity.
I did the same on the second-from-the-bottom coil (wanted the bottom coil bare to avoid scratching the kettle).
Popped on the tube and clamps, and we're good to go!
One connection piece is too long, so I'll go borrow a pipe cutter tonight and trim/deburr it.
My faucet fitting turned out to be the wrong size, so I'll return it tonight and post back when I test the chilling performance!
Last edited:


![Craft A Brew - Safale S-04 Dry Yeast - Fermentis - English Ale Dry Yeast - For English and American Ales and Hard Apple Ciders - Ingredients for Home Brewing - Beer Making Supplies - [1 Pack]](https://m.media-amazon.com/images/I/41fVGNh6JfL._SL500_.jpg)


